

Dear readers, let me welcome you and start by saying that this tutorial is the beginning of a new journey and new explorations, as it’s the first of a series of tutorials on a new topic: macOS programming!
Developing for macOS and creating desktop applications is a wonderful process if you want to go down that road. If you are coming from an iOS background like me, then you will find exciting and challenging at the same time to be able to make apps for both systems. What makes it even better is one simple fact: There are lots of common things between iOS and macOS programming. Several frameworks and SDKs, the language itself (Swift), even the coding style that one has used to remain almost the same. But macOS programming is not meant for people being iOS developers already. New programmers who have started learning Swift and they want to make their own desktop applications can follow along as well!
Starting from this tutorial we are going to meet and learn key concepts on macOS programming. I am planning to present various topics for which I will highlight their most important concepts and I will show techniques, how-to and best practices. It is obvious that it would take a series of books to cover everything about macOS programming, not just a series of tutorials.
However, what I’m going to show you starting from this tutorial and onwards not only will get you started, but it will enable you to build full applications and it will put you on the right track so you know how to look further on topics you are interested in. Whenever possible, we will be going through the making process of a new macOS app that will have some usefulness at the end. Something that you can take with you when finish reading each post.
So, once again welcome to a new exciting journey! Let’s go together to build our first macOS application!
Our Roadmap for you to learn macOS Programming
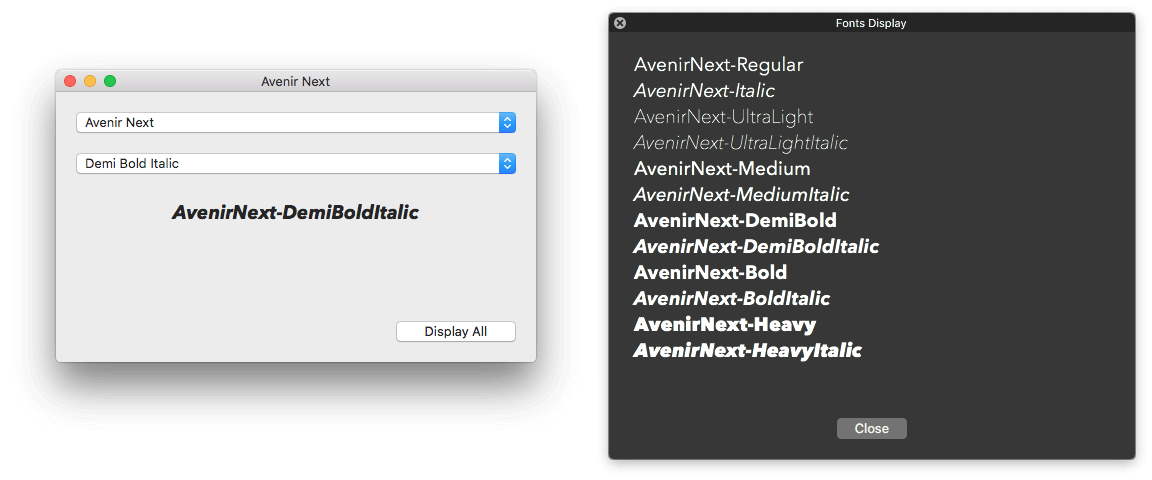
In this post we are going to see the basics of a macOS app through the creation of a simple, but at the same time useful for many developers app: A font viewer that will let us choose font families and it will be displaying the PostScript names of the available fonts. Clarifying why this is useful: The PostScript name is the font name we write in code when creating a NSFont object. Usually it’s not the same to the font’s file name, and without knowing the PostScript it’s impossible to create font objects in code or to add custom fonts into projects. There’s a manual process to reveal PostScript names as described here, but why not to have a macOS app that will let us get it instantly?
Our menu today contains a lot of key stuff:
- How to create a new macOS project.
- What the most important parts of the generated project are.
- What is a window controller and how to configure its contained window, including size, position, title, and a lot more.
- How to add graphical controls into a view controller.
- How to interact with those graphical controls, update their values and react on actions triggered by them.
- How to create additional window controllers.
- How to change a window’s appearance so it looks like a utility or auxiliary panel.
- How to load and present and close a window programmatically.
There are even more things to discuss in this post in addition to those listed above. We will talk about new classes that will be proved extremely valuable for our cause, we will talk about the custom logic that we will implement in the various parts of the app, and we will see small or big details that will produce at the end a complete project.
Here is what you are going to have in your hands by the time you will leave here:
Creating Your First Mac App
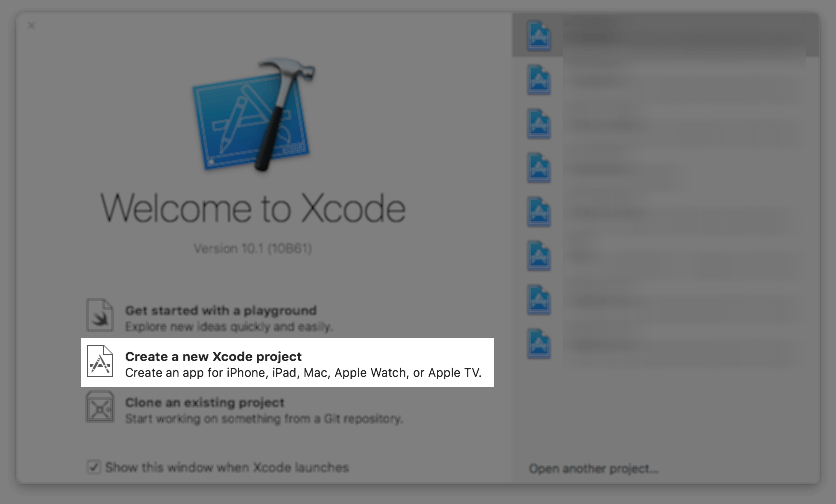
Launch Xcode, and then choose to create a new project:
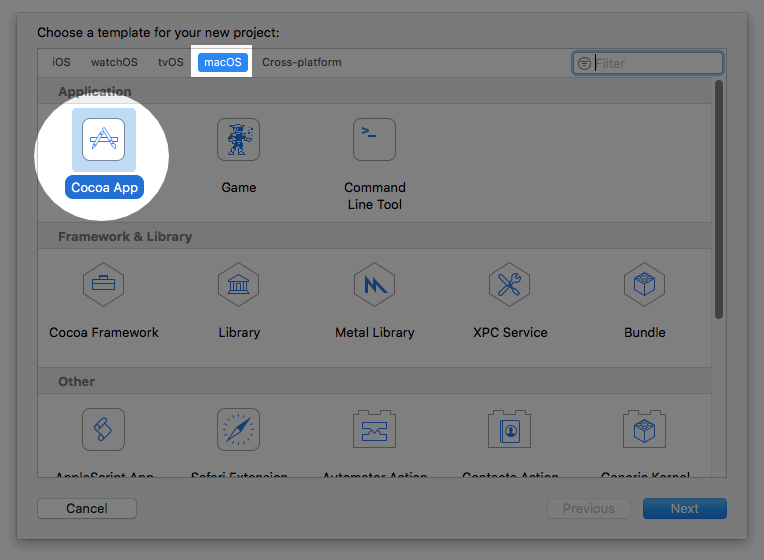
In the first step of the guide that appears next do the following:
- Select the macOS platform.
- Click on the Cocoa App option in the Application section.
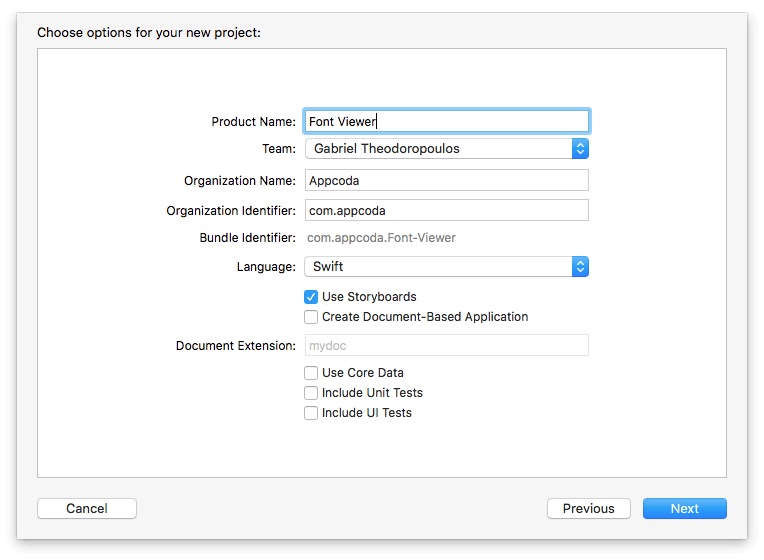
Once you do so, it’s time to “baptise” the project and set all the rest initial information. Since we’re going to create our custom font viewer, why not to call it just like that, Font Viewer? Set that as the value to the Product Name field, and configure the other properties such as Team, Organization Name, Organization Identifier. Generally, make sure that your window looks like the next one:
Finally, choose a place to save the project on your disk, and finish with the creation process.
Running The App
While having Font Viewer project open in Xcode, press Cmd + R on your keyboard to run the app. Here’s what you’ll see appearing on your screen:
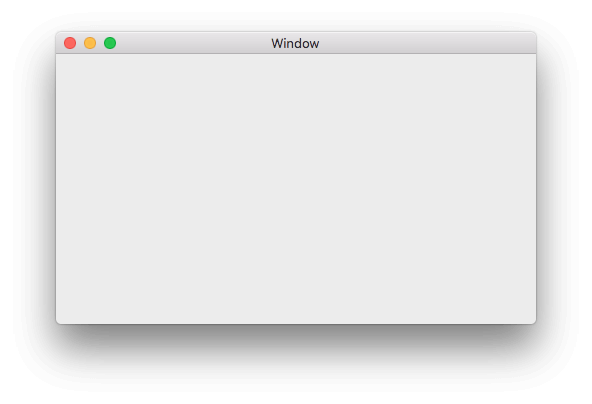
Congratulations! You just ran your first macOS app!
It’s an empty window for now, but it doesn’t matter as we will change that. Look and play around with it. You will notice that standard behaviour and attributes are assigned by default to the window, such as resizing, moving or going full screen. Also, there’s the main menu at the top bar, where some common functionalities are provided already, while some others are just disabled as they don’t trigger any action.
Exploring The Project
If you have prior experience to iOS development, you will find out that a macOS project looks pretty much the same to an iOS project. Project Navigator lists all files and groups, tabs like General, Capabilities, Build Settings, etc are here too, and generally everything looks familiar. Displayed settings and options are specific to macOS though.
In the Project Navigator you will find all files and groups that Xcode creates by default for a Cocoa App. What is new here (comparing again to iOS projects), is an .entitlements file. This is a property list file that contains rights an app is granted with. Most of the times there is no need to edit it manually. Changes made through the Capabilities tab update this file automatically.
Other than that, two code files are created automatically. AppDelegate.swift and ViewController.swift. We will add more code to ViewController.swift in a while. There is also:
- The Main.storyboard file to design the app’s user interface graphically.
- The Assets catalog where any images or other assets that should be included in the app bundle must be added to.
- The Info.plist file that contains various project settings.
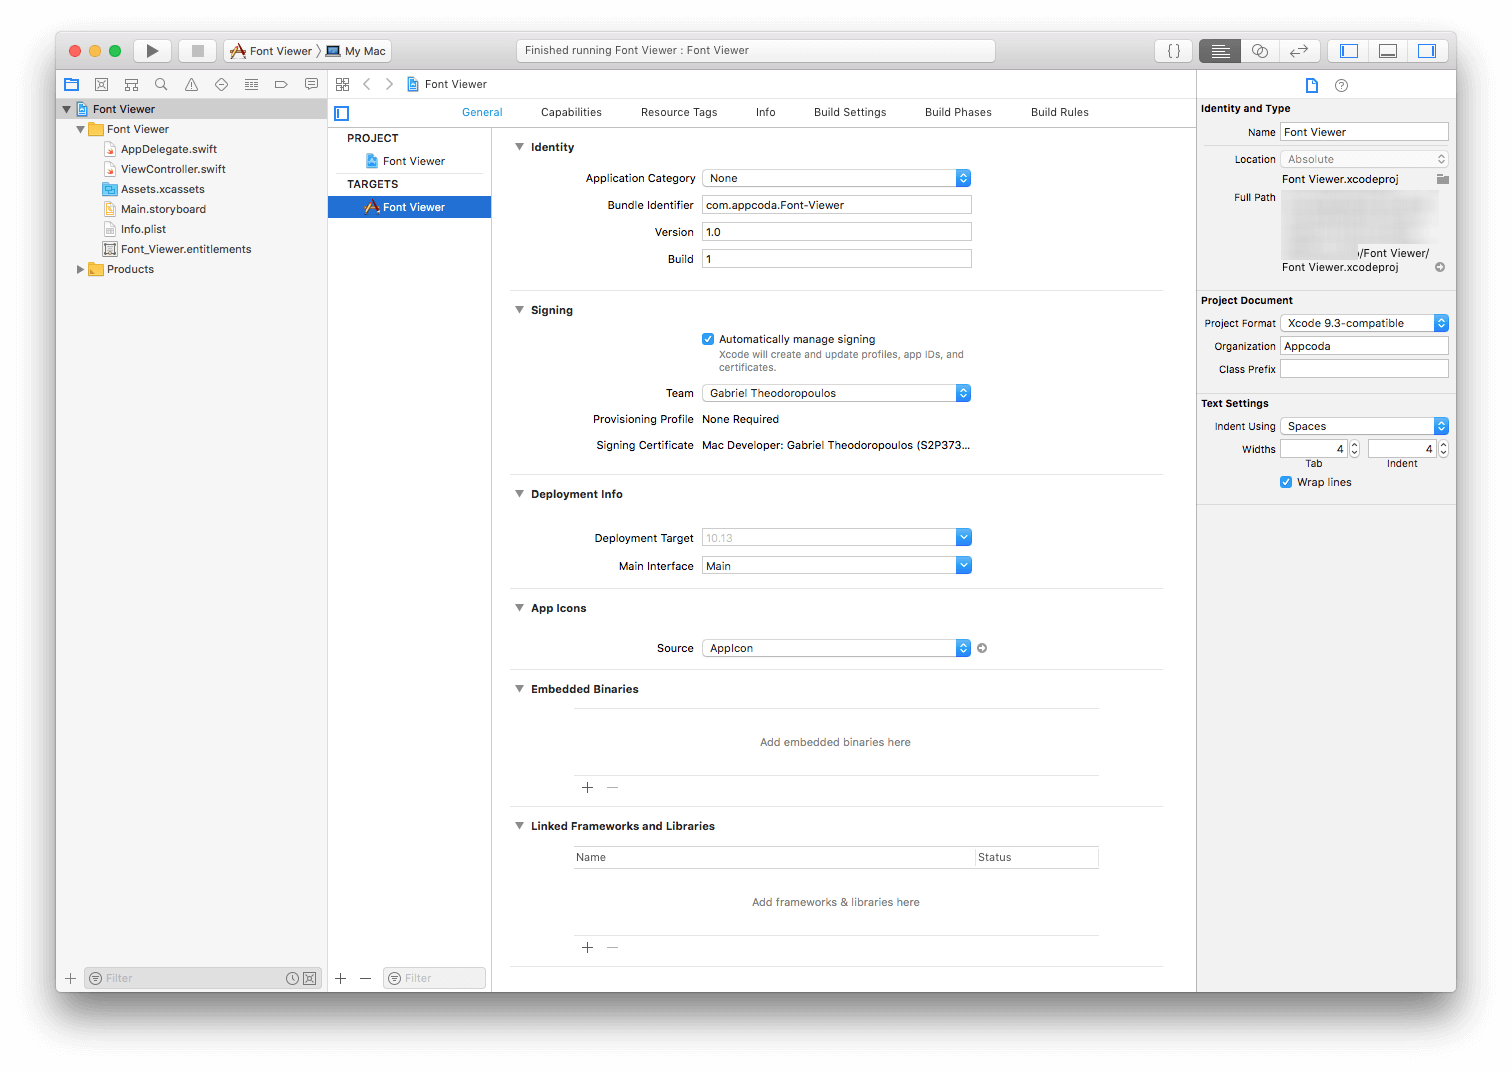
Looking at the General tab of the Font Viewer target, in the Identity section you can find the Bundle Identifier, as well as the Version and Build Number. But what is more interesting here, is the Application Category popup, where you can find all available app categories also found on App Store. This is the place where we set the category of our app. Which category would be suitable for us here? We could assign it under Developer Tools since it’s going to display font information, but we could also have it in the Utilities category. Right now it doesn’t really matter as we are not going to publish it, but remember to choose a category for your app before you send it to the App Store (it’s still okay if you don’t, you can choose app category on the App Store as well, but why not to do it here?).
Looking a bit lower you will see the Deployment Info section. Here you specify the minimum macOS version required by your app to run. You can have it run on macOS Mojave only (10.14), or enable it running on High Sierra (10.13) or older versions too. Keep that option in mind if you ever want to support older operating systems.
Take your time to go through every aspect of the project. Switch to the Capabilities tab, and see what kind of options are available, or go to Build Settings and see if you find something interesting there too. Once you finish your exploration, let’s take a few moments to see what Main.storybard file contains.
Exploring The Main.storyboard
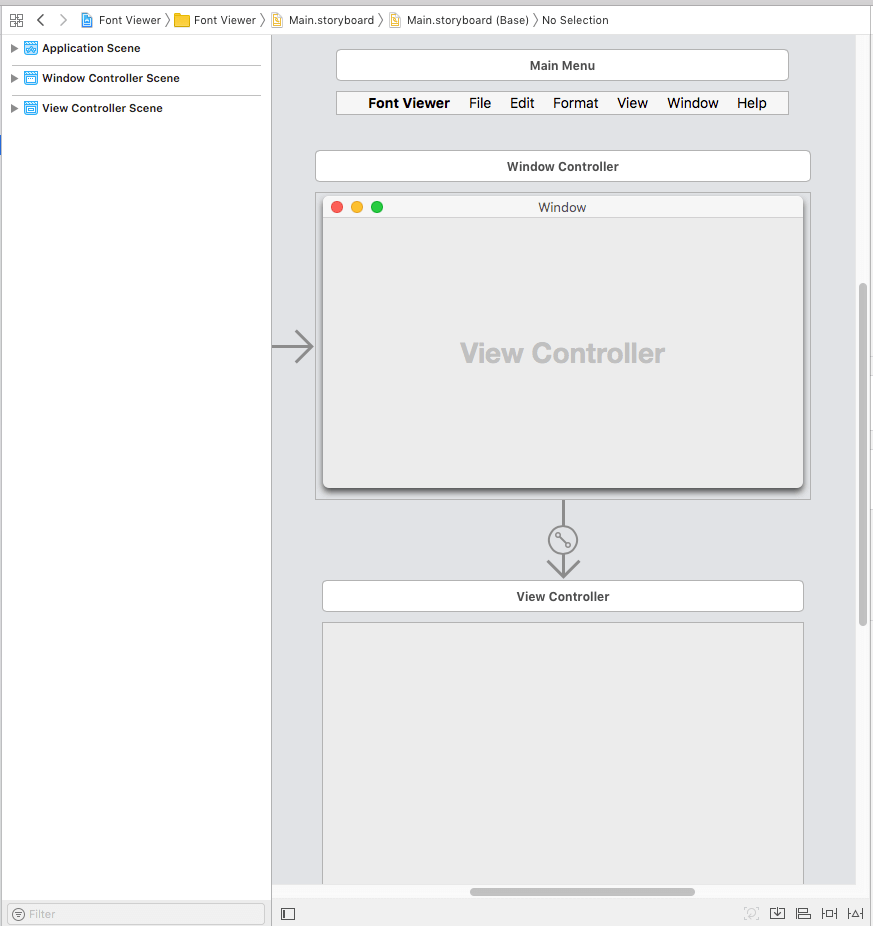
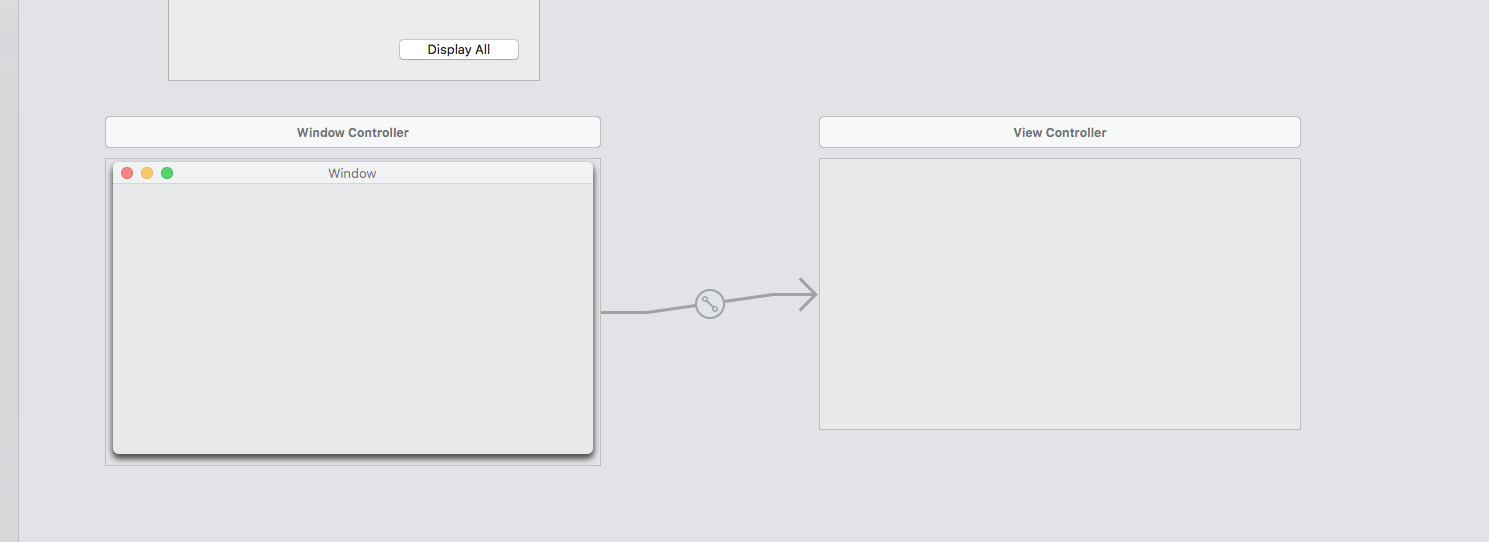
Clicking on the Main storyboard file in the Project Navigator, the automatically created, default user interface will be revealed in Interface Builder. Any Cocoa based app contains three default scenes:
- A window controller that manages the contained window (such as loading, showing and closing it, storing window’s state, customize its title, and more).
- A view controller which is linked to the window controller and is being presented automatically along with the window. The View Controller scene is the place where Cocoa graphical controls are being added to.
- The Application scene, which is the graphical representation of the
NSApplicationinstance that manages the app’s main event loop and resources used by all of that app’s objects (by Apple docs). The main menu of the app with all submenus and menu items is contained in that scene.
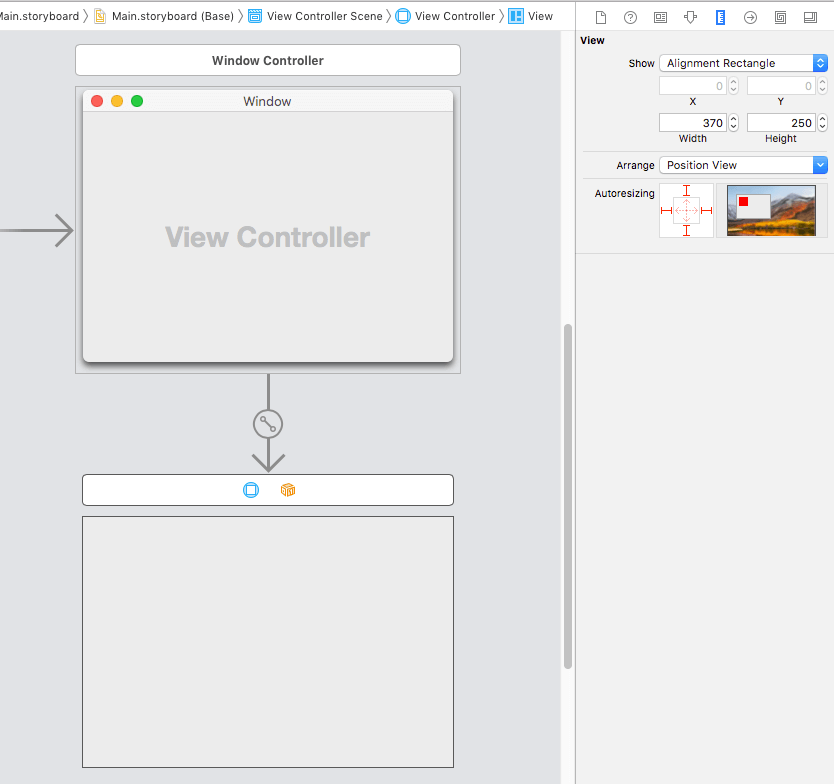
Let’s focus on some interesting details now. Click on the window in the window controller scene, and open Attributes Inspector in the inspectors panel of Xcode. This is what you should be seeing:
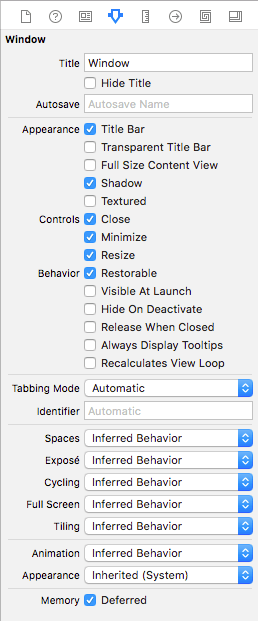
For some of them, just enabling or disabling options has immediate visual effect on the window. For some others it has not. Let me highlight the most important ones, but if you find yourself needing information for options not mentioned below, feel free to search for them on the web.
- In the Title text field you can edit and change the window name. Default value is “Window”, but definitely you wouldn’t want an app titled liked that. Alternatively, you can just hide it by just turning on the Hide Title checkbox. Later on you will see how to change that title programmatically as well.
- The full title bar can become hidden if you uncheck the Title Bar checkbox. The danger here is that users won’t be able to move the window around, but that could be a desired feature sometimes.
- Enable Transparent Title Bar option so title bar does not look different than the rest of the window.
- Close option enables the small red button on the left side of every window that let’s you close it. In case you disable that, make sure that users will have a way to close the window.
- Leave Minimize enabled if you want to let your app be minimized to the dock.
- If you don’t want your app to go full screen, then just disable Resize option. The small green button in the window title bar go off.
- Restorable preserves the window configuration between launches (normal launches, not running through Xcode). Disable that if you want your window to appear in the same size and position every time users launch your app.
- All macOS applications must show a window when they are launched, unless they are agent apps (top menu apps, we’ll talk about them in a future post). So, the default window of the app is always visible. However, if an app contains more windows, then by default they are not visible at the launch time. If you want more than the default window to be visible at launch, just enable the Visible At Launch option to each additional window you want to have that behaviour.
- Hide On Deactivate makes the window just disappear when it has not the focus anymore (when switching to another app.) Window will appear again when you switch to your app through the dock, or by pressing Cmd + Tab and you select it among other running applications.
- Enable Release When Closed to release memory allocated by the window after it gets closed. However, if a window is managed by a window controller, then this option is just not taken into account.
- Always Display Tooltips allows to show small tooltip bubbles when mouse stops over a UI control. Tooltip texts however should be set by you for each control you want to show a tooltip. Use Identity inspector to do that for each control of your app.
Leaving the rest options to their default settings makes sure that a window fits to the general macOS environment and it follows workflows that users are already familiar with. Of course, you can find additional information about them and their purpose if you wish so, I just highlighted the most important ones here.
With the window still being selected, show the Size Inspector. Here, you can set the content size of the window, the allowed maximum and minimum size, as well as the initial place of the window on screen.
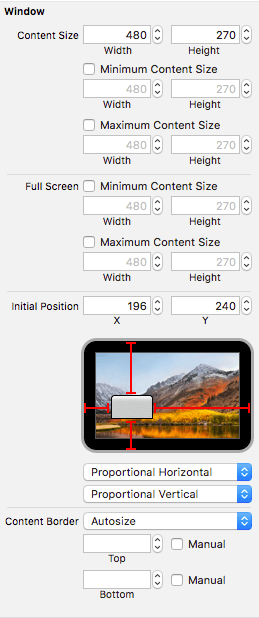
Setting the content size (width and height) makes the obvious, it changes the window’s default content size. By leaving the Minimum Content Size and Maximum Content Size unchecked, users can resize the window and make it as small or as big they want. To limit the minimum content size so users cannot decrease it further than that, just enable the Minimum Content Size checkbox and specify values for the min width and height. Similarly, enable the Maximum Content Size checkbox to prevent your window grow more than the values you specify.
To keep a constant content size and disallow resizing, then set the exact same values to both minimum and maximum content size.
By default a window is displayed to the bottom left side of the screen. You can change that by either dragging the window sample in the small screen preview window, or just change the initial position X and Y values. Just remember: coordinates in macOS are not like iOS. The Y=0 point is the bottom side of the screen, not the top.
Windows can also be shown centered on the screen. To do that, click on the Proportional Horizontal and Proportional Vertical popup buttons, and select Center Horizontally and Center Vertically respectively. The screen sample in the Size inspector will be updated, and you can verify that by running the app; the window will be shown on the center of the screen.
Setting Up The UI
After that quick walkthrough to the macOS project, let’s do some real work on our app. For starters, select the default Window and open the Size Inspector in the inspectors panel. Change the Content Size to 370×250. Then, select the view controller’s view and do the same.
Now let’s add the graphical controls to the default view of the view controller.
Begin by clicking on the Library Button on Xcode to open the Objects Library:
In the Objects Library, type popup in the top search field:
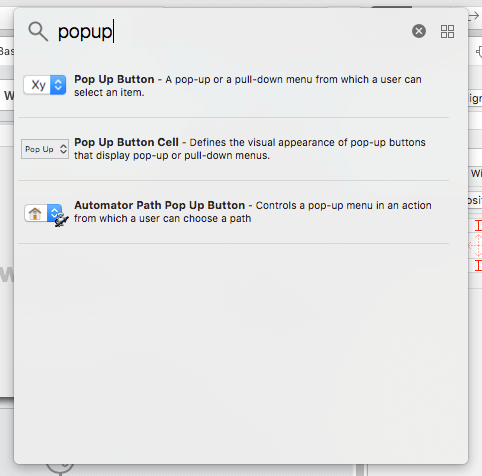
Choose the Pop Up Button item, and drag and drop it to the view controller’s view. Select the popup control you just dragged to the view controller, and press Cmd + D on your keyboard to duplicate it.
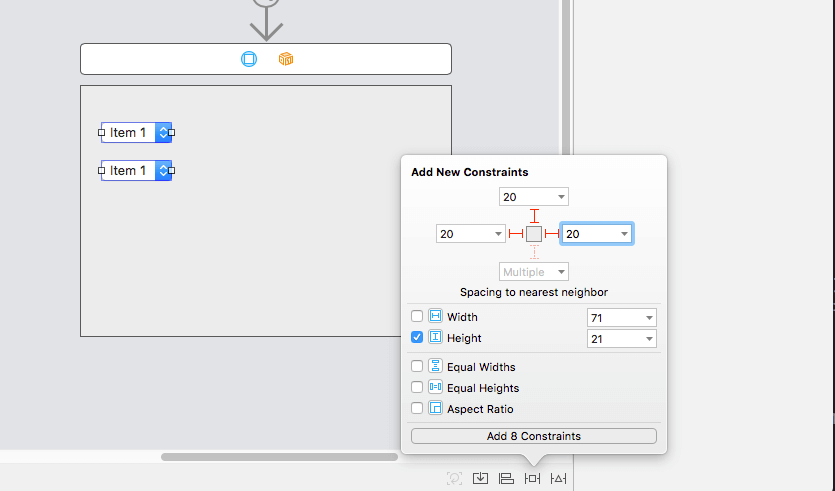
Select both popup buttons, and add the following constraints: Top: 20, Leading: 20, Trailing: 20, Height: 21.
Following the above steps, let’s add also a push button and a label:
- Open the Objects Library again, and type button.
- Drag and drop a push button to view controller’s view below the popups.
- Set its constraints: Trailing: 20, Bottom: 20, Width: 120, Height: 21.
- Double click on the button to change its title to: Display All
- Open the Objects Library one last time, and type label in the search field.
- Drag and drop a label object into the view controller, under the popups but above the push button.
- Set the following constraints for the label: Top: 20, Leading: 20, Trailing: 20, Height: 80.
At the end, your view should be similar to this one:
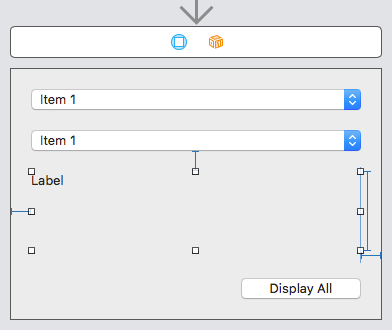
The first popup button will be displaying all available font families on the system, while the second will contain all available font types (such as bold, italic, etc) for any selected font family in the first popup.
Label will show the PostScript name of the selected font family and type, formatted accordingly.
Lastly, the “Display All” button will be used to show all available font types of a font family at once. More about that later.
IBOutlet Properties And IBAction Methods
We will come to the need to interact with the controls we just added soon, so it’s necessary to create and connect IBOutlet properties and IBAction methods to them. Open the ViewController.swift file, and to the top of the class add the next IBOutlet property declarations:
@IBOutlet weak var fontFamiliesPopup: NSPopUpButton!

@IBOutlet weak var fontTypesPopup: NSPopUpButton!

@IBOutlet weak var sampleLabel: NSTextField!
Also, define the following IBAction methods:
@IBAction func handleFontFamilySelection(_ sender: Any) {

}


@IBAction func handleFontTypeSelection(_ sender: Any) {

}


@IBAction func displayAllFonts(_ sender: Any) {

}
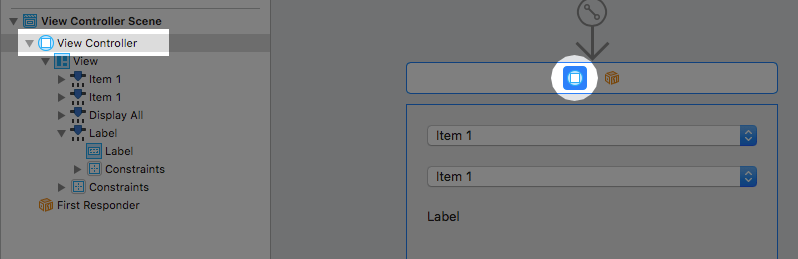
Back to the Main.storyboard file, select the view controller object in the document outline:
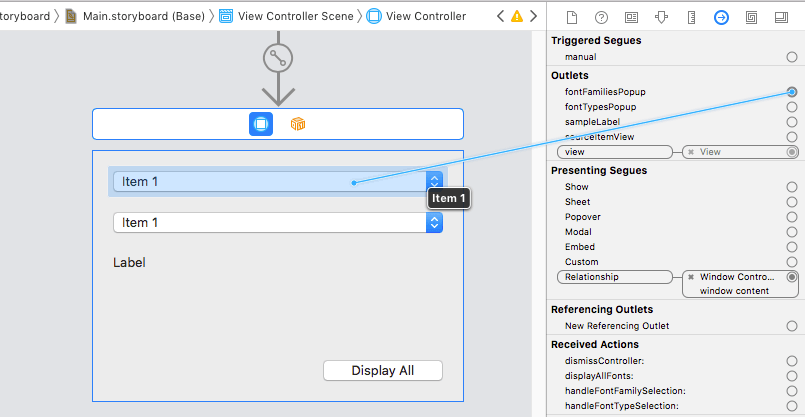
In the inspectors panel, select to open the Connections inspector, where you will find all the IBOutlet properties and IBAction methods previously declared. Make the connections as follows:
- The
fontFamiliesPopupoutlet to the first (top most) popup button. - The
fontTypesPopupoutlet to the second popup button. - The
sampleLabeloutlet to the label. - The
handleFontFamilySelection(_:)action to the first (top most) popup button. - The
handleFontTypeSelection(_:)action to the second popup button. - The
displayAllFonts(_:)action to the “Display All” button.
Before we make the simple user interface we just created usable, let’s take a look at the controls we just added. By default, each popup button contains three items, where each one is a menu item (more about menus and menu items in a future post). These can be changed either by double clicking on the popup button and then by double clicking on each item, or by selecting the popup button and spotting each item to the Document Outline.
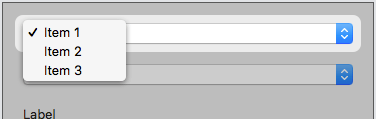
In this demo application, we will change the menu items programmatically, but Interface Builder is a good option to do that if you have a constant set of items that are not meant to be changed on the fly.
In the Attributes inspector you can find all configurable properties of the popup button (after selecting one). For example, you can define the default selected item, or to set font properties and text alignment.
Similarly, label’s and button’s properties can be changed in the Attributes inspector too if you select the label or button object in the view controller. Feel free to look around and experiment a bit by changing any properties you want. It doesn’t matter if you “damage” any control by accident; just delete it and create a new one by following the steps described above.
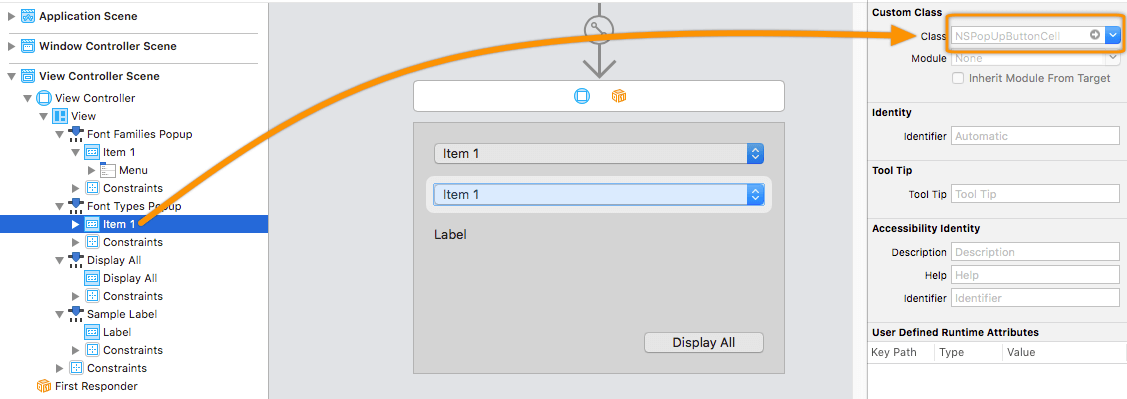
Another interesting point is the object hierarchy and the actual contained objects in the Document Outline pane. One would expect to find there only the popup buttons, the label and the push button along with their constraints. However, if you start expanding the objects tree you will notice that there are more objects than those we specifically added. Apart from the menu items of the popups (which is fine to be found there since a menu item is actually another Cocoa control created automatically), you will also find a cell object going in pair with each control. For example, the fontFamiliesPopup is a NSPopUpButton object, but it contains a NSPopUpButtonCell item which in turn contains the menu items. Likewise, the label which is a NSTextField object contains a NSTextFieldCell item.
So, what is the purpose of those “Cell” objects?
Generally speaking, a cell object (any “…Cell” subclass) is responsible for implementing the actual Cocoa control and its functionalities. All those subclasses inherit from the same ancestor, NSCell, which implements several common properties and methods regarding the appearance and behaviour of controls. Even though we will be interacting with the popup buttons, the label and the push button objects directly in this app, behind the scenes any visual changes and updates will be handled by the matching cell subclasses.
Practically speaking now, we don’t have to worry about them as we won’t have to deal with any cell subclass. Just one general warning: make sure to connect IBOutlet properties to the actual controls and not their cell counterparts. It’s a common mistake that can happen if you perform the outlet connection by pressing Control and drag-and-dropping from Interface Builder to the Assistant Editor (code) and you don’t pay attention to what the origin (source) object of the dragging is.
Bringing App To Life
Building the UI, even a simple one, is an achievement. But without code, not much can happen.
Initial Configuration
Open the ViewController.swift file, where we’ll get started by implementing a function in the ViewController class that will perform some initial setup to the UI.
Go after the default view controller methods and add the following:
func setupUI() {
    fontFamiliesPopup.removeAllItems()
    fontTypesPopup.removeAllItems()
    sampleLabel.stringValue = ""
    sampleLabel.alignment = .center
}
In the first two lines we remove all default items from the two popup buttons. In the other two lines we empty the default text of the label, and we center it. Notice that the property to set the label’s text is stringValue; don’t look for a property called text or something like that.
Next step is to populate the first popup button with actual values: All font families existing in the Mac. We will achieve that by getting to know a new class called NSFontManager. It is responsible for several things including the Font panel and Font menu found in many apps, keeping record of the currently selected font, triggering font changes, and more. Among its “duties”, important information about available font families and font attributes is also included!
NSFontManager is used through a shared instance programmatically. A property named availableFontFamilies can give us what we need: A collection (array) with all the available font families!
Right next we define a new method that uses the NSFontManager class and adds the found family names as items to the fontFamiliesPopup:
func populateFontFamilies() {
    fontFamiliesPopup.removeAllItems()
    fontFamiliesPopup.addItems(withTitles: NSFontManager.shared.availableFontFamilies)
}
Now, both of methods we implemented above have to be called once the app is started, and before the view gets appeared. Go right after the viewDidLoad() method and add the following:
override func viewWillAppear() {
    super.viewWillAppear()

    setupUI()
    populateFontFamilies()
}
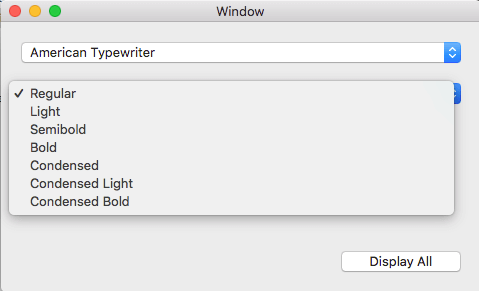
Let’s see what we’ve done so far. Run the app and open the first popup, you will find all available font families in it!

Handling Actions
NSFontManager class seems to be quite useful, as there are more interesting properties and methods to explore and use. One such method that is particularly interesting is called availableMembers(ofFontFamily:). It returns an array where each item is another array ([[Any]]) with four distinct values:
- The PostScript name of the font as a String.
- The type of the font, such as “Bold”, “Italic”, “Roman”, “Light”, etc.
- The font’s weight as an integer.
- The font’s traits as an unsigned integer (UInt).
An item-array is called a member of the font family. The following example taken from Apple Documentation illustrates what availableMembers(ofFontFamily:) returns:
(("Times-Roman", "Roman", 5, 4),
 ("Times-Italic", "Italic", 6, 5),
 ("Times-Bold", "Bold", 9, 2),
 ("Times-BoldItalic", "Bold Italic", 9, 3)
)
Putting the above in different words, with availableMembers(ofFontFamily:) we can get all font variations that a font family supports, and display them on the fontTypesPopup popup button.
Before we make the actual use of the above method, let’s declare the following two properties to the ViewController class, they’ll become handy a bit later:
var selectedFontFamily: String?

var fontFamilyMembers = [[Any]]()
What we need to do now is to make it possible to keep the selected font family and get its contained members every time the fontFamiliesPopup selection gets changed. This must be done in the handleFontFamilySelection(_:) IBAction method:
@IBAction func handleFontFamilySelection(_ sender: Any) {
    if let fontFamily = fontFamiliesPopup.titleOfSelectedItem {

        selectedFontFamily = fontFamily

        if let members = NSFontManager.shared.availableMembers(ofFontFamily: fontFamily) {
            fontFamilyMembers.removeAll()
            fontFamilyMembers = members
        }
    }
}
At first, we get the title of the item that gets selected in the fontFamiliesPopup; it matches to the font family name. We keep it in the selectedFontFamily property.
Next, we get all available members of the selected font family using the availableMembers(ofFontFamily:) method of the NSFontManager class. Those members are kept in the fontFamilyMembers class property. It’s important to remove any previous items existing in that array! We don’t want data from a previously selected font family to remain while we are selecting another one! That’s why removeAll() is called prior to assigning members to fontFamilyMembers.
However, just keeping the selected font family name and its members makes no real difference. We need to populate them to the fontTypesPopup so we see and use the font variations of each family. Why don’t we create a new method to do that? Add the next one to the ViewController class:
func updateFontTypesPopup() {
    fontTypesPopup.removeAllItems()

    for member in fontFamilyMembers {
        if let fontType = member[1] as? String {
            fontTypesPopup.addItem(withTitle: fontType)
        }
    }
}
Here is what is going on in the above method:
- At first, we remove any previous items from the
fontTypesPopup. - We go through each font member data in the
fontFamilyMembers, and we get the font type (“Bold”, “Italic”, etc) from the first position of the array, while we cast it to String at the same time. Remember that each member is an[Any]array. - We add each found font type as a new item to the popup button.
You might want to run the app now and see the available font variations after having selected a font family first. Do it, and soon enough you will end up to an unpleasant result: The fontTypesPopup does not get any value at all! But why?
Well, the previous method does, indeed, populate the available members of a font family to the fontFamiliesPopup, but where exactly is it called? Nowhere yet!
Back to the handleFontFamilySelection(_:) IBAction method, which should be updated so it calls the updateFontTypesPopup() when the available members have been retrieved using the availableMembers(ofFontFamily:) method:
@IBAction func handleFontFamilySelection(_ sender: Any) {
    if let fontFamily = fontFamiliesPopup.titleOfSelectedItem {
        selectedFontFamily = fontFamily

        if let members = NSFontManager.shared.availableMembers(ofFontFamily: fontFamily) {
            // ...

            updateFontTypesPopup()
        }
    }
}
Great, now you can run the app, select a font family, and then see the available members in the second popup!
So far so good, but we still have some more distance to run and get to finish line. When selecting a font member from the second popup, an actual sample should be shown in the sampleLabel label. We can make that happen if we update the font of the sample label every time a font variation is selected. And here is a new thing: How can we create a font (a NSFont object) using the data we have so far?
NSFontManager will be our tool again, as it provides a method named font(withFamily:traits:weight:size:) that returns a NSFont object. If you think about it, we have values for all parameters, as traits and weight are parts of the font member data that we keep in the fontFamilyMembers collection. Also, the selected font family is also kept to the selectedFontFamily property. Regarding size, we’ll set a random value, it doesn’t really matter.
In the handleFontTypeSelection(_:) IBAction method we are going to implement all the logic that will allow the creation of a new font object, which in turn we will set to the sample label along with the PostScript name of the font.
@IBAction func handleFontTypeSelection(_ sender: Any) {
    let selectedMember = fontFamilyMembers[fontTypesPopup.indexOfSelectedItem]

    if let postscriptName = selectedMember[0] as? String, let weight = selectedMember[2] as? Int, let traits = selectedMember[3] as? UInt, let fontfamily = selectedFontFamily {

        let font = NSFontManager.shared.font(withFamily: fontfamily,
                                             traits: NSFontTraitMask(rawValue: traits),
                                             weight: weight,
                                             size: 19.0)
        sampleLabel.font = font
        sampleLabel.stringValue = postscriptName
    }
}
- At first, we get the member array from the
fontFamilyMemberscollection that matches to the selected one in thefontTypesPopup. - As the
selectedMemberarray containsAnyvalues, it’s necessary to convert them appropriately. Also, we make sure thatselectedFontFamilyactually contains a value and it’s not nil. - Here’s the highlight of the method. We create a new
NSFontobject using all values gathered above. Notice that for thetraitswe initialize aNSFontTraitMaskvalue. - The created font is set to the sample label.
- The PostScript name of the font is set to the label.
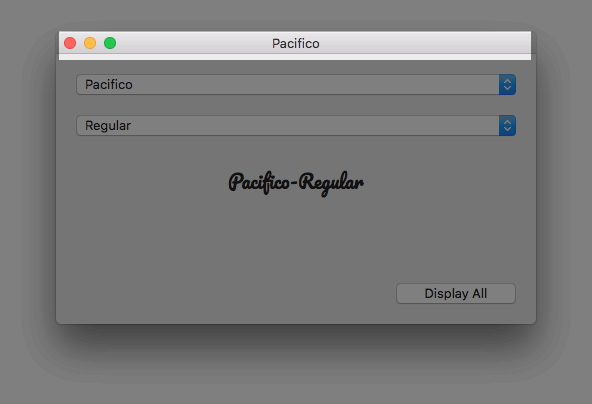
Run the app again, and this time you will have both a sample of the selected font, and its PostScript name too!

An Eye To The Details
Our small app is working, but there are a few details left untouched. Let’s go through them.
Regarding the first one, it’s obvious that there is no font sample when the app starts. Moreover, no font members are contained in the fontTypesPopup popup button until we update the selected font family. To get around that, we will go back to one of the first methods created here, the populateFontFamilies(). In it we must make a call to the handleFontFamilySelection(_:) IBAction method and trigger that way the gathering of the font family’s available members:
func populateFontFamilies() {
    // ...

    handleFontFamilySelection(self)
}
This fixes the missing values on the second popup when the app starts, but it doesn’t fix the missing font sample. To make the sample label show the font sample of the first member found in the fontTypesPopup popup button automatically, we need to update the updateFontTypesPopup() method as shown in the next snippet:
func updateFontTypesPopup() {
    // ...

    fontTypesPopup.selectItem(at: 0)
    handleFontTypeSelection(self)
}
First, we auto-select the first item in the popup. Then, we call the handleFontTypeSelection(_:) IBAction method to create the font based on the selected member and update the sample label.
Lastly, one more detail that will show us a general technique beyond the demo app specifics…
Updating The Window title
Our app’s window title is saying “Window” (unless you changed that in Interface Builder), but wouldn’t be nice to make it show the selected font family’s name?
Accessing the window programmatically is easy and it’s done through the view property (main view) of the view controller as you will see right next. Go to the handleFontFamilySelection(_:) IBAction method and add the following line:
@IBAction func handleFontFamilySelection(_ sender: Any) {
    if let fontFamily = fontFamiliesPopup.titleOfSelectedItem {
        // ...

        view.window?.title = fontFamily
    }
}
The window now displays the selected font family!
Completing The App With A New Window Controller
Our small application is working perfectly at this point and all steps presented so far have already shown some important how-to stuff regarding macOS programming. However, the “Display All” push button is not functioning yet, and this is the part that we will focus on here. This will give us the chance to explore and talk about more things that will make this post more complete and valuable.
The purpose of the “Display All” push button is to present a new window where font variations of a selected font family will be displayed all together, formatted based on each font’s PostScript name. That might not sound such a big deal given that we can already see them one by one through the popup buttons we have. By doing that though, we will learn:
- How to add an additional window controller.
- How to change the default window appearance and present it as a panel.
- How to load and present the new window controller programmatically.
- How to pass data to another view controller that belongs to a different window controller.
- How to programmatically close a window.
So, if all that sound interesting to you, just keep reading.
Adding A New Window Controller
Back to Main.storyboard file, let’s add a new window controller along with a view controller to our canvas.
- Click on the Library button to show the Objects Library.
- Clear any previous content on the search field, or just type Window.
- Drag and drop a window controller object to an empty area of the canvas.
You will notice that along with the window controller, an attached view controller is added as well!
What Kind Of Panel Do You Prefer?
Now, let’s see how we can change the default appearance so we can make our new window look like an auxiliary panel.
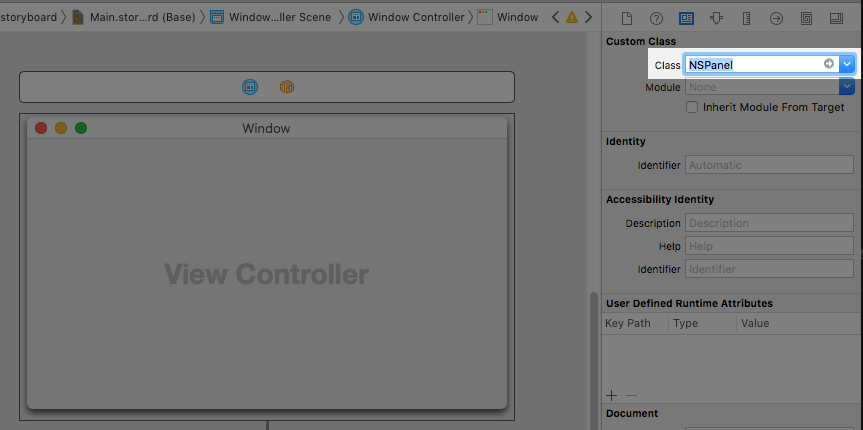
At first, click on the new window and then show the Identity Inspector. Look at the Custom Class section, where the window’s class is automatically set to NSWindow.
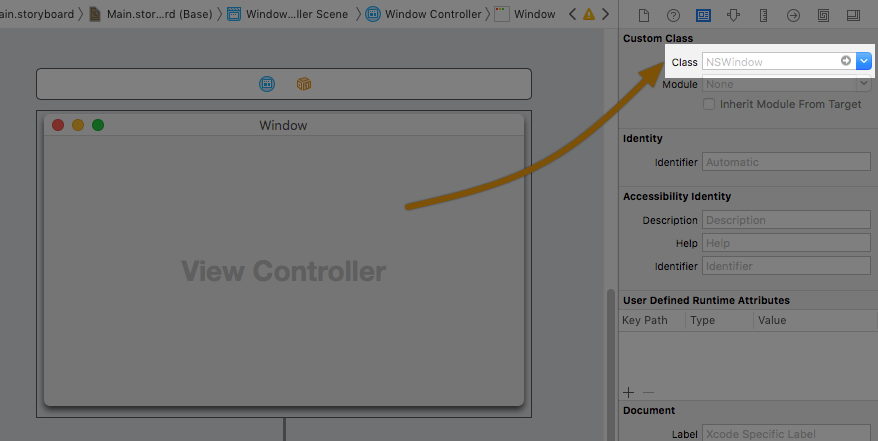
Click on that field, type: NSPanel and hit the Return key on your keyboard.
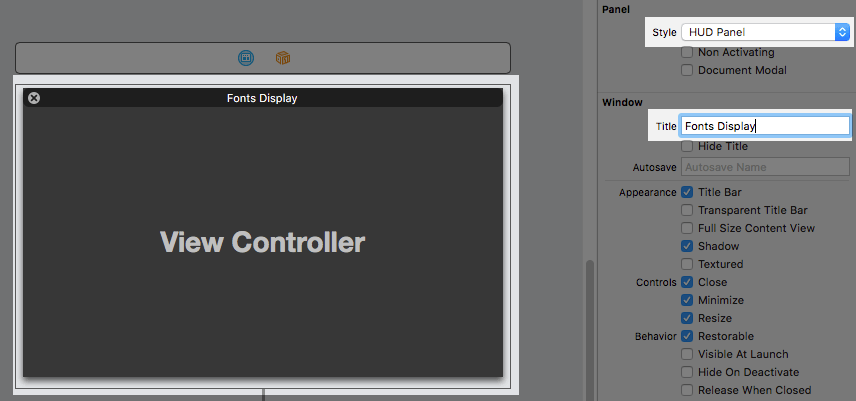
And now, switch to the Attributes Inspector. A new section has been added to the top, named Panel! The default value in the Style popup is Regular Panel, which means the normal window appearance. Two more panel types are supported:
- Utility Panel
- HUD Panel
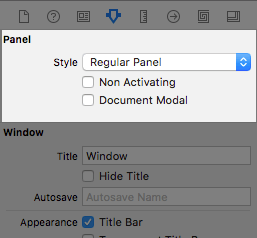
Both of them are meant to exist as auxiliary windows that contain supplementary options or information to the content shown on the main window.
Change the panel style and go through all options; see how the window’s appearance is being changed accordingly. A HUD panel is similar to a Utility panel, with the obvious graphical difference. It’s darker and translucent. Also, only the close button is available on the window’s bar.
Once you finish examining panel style settings, choose HUD as the style for our new window.
You are encouraged to read the Human Interface Guidelines about panels here.
While still being in the Attributes Inspector, set the “Fonts Display” text (without the quotes) as the window’s title.
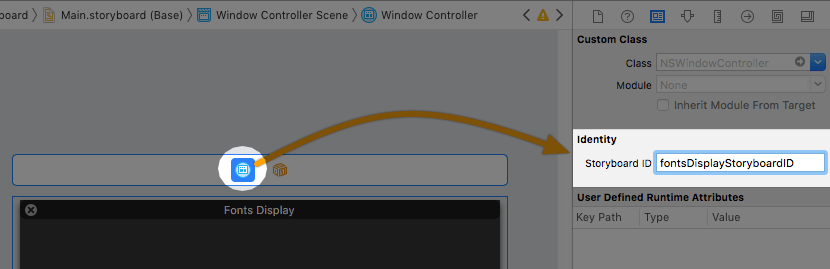
One last thing before we move to the next step. Show the Identity inspector and in the Identifier text field under the Identity section type the value: fontsDisplayStoryboardID. You will see in a while why we need that.
The Fonts Display View Controller
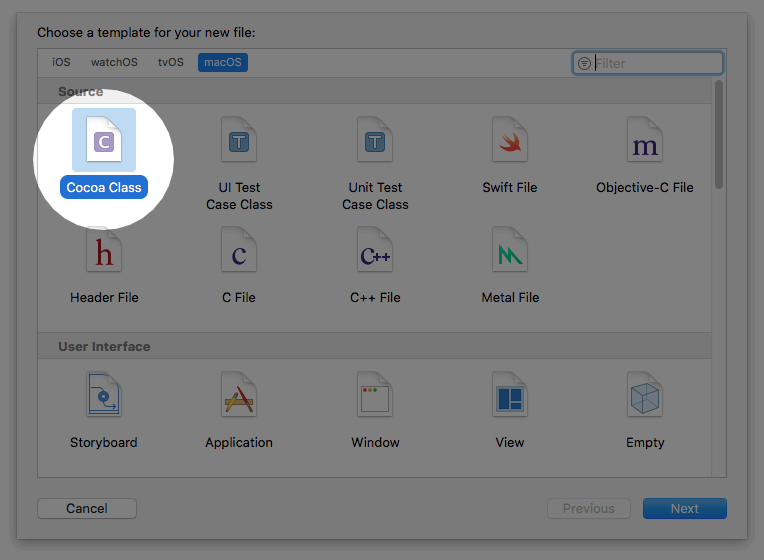
Along with the window controller, a new view controller was added too to the project. That brings us to the need to create a new NSViewController subclass that we will connect to that new view controller. Press Cmd + N in your keyboard, and select Cocoa Class under the Source section.
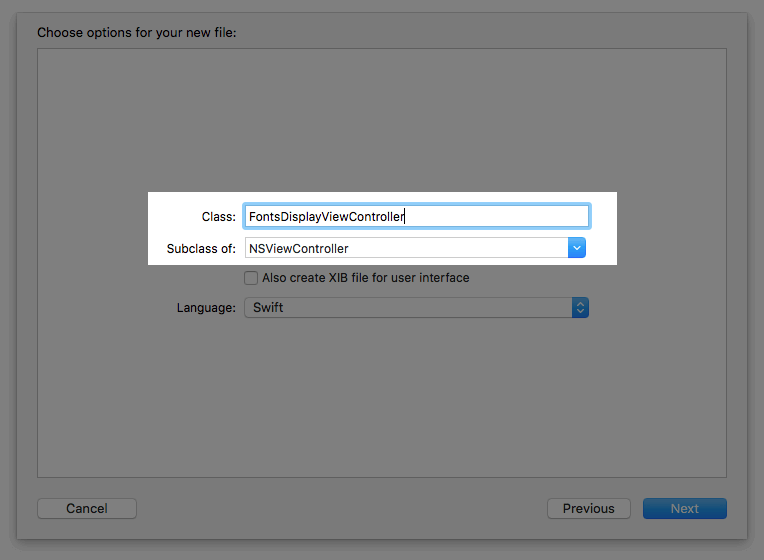
Click Next, and change the Subclass of: field to NSViewController. In the Class field, type FontsDisplayViewController. Get finished with the creation of the new file.
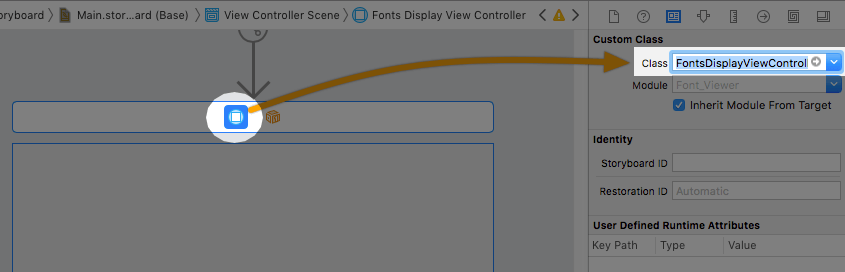
Again to the Main.storyboard file, click on the View Controller object, and set the FontsDisplayViewController value to the Class field in the Identity Inspector.
Next, click on the main view of the view controller, and show the Size Inspector. Set its size to 480×400.
Let’s add two new Cocoa controls now to the view.
- Open the Objects Library, and search for a textview.
- From the results, select a Scrollable Text View object, and drag and drop it to the view.
- Set the following constraints: Top: 20, Leading: 20, Trailing: 20, Bottom: 60.
- In the Objects Library again, search for a button control.
- Drag and drop a Push Button object to the view.
- Set its constraints: Bottom: 20, Width: 70, Height: 21, Horizontally aligned in container.
- Double click on it and change its text to: Close.
We will use the textview to display all available font members of a font family formatted. The button will be used to close the window.
In the FontsDisplayViewController.swift file now, let’s declare an IBOutlet property for the textview, and an IBAction method for the button:
@IBOutlet var fontsTextView: NSTextView!

@IBAction func closeWindow(_ sender: Any) {

}
Finally, in the Main.storyboard file again, click to select the Fonts Display View Controller object and from the Connections Inspector connect the fontsTextView outlet to the textview, and the closeWindow(_:) action to the button.
There is one disturbing thing in the UI we are being creating, and that is the white textview on the dark and translucent HUD window. That’s okay and tolerable in the storyboard, however who would want it when using the app?
So, open the FontsDisplayViewController.swift file and add the following function:
func setupTextView() {
    fontsTextView.backgroundColor = NSColor(white: 1.0, alpha: 0.0)
    fontsTextView.enclosingScrollView?.backgroundColor = NSColor(white: 1.0, alpha: 0.0)
    fontsTextView.isEditable = false
    fontsTextView.enclosingScrollView?.autohidesScrollers = true
}
The above:
- Makes the background of the textview transparent.
- Makes the background of the scrollview that contains the textview transparent.
- Makes the textview non-editable.
- Autohides the scrollbars.
We will call setupTextView() right before the view gets appeared:
override func viewWillAppear() {
    super.viewWillAppear()

    setupTextView()
}
Loading And Presenting The Window Controller
The UI of the auxiliary panel is ready, so let’s see how it looks like when the application is running. Before we load and present the new window controller, we must declare the following two properties in the FontsDisplayViewController.swift file:
var fontFamily: String?
var fontFamilyMembers = [[Any]]()
We need both of them, as we are going to pass the selected font family name and its members from the ViewController class to FontsDisplayViewController. We’ll see how we’ll make use of them in a while. Just declaring them for now is good enough.
So, let’s proceed to the presentation of the new window controller. Open the ViewController.swift file, and go to the displayAllFonts(_:) IBAction method. Remember that this action method is connected to the “Display All” button in the default window of our app, so any code added here will be executed when that button is clicked.
The idea behind presenting a window controller that has been created graphically in a storyboard file, is to initialize a NSStoryboard object and ask it to instantiate that window controller. A NSStoryboard object is being initialized by providing the storyboard name, but in a not-so-much straightforward way. Here it is:
let storyboardName = NSStoryboard.Name(stringLiteral: "Main")
let storyboard = NSStoryboard(name: storyboardName, bundle: nil)
As you can see, the NSStoryboard initializer does not accept a string value as an argument (aka the storyboard name). It expects for a NSStoryboard.Name value instead, where Name is String type alias. Value of bundle can be left nil.
With the storyboard object being initialized now, we can instantiate our window controller. For that purpose we will use the storyboard Identifier we had previously set in Interface Builder:
let storyboardID = NSStoryboard.SceneIdentifier(stringLiteral: "fontsDisplayStoryboardID")

if let fontsDisplayWindowController = storyboard.instantiateController(withIdentifier: storyboardID) as? NSWindowController {

}
instantiateController(withIdentifier:) is the method of the NSStoryboard class that instantiates the window controller in the above code. It returns an Any? value, so it is necessary to:
- Make sure that no nil value is returned by doing a conditional unwrapping.
- Cast to
NSWindowControllertype.
Note: Apart from window controllers, it is also possible to instantiate view controllers using the instantiateController(withIdentifier:) method, as long as a storyboard Identifier has been set for them in Interface Builder. That’s why that method returns an Any value instead of a NSWindowController object. It’s our duty to cast to the proper type.
Also, in the above snippet you see that the window controller’s identifier is not given as a plain String value. Instead, a NSStoryboard.SceneIdentifier value must be provided, where SceneIdentifier is a String type alias.
Supposedly at this point the new window controller has been instantiated. That’s not enough though, we must access its content view controller, and pass the selected font family and its members collection to it. NSWindowController has a property named contentViewController which represents the view controller attached to the window controller. We will use it, and after having accessed it we will pass the values we want:
if let fontsDisplayVC = fontsDisplayWindowController.contentViewController as? FontsDisplayViewController {
    fontsDisplayVC.fontFamily = selectedFontFamily
    fontsDisplayVC.fontFamilyMembers = fontFamilyMembers
}
Finally, we can present the window as follows:
fontsDisplayWindowController.showWindow(nil)
The above are the steps required to instantiate a window controller programmatically, to get its content view controller, and eventually present them all. Right next is the displayAllFonts(_:) method in one piece:
@IBAction func displayAllFonts(_ sender: Any) {
    let storyboardName = NSStoryboard.Name(stringLiteral: "Main")
    let storyboard = NSStoryboard(name: storyboardName, bundle: nil)

    let storyboardID = NSStoryboard.SceneIdentifier(stringLiteral: "fontsDisplayStoryboardID")

    if let fontsDisplayWindowController = storyboard.instantiateController(withIdentifier: storyboardID) as? NSWindowController {

        if let fontsDisplayVC = fontsDisplayWindowController.contentViewController as? FontsDisplayViewController {
            fontsDisplayVC.fontFamily = selectedFontFamily
            fontsDisplayVC.fontFamilyMembers = fontFamilyMembers
        }

        fontsDisplayWindowController.showWindow(nil)
    }
}
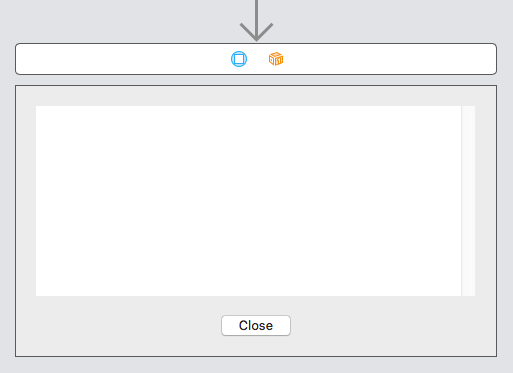
Now you can run the app and click on the “Display All” button. There will be no content yet, however you will have your first HUD panel!
Displaying Fonts
What we are going to achieve in this part is to display all font variations contained in a selected font family one after another in the textview. More precisely, the font PostScript names. Furthermore, each displayed font variation is going to be formatted according to the font it represents.
We will achieve that by creating an attributed string that will contain all PostScript names separated by the newline character “\n”, and by adding new font attributes for each displayed line. At the end, that attributed string will be assigned to the textview.
Let’s get started by creating a new method in the FontsDisplayViewController class. We’ll name it showFonts(), and the first thing we’ll do is to make sure that the font family name exists.
func showFonts() {
    guard let fontFamily = fontFamily else { return }
}
Remember that fontFamily is supposed to get its value when the “Display All” push button is clicked on the main window of the app.
Next, let’s declare the following two variables:
var fontPostscriptNames = ""
var lengths = [Int]()
fontPostscriptNames is the string that will hold all PostScript names that will be displayed on the textview. lengths is an array that will keep the length of each PostScript name. I’ll explain why we need it later.
Now, let’s gather all PostScript names from the font family members and let’s build the display string. At the same time, we’ll be storing each name’s length:
for member in fontFamilyMembers {
    if let postscript = member[0] as? String {
        fontPostscriptNames += "\(postscript)\n"
        lengths.append(postscript.count)
    }
}
Once again, the fontPostscriptNames string is composed by appending each font PostScript name and the newline symbol “\n” to it.
Having the string value we want to display, we are able to create the attributed string that will format later:
let attributedString = NSMutableAttributedString(string: fontPostscriptNames)
Here’s what’s coming next: We will go once again through all font family members, and for each one we will be creating a new font (NSFont) object based on each member’s data.
for (index, member) in fontFamilyMembers.enumerated() {
    if let weight = member[2] as? Int, let traits = member[3] as? UInt {
        if let font = NSFontManager.shared.font(withFamily: fontFamily, traits: NSFontTraitMask(rawValue: traits), weight: weight, size: 19.0) {

        }
    }
}
We will use the font object above to create a new attribute which we will add it to the attributedString we initialized previously.
Now, there is a tricky part coming. Any attribute added to an attributed string must specify the range of text that it will be applied to. That range is a NSRange value, which is composed by two distinct values: location and length. Location indicates the index of the starting character a range starts from, and length shows how many characters the range will spread to.
Given the fact that we want each line of our text to have a different attribute because of the different font, we must calculate the range of the text that each font will be applied to. And here is where the lengths array is becoming handy. Each new range will start where the previous range stopped, and its length will be equal to the respective value in the lengths array. First range will start at zero.
The following code shows how we calculate the starting location for each range and how we create a new range:
var location = 0
if index > 0 {
    for i in 0..<index {
        location += lengths[i] + 1
    }
}

let range = NSMakeRange(location, lengths[index])
In case index is zero, meaning this is the first member in the fontFamilyMembers array, the location is set to zero too (start of text). In every other case, location is the sum of all previous range lengths, including the “\n” symbol which counts as additional character in each line (that’s why “+ 1” is added to each length).
Last line shows how a range is created. NSMakeRange() function accepts two arguments, the location and the length of the range.
Finally, we can create a new attribute for each font now:
attributedString.addAttribute(NSAttributedString.Key.font, value: font, range: range)
All the above will happen for each single item found in the fontFamilyMembers array, or in other words, in the for (index, member) in fontFamilyMembers.enumerated() { ... } loop. There’s one more attribute we have to add to the entire text, and after the end of the loop. That is the text color. By default, black color is the text color of the textview. But since we are using a HUD panel which is already dark, we have to give a light color to the text.
Here is how we do that for the entire text. As you will see, specifying the range in that case is a lot easier than what we previously did:
attributedString.addAttribute(NSAttributedString.Key.foregroundColor, value: NSColor.white, range: NSMakeRange(0, attributedString.string.count))
Finally, the attributed string is ready with all the attributes set. It’s time to assign it to the textview, or more precisely, to the textStorage property of the textview:
fontsTextView.textStorage?.setAttributedString(attributedString)
Here’s the showFonts() method with its code all together:
func showFonts() {
    guard let fontFamily = fontFamily else { return }

    var fontPostscriptNames = ""
    var lengths = [Int]()

    for member in fontFamilyMembers {
        if let postscript = member[0] as? String {
            fontPostscriptNames += "\(postscript)\n"
            lengths.append(postscript.count)
        }
    }

    let attributedString = NSMutableAttributedString(string: fontPostscriptNames)

    for (index, member) in fontFamilyMembers.enumerated() {
        if let weight = member[2] as? Int, let traits = member[3] as? UInt {

            if let font = NSFontManager.shared.font(withFamily: fontFamily, traits: NSFontTraitMask(rawValue: traits), weight: weight, size: 19.0) {

                var location = 0
                if index > 0 {
                    for i in 0..<index {
                        location += lengths[i] + 1
                    }
                }

                let range = NSMakeRange(location, lengths[index])

                attributedString.addAttribute(NSAttributedString.Key.font, value: font, range: range)
            }
        }
    }

    attributedString.addAttribute(NSAttributedString.Key.foregroundColor, value: NSColor.white, range: NSMakeRange(0, attributedString.string.count))

    fontsTextView.textStorage?.setAttributedString(attributedString)
}
Do not forget to call it:
override func viewWillAppear() {
    // ...

    showFonts()
}
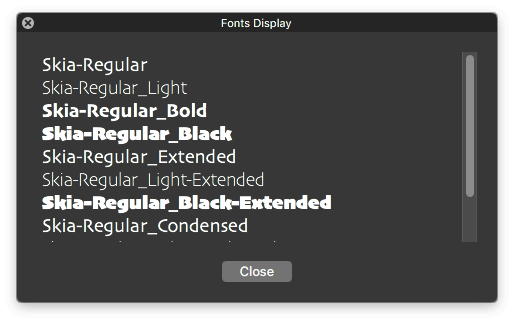
We are done! Run the app now, select any font family and click on the “Display All” button. You will get all available font variations in one place:
Closing The Window
There is one last thing to do, and that is to enable the Close button so it’s possible to close the window when clicking on it. Doing so is extremely easy as you can see right next:
@IBAction func closeWindow(_ sender: Any) {
    view.window?.close()
}
Summary
We came eventually to the end of the tutorial! Through all previous parts it became quite obvious that creating a macOS application involves a lot of steps and details, and this post highlighted the most important ones given our today roadmap. There are definitely more things to explore and discuss, and in future posts we’ll be focusing on more and new stuff about macOS programming.
Here we managed to create a small application with just a few graphical controls on its UI, we implemented code to get the font information we wanted, to make visual updates to controls and to “play” with windows. By going into the making process all these, we had the chance to meet important concepts and to talk about standard techniques and practices. I hope this post will become a guide to your efforts in building your own macOS applications. Don’t forget to visit Apple’s documentation and Human Interface Guidelines if you find yourself stuck, or you just want to make sure that you are playing by the rules. See you soon!
For reference, you can download the full project on GitHub.


