

If I was ever asked what’s one of the most common stuff I do among all projects, then I would have answered that dealing with dates is definitely one of them. Undoubtably, there’s no developer out there who doesn’t really need to “play” with the NSDate class and handle dates in some manner, no matter how much or little the work on dates is. From simply converting a date value into a string up to performing calculations with dates, there’s always one constant fact: Developers have to be acquainted with this side of programming in iOS. It’s not hard to master, and eventually can lead in gaining time in other more important programming tasks. Working with dates might seem like a hassle to new programmers; however that’s not true. All you need is to get the grasp of it.
The most common operation when using date (NSDate) objects in applications, is to convert them into string objects so they can be properly formatted and shown to the users. Quite common is the reverse action as well; converting strings to date objects. However, these are not the only tasks regarding dates. Here’s a sample list of what else can be done when messing with dates:
- Compare dates.
- Calculate dates in the future or in the past, simply by using a reference date (e.g. the current date) and adding or subtracting periods of time (days, months, years, etc).
- Calculate date differences (e.g. find the elapsed time between two specific dates).
- Break a date into its components and access each date part separately (day, month, etc).
All the above, including the conversions to and from strings, are subject for discussion in this tutorial. Through the next parts, you’ll see that is actually easy to do whatever you wish with dates, as long as you know what your tools are and how you should use them.
For your reference, I give you next a list of links with some important documentation. Don’t forget to pay a visit in case you need more information on specific topics:
About the Demo App
Well, in this tutorial we won’t really work with a demo application at all (yes, you’ve read well). Instead of an app, this time we’ll use a Playground for all the examples we’re about to see next. I’ve chosen this way on purpose, as my intention is to provide you with multiple sample code snippets targeting to all the NSDate aspects I want to deal with here.
Even though you can download the provided playground file and open it in Xcode, I strongly suggest you to create a new Playground file and test every new code snippet presented in the following steps. That way it’ll be easier for you to understand how each demonstrated aspect works, and moreover you’ll be able to modify it and see in real time how the results get changed depending on the modifications you perform.
The playground file that I provide you with all the code snippets is named PlayingWithDates. Feel free to use the same, or a different name for your file.
The Basics
Before we start looking at the details of dates and what we can do with them, it’s important to make sure first that some basic concepts are clear to everyone. So, let me start by the simplest thing, the NSDate object. An object like that describes both date and time in programming terms, so it’s not used only when we want to deal with dates, but with time too. The meaning of formatting doesn’t exist when talking about NSDate objects; just think of both date and time as properties, like any other properties in other classes. Talking about formatting is useful only in cases of converting a date object into a string, and we’ll see many details about that in the next parts. Generally, keep always in mind that the NSDate class is what you need, no matter if you’re interested only in date, time, or both.
Another class that we’ll meet a little bit later, is the NSDateComponents class. It would be easy to say that this one could be called the “sister” class of the NSDate, as it provides developers with some extremely useful features and operations. The first important thing about this class is the fact that it can represent each date or time part as a single property, so each of it can be accessed directly and used in other tasks (such as calculations). For example, the day and the month in a NSDateComponents instance are represented by the day and month properties as shown next:
let dateComponents = NSDateComponents()
let day = dateComponents.day
let month = dateComponents.month
It’s as simple as that. Of course, accessing the date parts and populating the date values into a NSDateComponents object requires some conversion mandatorily to be done first, but we’ll discuss about that later.
Besides the above, the NSDateComponents class is also quite useful when it’s necessary to calculate dates either in the future or in the past. All you have to do when you want to find an upcoming or a previous date of a reference date is to add or subtract the proper components, and eventually convert to the new date. Additionally, the NSDateComponents is also suitable for finding date differences. No need to go deeper in any of those two right now, as we’ll see details in a while.
Even though we’re not going to make big use of it, and we’ll just need it to perform conversions from NSDate to NSDateComponents and back, the NSCalendar class is also one more player to the dates game. The features this one supports are not going to be part of the subject in this tutorial. The duty to convert dates from NSDate to NSDateComponents (or the opposite) belongs to the NSCalendar class, as always a specific calendar object is required to be used for conversions. Actually, the system needs to know what calendar to use prior to any conversion, so it’s possible to produce the proper results (don’t forget that there are different calendars all over the world, so the converted days, months, etc values can vary). I’ll let you go and read more about calendars in the documentation link I provided you with in the introduction; all I have to say here is that for convenience we’ll use the currentCalendar() class method of the NSCalendar class that returns the specified by the user calendar in Settings.
Further than all the above, there’s one great tool that we’ll make use of starting from the next part, and that is the NSDateFormatter class. This one makes it possible to convert NSDate objects to String values, and strings to dates. It allows to customize the format of the final date string either by using some predefined date styles, or by manually describing the desired format for high customization. We’ll see several examples about that, and we’ll also see conversions towards both directions. A NSDateFormatter object supports localization as well; all we need is to provide it with a valid NSLocale object, and the final converted object will be represented properly based on the given locale settings.
A similar class is the NSDateComponentsFormatter, and it can be used for one single purpose: To take date and time units as input and produce human-readable, formatted strings of date as an output. It contains various methods for this job, and we’ll see a couple of them at the last part of the tutorial. To be honest, we won’t get into much details of this class; we’ll discuss only about the things we’re about to use in our examples.
So, by having said all the above, we’re ready to go straight to the action where you’ll see how everything mentioned here plays its role. Once again, I recommend you to create a new playground file and try out every single example I present. There’s no better way to learn something other than trying it out.
Converting Between NSDate and String
We’ll start working with the NSDate class by getting the current date and assigning it to a constant for easy access. Getting the current date doesn’t require to call any special method like now() or today(), like some others languages require. All you need is to initialize a NSDate object:
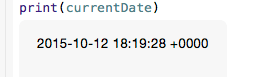
let currentDate = NSDate()
Here’s what you’ll get by writing the above in the Xcode playground:
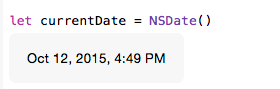
Note that we’re going to use the above value many times in the next code snippets. Now, let’s initialize a NSDateFormatter object. This is going to be our tool to make conversions from dates to strings and back. Here it is:
let dateFormatter = NSDateFormatter()
The dateFormatter is going to use the locale settings of the device by default, unless another locale explicitly set. Even though it’s not required to set the current locale manually, here’s how you can do it in case you need so:
dateFormatter.locale = NSLocale.currentLocale()
Setting a different locale it’s easy: You just need to know and specify the locale identifier of the matching locale:
dateFormatter.locale = NSLocale(localeIdentifier: "el_GR")
dateFormatter.locale = NSLocale(localeIdentifier: "fr_FR")
Those two lines demonstrate how to set a different locale to the date formatter (here Greek and French). Of course, setting subsequent locale values it’s pointless, as the last one will eventually apply. Are you wondering how the locale affects the conversion? You’ll find this out in a while.
Formatting the output using the date formatter styles
Before you convert a date object (NSDate) into a string, you need to “tell” the date formatter how you desire the output string to be formatted. There are two ways to do that. The first is to use some predefined values known as date formatter styles, and the second is to manually set the final formatting by using some certain specifiers.
We’ll begin here with the first case, and we’ll meet the NSDateFormatterStyle enum. Each single value of it represents a different type of formatting, and as they’re not too many, we’re going to see them all one by one right now. The first supported style is the FullStyle, and its results are shown in the following image.
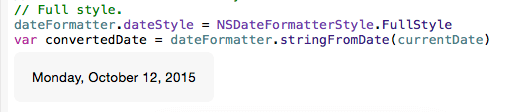
Here’s the above code in text as well, so you can copy it if you wish so:
dateFormatter.dateStyle = NSDateFormatterStyle.FullStyle
var convertedDate = dateFormatter.stringFromDate(currentDate)
Besides the date style, equally important in the above two lines is the stringFromDate: method that performs the actual conversion. When talking for conversion, we actually mean that method. All the rest are just steps for customizing the results. If you plan to make date conversions in your projects, then this one will definitely become quite handy to you.
Now, let’s see the next style, which is the Long Style:
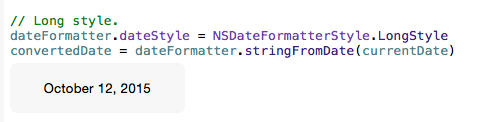
And the code in text:
dateFormatter.dateStyle = NSDateFormatterStyle.LongStyle
convertedDate = dateFormatter.stringFromDate(currentDate)
As you see in this type of style the day name is missing (comparing to the full style). The next is the Medium Style:
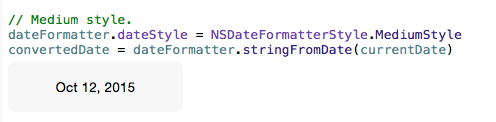
dateFormatter.dateStyle = NSDateFormatterStyle.MediumStyle
convertedDate = dateFormatter.stringFromDate(currentDate)
And finally there’s the Short Style:
dateFormatter.dateStyle = NSDateFormatterStyle.ShortStyle
convertedDate = dateFormatter.stringFromDate(currentDate)
Now that you know what the available date formatter styles are, you can use them in your projects according to your needs. Each style produce a different result, and it’s quite possible that one of them will fit to you.
A little bit earlier I mentioned how the locale of the date formatter can be changed to a different, non-default value. Now that we’ve seen how conversions can be performed using the date formatter styles, let’s also see how different locale values affect the final string output of the original date. I’m going to use the Full style and the two locale identifiers (Greek and French) mentioned earlier for the sake of this example:
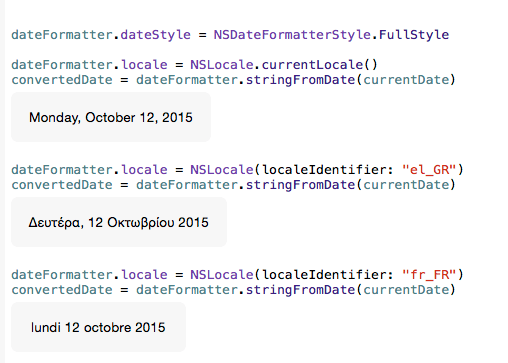
I think that now it’s pretty clear what the locale can do, so use it wisely.
Using date format specifiers
The date formatter styles presented right above are good enough for many cases, however they cannot be modified so we can achieve a different output. In such cases we have a different option available at our disposal, and that is the ability to set a custom date format that properly describes the desired format to the date formatter object. Setting a custom date format is mostly useful in two cases: When the date formatter styles are not suitable for the desired output (apparently), but also when you need to convert a complex date string (e.g. “Thu, 08 Oct 2015 09:22:33 GMT”) into a date object.
In order to set a date format properly, a combination of specifiers must be used. Specifiers is nothing more than simple characters that have a special meaning to the date formatter object. Before I give you specific examples, let me list first some of the format specifiers that we’ll meet in the following code snippets:
- EEEE: The full name of the day (e.g. Monday). Use 1-3 letters for the abbreviated representation of the day name.
- MMMM: The full name of the month (e.g. October). Use 1-3 letters for the abbreviated representation of the month name.
- dd: The day number in the month (e.g. 09 or 15).
- yyyy: The year with four digits (e.g. 2015)
- HH: The hour representation with two digits (e.g. 08 or 19).
- mm: The minutes representation with two digits (e.g. 05 or 54).
- ss: The seconds representation with two digits.
- zzz: The timezone presented with three letters (e.g. GMT)
- GGG: BC or AD.
For full reference on the date format specifiers, I’m prompting you to visit the official technical specification, where you can find variations on the specifiers given above, as well as other not mentioned here.
Let’s continue now with our examples and let’s see how the format specifiers are actually used. This time, let’s convert the current date into a string and let’s get the full day and month name, the day number and the year:
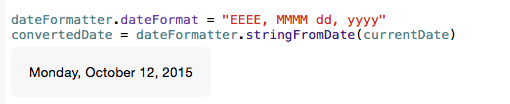
dateFormatter.dateFormat = "EEEE, MMMM dd, yyyy"
convertedDate = dateFormatter.stringFromDate(currentDate)
I think there’s nothing further to comment on how to use the custom date formatting, as you can clearly see that it’s a really straightforward technique. Let’s have one more example, and let’s convert the time:
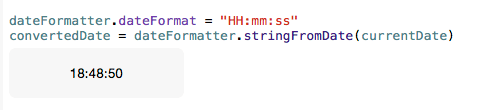
dateFormatter.dateFormat = "HH:mm:ss"
convertedDate = dateFormatter.stringFromDate(currentDate)
All the conversions we’ve seen so far regard NSDate objects that turn into a formatted string value. The opposite task is also interesting, where everything said before about the date formatter styles and the format specifiers apply here too. The key when converting formatted strings into NSDate objects is to properly set the value of the dateFormat property of the date formatter, and to use the dateFromString: method that will do the job. Let’s see a couple of examples on that:
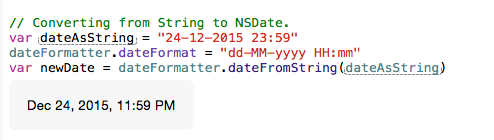
var dateAsString = "24-12-2015 23:59"
dateFormatter.dateFormat = "dd-MM-yyyy HH:mm"
var newDate = dateFormatter.dateFromString(dateAsString)
Let’s see a more complex string now, where the timezone is also included:
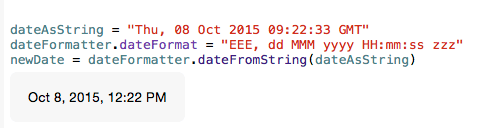
dateAsString = "Thu, 08 Oct 2015 09:22:33 GMT"
dateFormatter.dateFormat = "EEE, dd MMM yyyy HH:mm:ss zzz"
newDate = dateFormatter.dateFromString(dateAsString)
Note how the time value (09:22) gets changed simply by using a timezone in the date string (becomes 12:22). There’s no actual change here, it’s just how the time in my timezone (EET) is represented in GMT timezone. Later we’ll see a few more samples that use different timezones, but feel free to explore more on your own based on the previous snippet.
At this point you’ve met pretty much all you need in order to perform conversions between dates and strings. You can try to write your own code to test what you’ve seen here and get a deeper taste on how everything works.
Working With NSDateComponents
Many times you’ll need in your projects to break a date into its parts, and fetch specific values out of it. For example, you might have to get the day and the month values from a date, or the hour and minutes from the time. In this case the tool you should use is the NSDateComponents class.
The NSDateComponents class is usually used in combination with the NSCalendar class. To be more specific, NSCalendar methods perform the actual conversion from NSDate to NSDateComponents objects, and as we’ll see later, convert date components into date objects. With that in mind, the first thing we’ll do in this part is to get the current calendar and assign it to a constant for easy access:
let calendar = NSCalendar.currentCalendar()
Now, let’s see a typical example of how a NSDate object can be converted into a NSDateComponents object, and then I’ll make some comments about it:
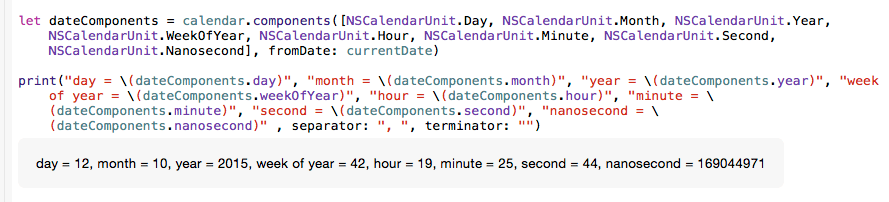
let dateComponents = calendar.components([NSCalendarUnit.Day, NSCalendarUnit.Month, NSCalendarUnit.Year, NSCalendarUnit.WeekOfYear, NSCalendarUnit.Hour, NSCalendarUnit.Minute, NSCalendarUnit.Second, NSCalendarUnit.Nanosecond], fromDate: currentDate)

print("day = \(dateComponents.day)", "month = \(dateComponents.month)", "year = \(dateComponents.year)", "week of year = \(dateComponents.weekOfYear)", "hour = \(dateComponents.hour)", "minute = \(dateComponents.minute)", "second = \(dateComponents.second)", "nanosecond = \(dateComponents.nanosecond)" , separator: ", ", terminator: "")
The method used in the first line above, is the components(_:fromDate:) of the NSCalendar class. This method accepts two parameters: The second is the source date that we want to get the components from. The first parameter however is the interesting one; the method expects as a first parameter an array of NSCalendarUnit properties that describe the components we want to extract from the date.
The NSCalendarUnit is a struct, and you can see all the available properties here. In the above example, and as you can find out in the screenshot that precedes the code segment, the calendar unit values specified above return the following date components:
- Day
- Month
- Year
- Week of year
- Hour
- Minute
- Second
- Nanosecond
Note that calendar units that are not specified in the first parameter array are not available for use after the method call. For example, as we don’t include the NSCalendarUnit.TimeZone unit in the above list, we cannot access the timezone as we do with the rest of the fetched components (e.g. print(dateComponents.timezone)). A runtime error will be caused. In case you need additional components, you must call the method once again specifying the calendar units you additionally want.
Going from date components to date objects is easy too. This time no use of the calendar units is involved in the process. All it is needed is to initialize a new NSDateComponents object, then to explicitly specify all the required components (required by your app of course), and then call the dateFromComponents: method of the NSCalendar class to make the conversion. Let’s see that:
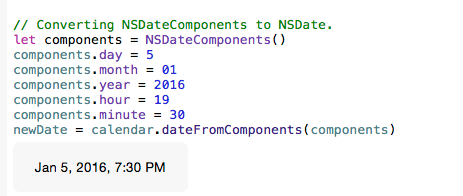
let components = NSDateComponents()
components.day = 5
components.month = 01
components.year = 2016
components.hour = 19
components.minute = 30
newDate = calendar.dateFromComponents(components)
In the previous part we saw an example of using the timezone while we were converting a formatted string into a date object. If you’re curious enough to see the results of setting different timezones to a date, let’s extend a bit the above snippet given right above and let’s set multiple values for the timezone:
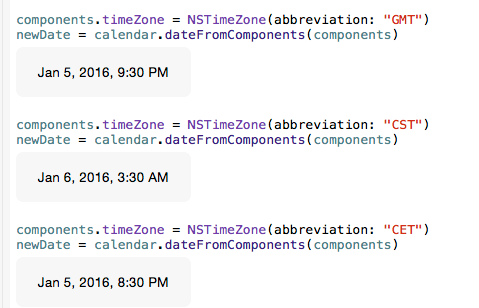
components.timeZone = NSTimeZone(abbreviation: "GMT")
newDate = calendar.dateFromComponents(components)

components.timeZone = NSTimeZone(abbreviation: "CST")
newDate = calendar.dateFromComponents(components)

components.timeZone = NSTimeZone(abbreviation: "CET")
newDate = calendar.dateFromComponents(components)
GMT = Greenwich Mean Time
CST = China Standard Time
CET = Central European Time
You can find a list with all the timezone abbreviations and some cool online tools here.
Now you know how to deal with NSDateComponents objects too, so let’s move ahead to other interesting stuff.
Comparing Date and Time
Another common scenario when dealing with dates is the necessity to compare two date objects, and decide what’s the earlier or later date, or even if two dates are the same. Generally, I’m going to provide you with three different ways to compare date objects, without telling you what’s the best or the worst option. That clearly depends on what you want to do in your app, and as each method is slightly different from the others, it’s up to you to pick what serves you the most.
Before I start presenting the comparing methods, we’ll create two custom date objects for the sake of the examples in this part. Initially, we’ll set the date format (dateFormat property of the date formatter), and we will convert two formatted strings into date objects:
dateFormatter.dateFormat = "MMM dd, yyyy zzz"
dateAsString = "Oct 08, 2015 GMT"
var date1 = dateFormatter.dateFromString(dateAsString)!

dateAsString = "Oct 10, 2015 GMT"
var date2 = dateFormatter.dateFromString(dateAsString)!
Let’s see now the first method for comparing dates. In case you want to determine the earlier or the later between two dates, then the NSDate class can help you a lot towards this effort as it provides two methods named earlierDate: and laterDate: respectively. The syntax when using any of those methods is simple:
date1.earlierDate(date2)
And here’s how it works:
- If the date1 object is earlier than date2, then the above method will return the value of the date1.
- If the date2 object is earlier than date1, then the value of the date2 will be returned.
- If the dates are equal, then the date1 is returned again.
All the above apply for the laterDate: as well.
Let’s turn to our example now, and let’s use the date objects we created previously. The following two commands display the earlier and the later date, as both of the methods I just mentioned are used:
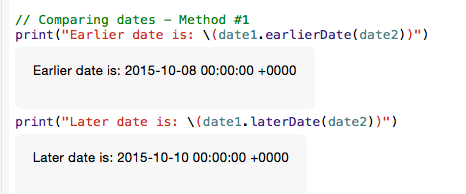
// Comparing dates - Method #1
print("Earlier date is: \(date1.earlierDate(date2))")
print("Later date is: \(date1.laterDate(date2))")
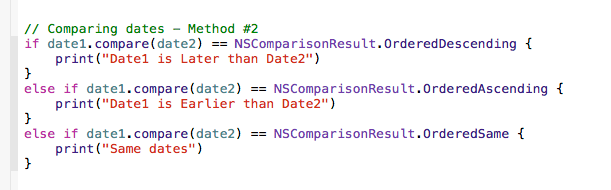
The second method of comparing two NSDate objects involves the use of the compare: method of the NSDate class and the NSComparisonResult enum. You’ll understand what I mean with the following example, but before that, let me say that the syntax of the method is similar to what I showed above. The result of the comparison is checked against all possible values, and that way it’s easy to determine if two dates are equal or not, and to find the earlier or later date. Needless to say more, the next code segment speaks of itself:
Here’s the result displayed in the playground:
And the code so you can copy it:
// Comparing dates - Method #2
if date1.compare(date2) == NSComparisonResult.OrderedDescending {
    print("Date1 is Later than Date2")
}
else if date1.compare(date2) == NSComparisonResult.OrderedAscending {
    print("Date1 is Earlier than Date2")
}
else if date1.compare(date2) == NSComparisonResult.OrderedSame {
    print("Same dates")
}
The third way to compare two date objects is somehow different, as it involves the use of time intervals. Actually, it’s a really simple method, as all it takes is to get the time interval since each date (time interval between now and each date), and then perform simple comparisons:

// Comparing dates - Method #3
if date1.timeIntervalSinceReferenceDate > date2.timeIntervalSinceReferenceDate {
    print("Date1 is Later than Date2")
}
else if date1.timeIntervalSinceReferenceDate <  date2.timeIntervalSinceReferenceDate {
    print("Date1 is Earlier than Date2")
}
else {
    print("Same dates")
}
What you've seen above can be applied in time too. Right next I give you one last example, but this time the date1 and date2 objects contain time representations. Once again I make use of the earlierDate: method, but in addition to that I present you one more, the idEqualToDate:, which is too obvious what is for:
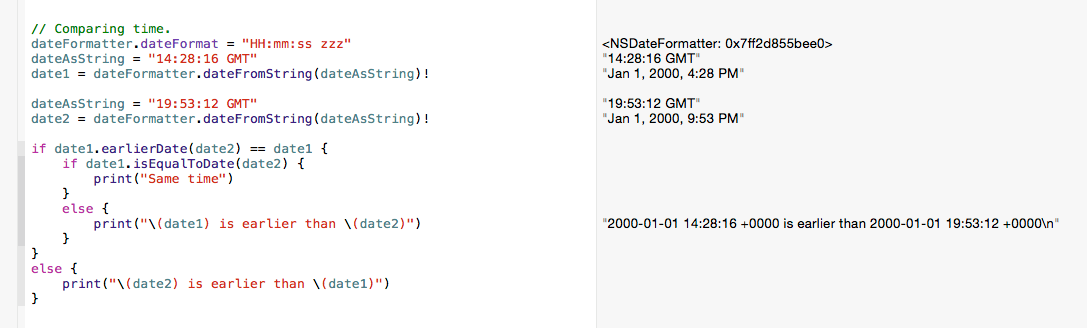
// Comparing time.
dateFormatter.dateFormat = "HH:mm:ss zzz"
dateAsString = "14:28:16 GMT"
date1 = dateFormatter.dateFromString(dateAsString)!

dateAsString = "19:53:12 GMT"
date2 = dateFormatter.dateFromString(dateAsString)!

if date1.earlierDate(date2) == date1 {
    if date1.isEqualToDate(date2) {
        print("Same time")
    }
    else {
        print("\(date1) is earlier than \(date2)")
    }
}
else {
    print("\(date2) is earlier than \(date1)")
}
If by looking at the "2000-01-01" date in the above results you become curious or suspicious, then don't worry. The NSDate adds this by default when no specific date is given for conversion, and it doesn't interfere by any means to the rest of the date parts (in this case the time).
So, at this point you know how to compare dates too!
Calculating Future and Past Dates
An interesting aspect when working with dates is to calculate a date either in the future or in the past. Things we've already seen will become handy here again, such as the NSCalendarUnit struct, or the NSDateComponents class. Actually, I'm going to show you two different methods to calculate other dates, where the first makes use the NSCalendar class and the NSCalendarUnit struct, and the second makes use of the NSDateComponents class. At the end I'll provide you with a third, alternative way, but generally it's not recommended (I'll say why when we'll be there).
At first let's remember again what's current date (during the time of the writing of this tutorial), as it will be used as our reference date:
Now, let's suppose that we want to add to the current date 2 months and 5 days. Actually, we'd better write that in code:
let monthsToAdd = 2
let daysToAdd = 5
Now we're ready to see the first method that will let us find the desired new date. Let me give you the code first, and then I'll explain more:
var calculatedDate = NSCalendar.currentCalendar().dateByAddingUnit(NSCalendarUnit.Month, value: monthsToAdd, toDate: currentDate, options: NSCalendarOptions.init(rawValue: 0))
calculatedDate = NSCalendar.currentCalendar().dateByAddingUnit(NSCalendarUnit.Day, value: daysToAdd, toDate: calculatedDate!, options: NSCalendarOptions.init(rawValue: 0))
As you see, the method used here is the dateByAddingUnit:value:toDate:options: of the NSCalendar class. It's job is to add a specific calendar unit (the one specified in the first parameter) to an existing date, and to return a new date that is the outcome of that addition. In our case we want to add two different calendar units to the current date, but obviously that's not possible to happen. So, the key here is to make subsequent calls to that method, and set each time another calendar unit so we eventually get the final result.
Here's what the playground displays next to each addition:

The above way is good, but only if you have 1-2 calendar units to add, otherwise you'll have to make enough calls to the above method.
The second and more preferable way when having more units to add, is to put in action the NSDateComponents class once again. For the sake of the example, we won't use more units than the months and days specified above. What we will do here is simple: At first we'll initialize a new NSDateComponents object, and we'll set the given month and day value. Then, we'll call another method of the NSCalendar class named dateByAddingComponents:toDate:options: and instantly we'll get a new NSDate object that represents the desired final date.
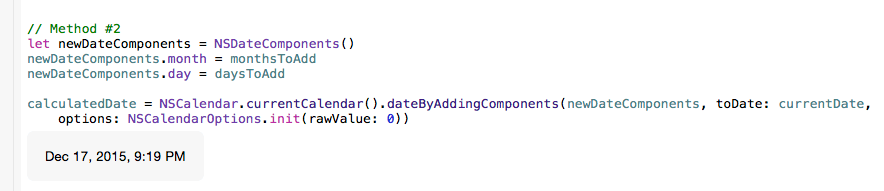
let newDateComponents = NSDateComponents()
newDateComponents.month = monthsToAdd
newDateComponents.day = daysToAdd

calculatedDate = NSCalendar.currentCalendar().dateByAddingComponents(newDateComponents, toDate: currentDate, options: NSCalendarOptions.init(rawValue: 0))
Notice that in both of the newly introduced methods in the two code snippets above I don't set any options at all in the last parameter. However, if you want to see more about the options you can specify, just visit the official documentation of the NSCalendar class.
The third way to calculate another date that is not generally recommended for big periods of time, because it can produce wrong results because of leap seconds, leap years, daylight saving time, and so on. The idea here is to add a specific time interval to the current date. For this purpose, we'll use the dateByAddingTimeInterval: of the NSDate class. In the following example, we calculate a time interval matching to 1.5 hours and we add it to the current date:
let hoursToAddInSeconds: NSTimeInterval = 90 * 60
calculatedDate = currentDate.dateByAddingTimeInterval(hoursToAddInSeconds)
Once again, the first two methods are more secure so as to make any kind of date calculations. However, it's up to you to select the method you prefer.
All the above three examples were adding units in the current date. How about to subtract now a number of days from the current date and calculate that way a date in the past?
The following example does that exactly. At first, a negative amount of days is added to the current date, so it's possible to result in a past date. Then the outcome is converted to a string with the proper formatting and the final result is quite... interesting:

let numberOfDays = -5684718
calculatedDate = NSCalendar.currentCalendar().dateByAddingUnit(NSCalendarUnit.Day, value: numberOfDays, toDate: currentDate, options: NSCalendarOptions.init(rawValue: 0))

dateFormatter.dateFormat = "EEEE, MMM dd, yyyy GGG"
dateAsString = dateFormatter.stringFromDate(calculatedDate!)
All the small code snippets and examples above are good enough to show you the way to calculate new dates by adding positive or negative calendar unit values to a reference date. Feel free to extend the above code fragments and write your own calculations, so you familiarize yourself even more with the above techniques.
Calculating Date Difference
As the title suggests, calculating the difference between two dates is another task that you might have to perform at some point in your programming career, and certainly more than once. In this (last) part of the tutorial, I'm going to give you three ways to calculate the difference of two NSDate objects, and you'll pick the most suitable to you depending on your needs.
First things first, and before we start let's define two custom NSDate objects:
dateFormatter.dateFormat = "yyyy-MM-dd HH:mm:ss"
dateAsString = "2015-10-08 14:25:37"
date1 = dateFormatter.dateFromString(dateAsString)!

dateAsString = "2018-03-05 08:14:19"
date2 = dateFormatter.dateFromString(dateAsString)!
With the above date objects ready, let's see how we can get the date difference as date components. Once again, we'll use the NSCalendar class and one of its methods that we haven't seen yet. At the end, we'll print the components so we see the results. Apparently, it's easy to do whatever you want or need once you have available at your disposal the date components that represent the date difference. Let's see how all this works:
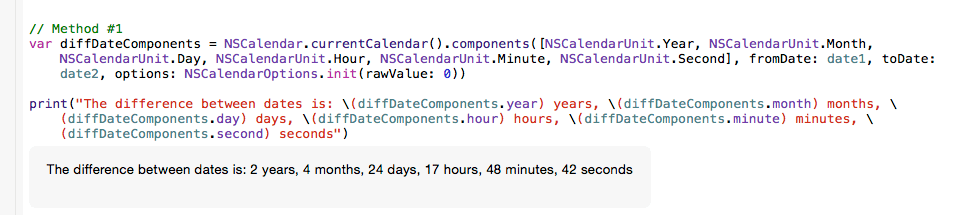
var diffDateComponents = NSCalendar.currentCalendar().components([NSCalendarUnit.Year, NSCalendarUnit.Month, NSCalendarUnit.Day, NSCalendarUnit.Hour, NSCalendarUnit.Minute, NSCalendarUnit.Second], fromDate: date1, toDate: date2, options: NSCalendarOptions.init(rawValue: 0))

print("The difference between dates is: \(diffDateComponents.year) years, \(diffDateComponents.month) months, \(diffDateComponents.day) days, \(diffDateComponents.hour) hours, \(diffDateComponents.minute) minutes, \(diffDateComponents.second) seconds")
The new method presented here is the components:fromDate:toDate:options:, and once again the first parameter is an array of NSCalendarUnit values. Note that in case the first date is later than the second date, then the values are returned as negative numbers.
For the other two methods that calculate the date difference, we're going to use for first time the NSDateComponentsFormatter class, which offers various methods that automatically perform the calculation and return a formatted string. At first, let's initialize a respective object, and let's specify just one of its properties for now:
let dateComponentsFormatter = NSDateComponentsFormatter()
dateComponentsFormatter.unitsStyle = NSDateComponentsFormatterUnitsStyle.Full
The unitsStyle property dictates the dateComponentsFormatter how the final string that describes the date difference should be formatted, and more specifically, what should be the style of the displayed date units. For example, by using the Full style, the day name, the month name, etc., will be displayed as normal, full-length words. If however we would have used the Abbreviated style, then an abbreviation of those names would appear. You can find a full list regarding the units style here.
Back to the date difference, this time we're going to calculate the time interval between the two dates first. Then, this interval will be passed as a parameter to the stringFromTimeInterval: method of the NSDateComponentFormatter class, and a formatted string will be printed with the desired difference:
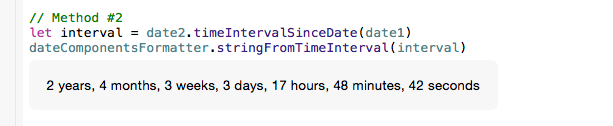
let interval = date2.timeIntervalSinceDate(date1)
dateComponentsFormatter.stringFromTimeInterval(interval)
Finally, in the last way that I'm presenting you for calculating date difference, both dates must be provided as parameters to a method called stringFromDate:toDate: of the NSDateComponentsFormatter class. However, there's a requirement needed to be fulfilled before using that method: At least one calendar unit must be set in a property named allowedUnits, otherwise the method will return a nil value. So, let's "tell" it what units we desire to have, and then let it give us the difference:

dateComponentsFormatter.allowedUnits = [NSCalendarUnit.Year, NSCalendarUnit.Month, NSCalendarUnit.Day, NSCalendarUnit.Hour, NSCalendarUnit.Minute, NSCalendarUnit.Second]
let autoFormattedDifference = dateComponentsFormatter.stringFromDate(date1, toDate: date2)
Summary
As I said in the introduction, working with NSDate objects in your projects is something quite common, and definitely it cannot be avoided. Undeniably, it's not one of the most favorite topics of the programmers, therefore I tried in the previous parts and through small examples to show to you that is actually easy to deal with dates. All the aspects of the NSDate and the other related classes presented in this tutorial had one common goal: To give you small and fast techniques that will get your job done in just two or three lines of code. I'd like to hope that this content will work as a guide for you, especially if you're a new developer. Until next time, keep... "dating"!


