

In programming, what differentiates a good developer from a great developer is the way each one takes advantage of the programming tools he or she offered by the used language. Objective-C, the official language for developing applications for iPhone, iPad and Mac OS, is a multi-featured one, and as a relative to C, very powerful. New developers have a lot to explore when starting working with it, while advanced programmers have always something new to learn, as there are numerous supported programming aspects. One of them, is the capability to write code using Blocks.
Blocks do not consist of a new programming discovery in Objective-C. They exist in other programming languages too (such as Javascript) with other names, such as Closures. In iOS, they first-appeared in version 4.0, and since then they’ve known great acceptance and usage. In subsequent iOS versions, Apple re-wrote or updated many framework methods so they adopt blocks, and it seems that blocks are going to be partly the future of the way code is written. But what are they all about really?
Well, a block is a self-contained, autonomous code fragment, existing always into the scope of another programming structure, as for example the body of a method. The code on the block can “interact” with the world out of it, but what takes place in the block is not visible to the scope out of it. Also, blocks can modify the values of variables being out of its body using a special way (we’ll see more later). Blocks have two great features:
- They can be executed in a later time, and not when the code of the scope they have been implemented is being executed.
- Their usage leads eventually to a much cleaner and tidier code writing, as they can be used instead of delegate methods, written just in one place and not spread to many files.
Focusing even more on the second feature, blocks offer a nice solution for creating callbacks instead of delegates, as they are declared and implemented directly to the point of the code where they are invoked. Using blocks, there is no need to adopt protocols, or implementing delegate methods that lead to much more code in a class. The best thing though, is that the callback procedure can directly access and use any variables existing locally in the scope where the block has been defined, so the need of passing data like we do in callback methods is eliminated. However, blocks cannot totally replace delegates as they cannot be used for every purpose. The best practice is to make combination of both, and that can be achieved both by following some simple rules and using the experience obtained in time.
Blocks are objects, so they can be stored to NSArray or NSDictionary data structures, as well as to be returned from methods, even to be assigned to variables.
Two facts are sure for every developer, even if someone has no idea about blocks. First off, it’s certain that every one has used blocks, even without knowing it. That’s because Apple has adopted blocks especially as completion handlers to many important, commonly used methods. Secondarily, thankfully or not, you don’t need to have deep knowledge on block programming in order to use them, just to understand how they work.
Blocks have just one weird characteristic, and that’s the way they are written. If you are new to all these, don’t worry, as after a couple of days of using and writing blocks, you will get used to it like everything else in Objective-C.
In this tutorial I’m aiming at two goals: To clarify all these things I just presented using code, and, above all to show you how blocks can be used in practice, by demonstrating practical examples, so they can make your programming life easier. If you don’t do any block programming yet, I wish after having finished this tutorial to start doing so.
So, keep reading in order to discover some cool and interesting stuff!
App Overview
I could say that the demo application we’ll create for the purposes of this tutorial is composed by multiple parts that are independent on each other. Actually, we could implement a command-line application, but as I am going to present some UI-related content, we’ll make a really simple application. First of all, we are going to create some code that will display messages only on the debugger, without build any special UI for it. That’s because we’ll focus on making our debut in writing blocks, and that part will consist of multiple, small examples, for which we care about only for the returned results. However, we’ll do some interface building as well, as we are going to perform some view-related tasks and we want our application to provide UI interaction. The most important is that each part of our app will focus on another way of using blocks, so useful techniques to be demonstrated in practice.
Creating the Demo App
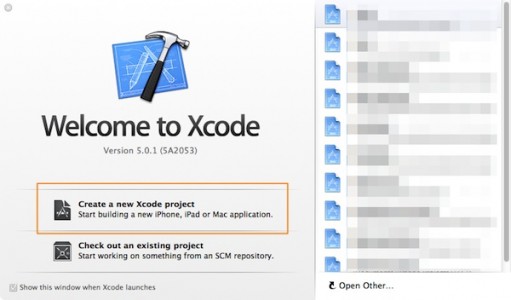
Before we make any discussion and see any single line of code, it’s necessary to have a project ready to be waiting for us. Therefore, let’s create one. Launch Xcode, and select to create a new project on the Welcome window:
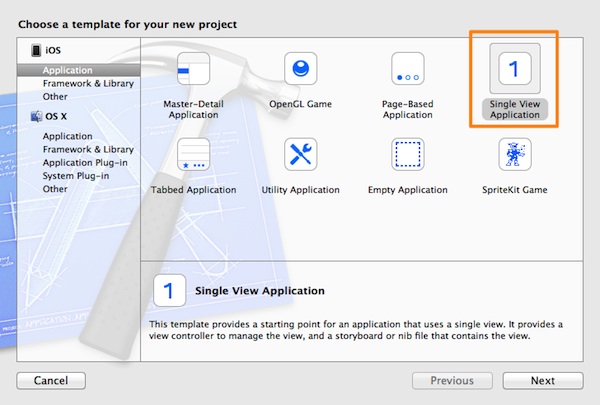
In the first step of the guide, select the Single View Application in the Application category, under the iOS section.
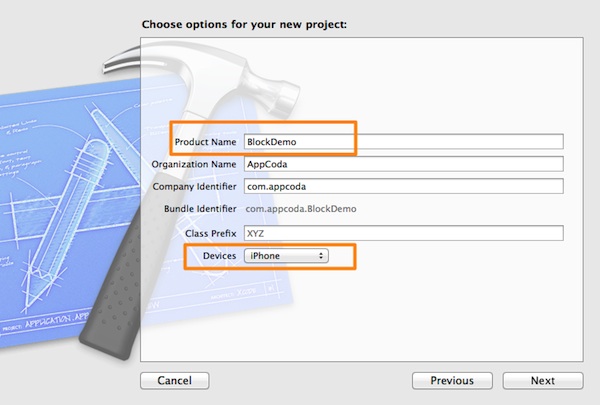
Click Next to proceed and set a name to the project. I named it BlockDemo, but you’re free to name it however you like. Also, make sure that in the Devices drop down menu, the iPhone value is selected.
Click again on the Next button and select a destination directory for your project. Once you do that, click on the Create button and we are ready.
Basic Block-ing
Before we dive in blocks, I should tell that you can write all code presented in this section inside the viewDidLoad method on the ViewController.m file, in case you want to try it out on your own. So, let’s start.
A block declaration follows the next syntax pattern:
ReturnType (^blockName)(Parameters)
This is quite similar to a C function declaration, with one great exception: The caret (^) symbol, which indicates that the declared object is a block. Let’s see everything one by one:
- ReturnType: Any data type Objective-C supports, or void if the block returns nothing.
- ^blockName: Always remember that the block name is preceded by the ^ symbol. The block name can be any string you like, just like you name any other variable or method. Remember that both the ^ and the block name are enclosed in parentheses ().
- Parameters: The list of parameters you want to pass on the block, just like you do when declaring methods. However, keep in mind an important notice: When you pass no parameters to block, then the void keyword should be always set. The arguments list must also be enclosed in parentheses.
And that’s all about declaring blocks. Here are some examples:
int (^firstBlock)(NSString *param1, int param2);

void (^showName)(NSString *myName);

NSDate *(^whatDayIsIt)(void);

void (^allVoid)(void);

NSString *(^composeName)(NSString *firstName, NSString *lastName);
The use of the ^ symbol and all those parentheses may seem confusing at the beginning, but don’t worry. You just have to get used to it and do never forget the ^ symbol.
A special characteristic that the block declaration has, is that the parameter names can be omitted, and just keep the parameter types. Actually, adding parameter names to the declaration only helps developers to remember them, but it offers nothing to the compiler. So, all the above declarations could be re-written without the parameter names this time:
int (^firstBlock)(NSString *, int);

void (^showName)(NSString *);

NSDate *(^whatDayIsIt)(void);

void (^allVoid)(void);

NSString *(^composeName)(NSString *, NSString *);
Using or not parameter names is totally up to you. It’s not wrong to use them, nor to omit them as well. Usually, advanced developers familiarized with blocks do not write parameter names, just their types, but for beginners I think that helps a lot to have the parameter names written.
Let’s focus now on the block definition. Here is the pattern been followed:
^(Parameters){

... block body ...

return ReturnValue (or nothing if the block return type is void)
};
As you see, no block name exists here. In block definition, parameter names are mandatory, unlike the block declaration where they are optional. Especially note that after the block body closing, the semicolon ; is added, as the whole block is considered as a variable. Don’t worry if you ever forget it; Compiler is there to remind it to you.
Here is a really simple example:
    ^(int a, int b){
        int result = a * b;
        return result;
    };
Of course, you are never going to use a block simply like this. The most possible cases is that the block definition result will be assigned to a variable, or that you’ll define the block using it as a completion handler, upon a method call (later on this).
Let’s see now a couple of examples on how you can assign block results to a block variable:
int (^howMany)(int, int) = ^(int a, int b){
    return a + b;
};
In this example, the parameter names have been omitted in the declaration, but they mandatorily exist on the definition. Once again, I underline the usage of the ^ symbol, and the ; at the closing of the block body.
One more:
void (^justAMessage)(NSString *) = ^(NSString *message){
   NSLog(@"%@", message);
};
As you see, the return type of the block is void, so there is no return command.
Let me clarify that it’s not necessary the declaration and the definition to take place at the same time. For example:
    // Declare a block variable.
    void (^xyz)(void);

    // Some other code...

    // Define the block.
    xyz = ^(void){
        NSLog(@"What's up, Doc?");
    };
Even more, a block can be declared as a class member variable, just like any other member variables. For example, in the private section of the interface you can write this…
@interface ViewController ()
@property (nonatomic, strong) NSString *(^blockAsAMemberVar)(void);
@end
… and then inside the viewDidLoad add this:
    _blockAsAMemberVar = ^(void){
        return @"This block is declared as a member variable!";
    };
Not that hard, right? Just have in mind to always make sure that you write the parameters at block declaration in the same order and using the same type to the block definition.
Let’s make a synopsis at this point. Up to now, we saw how we declare and how we define a block, and a couple of rules that apply in each case. However, what we have not seen yet, is how we call blocks, as just simply declaring and defining them has no meaning at all.
A block variable is called just like a C function, using its name and providing any required arguments. Here is an example that clears it:
    int (^howMany)(int, int) = ^(int a, int b){
        return a + b;
    };

    NSLog(@"%d", howmany(5, 10));

    // Output: 15
Let’s see one more example:
   NSDate *(^today)(void);

    today = ^(void){
        return [NSDate date];
    };

    NSLog(@"%@", today());

    // Outputs the today's date.
I hope this one won’t confuse you:
    float results = ^(float value1, float value2, float value3){
        return value1 * value2 * value3;
    } (1.2, 3.4, 5.6);

    NSLog(@"%f", results);

    // Output: 22.848001
This is a more direct approach, as using the same command we define the block, we pass the parameter values and we assign the results to a variable.
One last example, using a variable existing out of the block definition:
    int factor = 5;
    int (^newResult)(void) = ^(void){
        return factor * 10;
    };

    NSLog(@"%d", newResult());

    // Output: 50
At this point you are considered to have taken the basic understanding and have set the ground for writing and using blocks. It’s time to move a little bit further and see some more advanced things, that surely you’ll need along your programming way.
The __block Storage Type
The code existing in a block can access a variable that belongs to the scope of the method that the block is defined in, but by default this access is read-only. That means that the code of the block cannot change a variable’s value from the “outer world”, a fact that’s useful for protecting us by doing any unwanted modifications, however the ability to assign new values in such variables is many times necessary.
Before we see how this can be overcomed and because I’d like to keep things simple and tidy, let’s go to create a new private method that we will use for demonstrating this functionality. So, first of all, let’s do the easy steps, therefore move to the private section of the interface and add the next method declaration:
@interface ViewController ()
...
-(void)testBlockStorageType;
@end
Next, inside the viewDidLoad method, invoke it:
- (void)viewDidLoad
{
    [super viewDidLoad];
    ...
    [self testBlockStorageType];
}
We can now focus on the implementation. For starters, implement it by adding the code shown in the next fragment:
-(void)testBlockStorageType{
    int someValue = 10;

    int (^myOperation)(void) = ^(void){
        someValue += 5;

        return someValue + 10;
    };

    NSLog(@"%d", myOperation());
}
In this snippet, we have the someValue variable that belongs to the method, and inside the myOperation block we try to change its value. You’ll notice that Xcode throws an error, highlighting the next line…
someValue += 5;
… inside the block and showing the message: “Variable is not assignable“, along with some extra info. Not even Xcode allows us to proceed until we manage this situation.
Thankfully, Objective-C provides a special storage type modifier, named __block, which when is used in a variable declaration, it makes this variable mutable so blocks can have write access to it. In our example, our problem can be solved really easy, simply by making this line:
int someValue = 10;
like this:
__block int someValue = 10;
The Xcode error gets disappeared and if you test it, you’ll see on the debugger the expected result (which is 25).
Through this really simple example, the use of __block specifier becomes as much clear as it can get. As a final note, when you use it, don’t forget when to type two underscore (_) symbols before the block keyword.
Blocks As Completion Handlers
Many developers when they think of blocks, they actually (and instantly) think of completion handlers and they have a good reason for that, as blocks are used as completion handlers extensively by many framework methods. It’s granted that all iOS developers, even rookies, have seen and probably worked with completion handlers. But, before we go any further, what a completion handler is?
A completion handler is the way (technique) for implementing callback functionality using blocks. In the introduction of this tutorial I mentioned that blocks can be used in place of delegate methods that work as callbacks, and that’s the way this can be done; through completion handlers.
A completion handler is nothing more than a simple block declaration passed as a parameter to a method that needs to make a callback at a later time. When this time comes, the block is simply called. Besides that, the block definition takes place upon the method invocation, so any actions needed to be taken after a callback has been made can be locally implemented.
One important notice before moving forward is that you should never forget that the completion handler should always be the last parameter in a method. A method can have as many arguments as you want, but always have the completion handler as the last argument in the parameters list.
Here is the declaration pattern of a method which contains a completion handler to make callbacks:
-(returnType)methodNameWithParams:(parameterType)parameterName ...... andCompletionHandler:(void(^)())completionHandler;
On its implementation:
-(returnType)methodNameWithParams:(parameterType)parameterName ...... andCompletionHandler:(void(^)())completionHandler{
    ...
    ...

    // When the callback should happen:
    completionHandler();
}
The completion handler block is always defined when the method is invoked:
[self methodNameWithParams:parameter1 ...... andCompletionHandler:^(){
    // The completion handler code is added here after the method has finished execution and has made a callback.
}];
A couple of typical examples of using completion handlers from framework methods are:
1. When showing a modal view controller, if you want to handle something after the view controller has been presented:
    [self presentViewController:viewController animated:YES completion:^{
        NSLog(@"View Controller was presented...");

        // Other code related to view controller presentation...
    }];
2. When performing UIView animations:
    [UIView animateWithDuration:0.5
                     animations:^{
                         // Animation-related code here...
                         [self.view setAlpha:0.5];
                     }
                     completion:^(BOOL finished) {
                         // Any completion handler related code here...

                         NSLog(@"Animation is over.");
                     }];
Let’s see a quite simple example on how we can create a method with a completion handler, how we call it and how to deal with the completion handler. To keep it simple, we will implement a method which adds two integers, and instead of returning the result to the caller, it will send it back using the completion handler. Of course, in real life you’ll never create such a simple method using a completion handler, but I’m confident that will help everyone to get the whole idea. So, let’s get started.
On the ViewController.m file, go to the private section of the interface and make the following method declaration:
@interface ViewController ()
...

-(void)addNumber:(int)number1 withNumber:(int)number2 andCompletionHandler:(void (^)(int result))completionHandler;

@end
As you see, we declare a method with three parameters. The first two are the numbers we want to add, and the last one is the completion handler. Note that you can set any name you want to the completion handler parameter. As you see, the block declaration on the completion handler contains just one parameter, the result we want to send back to the caller of the method. In a real case, you may add as many parameters as you wish, but in our case that’s perfect. Let’s keep going with its implementation, which is going to be really easy:
-(void)addNumber:(int)number1 withNumber:(int)number2 andCompletionHandler:(void (^)(int result))completionHandler{
    int result = number1 + number2;
    completionHandler(result);
}
Anything hard? We just add the two numbers, and we call the completion handler, passing the expected parameter, the result of the addition.
Let’s invoke it now in the viewDidLoad method as follows:
- (void)viewDidLoad
{
    ...

    [self addNumber:5 withNumber:7 andCompletionHandler:^(int result) {
        // We just log the result, no need to do anything else.
        NSLog(@"The result is %d", result);
    }];
}
When invoking the method, we pass the values 5 and 7 as parameters, and we define the completion handler block here. It’s obvious that is much more helpful to handle any callback actions here, than creating protocols, delegate methods, and so on, scattered all over the place. Anyway, as this just an example, there is no need to do any special handling, therefore we just log the result of the addition.
The last three pieces of code summarize the way you can deal with completion handlers of your own. If you are new to all this, don’t worry. It’s truly just a matter of habit writing code in such a way. Xcode makes things even easier to all of us, by suggesting what to type in the editor just when you start writing the method invocation, as follows:
![]()
After having entered the numeric values and having moved to the completion handler argument, just by pressing the Return key on the keyboard Xcode creates the block’s body as you see in the next figure:

You just have to handle the callback, and of course, don’t forget the semicolon at the end.
Now that completion handlers have been illustrated, and after having seen the very simple example above, it’s time to do something more advanced and really useful that can be used in real applications as a tool.
Completion Handlers: A Practical Example
Let me start by explaining what our goal is, and then we’ll proceed to implementation. So, what we are going to do here, is to create a custom class for making a UIActionSheet object to be used with a completion handler, without any delegate methods at all. If you ever have worked with action sheets, then you know that in order to be used, you have to make your class conform to UIActionSheetDelegate protocol, and then implement at least one delegate method, which usually is the actionSheet:clickedButtonAtIndex:, so you know what’s the tapped button by the user. The normal and usual approach means that you have to write code in various places, but wouldn’t be great if you could handle the user response to the options you present through the action sheet in the place you invoke it, and just have it all together? That’s exactly what we’ll do!
After having the custom class ready, you can take it as a reusable piece of code for your projects. Trust me, simply using a completion handler to manage the user selection on a action sheet is much cooler and easy to use than one can imagine. So, let’s get started.
First of all, let’s create a new class file, and the fastest way to do so, it to press the ⌘-N key combination on the keyboard, or use the menu File > New > File….
In the guide that appears, select the Objective-C class option, in the Cocoa Touch category, under the iOS section:

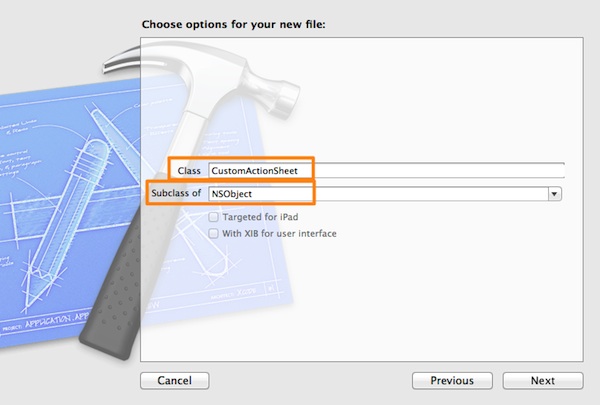
Click Next to move to the next step. In the Subclass of field, make sure to set the NSObject value. In the Class field, type CustomActionSheet, as it’s shown in the next figure:
Click once again on the Next button, and in the last window that appears click on the Create button to get finished. You should now see on the Project Navigator these two new files:
In our custom class we will make all the usual required action sheet handling. That means that we’ll make it conform to the UIActionSheet protocol, we’ll implement the actionSheet:clickedButtonAtIndex: delegate method, and anything else that maybe is needed, but the most important thing is that we’ll do all this just once. After that, we won’t bother with those tasks again, as we will simply use the completion handler to manage any callback made by an action sheet object. Don’t mind if all that look confusing to you. By the end of this section, you will have perfectly understood what’s that all about, and you’ll have a reusable tool on your hands.
So, open the CustomActionSheet.h and adopt the UIActionSheet protocol, as it’s shown right next:
@interface CustomActionSheet : NSObject
Next, declare the following custom init method, so our class can be initialized using the same parameters that an action sheet object gets upon initialization:
@interface CustomActionSheet : NSObject

-(id)initWithTitle:(NSString *)title delegate:(id)delegate cancelButtonTitle:(NSString *)cancelButtonTitle destructiveButtonTitle:(NSString *)destructiveButtonTitle otherButtonTitles:(NSString *)otherButtonTitles, ...;

@end
It might look a little bit strange, but it’s the same init method to the action sheet’s. Before we go, let’s declare one important method, the one that will enable us to show the action sheet on a view:
@interface CustomActionSheet : NSObject
...

-(void)showInView:(UIView *)view withCompletionHandler:(void(^)(NSString *buttonTitle, NSInteger buttonIndex))handler;

@end
Normally, when invoking the showInView: method, the action sheet appears to the view we set as its parameter. In our case, we declare this method using the same name in order to make it look familiar, but the new and great addition is the completion handler at the end. As you see, we specify two parameters in the block: A NSString and a NSInteger parameter, that represent the title and the index of the tapped button respectively. Using this exact method we won’t have again to write any delegate method when we need an action sheet in our project, as we now have the completion handler. Great, isn’t it?
Let’s go now to the CustomActionSheet.m file. Head to the private section of the class (if it’s not there, just add it as shown below), and add the next two object declarations:
@interface CustomActionSheet()

@property (nonatomic, strong) UIActionSheet *actionSheet;

@property (nonatomic, strong) void(^completionHandler)(NSString *, NSInteger);

@end
The first one is an action sheet object that will be used throughout our class. The second one will keep the completion handler that will be provided to the previous method as a parameter, as we will need to call it after the method execution has been finished. Notice two things: That I specify a name for the block, and that the parameters are of the same type and in the same order as those in the method’s completion handler. Also, you can observe that this block has been declared like any other property. Don’t forget that, as I already said in the introduction, a block is an object after all.
Let’s focus now on the initialization. What we have to do is to initialize our actionSheet object that we declared right before. In the following code fragment there is some code that might look strange to you, and it’s possible that many of you see it for first time. Nonetheless, take a look at it and then we will discuss it.
-(id)initWithTitle:(NSString *)title delegate:(id)delegate cancelButtonTitle:(NSString *)cancelButtonTitle destructiveButtonTitle:(NSString *)destructiveButtonTitle otherButtonTitles:(NSString *)otherButtonTitles, ...  {

    self = [super init];
    if (self) {
        _actionSheet = [[UIActionSheet alloc] initWithTitle:title
                                                   delegate:self
                                          cancelButtonTitle:nil
                                     destructiveButtonTitle:destructiveButtonTitle
                                          otherButtonTitles:nil];

        va_list arguments;
        va_start(arguments, otherButtonTitles);
        NSString *currentButtonTitle = otherButtonTitles;
        while (currentButtonTitle != nil) {
            [_actionSheet addButtonWithTitle:currentButtonTitle];
            currentButtonTitle = va_arg(arguments, NSString *);
        }
        va_end(arguments);

        [_actionSheet addButtonWithTitle:cancelButtonTitle];
        [_actionSheet setCancelButtonIndex:_actionSheet.numberOfButtons - 1];

    }

    return self;
}
Well, first things first. Initially, using this:
_actionSheet = [[UIActionSheet alloc] initWithTitle:title
                                                   delegate:self
                                          cancelButtonTitle:nil
                                     destructiveButtonTitle:destructiveButtonTitle
                                          otherButtonTitles:nil];
The action sheet object is initialized, but notice that we do not provide it with the cancel button and the other button titles objects; instead we pass nil values. This is done on purpose, as the otherButtonTitles parameter object passed in the init method is actually a list of values, and it’s needed to be specially treated. Also, the cancel button should be the last button added, so we make it nil as well.
Moving ahead, this is something probably seen for the very first time by many of you:
va_list arguments;
va_start(arguments, otherButtonTitles);
NSString *currentButtonTitle = otherButtonTitles;
while (currentButtonTitle != nil) {
    [_actionSheet addButtonWithTitle:currentButtonTitle];
    currentButtonTitle = va_arg(arguments, NSString *);
}
va_end(arguments);
All button titles are given in the init method in the form of a nil-terminated string, which is actually a list of strings, and that means that the number of values existing in it may vary. Our job is to get all string values one by one, until we find the nil value, and that exactly happens here. Going into some more details, here is in short what those va_XXX pointers and functions are for:
- va_list: It’s actually a pointer to a list that contains a variable number of objects (usually called arguments).
- va_start: It initializes the va_list pointer, making it point to the first argument of the list.
- va_arg: It gets the next object of the list (to make it more clear, the next button title in our case). The second argument is always the type of the argument, because this function needs to know how many bytes should extract.
- va_end: It just releases any allocated memory required for accessing the list and extracting all arguments.
Note that these are functions of C, not Objective-C’s. Anyway, the important is that we can add all button titles one by one, using this command:
[_actionSheet addButtonWithTitle:currentButtonTitle];
After all buttons have been added, we should not forget about the cancel button. Therefore, with these couple of lines:
[_actionSheet addButtonWithTitle:cancelButtonTitle];
[_actionSheet setCancelButtonIndex:_actionSheet.numberOfButtons - 1];
we manage to add it to the action sheet as well. The second line is quite important, as with it we tell action sheet which the cancel button is, and that’s how it manages to display it separately from all other buttons.
I must admit that what we’ve done here it might not be the most straighforward thing, but it surely consists of a lesson for many of you, and besides that, that’s the only way to have access to all button titles. You may wonder what would happen if we had simply provided the otherButtonTitles parameter to the action sheet initialization method. Well, you may try it out by yourself and see the results, but for those who just want to listen to the answer, the action sheet would simply show only the first button title, ignoring the rest, and considering the otherButtonTitles as a single object, not a list of arguments.
So, hoping that you’ve got the meaning of all the above, let’s implement the showInView:withCompletionHandler: method. I don’t have much to say, because it’s an easy one:
-(void)showInView:(UIView *)view withCompletionHandler:(void (^)(NSString *, int))handler{
    _completionHandler = handler;

    [_actionSheet showInView:view];
}
The only noteworthy thing here is that in our class member variable completionHandler we assign the handler block object passed as a parameter to the method. That way, we keep a reference to it even after the method has exited. The second command is the well-known one that lets the action sheet appear to the specific view.
If we would test the custom class now, we would have been able to make an action sheet appear on-screen. However, no interaction would take place, as no delegate methods have still been implemented. So, let’s add the next one, and we are ready:
-(void)actionSheet:(UIActionSheet *)actionSheet clickedButtonAtIndex:(NSInteger)buttonIndex{
    NSString *buttonTitle = [_actionSheet buttonTitleAtIndex:buttonIndex];

    _completionHandler(buttonTitle, buttonIndex);
}
Two actions are performed here: At first, the tapped button’s title is assigned to a NSString variable, and then is happening what we care about, the completion handler is called. See that upon calling we specify the two parameters that they are expected and in the proper order. First the string button title value, then the integer button index value. The second command actually triggers the callback, and it’s our duty to properly manage the returned data in our block definition (in a while).
And with that, our custom class is ready! Now we can display an action sheet and handle the user interaction simply by using a block as the completion handler, just right in the place where the action sheet appearance will be invoked. But before we do so, let’s add a UIButton to our view that will trigger this action.
First off, go to the ViewController.h and declare the following IBAction method:
@interface ViewController : UIViewController

- (IBAction)showActionSheet:(id)sender;

@end
Now, click on the Main.storyboard file, and from the Objects Library add a UIButton to the canvas. Set the following values to the respective properties:
- Frame: X=95, Y=80, Width=131, Height=30
- Title: Show Action Sheet
Next, connect the IBAction we previously declared to the button object and you are ready. I won’t get into details on how to make such a connection, as I’m pretty sure that if you read about blocks, then you already know some basic stuff, such as connecting IBOutlet properties and IBAction methods.
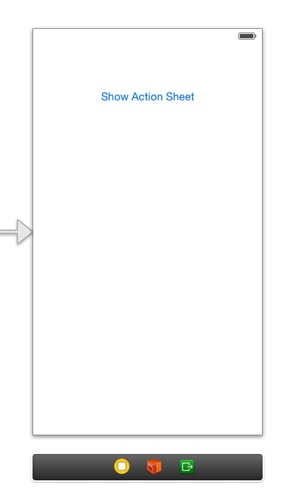
Anyway, here is how your (very simple) interface should look like:
Two steps have been left before we go to implement the IBAction method. Open the ViewController.m file, and import the custom class we created at the top of the file:
#import "CustomActionSheet.h"
Next, in the private section of the class, declare a CustomActionSheet object:
@interface ViewController ()
...

@property (nonatomic, strong) CustomActionSheet *customActionSheet;
@end
In the showActionSheet: IBAction method, we’ll start by initializing the CustomActionSheet object. The parameters we’ll set are shown right next:
- (IBAction)showActionSheet:(id)sender {
    _customActionSheet = [[CustomActionSheet alloc] initWithTitle:@"AppCoda"
                                                                       delegate:nil
                                                              cancelButtonTitle:@"Cancel"
                                                         destructiveButtonTitle:nil
                                                              otherButtonTitles:@"Option 1", @"Option 2", @"Option 3", nil];
}
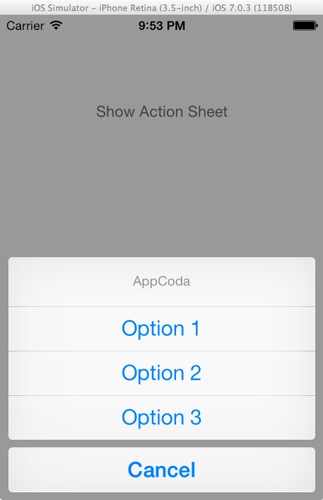
As you see, it’s just like we initialize a normal action sheet object. I kept the best part for the end. Just admire the magic of the blocks and the completion handlers by making the method complete:
- (IBAction)showActionSheet:(id)sender {
    CustomActionSheet *customActionSheet = [[CustomActionSheet alloc] initWithTitle:@"AppCoda"
                                                                       delegate:nil
                                                              cancelButtonTitle:@"Cancel"
                                                         destructiveButtonTitle:nil
                                                              otherButtonTitles:@"Option 1", @"Option 2", @"Option 3", nil];

    [_customActionSheet showInView:self.view withCompletionHandler:^(NSString *buttonTitle, NSInteger buttonIndex) {
        NSLog(@"You tapped the button in index: %d", buttonIndex);
        NSLog(@"Your selection is: %@", buttonTitle);
    }];
}
Upon invoking the showInView:withCompletionHandler: method, we also define the block, and without writing even one line of code anywhere else, we can locally manage the callback made by our custom class! Just for the records, as this is an example, we don’t need to manage the button title and index in any special way, therefore just log the respective values of the selected button. Of course, if you’re planning to use the CustomActionSheet class in your projects, you will probably need to add more action sheet delegate methods, but you now have the big picture and I am confident that you’ll manage to do any custom additions you want.
Let me also note one more thing. We use the customActionSheet object as a class member variable, instead of simply declaring it locally, because we need to keep a strong reference to the custom action sheet object so the block code to run, even after the IBAction method execution has been finished.
The custom class we made, is a real-world case where blocks can be put in action. I hope everything presented in this section to be useful and consist of a tool to all of you. If you feel so, try to make the same using the UIAlertView instead of an action sheet. Consider it as your homework!
Blocks And Multithreading
Besides all the above, blocks are also useful when you implement multithreading applications. The important once again is that the code written for execution in secondary threads resides in one place, so it’s easy to have great control over your implementation.
The most common method used for performing multithreaded tasks in combination with blocks, is the Grand Central Dispatch, or else known as the GCD. What you have to do so you can define a block using GCD, is to create a new queue and implement the block body. The following example illustrates how this can be done pretty easily. Note that for the sake of the simplicity of the example, the code written inside the block has no point at all, it’s just for demonstration. If you have implemented the demo application following every step until here, then you can continue by adding the next fragment to the viewDidLoad method.
    NSLog(@"Preparing to run code in secondary thread...");
    dispatch_queue_t myQueue = dispatch_queue_create("My Queue", NULL);
    dispatch_async(myQueue, ^{
        NSLog(@"Running code in secondary thread...");

        int value = 0;
        for (int i=0; i<100; i++) {
            for (int j=0; j<100; j++) {
                for (int n=0; n<100; n++) {
                    value += j;
                }
            }
        }

        NSLog(@"From secondary thread: value = %d", value);
    });

    NSLog(@"This is main thread again...");
As you see, we first create a new queue and then, inside the dispatch_async function we define our block. In there you can write any code required for your application. Here is what you should expect to see on the debugger:

Compile And Run The App
At this point, and if you haven't done so already, go to give a try to the application. As I said in the app overview section of the tutorial, this demo is composed from many different parts, and most of them just show messages on the debugger. There is no great interaction, and from visual aspect, the app might seem really poor. However, what you can find behind all these is some really useful stuff. Note that after having tested the app, the most important thing is you go and create some blocks of your own. When you manage to properly implement blocks, then you're on a really good way.
Summary
It's commonly accepted that blocks are going to be the future in the way we write programs, and up to a point they are already here. Many frameworks have been changed and many methods have been rewritten, so they use blocks. If you are not familiar with all this kind of stuff, then you should better start learning about blocks and working with them, because the time will come that you'll be forced to do so. Blocks can be very powerful, and extremely assistive. As it has already been proved, they help us keep our code tidy in a great level, and they offer easier control over it. However, blocks cannot replace everything. For some certain tasks, implementing delegate methods or other kind of programming techniques will remain intact. Nonetheless, it's clear that we can all use blocks even more in our code from now on, and take advantage of the Objective-C in a greater level. So, after having said all that, I wish you find your way on the blocks world, and you manage to do great programming using them!
For your reference, you can download the BlockDemo project from here.
What do you think about the tutorial? Leave me comment and share your thought.
Author bio: Gabriel Theodoropoulos has been a software developer for almost two decades. Experienced in the most known programming languages, I have developed numerous applications for various target platforms. Since the middle of 2010, I’ve been working almost exclusively on iOS. Having built applications and libraries, I keep doing so up to date. By writing tutorials I’m in position to share knowledge with other developers.


