

The greatest enemy of software developers is complexity, so when I hear about new technologies promising to help me manage chaos, I listen. One of the “hot” methodologies generating much attention recently (at least since 2015) is “protocol-oriented programming” (POP) in Swift. We’ll use Swift 4 herein. While writing my own code, I’ve found POP to be promising. What’s very intriguing is Apple’s assertion that “at its heart, Swift is protocol-oriented.”. I’d like to share my experiences with POP in a formal presentation, a clear and concise tutorial on this up-and-coming technology.
I’ll explain the key concepts, provide plenty of code samples, make the inevitable comparison between POP and object-oriented programming (OOP), and pour cold water on the fad-oriented programming (FOP?) crowds’ claim that POP is a magic bullet solution to everything.
Protocol-oriented programming is a great new tool to add to your existing programming arsenal, but nothing is a replacement for the good old basics, like breaking large functions into smaller ones, breaking large code files into smaller ones, using meaningful variable names, taking time for design before banging on a keyboard, making judicious and consistent use of spacing and indentation, the grouping of related properties and behaviors into classes and structs — all those common sense practices that can make a world of difference. If your code’s not readable by your peers, it’s useless code.
Learning and adopting a new technology like POP is not an all or nothing proposition. POP and OOP can not only co-exist, they can compliment each other. For a lot of developers including myself, getting a good grasp of POP has taken time and patience. Because POP is absolutely non-trivial, I’m breaking my tutorial into two posts. This article will concentrate mainly on introducing and explaining Swift protocols and POP. The second article will delve into advanced applications of POP (like building an app feature starting with a protocol), generic protocols, the motivations behind the movement from reference semantics to value semantics, enumerating the pros and cons of POP, enumerating the pros and cons of OOP, comparing OOP and POP, determining why “Swift is protocol-oriented,” and delving into a concept called “local reasoning” which is supposedly enhanced by using POP. We’ll touch upon some of these more advanced topics today, but only superficially.
Introduction
As software developers, managing complexity is, by the nature of the beast, our most prominent concern. As we dip our toes into POP, you may not see an immediate return on your investment of time learning this new technology. As you bear with me though, you’ll start to see where POP addresses complexity and provides you with yet another tool for controlling the chaos inherent in software systems.
I’ve gradually been hearing more and more talk about POP, but I haven’t seen much production code written using the methodology, in other words, I haven’t seen a lot of people creating app features by starting with a protocol instead of a class. This is not just about the human propensity for resistance to change. It’s easier said than done to learn an entirely new paradigm and put it into practice. In new apps I’m writing, I have gradually found myself starting the design and implementation of features using POP — organically and intuitively.
There’s a substantial amount of talk about replacing OOP with POP, as is generally the case with the excitement that accompanies new fads. That’s just not going to happen unless POP languages like Swift are revised extensively — or it may not happen at all. I’m a pragmatist, not a fad-chaser. What I see happening in my own behavior while developing new Swift projects is an eclectic approach. I’m leveraging OOP where justified, leveraging POP where justified, and learning that the two paradigms are not mutually exclusive. I’m blending the two techniques together. As you join me in this two-part series on POP, you’ll understand what I’m talking about.
I plunged into OOP a long time ago. I picked up a retail version of Turbo Pascal in 1990. After about a year of getting used to the new paradigm, I started designing, developing, and releasing OOP production applications. I became a believer. When I found that I could extend and enhance my own classes, I was blown away. As time went by, companies like Microsoft and Apple started developing vast libraries of code based on OOP, like the Microsoft Foundation Classes (MFC) and .NET, and the iOS and OS X SDKs, respectively. Nowadays, it’s pretty rare for a developer to have to reinvent the wheel when it comes to creating a new app. There are some drawbacks to OOP, as there are in all methodologies, but the pros still outweigh the cons. We’ll spend some time comparing OOP and POP.
Understanding Protocols
When a developer lays out the basic structure of a new iOS app, they’re almost always starting with existing classes in frameworks like Foundation and UIKit. Almost all apps I can think of require some kind of user interface navigation system. Users need some entry point into an app and signposts to lead them to app features. Browse through the apps on your iPhone or iPad.
What do you see when those apps open up? I bet you see subclasses of UITableViewController, UICollectionViewController, and UIPageViewController.
All of you must recognize the following code snippet when you first create, for example, a new iOS project based on the Single View App template in Xcode:
...
import UIKit

class ViewController: UIViewController
{
...
Some developers will stop here and create fully custom interfaces, but the majority will take another step.
So as iOS developers start new apps, and one of the most obvious features is OOP, where does POP fit into all this?
Do you see where I’m going? Think about what is most developers’ next major step. It’s adopting protocols (and implementing delegation, but we already discussed that).
Let me show you an example that will bring it home. I’m sure a lot of you out there have used UITableViews. While this isn’t a tutorial on UITableView, you should know that protocols play a big part in implementing one in a UIViewController. At some point in adding a UITableView to a UIViewController, your UIViewController will have to adopt the UITableViewDataSource and UITableViewDelegate protocols, like so:
class ViewController: UIViewController, UITableViewDataSource, UITableViewDelegate
In brief, adopting UITableViewDataSource allows you to fill your UITableViewCells with data, like the names of menu items to which you want your users to be able to navigate. Adopting UITableViewDelegate enables you to exercise fine-grained control over user interactions with your UITableView, like performing the appropriate action when a user taps on a specific UITableViewCell.
Definitions
I find that common parlance definitions help prime readers on a subject before plunging into technical definitions and discussions. Let’s first consider the layman’s definition for the word “protocol”:
… The official procedure or system of rules governing affairs of state or diplomatic occasions. …
The accepted or established code of procedure or behaviour in any group, organization, or situation. …
A procedure for carrying out a scientific experiment…
Apple’s “The Swift Programming Language (Swift 4.0.3)” documentation states:
A protocol defines a blueprint of methods, properties, and other requirements that suit a particular task or piece of functionality. The protocol can then be adopted by a class, structure, or enumeration to provide an actual implementation of those requirements. Any type that satisfies the requirements of a protocol is said to conform to that protocol. …
Protocols are one of the most important tools we have to bring some order to the inherent chaos that is software. Protocols give us the ability to require that one or many of our classes and structs contain certain minimum, required properties and/or provide certain minimum, required behaviors/functionality. With protocol extensions, we can provide default behavior for some or all of our protocols’ methods.
Adopting a protocol
We’re going to make my Person class conform to (adopt) Apple’s built-in Equatable protocol, where:
Types that conform to the Equatable protocol can be compared for equality using the equal-to operator (==) or inequality using the not-equal-to operator (!=). Most basic types in the Swift standard library conform to Equatable. …
class Person : Equatable
{
    var name:String
    var weight:Int
    var sex:String

    init(weight:Int, name:String, sex:String)
    {
        self.name = name
        self.weight = weight
        self.sex = sex
    }

    static func == (lhs: Person, rhs: Person) -> Bool
    {
        if lhs.weight == rhs.weight &&
            lhs.name == rhs.name &&
            lhs.sex == rhs.sex
        {
            return true
        }
        else
        {
            return false
        }
    }
}
Apple states that, “Custom types state that they adopt a particular protocol by placing the protocol’s name after the type’s name, separated by a colon, as part of their definition.” That’s just what I did:
class Person : Equatable
You can conceptualize a protocol as a contract or promise that you can apply to a class, struct, or enum. I have entered my Person class into a contract with the Equatable protocol, and the Person class promises to fulfill the contract by implementing the methods or member variables that Equatable requires be materialized or fulfilled, i.e., implemented.
The Equatable protocol doesn’t implement anything. It only specifies what methods and/or member variables must be implemented by the class, struct, or enum that adopts (conforms to) Equatable. Some protocols implement functionality through extensions and we’ll discuss that shortly. I won’t spend a lot of time on enum vis-a-vis POP. I leave that to you as an exercise.
Defining a protocol
Protocols are best understood from example code. I’m going to implement my own version of Equatable to show you how protocols work:
protocol IsEqual
{
    static func == (lhs: Self, rhs: Self) -> Bool

    static func != (lhs: Self, rhs: Self) -> Bool
}
Remember that my “IsEqual” protocol doesn’t implement the == and != operators. “IsEqual” requires that adopters of the protocol implement their own == and != operators.
All the rules for defining the properties and methods of protocols are summarized in Apple’s Swift documentation. For example, you never use let in a protocol property definition. Read-only properties are specified by using a var property followed only by { get }. If you have a method that modifies a property or properties, you mark that method as mutating. You should understand why my operator overrides for == and != are defined as static. If you don’t, a good exercise for you would be to find out why.
To show you how widely applicable is a protocol like my IsEqual (or Equatable), we’ll use it to build a class below. But before we do that, let’s talk about “reference semantics” versus “value semantics.”
Reference semantics versus value semantics
Before moving forward, you should read Apple’s article on “Value and Reference Types”. This should get you thinking about reference semantics versus value semantics. I’m purposefully not going into great detail here because I want you to think through and understand this very important topic. It’s so important that Apple started discussing the topics of POP and reference/value semantics simultaneously at their:
- WWDC 2015 presentation on “Protocol-Oriented Programming in Swift”
- WWDC 2015 presentation on “Building Better Apps with Value Types in Swift”
- WWDC 2016 presentation on “Protocol and Value Oriented Programming in UIKit Apps”
I’ll give you a hint and assignment… Suppose you have several references to the same class instance changing, or “mutating,” a property. These references point to the same piece of data, so it’s not an exaggeration to call it “shared” data. In some cases, shared data may lead to problems, as you’ll see in the example below. Does that mean we should change all our code to value semantics? NO! As one of the Apple engineers points out: “So, for example, a Window. What would it mean to copy a Window? Look at the code below and think about it.
Reference semantics
The following code snippet from an Xcode playground presents an interesting dilemma when a copy of an object is made and a property is changed. Can you find the problem? We’ll be talking about this in the next article.
This code also demonstrates a protocol definition and an extension.
// REFERENCE SEMANTICS: EVERYBODY HAS USED CLASSES
// FOR SO LONG -- AND THINK ABOUT ALL THE IMPLICIT
// COPYING THAT GOES ON IN COCOA.

protocol ObjectThatFlies
{
    var flightTerminology: String { get }
    func fly() // no need to provide implementation unless I want
}

extension ObjectThatFlies
{
    func fly() -> Void
    {
        let myType = String(describing: type(of: self))
        let flightTerminologyForType = myType + " " + flightTerminology + "\n"
        print(flightTerminologyForType)
    }
}

class Bird : ObjectThatFlies
{
    var flightTerminology: String = "flies WITH feathers, and flaps wings differently than bats"
}

class Bat : ObjectThatFlies
{
    var flightTerminology: String = "flies WITHOUT feathers, and flaps wings differently than birds"
}

// REFERENCE SEMANTICS

let bat = Bat()
bat.fly()
// "Bat flies WITHOUT feathers, and flaps wings differently than birds"

let bird = Bird()
bird.fly()
// "Bird flies WITH feathers, and flaps wings differently than bats"

var batCopy = bat
batCopy.fly()
// "Bird flies WITH feathers, and flaps wings differently than bats"

batCopy.flightTerminology = ""
batCopy.fly()
// just "Bat" prints to console

bat.fly()
// just "Bat" prints to console
Console output from previous code snippet
Bat flies WITHOUT feathers, and flaps wings differently than birds

Bird flies WITH feathers, and flaps wings differently than bats

Bat flies WITHOUT feathers, and flaps wings differently than birds

Bat

Bat
Value semantics
In the following Swift sample code snippet, we use struct, not class. Here, the code looks safer, and Apple seems to be pushing value semantics and POP. Note that they haven’t given up on the class — yet.
// THIS IS WHERE THE PARADIGM SHIFT STARTS, NOT JUST
// WITH PROTOCOLS, BUT WITH VALUE SEMANTICS

protocol ObjectThatFlies
{
    var flightTerminology: String { get }
    func fly() // no need to provide implementation unless I want
}

extension ObjectThatFlies
{
    func fly() -> Void
    {
        let myType = String(describing: type(of: self))
        let flightTerminologyForType = myType + " " + flightTerminology + "\n"
        print(flightTerminologyForType)
    }
}

struct Bird : ObjectThatFlies
{
    var flightTerminology: String = "flies WITH feathers, and flaps wings differently than bats"
}

struct Bat : ObjectThatFlies
{
    var flightTerminology: String = "flies WITHOUT feathers, and flaps wings differently than birds"
}

// VALUE SEMANTICS

let bat = Bat()
bat.fly()
// "Bat flies WITHOUT feathers, and flaps wings differently than birds"

let bird = Bird()
bird.fly()
// "Bird flies WITH feathers, and flaps wings differently than bats"

var batCopy = bat
batCopy.fly()
// "Bird flies WITH feathers, and flaps wings differently than bats"

// Here, it's obvious what we did to this INSTANCE of Bat...
batCopy.flightTerminology = ""
batCopy.fly()
// just "Bat" prints to console

// BUT, because we're using VALUE semantics, the original
// instance of Bat was not corrupted by side effects
bat.fly()
// "Bat flies WITHOUT feathers, and flaps wings differently than birds"
Console output from previous code snippet
Bat flies WITHOUT feathers, and flaps wings differently than birds

Bird flies WITH feathers, and flaps wings differently than bats

Bat flies WITHOUT feathers, and flaps wings differently than birds

Bat

Bat flies WITHOUT feathers, and flaps wings differently than birds
Sample code
I’ve written some protocol-based code. Please walk through the code, read the inline comments, read the accompanying prose, follow my hyperlinks, and get a good grasp on what I’m doing. You’ll need it for the next article on POP.
Adopting multiple protocols
When I first started this article, I got greedy and had thought about manually creating a protocol that mirrored both Apple’s Equatable and Comparable built-in protocols:
protocol IsEqualAndComparable
{

    static func == (lhs: Self, rhs: Self) -> Bool

    static func != (lhs: Self, rhs: Self) -> Bool

    static func > (lhs: Self, rhs: Self) -> Bool

    static func < (lhs: Self, rhs: Self) -> Bool

    static func >= (lhs: Self, rhs: Self) -> Bool

    static func <= (lhs: Self, rhs: Self) -> Bool

}
I realized that I should divide and conquer and make my code as flexible as possible. Why not? Apple states that multiple protocols can be adopted by a class, structure, or enumeration, as we’ll see below. Here are the two protocols I came up with:
protocol IsEqual
{
    static func == (lhs: Self, rhs: Self) -> Bool

    static func != (lhs: Self, rhs: Self) -> Bool
}

protocol Comparable
{
    static func > (lhs: Self, rhs: Self) -> Bool

    static func < (lhs: Self, rhs: Self) -> Bool

    static func >= (lhs: Self, rhs: Self) -> Bool

    static func <= (lhs: Self, rhs: Self) -> Bool
}
Remember your algorithms
An important skill you need to hone is the development of algorithms, and translating them into code. I guarantee that one day somebody is going to give you a verbal description of some complex process and ask you to encode it. There’s often a huge gap between a human language description of some procedure and realizing that procedure in software. I was reminded of that when I got the idea to apply my IsEqual and Comparable protocols to a class representing a line (vector). I remembered that calculating the length of a line is based on the Pythagorean Theorem (here and here), and line length was necessary when comparing vectors with the ==, !=, <, >, <=, and >= operators. My Line class would come in handy in, for example, a drawing app or game, where the user taps on two locations on screen to create a line between two points.
Custom class adopting multiple protocols
Here’s my Line class, which adopts two protocols, IsEqual and Comparable (below). This is a form of multiple inheritance!
class Line : IsEqual, Comparable
{
    var beginPoint:CGPoint
    var endPoint:CGPoint

    init()
    {
        beginPoint = CGPoint(x: 0, y: 0);
        endPoint = CGPoint(x: 0, y: 0);
    }

    init(beginPoint:CGPoint, endPoint:CGPoint)
    {
        self.beginPoint = CGPoint( x: beginPoint.x, y: beginPoint.y )
        self.endPoint = CGPoint( x: endPoint.x, y: endPoint.y )
    }

    // The line length formula is based on the Pythagorean theorem.
    func length () -> CGFloat
    {
        let length = sqrt( pow(endPoint.x - beginPoint.x, 2) + pow(endPoint.y - beginPoint.y, 2) )
        return length
    }

    static func == (leftHandSideLine: Line, rightHandSideLine: Line) -> Bool
    {
        return (leftHandSideLine.length() == rightHandSideLine.length())
    }

    static func != (leftHandSideLine: Line, rightHandSideLine: Line) -> Bool
    {
        return (leftHandSideLine.length() != rightHandSideLine.length())
    }

    static func > (leftHandSideLine: Line, rightHandSideLine: Line) -> Bool
    {
        return (leftHandSideLine.length() > rightHandSideLine.length())
    }

    static func < (leftHandSideLine: Line, rightHandSideLine: Line) -> Bool
    {
        return (leftHandSideLine.length() < rightHandSideLine.length())
    }

    static func >= (leftHandSideLine: Line, rightHandSideLine: Line) -> Bool
    {
        return (leftHandSideLine.length() >= rightHandSideLine.length())
    }

    static func <= (leftHandSideLine: Line, rightHandSideLine: Line) -> Bool
    {
        return (leftHandSideLine.length() <= rightHandSideLine.length())
    }

} // end class Line : IsEqual, Comparable
Verifying your algorithms
I used a spreadsheet, Apple Numbers, and prepared a visual representation of two vectors to do some basic testing of my Line class’s length() method:
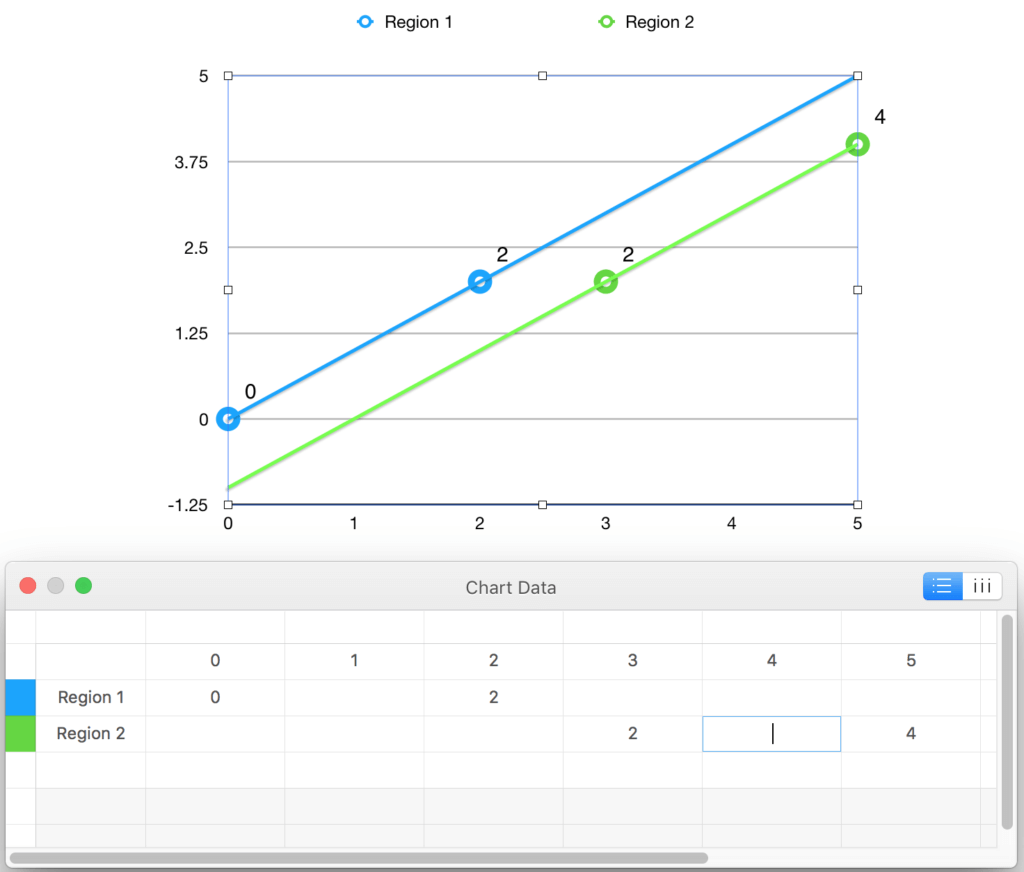
Here’s my test code for the points shown in the chart above:
let x1 = CGPoint(x: 0, y: 0)
let y1 = CGPoint(x: 2, y: 2)
let line1 = Line(beginPoint: x1, endPoint: y1)
line1.length()
// returns 2.82842712474619

let x2 = CGPoint(x: 3, y: 2)
let y2 = CGPoint(x: 5, y: 4)
let line2 = Line(beginPoint: x2, endPoint: y2)
line2.length()
// returns 2.82842712474619

line1 == line2
// returns true
line1 != line2
// returns false
line1 > line2
// returns false
line1 <= line2
// returns true
Testing/prototyping UI with “Single View” Xcode playground template
Did you know that you can prototype and test your user interface (UI) using an Xcode 9 Single View playground template? It’s pretty awesome — a great time saver and tool for rapid prototyping. In order to more robustly test my Line class, I created just such a playground. Assignment: I want you to try this out yourself before I explain it. I will show you my playground’s code, simulator output, and my Swift test statements.
Here’s my playground code:
import UIKit
import PlaygroundSupport

class LineDrawingView: UIView
{
    override func draw(_ rect: CGRect)
    {
        let currGraphicsContext = UIGraphicsGetCurrentContext()
        currGraphicsContext?.setLineWidth(2.0)
        currGraphicsContext?.setStrokeColor(UIColor.blue.cgColor)
        currGraphicsContext?.move(to: CGPoint(x: 40, y: 400))
        currGraphicsContext?.addLine(to: CGPoint(x: 320, y: 40))
        currGraphicsContext?.strokePath()

        currGraphicsContext?.setLineWidth(4.0)
        currGraphicsContext?.setStrokeColor(UIColor.red.cgColor)
        currGraphicsContext?.move(to: CGPoint(x: 40, y: 400))
        currGraphicsContext?.addLine(to: CGPoint(x: 320, y: 60))
        currGraphicsContext?.strokePath()

        currGraphicsContext?.setLineWidth(6.0)
        currGraphicsContext?.setStrokeColor(UIColor.green.cgColor)
        currGraphicsContext?.move(to: CGPoint(x: 40, y: 400))
        currGraphicsContext?.addLine(to: CGPoint(x: 250, y: 80))
        currGraphicsContext?.strokePath()
    }
}

class MyViewController : UIViewController
{
    override func loadView()
    {
        let view = LineDrawingView()
        view.backgroundColor = .white

        self.view = view
    }
}

// Present the view controller in the Live View window
PlaygroundPage.current.liveView = MyViewController()
Here’s the visual output of my view from the playground simulator:
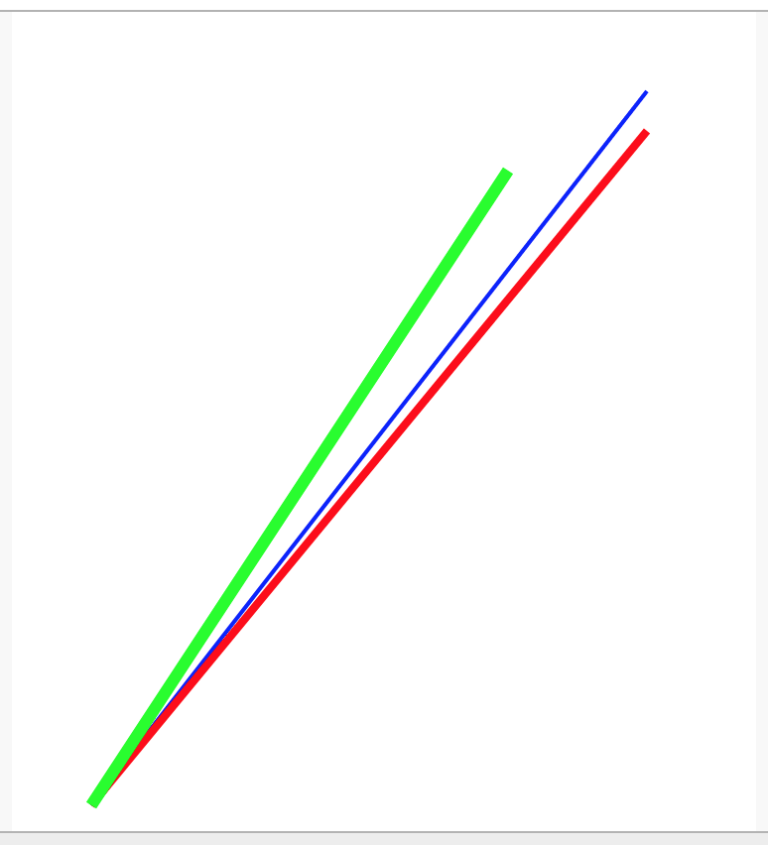
Here’s Swift code for testing my Line class instances matching the vectors I drew in the playground:
let xxBlue = CGPoint(x: 40, y: 400)
let yyBlue = CGPoint(x: 320, y: 40)
let lineBlue = Line(beginPoint: xxBlue, endPoint: yyBlue)

let xxRed = CGPoint(x: 40, y: 400)
let yyRed = CGPoint(x: 320, y: 60)
let lineRed = Line(beginPoint: xxRed, endPoint: yyRed)
lineRed.length()
// returns 440.454310910905

lineBlue != lineRed
// returns true
lineBlue > lineRed
// returns true
lineBlue >= lineRed
// returns true

let xxGreen = CGPoint(x: 40, y: 400)
let yyGreen = CGPoint(x: 250, y: 80)
let lineGreen = Line(beginPoint: xxGreen, endPoint: yyGreen)
lineGreen.length()
// returns 382.753184180093
lineGreen < lineBlue
// returns true
lineGreen <= lineRed
// returns true
lineGreen > lineBlue
// returns false
lineGreen >= lineBlue
// returns false
lineGreen == lineGreen
// returns true
Conclusion
I hope you enjoyed today’s post and are raring to go for “part 2” of this article. Remember that we’ll be delving into advanced applications of POP, generic protocols, the motivations behind the movement from reference semantics to value semantics, enumerating the pros and cons of POP, enumerating the pros and cons of OOP, comparing OOP and POP, determining why “Swift is protocol-oriented,” and delving into a concept called “local reasoning”.
See you then.


