

Medical research study is being carried out usually by giving stack of papers and numerous question forms to participants to fill up. Electronic surveys are also carried out to know participants habits better. But it is a tedious to carry out these activities on daily basis. What if we have better and simpler way to do this.
And we have ResearchKit.
ResearchKit, asthe name itself suggests, is something related to research. ResearchKit is an open source framework released by Apple that lets developers create medial research apps specifically designed to recruit patients and help them participate in medical research studies. This framework comes with all the elements you will need to create a clinical research app.
With the apps built using ResearchKit, participants from anywhere in the world can contribute to the research study. There are already apps available which are helping researchers to better understand the health conditions of Asthma, Parkinsons, Breast Cancer, Diabetes etc. ReseachKit provides the framework for you to collect data from device sensors, however, it does not provide the way to upload the collected data to your server. You need to manage it on your own. On top of that, ResearchKit works seamlessly with Apple’s HealthKit framework so it becomes easier to collect detailed data from HealthKit such as steps count, heart rate, etc.
The ResearchKit framework provides three modules:
- Consent – provides a basic mechanism to ask for the participant’s consent
- Survey – prompts users to answer a set of questions
- Active task – instructs the participant to perform a specific task (e.g. finger tapping) for research purpose
We will discuss each of the module in detail in this tutorial. Along with that, we will create a demo app to show you how to use consent, survey and active task.
Creating the Demo App
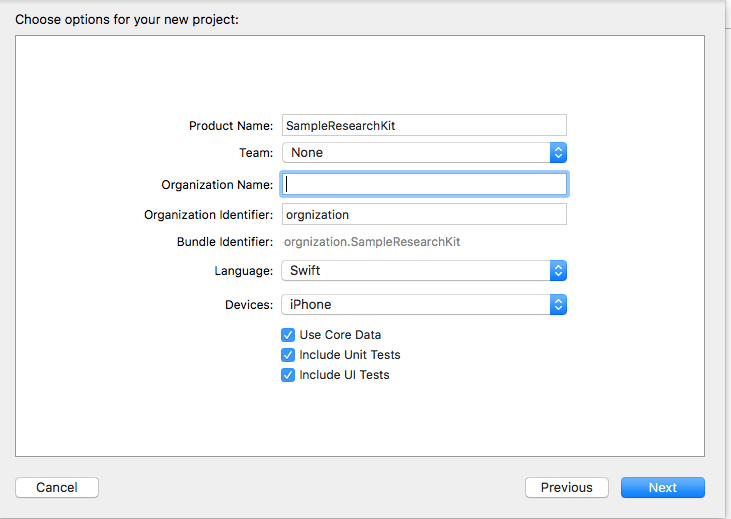
For demo purpose, we will create a simple app. So fire up Xcode and create a new project by using the Single View Application template. Name your application SampleResearchKit, enter a organisation identifier, set iPhone for the device family. Tell Xcode where you want to save the project and click on create button.
The easiest way to get ResearchKit into your iOS project is to use CocoaPods. Assuming you have CocoaPods installed, you can follow the steps below to install the ResearchKit library in your Xcode project:
- Open terminal and run the command below to create a file in your Xcode project called Podfile.
- Once the Podfile is created, edit the pod file and add the line
pod 'ResearchKit', '~> 1.0'to the file: - Finally run
pod installin terminal. It should download and install the ResearchKit library, and create a new Xcode workspace called SampleResearchKit.xcworkspace. Open up this workspace in Xcode.
cd [your-projectPath]
pod init
# Uncomment the next line to define a global platform for your project
# platform :ios, '9.0'

target 'SampleResearchKit' do
  # Comment the next line if you're not using Swift and don't want to use dynamic frameworks
  use_frameworks!

  # Pods for SampleResearchKit
  pod 'ResearchKit', '~> 1.0'
end
Adding UI to the App
Next, let’s design the UI of the app. Go to Main.storyboard and add three buttons to the view controller as below:
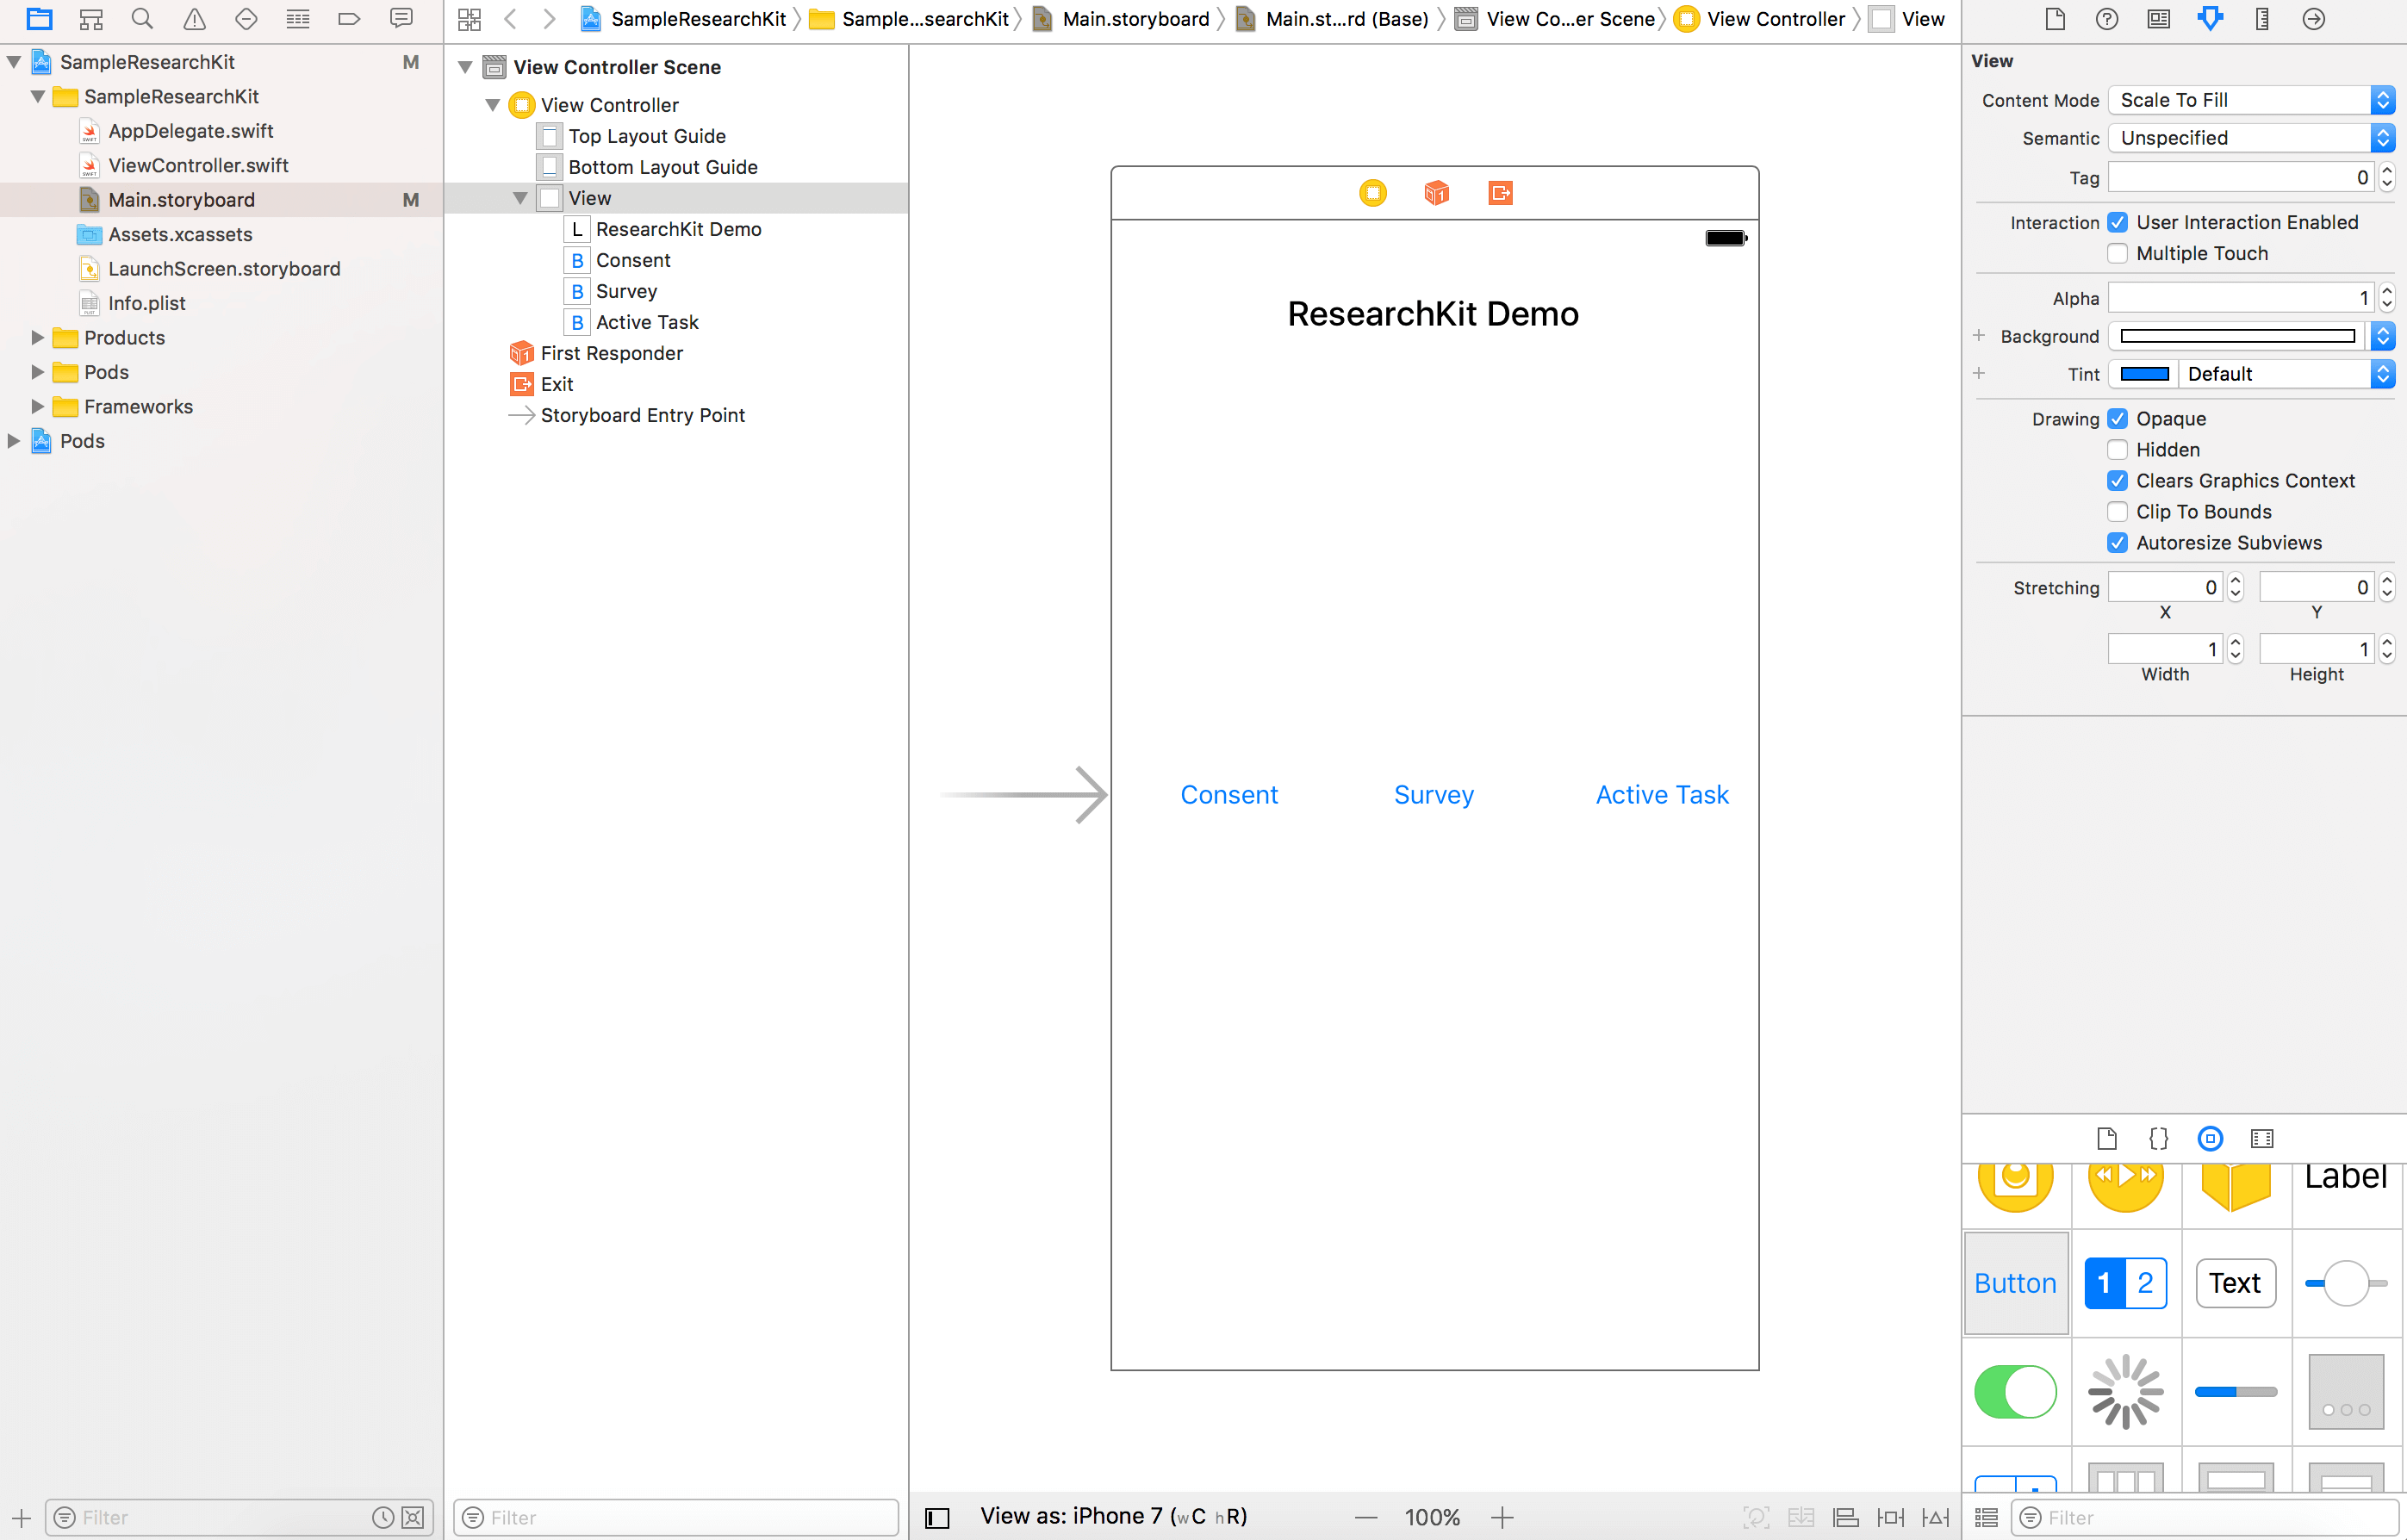
Create the action for consent(consentClicked), survey(surveyClicked) and Active task (activeTaskClicked) buttons.
Make sure you establish the connections between the buttons and action methods. Name the action method as follows:
- Consent button –
consentClicked - Survey button –
surveyClicked - Action Task button –
activeTaskClicked
After the changes, your ViewController.swift should be like this:
import UIKit

class ViewController: UIViewController {

    override func viewDidLoad() {
        super.viewDidLoad()
        // Do any additional setup after loading the view, typically from a nib.
    }

    override func didReceiveMemoryWarning() {
        super.didReceiveMemoryWarning()
        // Dispose of any resources that can be recreated.
    }

    @IBAction func consentClicked(sender : AnyObject) {
    }

    @IBAction func surveyClicked(sender : AnyObject) {
    }

    @IBAction func activeTaskClicked(sender : AnyObject) {
    }

}
Obtaining Consent
During research study, researchers usually need to submit the documentation of their study. If medical research involves human as their subject , the study may contain sensitive information which should be reviewed by the participant. You need to ensure that consent obtained is in legal form. ResearchKit provides simpler way to display the consent document and you can also obtain participant’s signature.
We will first see how to implement the consent button in our sample project. Let’s begin by creating an empty swift file and name it ConsentTask.swift. Open the file and import Researchkit framework:
import ResearchKit
Add the following code to ConsentTask.swift:
public var ConsentTask: ORKOrderedTask {

    let Document = ORKConsentDocument()
    Document.title = "Test Consent"
}
Here we have created an ORKConsentDocument object which will be presented to the participant giving him the information regarding the research study in order to obtain his/her consent.
ORKConsentDocument contains section types which can be defined as ORKConsentSectionType. ORKConsentSectionType enumerates the predefined visual consent sections available in the ResearchKit framework. We can add it using following code. You can add section type according to your research required. If your research doesn’t need any of the section, you can remove them accordingly. After adding section types code looks as below:
public var ConsentTask: ORKOrderedTask {

    let Document = ORKConsentDocument()
    Document.title = "Test Consent"

    let sectionTypes: [ORKConsentSectionType] = [
        .overview,
        .dataGathering,
        .privacy,
        .dataUse,
        .timeCommitment,
        .studySurvey,
        .studyTasks,
        .withdrawing
    ]

    let consentSections: [ORKConsentSection] = sectionTypes.map { contentSectionType in
        let consentSection = ORKConsentSection(type: contentSectionType)
        consentSection.summary = "Complete the study"
        consentSection.content = "This survey will ask you three questions and you will also measure your tapping speed by performing a small activity."
        return consentSection
    }
}
The ORKConsentSection class represents one section in a consent document. Here we are also adding summary and content for particular section type by iterating through array of sectionTypes. We are using the same summary and content for every section. But you can set it according to section types.
Now we will add signature to our document. ResearchKit makes it extremely simple to add a signature to a document. Continue to add the following code:
Document.sections = consentSections
Document.addSignature(ORKConsentSignature(forPersonWithTitle: nil, dateFormatString: nil, identifier: "UserSignature"))
The ORKConsentSignature class represents a signature in as ORKConsentDocument object. You can also prepopulate the signature with a name, date. Here the identifier acts as a unique entity to distinguish any other signature in the document.
Now we have created a document. The next thing is prepare the steps for the current task so that we can present it to the participant. Continue to insert the following code:
var steps = [ORKStep]()

//Visual Consent
let visualConsentStep = ORKVisualConsentStep(identifier: "VisualConsent", document: Document)
steps += [visualConsentStep]

//Signature
let signature = Document.signatures!.first! as ORKConsentSignature
let reviewConsentStep = ORKConsentReviewStep(identifier: "Review", signature: signature, in: Document)
reviewConsentStep.text = "Review the consent"
reviewConsentStep.reasonForConsent = "Consent to join the Research Study."

steps += [reviewConsentStep]

//Completion
let completionStep = ORKCompletionStep(identifier: "CompletionStep")
completionStep.title = "Welcome"
completionStep.text = "Thank you for joining this study."
steps += [completionStep]
A step, represented by ORKStep, can be a question, an active test, or a simple instruction. As we are going to present multiple steps, we first create an empty array of ORKStep. We will add three tasks:
- A visual consent step (
ORKVisualConsentStep) – TheORKVisualConsentStepobject is used to present a series of simple graphics to help participants understand the content of an informed consent document. - A consent review step (
ORKConsentReviewStep) – TheORKConsentReviewStepobject is used to display the consent document for review. The user is asked to enter name and draw the signature. Name and signature entry is optional. - A completion step (
ORKCompletionStep) – This step will be displayed to user on completion of the review task.
Lastly, we have to return the ORKOrderedTask object with the steps. Insert the return statement as below:
return ORKOrderedTask(identifier: "ConsentTask", steps: steps)
If you have followed me correctly, the final code of ConsentTask will look as below:
public var ConsentTask: ORKOrderedTask {

    let Document = ORKConsentDocument()
    Document.title = "Test Consent"

    let sectionTypes: [ORKConsentSectionType] = [
        .overview,
        .dataGathering,
        .privacy,
        .dataUse,
        .timeCommitment,
        .studySurvey,
        .studyTasks,
        .withdrawing
    ]

    let consentSections: [ORKConsentSection] = sectionTypes.map { contentSectionType in
        let consentSection = ORKConsentSection(type: contentSectionType)
        consentSection.summary = "Complete the study"
        consentSection.content = "This survey will ask you three questions and you will also measure your tapping speed by performing a small activity."
        return consentSection
    }

    Document.sections = consentSections
    Document.addSignature(ORKConsentSignature(forPersonWithTitle: nil, dateFormatString: nil, identifier: "UserSignature"))

    var steps = [ORKStep]()

    //Visual Consent
    let visualConsentStep = ORKVisualConsentStep(identifier: "VisualConsent", document: Document)
    steps += [visualConsentStep]

    //Signature
    let signature = Document.signatures!.first! as ORKConsentSignature
    let reviewConsentStep = ORKConsentReviewStep(identifier: "Review", signature: signature, in: Document)
    reviewConsentStep.text = "Review the consent"
    reviewConsentStep.reasonForConsent = "Consent to join the Research Study."

    steps += [reviewConsentStep]

    //Completion
    let completionStep = ORKCompletionStep(identifier: "CompletionStep")
    completionStep.title = "Welcome"
    completionStep.text = "Thank you for joining this study."
    steps += [completionStep]

    return ORKOrderedTask(identifier: "ConsentTask", steps: steps)
}
With the consent task created, it’s time to present it to the user. Let’s go back to ViewController.Swift. First, add an import statement at the beginning of the file:
import ResearchKit
The view controller is responsible for processing the results of the consent. So adopt the ORKTaskViewControllerDelegate protocol:
class ViewController: UIViewController, ORKTaskViewControllerDelegate {
When the Consent button is tapped, we will present the consent task. Therefore, implement the consentClicked method like this:
@IBAction func consentClicked(sender : AnyObject) {
    let taskViewController = ORKTaskViewController(task: ConsentTask, taskRun: nil)
    taskViewController.delegate = self
    present(taskViewController, animated: true, completion: nil)
}
In order to handle the result of the consent task, we will implement the following method of the ORKTaskViewControllerDelegate protocol:
func taskViewController(_ taskViewController: ORKTaskViewController, didFinishWith reason: ORKTaskViewControllerFinishReason, error: Error?) {

    taskViewController.dismiss(animated: true, completion: nil)
}
You can provide special handlings by accessing the task result (taskViewController.result). For this demo, we will simply dismiss the task view controller.
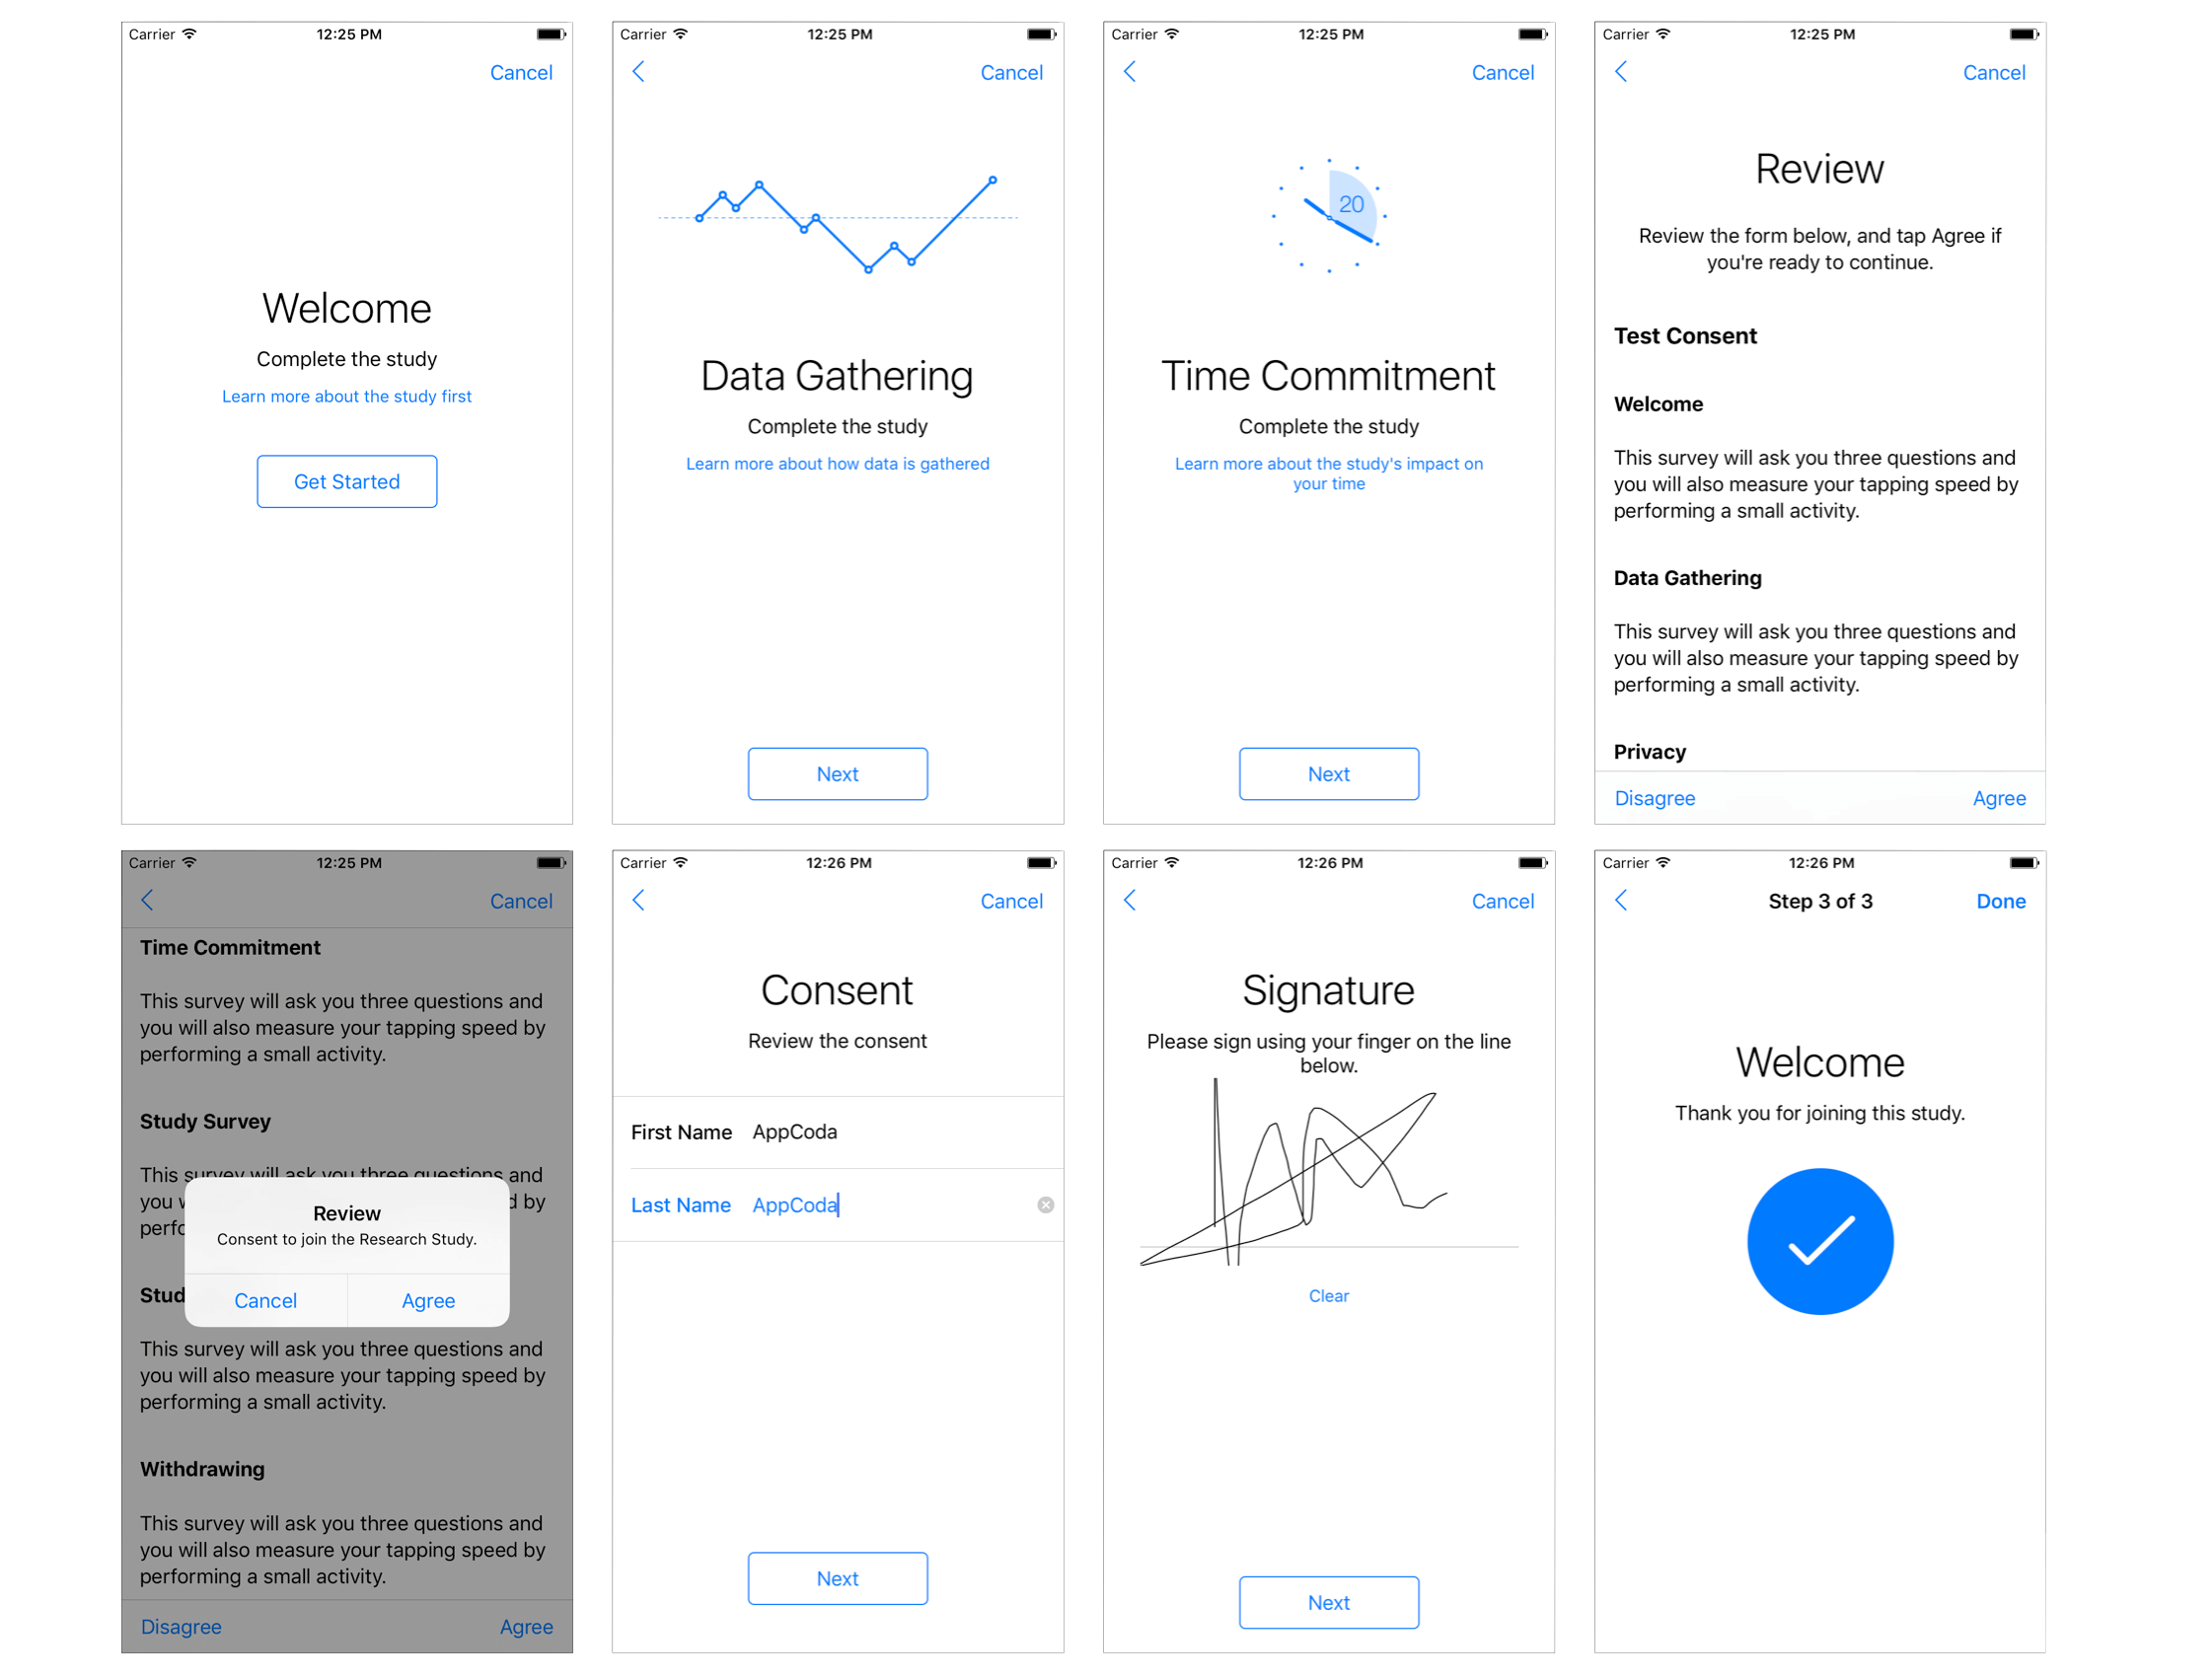
Now it’s time to run the app and try out the feature. You will see all the sections which you have added in document with the wonderful build-in animation. After going through the section, you will see the review page and screen for visual consent. You are asked to enter the name and sign to join the study.
Creating Surveys
Survey is nothing but a series of questions that you use to collect data from the participants. There are two types of survey tasks, provided by the ResearchKit framework:
ORKOrderedTask– where the order of steps remains the same.ORKNavigableOrderedTask– where the order of the steps can change depending on how the user answers a question in the previous step.
Now we will create a survey in our demo app. In order to do that, we need to create a empty swift file named SurveyTask.swift. Insert the code as shown below to SurveyTask.swift:
import ResearchKit

public var SurveyTask: ORKOrderedTask {

    var steps = [ORKStep]()
    return ORKOrderedTask(identifier: "SurveyTask", steps: steps)
}
Here we have created a task but we need to add the questions to this task. The framework provides a class named ORKInstructionStep which gives the participant instructions for a task. You can use instruction steps to present various types of content during a task. Here we will create the ORKInstructionStep object which will let the participant know about the purpose of the survey. Insert the following code after var steps = [ORKStep]():
//Introduction
let instructionStep = ORKInstructionStep(identifier: "IntroStep")
instructionStep.title = "Test Survey"
instructionStep.text = "Answer three questions to complete the survey."
steps += [instructionStep]
Next, we will add a question with text answer as an input type:
//Text Input Question
let nameAnswerFormat = ORKTextAnswerFormat(maximumLength: 20)
nameAnswerFormat.multipleLines = false
let nameQuestionStepTitle = "What is your name?"
let nameQuestionStep = ORKQuestionStep(identifier: "NameStep", title: nameQuestionStepTitle, answer: nameAnswerFormat)
steps += [nameQuestionStep]
The ORKQuestionStep object is used to present a single question to the user. Here we simply ask the user’s name, and we expect a text response from the user. So we create the ORKTextAnswerFormat object to associate with the question. This is how you create a question for the survey.
We will now add some more questions to our survey. Continue to add the following code:
//Image Input Question
let moodQuestion = "How do you feel today?"
let moodImages = [
    (UIImage(named: "Happy")!, "Happy"),
    (UIImage(named: "Angry")!, "Angry"),
    (UIImage(named: "Sad")!, "Sad"),
    ]
let moodChoice : [ORKImageChoice] = moodImages.map {
    return ORKImageChoice(normalImage: $0.0, selectedImage: nil, text: $0.1, value: $0.1 as NSCoding & NSCopying & NSObjectProtocol)
}
let answerFormat: ORKImageChoiceAnswerFormat = ORKAnswerFormat.choiceAnswerFormat(with: moodChoice)
let moodQuestionStep = ORKQuestionStep(identifier: "MoodStep", title: moodQuestion, answer: answerFormat)
steps += [moodQuestionStep]
Here we added another question but the only change is that we are taking image as input this time. We are asking user “How do you feel today?” as the question, and will present the user with an array of images for answer. ORKImageChoice is used to display the images to the user. Typically, image choices are displayed in a horizontal row.
Next, we will create a question with number as input.
//Numeric Input Question
let ageQuestion = "How old are you?"
let ageAnswer = ORKNumericAnswerFormat.integerAnswerFormat(withUnit: "years")
ageAnswer.minimum = 18
ageAnswer.maximum = 85
let ageQuestionStep = ORKQuestionStep(identifier: "AgeStep", title: ageQuestion, answer: ageAnswer)
steps += [ageQuestionStep]
In this question, we ask the user to enter his/her age. We define the answer format as numeric using ORKNumericAnswerFormat. At the same time, we also set the minimum and maximum age values.
Now that we have defined our questions, the last step is add a summary and say “Thank You”:
//Summary
let completionStep = ORKCompletionStep(identifier: "SummaryStep")
completionStep.title = "Thank You!!"
completionStep.text = "You have completed the survey"
steps += [completionStep]
That’s it for the survey task. It’s time to present this survey to the user. Let’s go back to ViewController.swift and update the surveyClicked method like below:
@IBAction func surveyClicked(sender : AnyObject) {
    let taskViewController = ORKTaskViewController(task: SurveyTask, taskRun: nil)
    taskViewController.delegate = self
    present(taskViewController, animated: true, completion: nil)
}
Again, you can handle the result in the delegate method. But for this demo, we keep the delegate method unchanged and just dismiss the task controller. Before you hit the run button to test the app, make sure you download the image file here, and add them to Asset.xcassets.
![]()
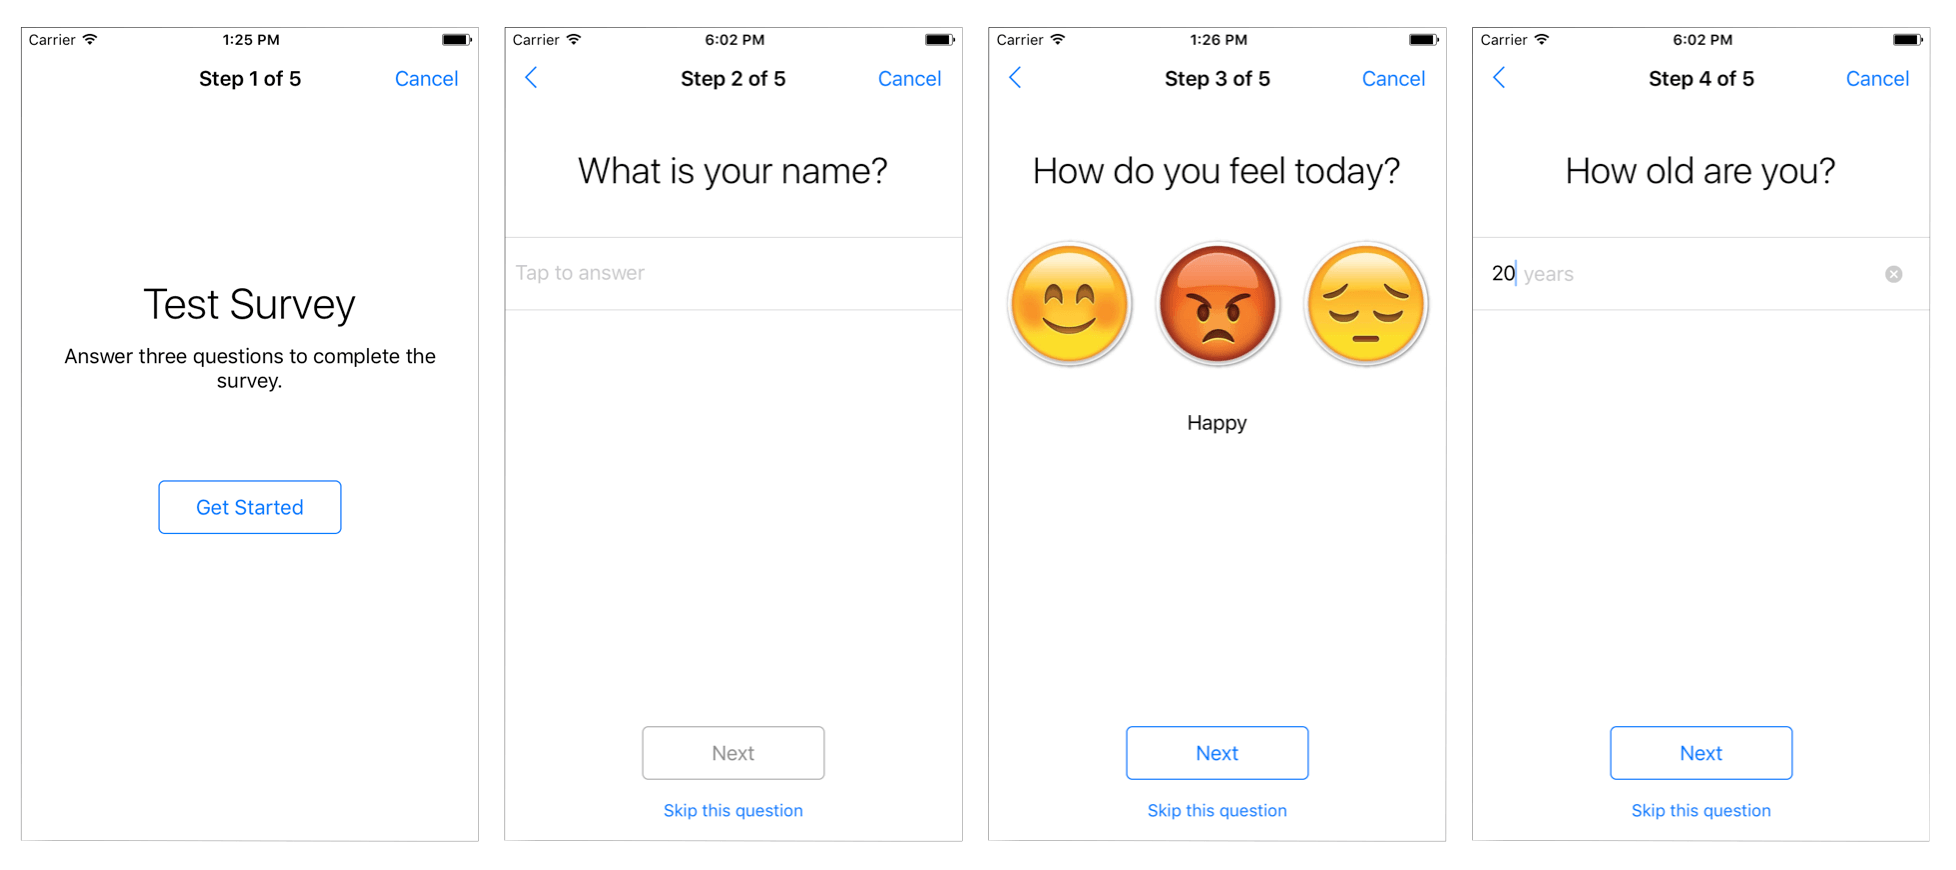
Now it’s time to run the app and see how the survey looks like.
Active Tasks
The primary purpose of the ResearchKit framework is for researchers to collect data from device sensors while the user is invited to perform a certain activity. Active tasks can be used to ask users to perform activities while using iPhone sensors like accelerometer, gyroscope, GPS, microphone and touch for data collection. Say, you can ask the user to walk a certain distance and your app collects accelerometer data while the user is walking.
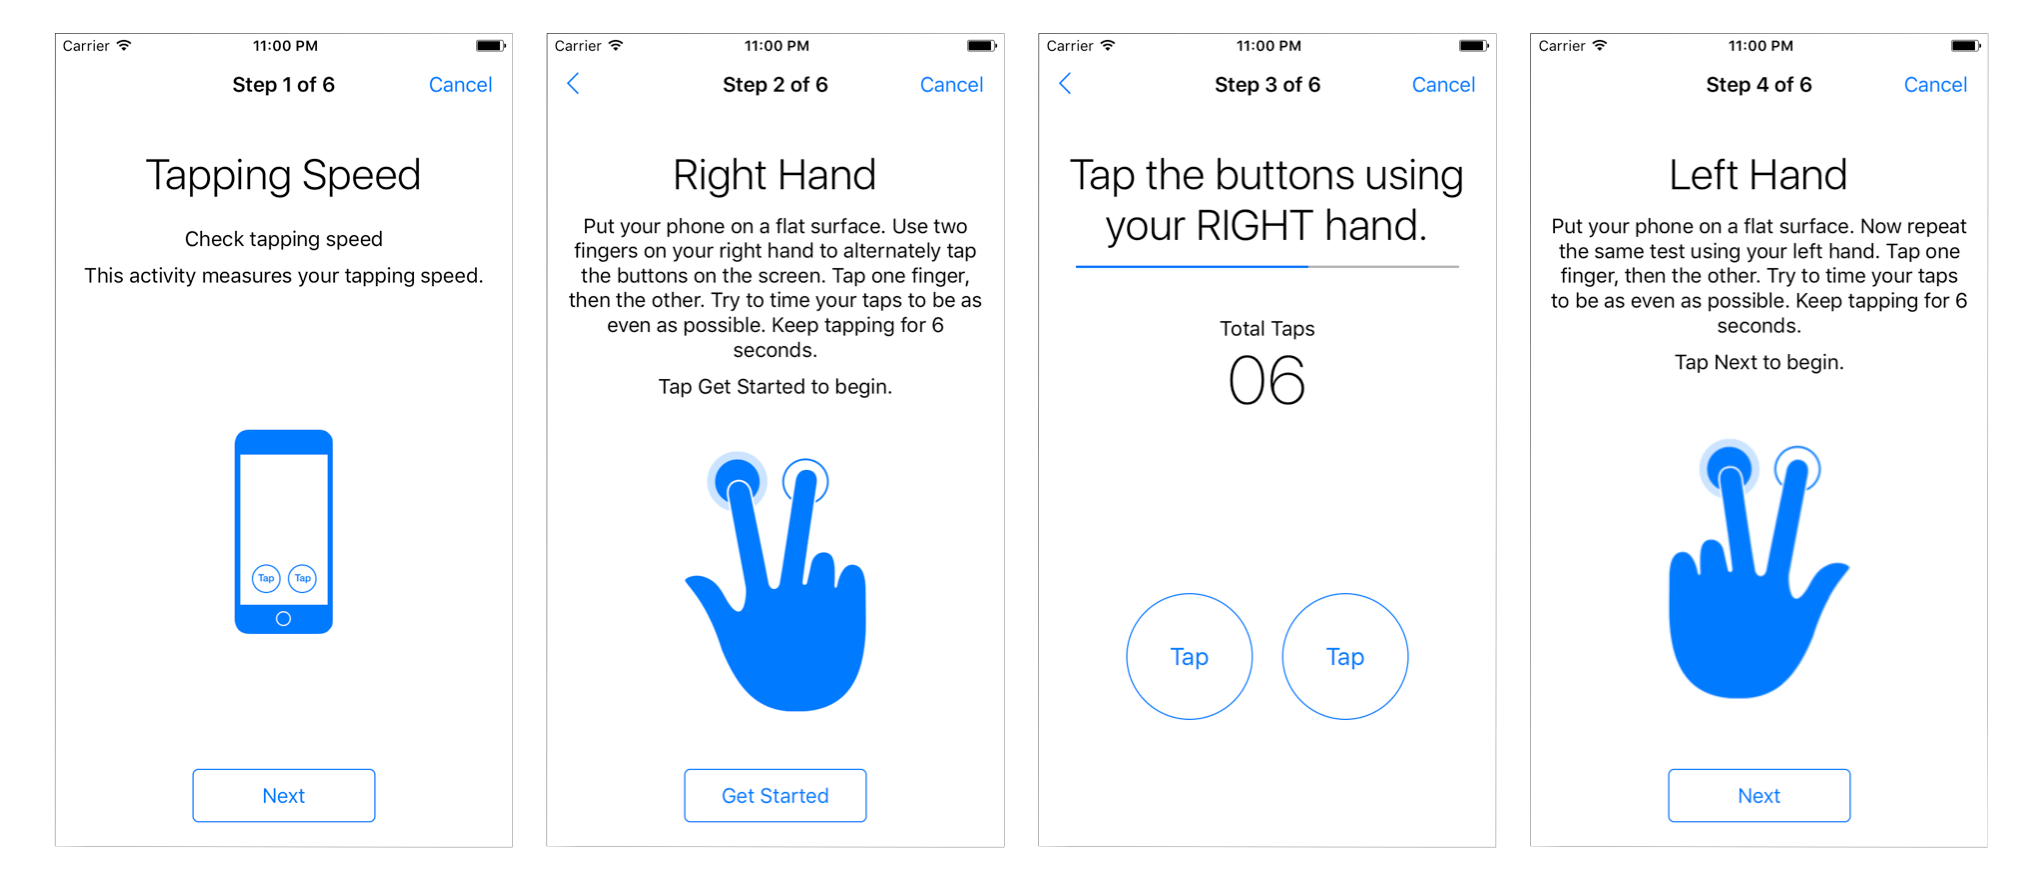
The ResearchKit framework includes a number of predefined active tasks such as testing the reaction time of a user. In this demo, we will create a touch based task that will ask the user to do some tappings.
First, let’s create an empty swift file called ActiveTask.swift. Insert the below code to the ActiveTask.swift file:
import ResearchKit

public var ActiveTask: ORKOrderedTask {
    return ORKOrderedTask.twoFingerTappingIntervalTask(withIdentifier: "TapTask", intendedUseDescription: "Check tapping speed", duration: 6, handOptions: .both, options: ORKPredefinedTaskOption())
}
The twoFingerTappingIntervalTask is one of the predefined tasks, that asks the user to tap two on-screen targets rapidly and alternatively. We use it to add a tapping action, and set the its identifier to “TapTask”. We also set the description to “Check tapping speed” with a duration of 6 seconds. Data collected in this task includes touch activity and accelerometer information.
That’s it. We have created an Active Task. Now we need to initiate this task in ViewController.swift. Update the activeTaskClicked method to the following:
@IBAction func activeTaskClicked(sender : AnyObject) {
    let taskViewController = ORKTaskViewController(task: ActiveTask, taskRun: nil)
    taskViewController.delegate = self
    present(taskViewController, animated: true, completion: nil)
}
Now it’s time to test out the active task feature. Build and run the app, and then tap the Active Task button to see what happens.
Wrap Up
We have covered the three modules of the Researchkit framework in this tutorial. With these modules, you can create amazing research app and the possibilities are endless. For more details about the framework, you can refer to the official ResearchKit documentation.
For reference, you can refer to the complete Xcode project on GitHub.


