

Most applications nowadays communicate with servers to exchange data, and they do so by consuming RESTful APIs, also called RESTful web services. Using REST, applications can send requests to servers, and servers send responses as answers back to client apps. The whole communication is based on standard rules that REST architectural style defines. Obviously, developers are meant to be able to use RESTful APIs either by integrating third-party libraries to their projects, or by implementing their own solution to achieve that.
In this tutorial I am going to show you how to build your own lightweight class to perform web requests. I’ll take you from the beginning and step by step we’ll create together a complete solution which will offer a neat and simple to use API to prepare and make requests.
Some basic knowledge about web services, REST and its various concepts is required in the upcoming parts of this post. If you are not confident with this topic, maybe you would like to take a look at wikipedia or this article that explains a lot of things. Before you proceed, make sure you understand what a HTTP message is, as well as the meaning of the following terms:
- HTTP method
- Request & Response HTTP headers
- URL query parameters
- HTTP body
By the end of this post you will have a class fully capable of making web requests and exchanging data with any server!
What’s On The Today Menu
As I said, we are about to create a simple, yet a powerful class through which we’ll be able to perform web requests. Unlike other tutorials, today we will focus mostly on code, so even the examples which we’ll use to try out our class will present results in the console. However, there is still a starter project for you to download. In it you’ll find the file where we’ll write our class already added, as well as another file with the definition of a few structures necessary for testing our class by the end of this tutorial.
We will start the implementation by defining a few custom types (enums and structs) that will make it easy to handle various kind of data. Then we’ll start implementing a few private methods in order to start giving some functionality to the class, and we’ll end up to define a couple of public methods that will employ whatever has been previously done in order to initiate web requests.
So, once you get the project, open it in Xcode and keep on reading!
Preparing The Ground for RESTful APIs
So, let’s get started by opening the starter project and going to the RestManager.swift file. It’s the place where we’ll spend most of our time in this post while we will be implementing our REST manager.
We’ll kick off our tasks by declaring a new class named (what else) RestManager:
class RestManager {

}
Instantly right after that, create an extension of it:
extension RestManager {

}
I guess that a question was just born in your mind, and that is what the extension is for? To explain, let me say this: Starting from this part and on, we are going to implement a bunch of custom types (structs, enums), and I want them all to be inner types of the RestManager class. We can definitely implement them out of the class, but by keeping them internally we clearly indicate their purpose and relate them directly to the class. So, we keep the extension for the implementation of our custom types, and the main body of the class for the public and private methods.
To see the first one, let’s create an enumeration that will represent the various HTTP methods. Add the following in the class extension:
enum HttpMethod: String {
    case get
    case post
    case put
    case patch
    case delete
}
As you can see, we define our enumeration to be of type String, and that makes the implicit value of each case to be the same to the case’s name. At a later part you’ll see that HTTP method values must be treated as string values, and we’ll manage that by just using the raw value of any of the above cases (for example, get.rawValue).
Without any hassle, we have our class definition and the first, yet important custom type implemented in it. Now, let’s handle more concepts regarding web requests.
Managing HTTP Headers & URL And HTTP Body Parameters
A web request can contain HTTP headers with various information required by the server, such as the content type of the sent data or the authorization header that authorizes an app to use a given resource. Almost always, response HTTP headers are sent with or without body data when servers answer back to client apps. Additionally, an endpoint might require various parameters to be included in the URL (usually that happens with GET requests), and other times parameters or other data must be sent through the HTTP body (in POST, PUT, or PATCH requests).
Even though all the above regard different aspects of a web request (request, response, URL, HTTP body), they all have something in common: Provided values can be described as key-value pairs, regardless of how they’ll be sent to server at the end. For example:
content-type: application/jsonis a request HTTP header, where “content-type” is the key and “application/json” the value.Server: Apache/2.4.1 (Unix)is a response HTTP header, where “Server” is the key and “Apache/2.4.1 (Unix)” the value.https://someurl.com?firstname=John&age=40is a URL with query parameters, where “firstname” and “age” are keys, and “John” and “40” are values.["email": "[email protected]", "password": "pass123"]is a dictionary with keys and values that can be converted into a JSON object and sent as the HTTP body of the request.
So, no matter what each kind of data means, what we have to deal with is actually the same: Values related to keys, which can be perfectly represented by dictionaries, and more specifically dictionaries with String values ([String: String]).
We will create a small struct to represent all the above, and as it was just made obvious, this struct will contain a dictionary to store any values. We will make it developer-friendly by implementing a few really simple methods that will:
- Work as proxies, so setting and getting values to and from the dictionary will be done through them. The additional code to do that is negligible.
- Hide the underlying data storage mechanism (the dictionary) from other classes that will use
RestManager. This is also useful if you want to shareRestManageras a framework and you want to hide implementation details.
So, here we go; in the RestManager extension add the following:
struct RestEntity {
    private var values: [String: String] = [:]

    mutating func add(value: String, forKey key: String) {
        values[key] = value
    }

    func value(forKey key: String) -> String? {
        return values[key]
    }

    func allValues() -> [String: String] {
        return values
    }

    func totalItems() -> Int {
        return values.count
    }
}
Now, go to the main body of the RestManager class and add the following properties:
class RestManager {

    var requestHttpHeaders = RestEntity()

    var urlQueryParameters = RestEntity()

    var httpBodyParameters = RestEntity()
}
They are all of the same custom type, but each one is meant to be used for a different concept of a web request. Notice that we did not create a property for the response HTTP headers, as we will handle the response more generally right next.
As an example, setting or getting values to any of the above properties will be similar to this:
// Setting a request HTTP header.
requestHttpHeaders.add(value: "application/json", forKey: "content-type")

// Getting a URL query parameter.
urlQueryParameters.value(forKey: "firstname")
Managing The Response
A HTTP response is a message sent by a server to a client as an answer to a HTTP request that was made by that client. A response may include the following three different kind of data:
- A numeric status (HTTP status code) indicating the outcome of the request. This is always returned by the server.
- HTTP headers. They can optionally exist in the response.
- Response body, which is the actual data a server sends back to the client app.
As you understand, data contained in responses is too arbitrary and we cannot implement a concrete solution in order to always manage them in the same way. However, knowing the separation of data as described above, it’s still possible to provide a general approach to handling a HTTP response.
Go to the class extension, and create the following struct:
struct Response {
    var response: URLResponse?
    var httpStatusCode: Int = 0
    var headers = RestEntity()
}
Three properties are contained here:
response: We will keep the actual response object (URLResponse) in it. Note that this object does not contain the actual data returned from server.httpStatusCode: The status code (2xx, 3xx, etc) that represents the outcome of the request.headers: An instance of theRestEntitystruct that we implemented and discussed about in the previous part.
A Response object will be part of the results that will be returned from our class when making web requests.
Now, let’s create a custom init method, so we can initialize a Response object easily:
struct Response {
    ...

    init(fromURLResponse response: URLResponse?) {
        guard let response = response else { return }
        self.response = response
        httpStatusCode = (response as? HTTPURLResponse)?.statusCode ?? 0

        if let headerFields = (response as? HTTPURLResponse)?.allHeaderFields {
            for (key, value) in headerFields {
                headers.add(value: "\(value)", forKey: "\(key)")
            }
        }
    }
}
The above init method accepts a URLResponse object (notice that it can be nil – in that case nothing will happen). We keep it as is in the response property, and we “extract” the HTTP status code. In order to do that we must cast the response argument from URLResponse to HTTPURLResponse object and then access its statusCode property. If, for some reason, this value is nil, we set 0 as the default value which has no special meaning, but it’s an indication that no HTTP status code could be determined.
Finally, we keep any HTTP headers contained in the response. See that we cast to HTTPURLResponse once again, and this time we access the allHeaderFields property to get them. Inside the for loop you can see the add(value:forKey) method of the RestEntity struct being used for first time!
Notice that we did not declare a property to keep the response body (actual data) in the above struct, we handle all the rest but this. Response body will be taken care of separately right next.
Representing Results
Since we are creating custom types to represent all key entities regarding web requests, let’s do the same for the results that our class will return back to other classes that will use it. But first, let’s specify what results are supposed to contain, keeping in mind that a web request can succeed, but it can also fail.
So, when talking about results, here’s what we should expect to see:
- Actual data coming from the server if the request was successful.
- Other data in the response (see previous part).
- Any potential errors.
Just a few lines above I mentioned that a request can fail. This can happen for two reasons mostly:
- The client app (iOS app for us) cannot make the request due to technical reasons (ex., there’s no Internet connection, provided data cannot be converted to JSON, etc) or it fails to process server’s response.
- The request is received by the server but the returned response contains a status code other than 2xx, usually 4xx (wrong request), or 5xx (server problem).
In the first case an Error object will most probably exist to describe the iOS-related error. In the second case, the error will be described by the HTTP status code, and possibly a verbose message which comes in place of the actual data.
Programmatically speaking now, in the RestManager class extension we’ll start implementing a new struct called Results:
struct Results {
    var data: Data?
    var response: Response?
    var error: Error?
}
Note that all properties are marked as optionals. Data returned on successful requests (data property) is usually a JSON object which should be decoded properly by classes which will use the RestManager class.
We’ll enrich Results struct a bit by adding two initializers: One that will accept arguments for all three properties, and one that will accept an error object as an argument only.
struct Results {
    ...

    init(withData data: Data?, response: Response?, error: Error?) {
        self.data = data
        self.response = response
        self.error = error
    }

    init(withError error: Error) {
        self.error = error
    }
}
Both initializers will be proved handly later.
Speaking of errors, let’s define a custom error at this point. Although you will fully understand in a following part why we need it, let me say in advance that in order to make web requests we will be based on two iOS SDK classes: URLRequest for creating a URL request which we will provide to a data task object that we’ll create using the URLSession class (the class enabling us to make HTTP requests in iOS). In case the URL request object cannot be created, then we must return a custom error to the caller of the RestManager class indicating that.
So, in the RestManager extension body, add the following enum:
enum CustomError: Error {
    case failedToCreateRequest
}
Note that it conforms to the Error protocol, and that makes it mandatory to extend the CustomError enum in order to provide a localized description of it. Go to the end of the RestManager.swift file, out of the class extension, and add the following:
extension RestManager.CustomError: LocalizedError {
    public var localizedDescription: String {
        switch self {
        case .failedToCreateRequest: return NSLocalizedString("Unable to create the URLRequest object", comment: "")
        }
    }
}
At the time being we have one custom error only. But that’s okay; if we (or you) ever come up with more custom errors then we’ll be able to easily add them.
Later on, we will provide our custom error as an argument to the second initializer method we defined in the Results struct.
Appending Parameters To URL
So far we were constructing all those structures and custom types that will help us handle every aspect of a web request easily. Now, it’s about time to start adding some functionality to our class.
The first thing we’ll do is to create a private function where we will append any URL query parameters specified through the urlQueryParameters property to the original URL. If there are not any parameters, this function will just return the original URL.
To get started, let’s write the new method’s definition. Add it to the RestManager class body:
private func addURLQueryParameters(toURL url: URL) -> URL {

}
Our method accepts a URL value, and a URL is what it also returns.
Initially, we must make sure that there are URL query parameters to append to the query. If not, we just return the input URL:
private func addURLQueryParameters(toURL url: URL) -> URL {
    if urlQueryParameters.totalItems() > 0 {

    }

    return url
}
Next, let’s create a URLComponents object that will let us deal with the URL and its parts easily. Its initializer needs the original URL object, our parameter:
private func addURLQueryParameters(toURL url: URL) -> URL {
    if urlQueryParameters.totalItems() > 0 {
        guard var urlComponents = URLComponents(url: url, resolvingAgainstBaseURL: false) else { return url }

    }

    return url
}
Note that the URLComponents(url:resolvingAgainstBaseURL:) initializer shown above can return a nil object, so using guard statement is necessary. Note also that instead of guard let we use guard var, because we want urlComponents object to be a variable, not a constant; changes will be made to it right next.
Note: You could use an if var statement instead of guard.
URLComponents class provides a property named queryItems. This is a collection (an array) of URLQueryItem objects, where each object represents a URL query item. By default this property is nil. When queryItems have a value, then URLComponents class can construct a URL which will contain the query items specified.
With that in mind, let’s initialize our own queryItems array, and then let’s iterate through all values in the urlQueryParameters property. For each parameter found, we’ll be creating a new URLQueryItem object and we’ll be appending it to our own queryItems array.
var queryItems = [URLQueryItem]()
for (key, value) in urlQueryParameters.allValues() {
    let item = URLQueryItem(name: key, value: value.addingPercentEncoding(withAllowedCharacters: .urlQueryAllowed))

    queryItems.append(item)
}
Initializing a URLQueryItem is straightforward and requires no explanation. However, watch out how we handle the value argument! It’s important not to forget to percent encode it, otherwise we make it possible to send illegal characters through the URL query, and quite probably the request will fail. To understand what the above does, consider we have the following parameter and value:
https://someUrl.com?phrase=hello world
The space character is not allowed to exist in a URL, so by percent encoding it as shown above it will turn into:
https://someUrl.com?phrase=hello%20world
which is totally acceptable.
Now that we have created our own collection of query items, let’s assign it to the queryItems property of the urlComponents object:
urlComponents.queryItems = queryItems
Then, let’s get the full URL that will contain the query parameters as well. Notice that the returned URL value right next is an optional value, so it’s required to unwrap it before we return it from the function:
guard let updatedURL = urlComponents.url else { return url }
return updatedURL
That’s it. We’ll make use of this method a bit later. Right next it’s the entire method implementation as one single piece of code:
private func addURLQueryParameters(toURL url: URL) -> URL {
    if urlQueryParameters.totalItems() > 0 {
        guard var urlComponents = URLComponents(url: url, resolvingAgainstBaseURL: false) else { return url }
        var queryItems = [URLQueryItem]()
        for (key, value) in urlQueryParameters.allValues() {
            let item = URLQueryItem(name: key, value: value.addingPercentEncoding(withAllowedCharacters: .urlQueryAllowed))
            queryItems.append(URLQueryItem(item)
        }

        urlComponents.queryItems = queryItems

        guard let updatedURL = urlComponents.url else { return url }
        return updatedURL
    }

    return url
}
The HTTP Body
POST, PUT, and PATCH web requests use the HTTP body (also known as message body or entity body) to send any data required by a web service. The kind of data to send is specified in the “Content-Type” request HTTP header. The two most commonly used content types are “application/json” and “application/x-www-form-urlencoded”, but there are a lot more not that common especially for mobile apps. In case of the first one, original data must be encoded and sent as a JSON object to server. In the second case, data should be sent as a query string with key-value pairs separated by an “&” symbol (just like the URL query parameters we talked about previously) converted to a Data object first.
In this part we will create a new private function that will generate the data for these two content types based on the values specified in the httpBodyParameters property. However, this will limit our class to be used with these two content types only! We must overcome that, and we will do so by declaring the following property in the RestManager class:
var httpBody: Data?
The above makes it possible to set the HTTP body data directly and therefore use any content type other than the two mentioned before.
Let’s create a new private method in the RestManager class now:
private func getHttpBody() -> Data? {

}
It returns an optional Data value because not all requests contain a HTTP body. This method will also return nil if the content type header is not specified or there is no data to return.
We will start implementing the method by checking if the “Content-Type” request HTTP header has been set through the requestHttpHeaders property. If not, we can assume that the request does not contain a body so we can return nil.
private func getHttpBody() -> Data? {
    guard let contentType = requestHttpHeaders.value(forKey: "Content-Type") else { return nil }

}
Next, we will examine cases of the content type value, and we’ll determine if any of the type of interest has been set:
private func getHttpBody() -> Data? {
    guard let contentType = requestHttpHeaders.value(forKey: "Content-Type") else { return nil }

    if contentType.contains("application/json") {

    } else if contentType.contains("application/x-www-form-urlencoded") {

    } else {

    }
}
In the first case, values specified in the httpBodyParameters object must be converted into a JSON object (Data object) which in turn will be returned from the method:
return try? JSONSerialization.data(withJSONObject: httpBodyParameters.allValues(), options: [.prettyPrinted, .sortedKeys])
In case of “application/x-www-form-urlencoded” we will build a query string (once again we url-encode the value):
let bodyString = httpBodyParameters.allValues().map { "\($0)=\(String(describing: $1.addingPercentEncoding(withAllowedCharacters: .urlQueryAllowed)))" }.joined(separator: "&")
return bodyString.data(using: .utf8)
Such a string would look like:
"firstname=John&age=40"
In any other case, we return the value of the httpBody property:
return httpBody
Here’s the entire implementation of the method:
private func getHttpBody() -> Data? {
    guard let contentType = requestHttpHeaders.value(forKey: "Content-Type") else { return nil }

    if contentType.contains("application/json") {
        return try? JSONSerialization.data(withJSONObject: httpBodyParameters.allValues(), options: [.prettyPrinted, .sortedKeys])
    } else if contentType.contains("application/x-www-form-urlencoded") {
        let bodyString = httpBodyParameters.allValues().map { "\($0)=\(String(describing: $1.addingPercentEncoding(withAllowedCharacters: .urlQueryAllowed)))" }.joined(separator: "&")
        return bodyString.data(using: .utf8)
    } else {
        return httpBody
    }
}
Preparing The URL Request
In this part we are going to initialize and configure a URLRequest object; the one and only we need to make web requests.
The creation and configuration of a URL request object will take place in a new private method:
private func prepareRequest(withURL url: URL?, httpBody: Data?, httpMethod: HttpMethod) -> URLRequest? {

}
Through the parameters we pass the URL (which will contain any query parameters), the HTTP body, and the HTTP method (GET, POST, etc) that will be used to make the request. At the end the method will return either a URLRequest object, or nil if it cannot be created.
Let’s start adding some code into this method. At first, we’ll check if the given URL is nil or not, and then we’ll initialize a URLRequest object using that URL. Also, we’ll assign the HTTP method:
private func prepareRequest(withURL url: URL?, httpBody: Data?, httpMethod: HttpMethod) -> URLRequest? {
    guard let url = url else { return nil }
    var request = URLRequest(url: url)
    request.httpMethod = httpMethod.rawValue
}
Note that the HTTP method must be assigned as a String value to the request, that’s why we use its raw value.
Next, let’s assign the request HTTP headers to the request object. This will take place inside a loop:
for (header, value) in requestHttpHeaders.allValues() {
    request.setValue(value, forHTTPHeaderField: header)
}
Eventually, we will also assign the httpBody object to the respective property of the request object, and we’ll return it from the method:
request.httpBody = httpBody
return request
Here is the entire method:
private func prepareRequest(withURL url: URL?, httpBody: Data?, httpMethod: HttpMethod) -> URLRequest? {
    guard let url = url else { return nil }
    var request = URLRequest(url: url)
    request.httpMethod = httpMethod.rawValue

    for (header, value) in requestHttpHeaders.allValues() {
        request.setValue(value, forHTTPHeaderField: header)
    }

    request.httpBody = httpBody
    return request
}
Making Web Requests
Finally, it’s about time to combine all the above and make web requests. As you will see next, all private methods and custom types we created in the previous parts will be used in a series of steps that will get us to our ultimate goal.
Let’s create the following public method in the RESTManager class:
func makeRequest(toURL url: URL,
                 withHttpMethod httpMethod: HttpMethod,
                 completion: @escaping (_ result: Results) -> Void) {

}
This is a public method that accepts three arguments: The URL that the web request will be made to, the preferred HTTP method and a completion handler that will contain the results of the request.
It’s important to highlight something: Web requests are not operations that are being executed instantly. It takes some time until a request is made, data is sent, and an answer comes from the server, no matter how fast all these can happen. While such an operation is in progress, the app should remain responsive at all time without freezing and users should be able to keep using it while a web request is being performed.
To ensure that, we’ll perform all actions asynchronously in a background thread, so the main thread remains free to be used by the app:
func makeRequest(toURL url: URL,
                 withHttpMethod httpMethod: HttpMethod,
                 completion: @escaping (_ result: Results) -> Void) {

    DispatchQueue.global(qos: .userInitiated).async { [weak self] in

    }
}
userInitiated value as the quality of service (“qos”) parameter will give priority to our task against other tasks that are being executed in the background and have lower priority than that. weak self ensures that any reference to properties and methods of the class won’t cause a crash if the RestManager instance stops being alive for some reason. self will be treated as an optional inside the queue’s body.
So, let’s start calling our private methods and have the request getting prepared. At first, let’s append any URL query parameters to the given URL:
let targetURL = self?.addURLQueryParameters(toURL: url)
Even though addURLQueryParameters(toURL:) method will return an actual URL object and not a nil value, targetURL can be nil because we handle self as a weak variable. If self is not nil, targetURL will get the value returned by the addURLQueryParameters(toURL:) method; otherwise it’ll become nil.
Next, let’s get the HTTP body:
let httpBody = self?.getHttpBody()
Now we can create the URLRequest object:
guard let request = self?.prepareRequest(withURL: targetURL, httpBody: httpBody, httpMethod: httpMethod) else
{
    completion(Results(withError: CustomError.failedToCreateRequest))
    return
}
A few observations here. Initially, look at the URL value we provide as an argument to the above method: It’s the targetURL which can be nil as it was said before. That explains why we declared the URL parameter as an optional when we defined the prepareRequest(withURL:httpBody:httpMethod:) method in the previous part.
Secondly, we cannot proceed in making the web request if the request object is nil. Therefore, it’s extremely important to use a guard statement (or if let if you prefer), and make sure that the request object has a value before going to the next steps.
In case the request object is nil, we must return from the function, but before doing so we must call the completion handler and pass a Results object. Through that object we must provide an error that explains why the request failed to be performed. And that is the custom error in the CustomError enum we have already defined.
The actual web request will be performed by creating a data task through a URLSession instance. The following lines initialize a session object using a default configuration, and then create a new data task. Pay attention to this: Here’s where we provide the request (URL request) object, that’s why it’s so important that it’s not nil:
let sessionConfiguration = URLSessionConfiguration.default
let session = URLSession(configuration: sessionConfiguration)
let task = session.dataTask(with: request) { (data, response, error) in

}
On completion, data task returns the actual data sent by the server in the data object (if any), the response as a URLResponse object, and any potential error. We’ll use them to initialize a Results object and pass it back to the caller of this class through our completion handler:
completion(Results(withData: data,
                   response: Response(fromURLResponse: response),
                   error: error))
Notice above that we are creating a custom Response object using the response from the data task.
There is one last action left to be made: To start the data task:
task.resume()
Our method is now ready and we can make web requests!
Here it is altogether:
func makeRequest(toURL url: URL,
                 withHttpMethod httpMethod: HttpMethod,
                 completion: @escaping (_ result: Results) -> Void) {

    DispatchQueue.global(qos: .userInitiated).async { [weak self] in
        let targetURL = self?.addURLQueryParameters(toURL: url)
        let httpBody = self?.getHttpBody()
        guard let request = self?.prepareRequest(withURL: targetURL, httpBody: httpBody, httpMethod: httpMethod) else {
            completion(Results(withError: CustomError.failedToCreateRequest))
            return
        }

        let sessionConfiguration = URLSessionConfiguration.default
        let session = URLSession(configuration: sessionConfiguration)
        let task = session.dataTask(with: request) { (data, response, error) in
            completion(Results(withData: data,
                               response: Response(fromURLResponse: response),
                               error: error))
        }
        task.resume()
    }
}
Fetching Data From URLs
It’s quite often necessary to fetch data from a URL which usually regards the contents of a file, as for example a profile picture image data, or a PDF. Data class allows to initialize an object of it with the contents of a URL, but doing so on the main thread and waiting until all data has been fetched is one of the biggest mistakes a developer can do.
Now that we have our main method to make web requests, let’s create another one that solves the problem of fetching single data from a URL, without the need to prepare a request or caring about server’s response. As you understand, this part is not exactly REST-related, however in most cases after you fetch the main data from the server through RESTful services you will be asked to also fetch complementary data, such as avatar images or other content from specific URLs.
So, back to the RestManager class, where we’ll define the following (obviously public) method:
func getData(fromURL url: URL, completion: @escaping (_ data: Data?) -> Void) {

}
See the parameters here: We have a URL where data should be fetched from, and the completion handler which either returns the fetched data on success, or nil on failure.
Likewise to the previous method, whatever we’ll do in the body of this method must happen in a background thread asynchronously, so the app won’t look frozen.
public func getData(fromURL url: URL, completion: @escaping (_ data: Data?) -> Void) {
    DispatchQueue.global(qos: .userInitiated).async {

    }
}
For one more time we’ll use a data task to fetch the data from the given URL. This time though we will use the parameter URL value to initialize the data task object; we don’t have (and we don’t need) a URL request. Before that, it’s necessary to initialize a URLSession object:
let sessionConfiguration = URLSessionConfiguration.default
let session = URLSession(configuration: sessionConfiguration)
let task = session.dataTask(with: url, completionHandler: { (data, response, error) in

})
Also, we don’t care about the response and the error, which will have nil values almost always if we use this method for the intended purpose. Of course, feel free to manage them too if you need so.
Inside the completion body of the data task, we must check whether data has been fetched or not, and then call our completion handler passing either the actual data, or nil:
guard let data = data else { completion(nil); return }
completion(data)
Lastly, don’t forget to start the data fetching:
task.resume()
That’s all in our new method, which enables us now to download data directly from a URL without creating collateral problems to the rest of the app. We’ll see a demo usage of it pretty soon. At the time, here’s the entire method:
public func getData(fromURL url: URL, completion: @escaping (_ data: Data?) -> Void) {
    DispatchQueue.global(qos: .userInitiated).async {
        let sessionConfiguration = URLSessionConfiguration.default
        let session = URLSession(configuration: sessionConfiguration)
        let task = session.dataTask(with: url, completionHandler: { (data, response, error) in
            guard let data = data else { completion(nil); return }
            completion(data)
        })
        task.resume()
    }
}
Trying Out RestManager
Finally, it’s about time to see if our class works and if we can actually make web requests. There are a lot of free APIs that you can find if you search online. Among all I chose this, as it looks really good for testing. Before we start making requests, I’d recommend you to visit that site and give a try to the various provided endpoints. We are going to use some of them here.
Before we do that, in the starter project you will find a file called SampleStructures.swift. There are a few simple structs in it that represent the structure of the various data that will be fetched as part of the server responses to the requests we’ll perform here. Notice that all of them conform to Codable protocol, so we can easily decode the received JSON data.
One more thing: Go to ViewController.swift file, and right before the viewDidLoad() method declare the following property:
let rest = RestManager()
Fetching A List Of Users
So, let’s get started by making a GET request and fetch a list of users from this URL: https://reqres.in/api/users. Open ViewController.swift file in the starter project, and add the following method:
func getUsersList() {
    guard let url = URL(string: "https://reqres.in/api/users") else { return }

    rest.makeRequest(toURL: url, withHttpMethod: .get) { (results) in

    }
}
We start simply, without any request HTTP headers or other data. We just specify the URL that we’ll make the request to, and the HTTP method.
To see the list of fetched users with the request specified in the getUsersList() method we will use the results object in the completion handler. Update the method as shown below:
func getUsersList() {
    guard let url = URL(string: "https://reqres.in/api/users") else { return }

    rest.makeRequest(toURL: url, withHttpMethod: .get) { (results) in
        if let data = results.data {
            let decoder = JSONDecoder()
            decoder.keyDecodingStrategy = .convertFromSnakeCase
            guard let userData = try? decoder.decode(UserData.self, from: data) else { return }
            print(userData.description)
        }
    }
}
Remember that the data property in the results is an optional value, therefore it must be unwrapped before it gets used. We initialize a JSONDecoder object in which we provide the preferred key decoding strategy (so “first_name” will be decoded to “firstName”, and so on), and then we decode the data.
To use the above method just call it in the viewDidLoad() as shown next:
override func viewDidLoad() {
    super.viewDidLoad()

    getUsersList()
}
Run the project and look at the Xcode console. If you’ve followed all previous steps up until this point, then this is what you should see:
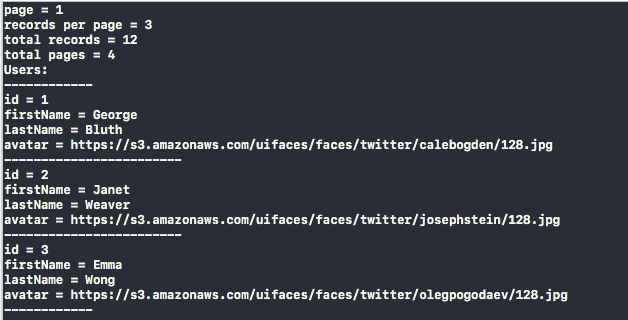
Do you see results similar to the above? If yes, congratulations! You just made your first web request using your own custom class!
Getting Response Headers
Now, update the getUserList() method to make it possible to see the response HTTP headers coming from the server. results object has a response property of the custom Response type. In it you can find response HTTP headers:
func getUsersList() {
    guard let url = URL(string: "https://reqres.in/api/users") else { return }

    rest.makeRequest(toURL: url, withHttpMethod: .get) { (results) in
        if let data = results.data {
            ...
        }

        print("\n\nResponse HTTP Headers:\n")

        if let response = results.response {
            for (key, value) in response.headers.allValues() {
                print(key, value)
            }
        }
    }
}
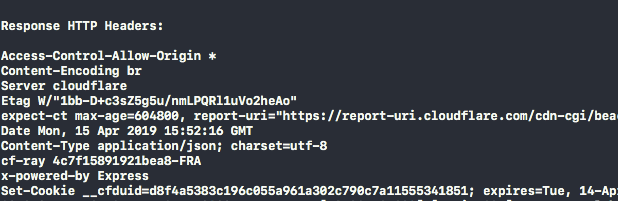
Here’s what is printed in the console after running the app again:
Providing URL Query Parameters
This time we will make the same request, but we will provide a URL query to indicate the page of data we want to fetch:
func getUsersList() {
    guard let url = URL(string: "https://reqres.in/api/users") else { return }

    // The following will make RestManager create the following URL:
    // https://reqres.in/api/users?page=2
    rest.urlQueryParameters.add(value: "2", forKey: "page")

    rest.makeRequest(toURL: url, withHttpMethod: .get) { (results) in
        ...
    }
}
Let’s run and see the results again:
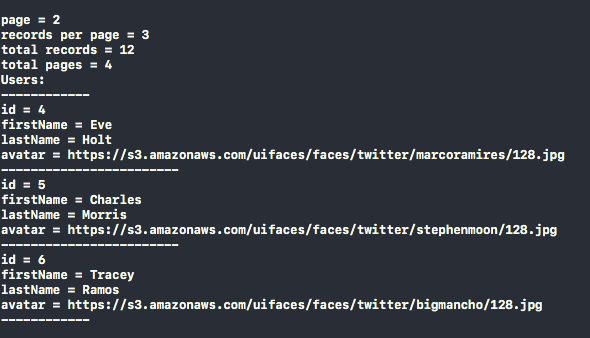
A different result set this time! The URL query parameter we specified was successfully taken into account.
Checking HTTP Status Code
Let’s make another try now, where we’ll make a request to the URL: https://reqres.in/api/users/100. This URL returns no data at all. This time we’ll create a new method:
func getNonExistingUser() {
    guard let url = URL(string: "https://reqres.in/api/users/100") else { return }

    rest.makeRequest(toURL: url, withHttpMethod: .get) { (results) in
        if let response = results.response {
            if response.httpStatusCode != 200 {
                print("\nRequest failed with HTTP status code", response.httpStatusCode, "\n")
            }
        }
    }
}
Call the above in the viewDidLoad() method:
override func viewDidLoad() {
    super.viewDidLoad()

    // getUsersList()
    getNonExistingUser()
}
Here’s the value of the HTTP status code as contained in the response property of the results object:
![]()
As it seems, HTTP status code is properly “extracted” from the server’s response!
Creating A New User
The point of this example is to make a POST request in which we will specify both a request HTTP header and HTTP body data (through the httpBodyParameters property). The purpose is to create a new user to the testing endpoint. User won’t be created for real, but server will give us back a proper response.
Let’s create a new method for that:
func createUser() {
    guard let url = URL(string: "https://reqres.in/api/users") else { return }

    rest.requestHttpHeaders.add(value: "application/json", forKey: "Content-Type")
    rest.httpBodyParameters.add(value: "John", forKey: "name")
    rest.httpBodyParameters.add(value: "Developer", forKey: "job")

    rest.makeRequest(toURL: url, withHttpMethod: .post) { (results) in
        guard let response = results.response else { return }
        if response.httpStatusCode == 201 {
            guard let data = results.data else { return }
            let decoder = JSONDecoder()
            guard let jobUser = try? decoder.decode(JobUser.self, from: data) else { return }
            print(jobUser.description)
        }
    }
}
See how requestHttpHeaders and httpBodyParameters properties are being used, and how values are set into their dictionaries. Quite straightforward and simple to use.
We should call it in the viewDidLoad() method:
override func viewDidLoad() {
    super.viewDidLoad()

    //getUsersList()
    //getNonExistingUser()
    createUser()
}
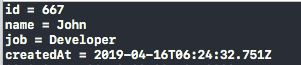
Note that we decode if only the HTTP status code is 201 (meaning successful creation). Returned results would look like this:
Fetching Single Data
Finally, let’s have one last try and this time let’s use the getData(fromURL:completion:) method of the RestManager class. With it we will fetch a user’s avatar image data. For last time we are going to create a new method that fetches a single user based on the ID value as you can see in the specified URL. Once we get user’s data and decode it successfully, we’ll get the avatar data and we’ll store it to Caches directory. If all these steps are successful, we’ll see on the console the URL to the avatar file on disk. We will use it to verify that the avatar has been downloaded.
Here’s the new method that fetches a single user data, and then the avatar image:
func getSingleUser() {
    guard let url = URL(string: "https://reqres.in/api/users/1") else { return }

    rest.makeRequest(toURL: url, withHttpMethod: .get) { (results) in
        if let data = results.data {
            let decoder = JSONDecoder()
            decoder.keyDecodingStrategy = .convertFromSnakeCase
            guard let singleUserData = try? decoder.decode(SingleUserData.self, from: data),
                let user = singleUserData.data,
                let avatar = user.avatar,
                let url = URL(string: avatar) else { return }

            self.rest.getData(fromURL: url, completion: { (avatarData) in
                guard let avatarData = avatarData else { return }
                let cachesDirectory = FileManager.default.urls(for: .cachesDirectory, in: .userDomainMask)[0]
                let saveURL = cachesDirectory.appendingPathComponent("avatar.jpg")
                try? avatarData.write(to: saveURL)
                print("\nSaved Avatar URL:\n\(saveURL)\n")
            })

        }
    }
}
We have to call this method in the viewDidLoad():
override func viewDidLoad() {
    super.viewDidLoad()

    //getUsersList()
    //getNonExistingUser()
    //createUser()
    getSingleUser()
}
Here’s what is displayed on the console:
![]()
Using the displayed URL, let’s verify that the avatar has been indeed fetched and saved:
![]()
Summary
It’s about time to get to the end of this tutorial, which I hope you found interesting, but mostly helpful. Through the previous parts we created a lightweight class capable of making RESTful web requests, and in the last part we made sure it works. Feel free to add more functionalities to this class, to customize it, or to extend it in any way you like.
An interesting case that I did not present today is how to upload files using “multipart/form-data” content type, but sticking to the default and core stuff, and then trying everything out I considered to be the best approach.
Although uploading files is just a part of web requests, it requires some extended presentation and discussion which would be too much considering the original scope of the tutorial. We might have the chance to discuss about that in a future post. For now, let’s just say goodbye hoping that you are leaving today getting something really valuable with you!
For the full project, you can download it on GitHub.


