

Welcome to a new, hopefully exciting tutorial! In a previous post I showed to you the process of creating a custom class that manages web requests and RESTful APIs. Today, we will keep building on it, as I would like to focus on a specific use case: How to upload files to a server!
Uploading files might not be one of the most common things when dealing with web services. However, it can be proved to be a tedious task to perform when it’s time to send files to a server. In the implementation steps that follow we will try to break things down and shed light to the key points and the details of the uploading process. Before we get there though, it’s necessary to have a quick discussion about some ground knowledge that we all should have on this topic.
A Quick Intro To “Multipart/form-data” Content Type
Before we start doing actual work, it’s necessary some important things to be mentioned first. Let me start by saying that in order to upload files to a server, multipart/form-data is the content type that should be specified in the web request. This content type allows to send files or large amounts of data in combination with other usual data that should be posted. “Multipart/form-data” content type tells to HTTP request that posted data should be broken into parts, as if they were to be posted by a web form that expects from users to fill in various fields and select files that should be submitted to a server.
Since posted data is broken into parts, it’s necessary for the server to know where a part starts and where it ends. For that purpose, a special and unique string is provided along with the content type, called boundary. That string should not occur in the actual data, so it must be as much unique as possible. It always starts with two dashes (“–“), with an arbitrary combination of other alphanumeric characters coming afterwards. Usually, boundaries start with multiple dashes, and then they have an alphanumeric suffix (e.g. —————–abc123).
Each part of a multipart body necessarily starts with a Content-Disposition header, with the form-data value coming in pair with it. An attribute called “name” should also be provided in the header, as it specifies the name of the part. Notice that names don’t need to be unique, and sometimes server sets the rules that apply to the “name” attribute. These two key-value pairs are enough when adding single data (meaning no files) to the request’s HTTP body. When appending files data, the filename should be also included in the “Content-Disposition” header with the original name of the file, as well as the content type (MIME type) of each file that is about to be uploaded.
The following is a fake example of a HTTP request body that uses the “multipart/form-data” content type:
Content-Type: multipart/form-data; boundary=-----------------------------abc123

-----------------------------abc123
Content-Disposition: form-data; name="username"

usernameValue
-----------------------------abc123
Content-Disposition: form-data; name="password"

passwordValue
-----------------------------abc123
Content-Disposition: form-data; name="aFile"; filename="avatar.png"
Content-Type: image/png

...contents of avatar.png file...

-----------------------------abc123
Content-Disposition: form-data; name="anotherFile"; filename="info.pdf"
Content-Type: application/pdf

...contents of info.pdf file...

-----------------------------abc123--
Notice how everything mentioned in the previous paragraphs is used. At first, the “multipart/form-data” content type is specified along with the boundary string that separates the data parts. See how boundary indicates the beginning of each part and also see how semicolon (“;”) separates attributes in headers. Line breaks are also important when building a HTTP body such the above one. In single fields, an empty line exists between the “Content-Disposition” header and the actual field value, while the boundary of the next part comes right after in the next line. In file parts, the “filename” attribute contains the name of the file, while an additional empty line exists between the file contents and the next boundary. The body ending is highlighted by the boundary, plus two more dashes as a suffix to it.
I am encouraging you to take a look at the W3C HTML Specification and read more about encoding content types and the “multipart/form-data” especially. You don’t have to stop there of course; a general search on the web will return lots of resources to read about this topic.
About The Demo App
So, as I said in the beginning of this post, we are going to keep building on the custom class we created in the previous tutorial, called RestManager. To get started, please download a starter package which contains a Xcode project with that class and one more directory with a demo server implementation (see next part). In Xcode project you will find three files that we’ll use to test file uploading after we finish all implementation steps:
- A text file named SampleText.txt with “lorem ipsum” data generated here.
- A PDF file named SamplePDF.pdf taken from File Examples.
- An image file named SampleImage.jpg downloaded from Pexels (Photo by Oleg Magni from Pexels).
No UI will exist in our app, and the results of our final tests will be printed in Xcode console and in Terminal. Any input values will be hard-coded. Therefore, we’ll entirely focus on the file uploading feature that we’ll add to the RestManager class. Obviously, you are free to create any UI you desire if you want to create a more dynamic demo application.
About The Server
After we finish implementing all the new code we’ll meet in the following parts, we’ll need to test if file uploading is actually working. For that purpose, a simple server implemented in Node.js is included in the starter package that you downloaded; you will find it in the Server subdirectory. You can keep it in the location that currently is, or copy it anywhere else you want in your disk.
In order to run the server, you must have Node.js installed on your computer. If you don’t, please check here or here on how to do that. Open Terminal and type the following command:
cdThere is a space character after the cd command. Then switch to Finder, and drag and drop the Server directory to terminal and press the Return key:
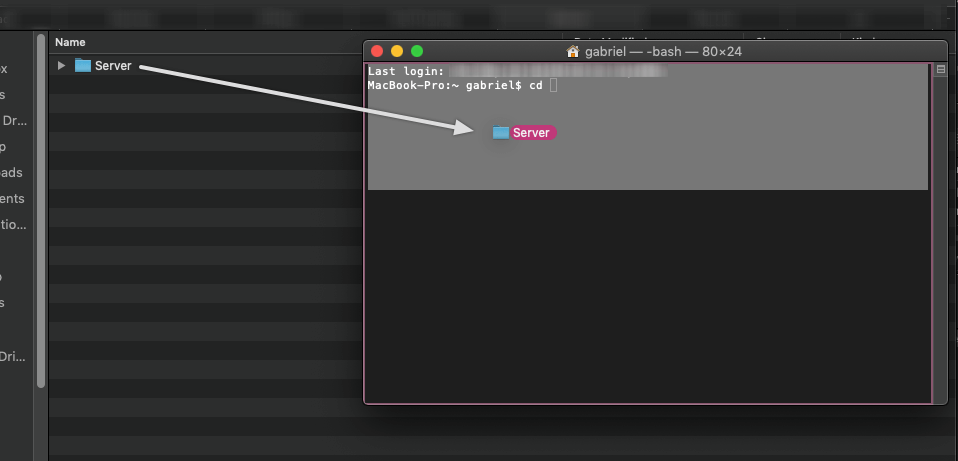
By doing so, you don’t have to type the path to the server directory; it’s automatically appended to the command in terminal.
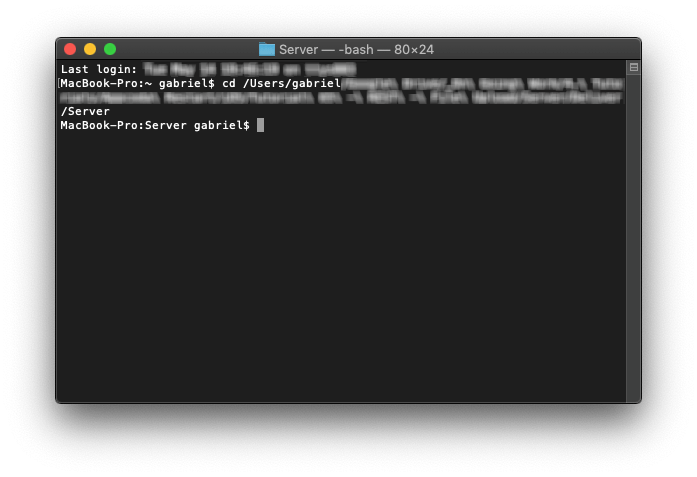
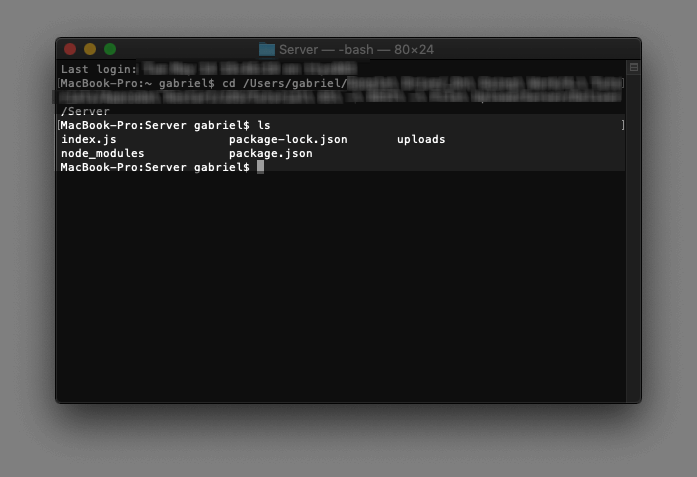
To verify that you are successfully in the server directory, just type:
lsThis command will show the current directory contents, and if you see something similar to the next one, then you’re just fine:
To start the server just type:
node index.jsYou should see the message:
Server started successfully on port 3000!
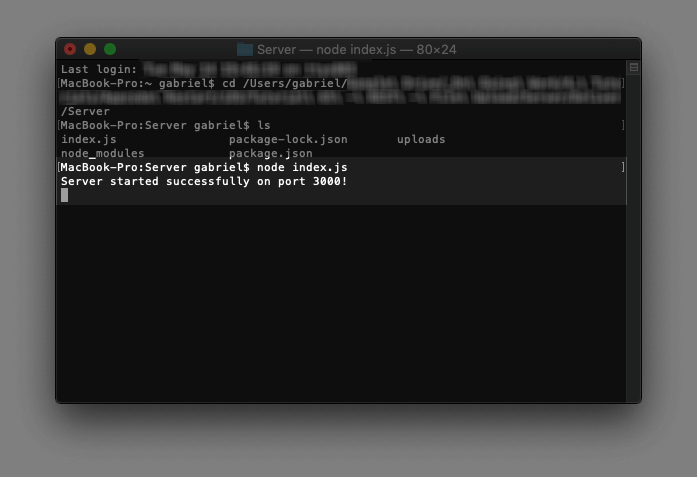
The server is now running at address http://localhost:3000. You can also verify that if you paste that address in a new tab in your browser. You’ll see a message coming from the server.
Note: If you are already running another server at port 3000, edit the index.js file and set a custom port number to the port variable. Then restart the server with the node index.js command.
Requests made to “http” addresses are not allowed by default in iOS as they are considered insecure. However, for the sake of the tutorial, localhost has been whitelisted in the Info.plist file of the starter project so you will meet no problem in testing the app later.
Representing Files
The first thing we need to take care of is how files are going to be represented in the RestManager class. For any file that is about to be uploaded, we need to have the following data available at the time of the HTTP body preparation:
- The actual file contents.
- The original file name. Remember that the filename attribute must exist in the “Content-Disposition” header of each part that represents a file.
- The part’s name for the name attribute in the “Content-Disposition” header.
- The content type (MIME type) of the file.
Obviously, all that data could be stored in a dictionary, but that wouldn’t be the best approach in Swift. To do it better, let’s create a struct which we’ll call FileInfo. Open the RestManager.swift file in the starter Xcode project, and go to the end of it. You will find the following empty extension:
// MARK: - File Upload Related Implementation

extension RestManager {

}
This is where we’ll add almost all new code regarding the file uploading feature. Inside this extension, add the following structure:
struct FileInfo {
    var fileContents: Data?
    var mimetype: String?
    var filename: String?
    var name: String?
}
The four properties will keep the data described earlier. As you will see later, if any of the above properties is nil the file won’t be added to the HTTP body for submission to the server.
We can make the initialization of a FileInfo object more friendly if we add the following custom initializer:
struct FileInfo {
    ...

    init(withFileURL url: URL?, filename: String, name: String, mimetype: String) {
        guard let url = url else { return }
        fileContents = try? Data(contentsOf: url)
        self.filename = filename
        self.name = name
        self.mimetype = mimetype
    }
}
With this initializer, it won’t be necessary to provide the actual file contents when creating a FileInfo object. Specifying the URL of the file will be enough. File contents will be read in the above initializer.
Creating The Boundary
Having a solution on our hands about how to represent files, let’s create a method which will be responsible of creating the boundary string. Remember that a boundary must be unique and definitely not an ordinary string that could be potentially found in the actual data that will be uploaded. As I said in the beginning of the post, even though boundaries start with two dashes (“–“), they usually have several more dashes following and a random alphanumeric string at the end. That’s not mandatory, but it’s the logic we will follow here.
Right after the FileInfo struct, define the following private method:
private func createBoundary() -> String? {

}
I will show you two different ways to generate the random boundary string.
Using A UUID String
The fastest way to get a random string is to generate a UUID value:
var uuid = UUID().uuidStringThe above will generate something similar to this:
D41568F4-7175-42BB-9503-DAA282180D70Let’s get rid of the dashes in that string, and let’s convert all letters to lowercase:
uuid = uuid.replacingOccurrences(of: "-", with: "")
uuid = uuid.map { $0.lowercased() }.joined()
The original UUID will now look like this:
d41568f4717542bb9503daa282180d70Let’s construct the boundary string. It will be a concatenation of 20 dashes at the beginning and the transformed UUID value:
let boundary = String(repeating: "-", count: 20) + uuidIf you like exaggerating, add the current timestamp to the end as well:
let boundary = String(repeating: "-", count: 20) + uuid + "\(Int(Date.timeIntervalSinceReferenceDate))"A boundary string created with the above will look like:
--------------------d41568f4717542bb9503daa282180d70579430569Well, that looks quite unique and random, no?
Here’s the implementation of the entire method:
private func createBoundary() -> String? {
    var uuid = UUID().uuidString
    uuid = uuid.replacingOccurrences(of: "-", with: "")
    uuid = uuid.map { $0.lowercased() }.joined()

    let boundary = String(repeating: "-", count: 20) + uuid + "\(Int(Date.timeIntervalSinceReferenceDate))"

    return boundary
}
Using Random Characters
As an alternative to the above we can create a mechanism which will pick random characters from a collection of available characters, and using them to form a string which will be appended to the boundary string. The collection of available characters will be parted by all letters ranging from upper cased “A” to “Z”, lower cased “a” to “z”, and all digits from “0” to “9”.
We won’t really need to hard-code anything, as we can programmatically construct everything. We will be based on the ASCII table for that.
We’ll start by specifying the range of the lower cased characters (“a” to “z”) in the ASCII table as shown below:
let lowerCaseLettersInASCII = UInt8(ascii: "a")...UInt8(ascii: "z")The above is equivalent to this:
let lowerCaseLettersInASCII = 97...122where 97 is the position of the “a” character and “122” is the position of the “z” character in the ASCII table.
However, the second line of code requires from us to search for an ASCII table online and then locate the position of the characters we are interested in into the table. Okay, it’s easy, but it’s definitely not the recommended way, since we can get the values we want by using the UInt8(ascii:) initializer. And that’s we do in the first place.
Similarly, we get the ranges of the upper cased A-Z and of the digits:
let upperCaseLettersInASCII = UInt8(ascii: "A")...UInt8(ascii: "Z")
let digitsInASCII = UInt8(ascii: "0")...UInt8(ascii: "9")
Now, let’s join all these ranges into a collection, or in other words a sequence of ranges (closed ranges more particularly) with aim to get the actual characters afterwards:
let sequenceOfRanges = [lowerCaseLettersInASCII, upperCaseLettersInASCII, digitsInASCII].joined()If we print the value of the sequenceOfRanges to the console at runtime we’ll get this:
FlattenSequence<Array<ClosedRange<UInt8>>>(_base: [ClosedRange(97...122), ClosedRange(65...90), ClosedRange(48...57)])Even though it’s not obvious unless someone looks up for it, the above can be easily converted into a String value:
guard let toString = String(data: Data(sequenceOfRanges), encoding: .utf8) else { return nil }Data struct provides several initializers for creating a data object and there is one among them that accepts a sequence as an argument, exactly as we do in the Data(sequenceOfRanges) expression. From that data object, we can create the following string which is assigned to the toString constant:
abcdefghijklmnopqrstuvwxyzABCDEFGHIJKLMNOPQRSTUVWXYZ0123456789That cool! Let’s generate a string of 20 random characters now:
var randomString = ""
for _ in 0..<20 { randomString += String(toString.randomElement()!) }
At first we initialize a string value called randomString. Then, we create a loop that will be executed 20 times. In it, we pick a random character from the toString string using the randomElement() method, and we generate a new String value (String(toString.randomElement()!)). This new String value is appended to the randomString.
Note that is safe to force unwrap the value of the randomElement() method, as it returns nil only in cases of empty collections. Here we know that toString won’t be empty.
The following is a random value of the randomString:
ZveNCE7Ptg3J2HaVLDfNFinally, we can build the boundary string:
let boundary = String(repeating: "-", count: 20) + randomString + "\(Int(Date.timeIntervalSinceReferenceDate))"Here is a sample of the boundary:
--------------------ZveNCE7Ptg3J2HaVLDfN579434247The createBoundary() method with the second implementation in one place:
private func createBoundary() -> String? {
    let lowerCaseLettersInASCII = UInt8(ascii: "a")...UInt8(ascii: "z")
    let upperCaseLettersInASCII = UInt8(ascii: "A")...UInt8(ascii: "Z")
    let digitsInASCII = UInt8(ascii: "0")...UInt8(ascii: "9")

    let sequenceOfRanges = [lowerCaseLettersInASCII, upperCaseLettersInASCII, digitsInASCII].joined()
    guard let toString = String(data: Data(sequenceOfRanges), encoding: .utf8) else { return nil }

    var randomString = ""
    for _ in 0..<20 { randomString += String(toString.randomElement()!) }

    let boundary = String(repeating: "-", count: 20) + randomString + "\(Int(Date.timeIntervalSinceReferenceDate))"

    return boundary
}
Use the implementation you prefer the most. The second one is more “Swifty” but it requires a bit of more code. At the end of the day, both approaches are going to work equally well.
An important note: I’ve mentioned already that the boundary string which separates the parts of a multipart body starts with two dashes (“–“). These two dashes are not included in the dashes of the boundary string we generated in both approaches here. This string will be provided as-is to the request as a request header along with the content type and server will try to locate it after the two dashes prefix. Also, a boundary string can exist with no dashes at all; we just add them to minimize the possibility to find similar string in the uploaded data. As you will see later, the two dashes prefix will be manually appended whenever necessary.
Extending Data Structure
Our next steps involve the preparation of the HTTP body using any arbitrary data provided to the class, as well as using the files data. But before we get into that, we will extend the Data structure and we will create the following generic method:
mutating func append<T>(values: [T]) -> Bool {

}
The purpose of this method is to let us easily append the values of the values collection to the data object that calls it. And as you’ll see, we’ll be interested for String and Data types only.
Just for clarification, we could avoid implementing this method. However, the code that we will add to it would have to be repeated multiple times in different points in the RestManager class, and that definitely would not be a wise move.
So, to continue go to the end of the RestManager.swift file where you will find a Data extension:
extension Data {

}
Add the new method’s definition in it:
extension Data {
    mutating func append<T>(values: [T]) -> Bool {

    }
}
At first, we’ll declare the following two local variables:
var newData = Data()
var status = true
Next, we’ll distinguish the type of the given values. Let’s start with the String type. In this case, we’ll make a loop to access all values in the values parameter collection:
if T.self == String.self {
    for value in values {

    }
}
In each repetition we will convert the string value into a Data object and we will append it to the local newData variable. If for some reason the string value cannot be converted into a Data object, we’ll set the status flag to false and we’ll break the loop.
guard let convertedString = (value as! String).data(using: .utf8) else { status = false; break }
newData.append(convertedString)
We will follow a quite similar approach in case of Data input values. Of course, there is no need to initialize any new Data object or make a conversion of any type. We are appending one data value to another:
else if T.self == Data.self {
    for value in values {
        newData.append(value as! Data)
    }
}
Lastly, let’s indicate that we don’t care about any other type of values:
else {
    status = false
}
Next, we’ll check the status value. If it’s true, then we can append the newData local variable to the self object (the Data object that is used to call this method).
if status {
    self.append(newData)
}
At the end, we should not forget to return the status as the result of the method:
return statusHere’s the entire implementation. We are going to put it in action starting from the next part.
extension Data {
    mutating func append<T>(values: [T]) -> Bool {
        var newData = Data()
        var status = true

        if T.self == String.self {
            for value in values {
                guard let convertedString = (value as! String).data(using: .utf8) else { status = false; break }
                newData.append(convertedString)
            }
        } else if T.self == Data.self {
            for value in values {
                newData.append(value as! Data)
            }
        } else {
            status = false
        }

        if status {
            self.append(newData)
        }

        return status
    }
}
Creating the HTTP Body
In the current implementation of RestManager there is a method named getHttpBody(). Its purpose is to prepare the HTTP body with the data that will be posted to the server. Although this method works great in any other case, unfortunately it’s not of much help in case of file uploading. There is the boundary string we have to take into account, as well as the special headers and formatting required when using the “multipart/form-data” content type. To serve our new needs, we’ll implement a similarly named method which will be accepting the boundary string as an argument (also known as method overloading).
In the new extension of the RestManager class, right below the createBoundary method, add the following:
private func getHttpBody(withBoundary boundary: String) -> Data {
    var body = Data()

    return body
}
Keep in mind that the HTTP body must be a Data value, so we are initializing such a value in this method, and this is also what the method returns. In this method we’ll deal with any data that should be posted to the server except for files. That’s the data that would be normally submitted if there were no files to upload at the same time, and it’s kept in the httpBodyParameters property (as a reminder, httpBodyParameters is a property in the RestManager class and it’s of RestEntity type, a custom structure – find it in RestManager and read more in the previous tutorial about it).
httpBodyParameters has a method called allValues() and returns all data as a dictionary (a [String: String] dictionary). We’ll use it to access all values that should be sent to the server and append them to the body variable. Right after the var body = Data() line add the following:
for (key, value) in httpBodyParameters.allValues() {

}
A small stop here now as we have to discuss what exactly we’ll be appending to the body. Let’s see again part of the example presented in the beginning of this post:
-----------------------------abc123
Content-Disposition: form-data; name="username"

usernameValue
-----------------------------abc123
Content-Disposition: form-data; name="password"

passwordValue
In this example the data is the username and the password. The following apply to each piece of data:
- At first there is the boundary string, and right after that a line break. In HTTP headers, a line break is marked with “\r\n” (carriage return and new line character), not just the “\n” that we are mostly used to. Programmatically, this could be written like:
"--\(boundary)\r\n"(see the two dashes before the boundary string). - Next, there is the “Content-Disposition” header with the
nameattribute only in it. Header is followed by a line break two times. We could write this like so:"Content-Disposition: form-data; name=\"\(key)\"\r\n\r\n". - Lastly, it’s the actual value followed by a line break. That’s easy:
"\(value)\r\n".
We will add the code that represents each step described above into an array:
let values = ["--\(boundary)\r\n",
                "Content-Disposition: form-data; name=\"\(key)\"\r\n\r\n",
                "\(value)\r\n"]
We will use for first time the append(values:) custom method we implemented in the previous step in order to convert these strings into Data objects and append them to the body variable:
_ = body.append(values: values)And that’s the last thing we had to do in this method. Let’s see it altogether now:
private func getHttpBody(withBoundary boundary: String) -> Data {
    var body = Data()

    for (key, value) in httpBodyParameters.allValues() {
        let values = ["--\(boundary)\r\n",
            "Content-Disposition: form-data; name=\"\(key)\"\r\n\r\n",
            "\(value)\r\n"]

        _ = body.append(values: values)
    }

    return body
}
We’ll use the results of this method in a while. For now, we have to add the files data to the HTTP body as well.
Adding Files To HTTP Body
One could say that the getHttpBody(withBoundary:) method we just implemented along with the new one we will implement here consist of the most important part of the overall work we have to do in order to make file uploading possible. And that would be pretty much true, as we’ve built all the helper methods we need and now we are dealing with the core functionality.
So, continuing on building the HTTP body, let’s define the following new method:
private func add(files: [FileInfo], toBody body: inout Data, withBoundary boundary: String) -> [String]? {

}
Let’s talk first about the parameters. The first one is a collection of FileInfo objects, and it contains the data for all files that are about to be uploaded. The second parameter value is the data object that represents the HTTP body. Any changes that will be made to that object inside this method will be reflected out of it as well because it’s marked with the inout keyword. The last parameter is the boundary string, as we necessarily need it to separate data parts.
You might be wondering why this method returns an optional array of String values. Well, in case there are files whose data cannot be added to the HTTP body, then we’ll keep their names into an array, which in turn the method will return. In normal conditions this method should return nil, meaning that data from all files was successfully appended to the HTTP body data.
Let’s start adding some code, with the first one being the following local variables:
var status = true
var failedFilenames: [String]?
status will indicate whether all pieces of data for each single file in the files collection were successfully combined in one Data object, which can be then appended to the body inout parameter. If status is false, we’ll be appending the name of the matching file to the failedFilenames array.
Let’s start a loop now:
for file in files {

}
The first thing we have to do is to make sure that all properties of each file object have actual values so we can proceed:
guard let filename = file.filename, let content = file.fileContents, let mimetype = file.mimetype, let name = file.name else { continue }Next, we will set the initial value of the status flag on each repetition of the loop to false, and we’ll initialize a new Data object.
status = false
var data = Data()
Now, let’s see again the example presented in the beginning of the tutorial so we understand what we have to do:
-----------------------------abc123
Content-Disposition: form-data; name="aFile"; filename="avatar.png"
Content-Type: image/png

...contents of avatar.png file...

-----------------------------abc123
Content-Disposition: form-data; name="anotherFile"; filename="info.pdf"
Content-Type: application/pdf

...contents of info.pdf file...

-----------------------------abc123--
Going step by step through the lines that describe a file part:
- At first there is the boundary with the line break at the end. We already know how to write that in code.
- Next, we have the “Content-Disposition” header. The addition here (comparing to the header in the previous part) is the new
filenameattribute which contains the actual file name. In code such a header is written like this:"Content-Disposition: form-data; name=\"\(name)\"; filename=\"\(filename)\"\r\n". - Right after we have the content type of the file. See all the available MIME Media Types. In code this is like so:
"Content-Type: \(mimetype)\r\n\r\n".
Let’s make a break here and let’s append all the above to an array:
let formattedFileInfo = ["--\(boundary)\r\n",
                "Content-Disposition: form-data; name=\"\(name)\"; filename=\"\(filename)\"\r\n",
                "Content-Type: \(mimetype)\r\n\r\n"]
Let’s convert all strings in that array into Data objects and append them to the data variable:
if data.append(values: formattedFileInfo) {

}
Let’s continue where we had stopped from. The next item in a file part is the actual file contents. Remember that file contents are represented by the fileContents property in a FileInfo object, which is a Data object. So far we were dealing with strings only. File contents must be appended to the data variable too:
if data.append(values: [content]) {

}
Remember that append(values:) method expects for an array of values, so it’s necessary to include content into the array’s opening and closing brackets above.
Lastly, notice in the above example that there is an empty line right after the file contents which should be added to the data as well:
if data.append(values: ["\r\n"]) {

}
These three conditions we wrote must be embedded into each other. If all of them are true, then all data pieces for the current file were successfully added to the data object, and we’ll indicate that by making the status true:
if data.append(values: formattedFileInfo) {
    if data.append(values: [content]) {
        if data.append(values: ["\r\n"]) {
            status = true
        }
    }
}
See that we used the custom append(values:) custom method three times in a row here. I hope you agree that its implementation was meaningful since we use it again and again.
Next, let’s check the status value for each file. While still being on the loop:
if status {
    body.append(data)
} else {
    if failedFilenames == nil {
        failedFilenames = [String]()
    }

    failedFilenames?.append(filename)
}
If status is true, we append the data variable to the body which represents the HTTP body. If not, then we initialize the failedFilenames array in case it’s not initialized already, and we keep the name of the current file in it.
One last thing remaining, to return the failedFilenames from the method:
return failedFilenamesOur new method should now look like this:
private func add(files: [FileInfo], toBody body: inout Data, withBoundary boundary: String) -> [String]? {
    var status = true
    var failedFilenames: [String]?

    for file in files {
        guard let filename = file.filename, let content = file.fileContents, let mimetype = file.mimetype, let name = file.name else { continue }
        status = false
        var data = Data()

        let formattedFileInfo = ["--\(boundary)\r\n",
            "Content-Disposition: form-data; name=\"\(name)\"; filename=\"\(filename)\"\r\n",
            "Content-Type: \(mimetype)\r\n\r\n"]

        if data.append(values: formattedFileInfo) {
            if data.append(values: [content]) {
                if data.append(values: ["\r\n"]) {
                    status = true
                }
            }
        }

        if status {
            body.append(data)
        } else {
            if failedFilenames == nil {
                failedFilenames = [String]()
            }

            failedFilenames?.append(filename)
        }
    }

    return failedFilenames
}
Closing The HTTP Body
Now that we created methods which build the HTTP body by appending any post data and file data, we must create one more which will close the body. Remember that in “multipart/form-data” the HTTP body closing is marked by the boundary string and two dashes as a suffix to it:
-----------------------------abc123--As you can guess, doing so doesn’t require much of work as all it takes is this:
private func close(body: inout Data, usingBoundary boundary: String) {
    _ = body.append(values: ["\r\n--\(boundary)--\r\n"])
}
For one more time here the body parameter is marked as inout, so the data argument will be passed by reference and the changes made to it inside this method will become visible to the caller too. Besides that, notice the line breaks before and after the closing string which ensure that the closing boundary will be the only content in the line.
It’s really important not to forget to call this method and indicate the end of parts in the multipart HTTP body.
Uploading Files
It’s about time to put everything together and make file uploading possible. The method we’ll write here will be public, so you can go and add it to the top of the class along with other two public methods existing already. Here is its definition:
func upload(files: [FileInfo], toURL url: URL,
                withHttpMethod httpMethod: HttpMethod,
                completion: @escaping(_ result: Results, _ failedFiles: [String]?) -> Void) {

}
In accordance to what we did to the other two existing public methods, we are going to perform all actions in this method asynchronously. We won’t run anything on the main thread since file uploading could take significant amount of time and we don’t want apps to show frozen. In code that means:
DispatchQueue.global(qos: .userInitiated).async { [weak self] in

}
With userInitiated value in the quality of service parameter we give our task a relatively high priority in execution. Note that we mark self as weak in the closure since the RestManager instance used to perform the file uploading can potentially become nil, and that practically means that self is from now on an optional. This introduces a couple of new needs as you will see next.
The first actual action we have to take is to add any URL query parameters specified in the urlQueryParameters property to the URL. This will happen by calling the addURLQueryParameters(toURL:) method which we implemented in the previous tutorial:
let targetURL = self?.addURLQueryParameters(toURL: url)Next, let’s call the createBoundary() method we implemented today and let’s create the boundary string:
guard let boundary = self?.createBoundary() else { completion(Results(withError: CustomError.failedToCreateBoundary), nil); return }Notice that since self is used as an optional, boundary becomes an optional value too, regardless of the fact that createBoundary() does not return an optional. So, in case there’s no boundary string to continue, we call the completion handler passing the error shown above and we return from the method. This custom error doesn’t exist yet in the class, we’ll add it in a while.
Let’s get going, and in the next step let’s add the “multipart/form-data” along with the boundary string to the collection of the request headers:
self?.requestHttpHeaders.add(value: "multipart/form-data; boundary=\(boundary)", forKey: "content-type")To refresh your memory, requestHttpHeaders is a RestEntity property which keeps all HTTP request headers as key-value pairs. It’s important to highlight that since we specify the content type header here, there is no need to provide a content type header manually while preparing the request. Not only it’s redundant, it’s also dangerous as it could create conflicts and make the server reject the request.
Next, let’s start preparing the HTTP body. We’ll start by calling the getHttpBody(withBoundary:) method:
guard var body = self?.getHttpBody(withBoundary: boundary) else { completion(Results(withError: CustomError.failedToCreateHttpBody), nil); return }Once again, since self is an optional, body might be nil in case self is nil. So, in that case we call the completion handler with another custom error and we return from the method.
Time to add the files to be uploaded to the HTTP body. Notice in the next line that we pass the body variable with the “&” symbol as that’s an inout parameter value:
let failedFilenames = self?.add(files: files, toBody: &body, withBoundary: boundary)failedFilenames is either nil if all files are successfully added to the HTTP body, or it contains the names of those files that failed to be appended to the body.
We should not forget to close the HTTP body properly:
self?.close(body: &body, usingBoundary: boundary)We are ready now to create the URL request:
guard let request = self?.prepareRequest(withURL: targetURL, httpBody: body, httpMethod: httpMethod) else { completion(Results(withError: CustomError.failedToCreateRequest), nil); return }The method we use here is already implemented in the RestManager class and we discussed about it in the previous tutorial. Notice that we pass the URL with any potential query items (targetURL) and the HTTP body as arguments.
Finally, we’ll create a new URLSession and an upload task to make the request. Upon completion, we’ll call the completion handler and we’ll pass a Results object with data regarding the results of the request, and the failedFiles array.
let sessionConfiguration = URLSessionConfiguration.default
let session = URLSession(configuration: sessionConfiguration)
let task = session.uploadTask(with: request, from: nil, completionHandler: { (data, response, error) in
    completion(Results(withData: data,
                       response: Response(fromURLResponse: response),
                       error: error),
               failedFilenames)
})
task.resume()
The upload method is now ready:
func upload(files: [FileInfo], toURL url: URL,
            withHttpMethod httpMethod: HttpMethod,
            completion: @escaping(_ result: Results, _ failedFiles: [String]?) -> Void) {

    DispatchQueue.global(qos: .userInitiated).async { [weak self] in
        let targetURL = self?.addURLQueryParameters(toURL: url)
        guard let boundary = self?.createBoundary() else { completion(Results(withError: CustomError.failedToCreateBoundary), nil); return }
        self?.requestHttpHeaders.add(value: "multipart/form-data; boundary=\(boundary)", forKey: "content-type")

        guard var body = self?.getHttpBody(withBoundary: boundary) else { completion(Results(withError: CustomError.failedToCreateHttpBody), nil); return }
        let failedFilenames = self?.add(files: files, toBody: &body, withBoundary: boundary)
        self?.close(body: &body, usingBoundary: boundary)

        guard let request = self?.prepareRequest(withURL: targetURL, httpBody: body, httpMethod: httpMethod) else { completion(Results(withError: CustomError.failedToCreateRequest), nil); return }

        let sessionConfiguration = URLSessionConfiguration.default
        let session = URLSession(configuration: sessionConfiguration)
        let task = session.uploadTask(with: request, from: nil, completionHandler: { (data, response, error) in
            completion(Results(withData: data,
                               response: Response(fromURLResponse: response),
                               error: error),
                       failedFilenames)
        })
        task.resume()
    }

}
There is one last thing to do before we test out everything. To add the two new custom errors to the CustomError enum. Find it in the RestManager class and update it as shown next:
enum CustomError: Error {
    case failedToCreateRequest
    case failedToCreateBoundary
    case failedToCreateHttpBody
}
Update its extension right below accordingly with the description of the messages:
extension RestManager.CustomError: LocalizedError {
    public var localizedDescription: String {
        switch self {
        case .failedToCreateRequest: return NSLocalizedString("Unable to create the URLRequest object", comment: "")
        case .failedToCreateBoundary: return NSLocalizedString("Unable to create boundary string", comment: "")
        case .failedToCreateHttpBody: return NSLocalizedString("Unable to create HTTP body parameters data", comment: "")
        }
    }
}
That’s it! Time to upload files!
Testing File Uploading
The time to test file uploading has finally come. Switch to the ViewController.swift file and add the following method definition:
func uploadSingleFile() {

}
For starters, we are going to upload a single file only, and here we will prepare the FileInfo object that will contain its data.
Before we proceed, let me remind you that in the starter Xcode project you downloaded there are three files for testing: “sampleText.txt”, “samplePDF.txt” and “sampleImage.pdf”. We’ll use the “sampleText.txt” here, but feel free to change and use any other file you want. Sample files exist in the application’s bundle just for making the example as simple as possible, but in real apps the you’ll almost always fetch them from the documents directory.
So, let’s start by creating a FileInfo object:
func uploadSingleFile() {
    let fileURL = Bundle.main.url(forResource: "sampleText", withExtension: "txt")
    let fileInfo = RestManager.FileInfo(withFileURL: fileURL, filename: "sampleText.txt", name: "uploadedFile", mimetype: "text/plain")
}
See that we are using the custom initializer we created in the FileInfo structure here. However, in case you don’t want to initialize a FileInfo object that way and you prefer to manually set all values including the files contents, here’s your alternative:
var fileInfo = RestManager.FileInfo()
fileInfo.filename = "sampleText.txt"
fileInfo.name = "uploadedFile"
fileInfo.mimetype = "text/plain"
if let fileURL = Bundle.main.url(forResource: "sampleText", withExtension: "txt") {
    fileInfo.fileContents = try? Data(contentsOf: fileURL)
}
Note: Server is implemented in a way that requires the name attribute in every part of the multipart body to have the “uploadedFile” value. Therefore, that’s the value that we’ll be setting in the name property of each FileInfo object we create here.
The URL where we’ll make the request to upload the file is: http://localhost:3000/upload. We will pass a URL object along with an array that will contain the fileInfo object as arguments to a new method (we’ll implement it right next):
upload(files: [fileInfo], toURL: URL(string: "http://localhost:3000/upload"))upload(files:toURL:) is a small method responsible for making the request as you can see next. We could have put that code in the uploadSingleFile() method, but we’ll use it again in a while when we’ll upload multiple files. So, we’d better avoid repeating code.
func upload(files: [RestManager.FileInfo], toURL url: URL?) {
    if let uploadURL = url {
        rest.upload(files: files, toURL: uploadURL, withHttpMethod: .post) { (results, failedFilesList) in
            print("HTTP status code:", results.response?.httpStatusCode ?? 0)

            if let error = results.error {
                print(error)
            }

            if let data = results.data {
                if let toDictionary = try? JSONSerialization.jsonObject(with: data, options: .mutableContainers) {
                    print(toDictionary)
                }
            }

            if let failedFiles = failedFilesList {
                for file in failedFiles {
                    print(file)
                }
            }
        }
    }
}
In the completion handler we don’t do anything particular. We just print the HTTP status code, we display any potential errors, and the server’s response after we convert it from JSON to a dictionary object. Of course, we also print the list of failed to be uploaded files (in case there is any).
In the viewDidLoad() method call the uploadSingleFile():
override func viewDidLoad() {
    super.viewDidLoad()
    uploadSingleFile()
}
Run the app now and look at both in Xcode console and in the terminal where the server’s output is printed. If you followed everything step by step up until here, you should get this in Xcode:
HTTP status code: 200
{
    result = 1;
}
At the same time, in terminal you should have the details of the uploaded file:
{ fieldname: 'uploadedFile',
  originalname: 'sampleText.txt',
  encoding: '7bit',
  mimetype: 'text/plain',
  destination: 'uploads/',
  filename: 'sampleText.txt',
  path: 'uploads/sampleText.txt',
  size: 5575
}
I wanted to make the small demo server and the file uploading process behave as much naturally as possible, so files sent to this server implementation are actually… being uploaded! In Finder, go to the Server directory that you downloaded in the starter package and then into the subdirectory called “uploads”. The uploaded file is there which proves that file uploading is actually working!

Let’s make our testing more interesting by also sending additional data along with the request. Right after the initialization of the FileInfo object in the uploadSingleFile() method add the following two lines:
rest.httpBodyParameters.add(value: "Hello 😀 !!!", forKey: "greeting")
rest.httpBodyParameters.add(value: "AppCoda", forKey: "user")
Run the app again. In the terminal you should see the additional uploaded data as well:
{ fieldname: 'uploadedFile',
  originalname: 'sampleText.txt',
  encoding: '7bit',
  mimetype: 'text/plain',
  destination: 'uploads/',
  filename: 'sampleText.txt',
  path: 'uploads/sampleText.txt',
  size: 5575
}
[Object: null prototype] { user: 'AppCoda', greeting: 'Hello 😀 !!!'
}
Let’s upload multiple files now. We’ll do that by creating a new method similar to the previous one, with the difference being that instead of initializing one FileInfo object, we’ll initialize three of them so we can upload all sample files we have. Here it is:
func uploadMultipleFiles() {
    let textFileURL = Bundle.main.url(forResource: "sampleText", withExtension: "txt")
    let textFileInfo = RestManager.FileInfo(withFileURL: textFileURL, filename: "sampleText.txt", name: "uploadedFile", mimetype: "text/plain")

    let pdfFileURL = Bundle.main.url(forResource: "samplePDF", withExtension: "pdf")
    let pdfFileInfo = RestManager.FileInfo(withFileURL: pdfFileURL, filename: "samplePDF.pdf", name: "uploadedFile", mimetype: "application/pdf")

    let imageFileURL = Bundle.main.url(forResource: "sampleImage", withExtension: "jpg")
    let imageFileInfo = RestManager.FileInfo(withFileURL: imageFileURL, filename: "sampleImage.jpg", name: "uploadedFile", mimetype: "image/jpg")

    upload(files: [textFileInfo, pdfFileInfo, imageFileInfo], toURL: URL(string: "http://localhost:3000/multiupload"))
}
At the end we call again the upload(files:toURL:) method which will trigger the actual upload request. Notice that the upload endpoint is different this time (“multiupload”). To see it working, don’t forget to call it in the viewDidLoad():
override func viewDidLoad() {
    super.viewDidLoad()
    //uploadSingleFile()

    uploadMultipleFiles()
}
This time you should see the names of the uploaded files in terminal:
Received files:
-sampleText.txt
-samplePDF.pdf
-sampleImage.jpg
Note that the current server implementation supports up to 10 simultaneous files to be uploaded. Of course you are free to change that limit according to your preference.
Summary
Starting in the previous tutorial where we created the first version of the RestManager class and continuing in this one where we added the file uploading feature, we have managed to build a small and lightweight class capable of covering our needs in making web requests. “Multipart/form-data” content type and the way HTTP body is built can be sometimes confusing, but if you break things down then everything gets easy. I hope what I shared with you here today to be of some value, and I wish you are enjoying RESTful services even more now. You are always welcome to add more features or adapt the current implementation according to your needs. See you next time!
For reference, you can download the full project on GitHub.


