

Siri Shortcut is a new API that Apple introduced in iOS 12 built on top of SiriKit framework. It provides ways for developer to create custom shortcut to the activities that the user often used within the app. User invokes the shortcut by issuing a voice command to Siri, the actual phrases can be customized by recording custom phrase associated with the shortcut.
Since the release of SiriKit in iOS 10, Apple has been limiting the usage of Siri within several built in domains that Apple provided, such as ride sharing, payment, messaging, and etc. There is no options for developers to provide their own custom intent. But with Siri Shortcut in iOS 12, finally Apple has provided the framework for developers to build their own custom intent that can be configured with custom parameters and responses that can at least be used for Siri Shortcut.
The ability for developers to create custom intent opens many ways for developers to create interaction with Siri, for examples:
- Order something (e.g. pizza, coffee, breakfast 😋);
- Search information that can connects to any APIs;
- Do any custom action that we want Siri to perform;
- Many more!
Apple encourages developers to only create meaningful Shortcuts for user, for example provide shortcut for activities that users like to repeat when they use the app. It’s not recommended to create shortcut for an activity that users just perform once in the app. I really encourage you all to watch Apple WWDC 2018 videos below to learn more about Siri Shortcut from Siri engineers from here and here.
What We Will Build for this Siri Shortcut Demo
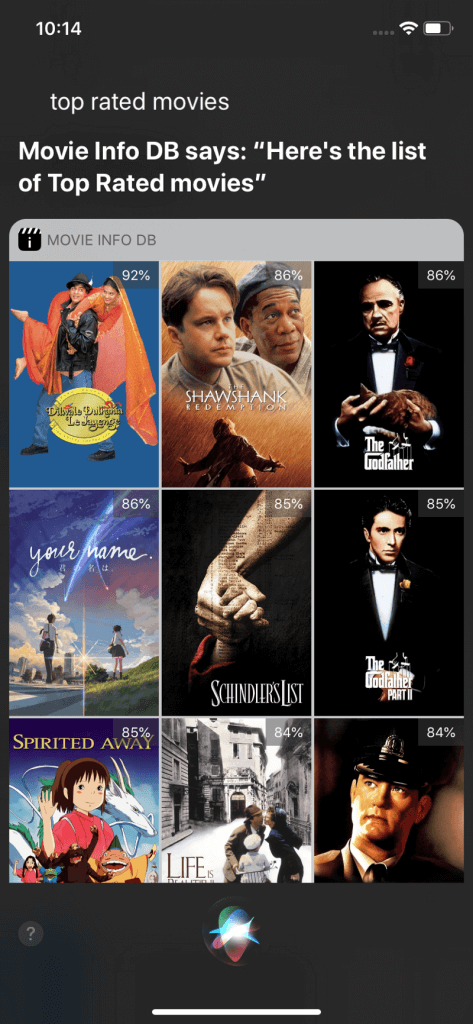
In this article, I would like to provide a simple example on how we can use Siri Shortcut to perform search on upcoming movies using The Movie DB API, then display the result using custom Intent UI Extension.
In order to build the demo app using Siri Shortcuts, here is what we will go through:
- Create New Project and setup Podfile.
- Create Shared Framework to share between main App and Extension.
- Build Movie List View Controller
- Create Siri Intent Definition File
- Create Intent Extension
- Create Intent UI Extension
- Donate Intent from View Controller.
- Test Shortcuts
Create Project and Setup
Create a new project using Xcode and initialize Podfile using pod init command from terminal. For the dependencies, we are going to use Kingfisher image download library to handle image download and cache when displaying thumbnails of movie posters.
pod 'Kingfisher', '~> 4.0'
After pod install, open the project from the generated .xcworkspace file.
Create Shared Framework to Share Code Between Apps & Extension
Click the project within the Project Navigator. In editor area inside the targets on the left, click the + button to add new Target. Select Cocoa Touch Framework from the options, and set the name of the framework to MovieKit. This framework will contain all the Model, Remote Repository, and UI Components for the Movies that can be shared between the App Target and App Intent Extensions. Remember that the Extension in iOS runs on different processes separated from the main app.
Create Movie Model with Codable
First, within the MovieKit folder in the project navigator, create new File with the name of Movie. This file will contain all the Models from Movie, Video, Cast, Crew that conforms to Codable protocol to make it easier to decode the JSON response from the The Movie DB API.
//
//  Movie.swift
//  MovieKit
//
//  Created by Alfian Losari on 11/24/18.
//  Copyright © 2018 Alfian Losari. All rights reserved.
//
import Foundation

public struct MoviesResponse: Codable {
    public let page: Int
    public let totalResults: Int
    public let totalPages: Int
    public let results: [Movie]
}

public struct Movie: Codable {

    public let id: Int
    public let title: String
    public let backdropPath: String
    public let posterPath: String
    public let overview: String
    public let releaseDate: Date
    public let voteAverage: Double
    public let voteCount: Int
    public let tagline: String?
    public let genres: [MovieGenre]?
    public let videos: MovieVideoResponse?
    public let credits: MovieCreditResponse?
    public let adult: Bool
    public let runtime: Int?
    public var posterURL: URL {
        return URL(string: "https://image.tmdb.org/t/p/w500\(posterPath)")!
    }

    public var backdropURL: URL {
        return URL(string: "https://image.tmdb.org/t/p/original\(backdropPath)")!
    }

    public var voteAveragePercentText: String {
        return "\(Int(voteAverage * 10))%"
    }

}

public struct MovieGenre: Codable {
    let name: String
}

public struct MovieVideoResponse: Codable {
    public let results: [MovieVideo]
}

public struct MovieVideo: Codable {
    public let id: String
    public let key: String
    public let name: String
    public let site: String
    public let size: Int
    public let type: String

    public var youtubeURL: URL? {
        guard site == "YouTube" else {
            return nil
        }
        return URL(string: "https://www.youtube.com/watch?v=\(key)")
    }
}

public struct MovieCreditResponse: Codable {
    public let cast: [MovieCast]
    public let crew: [MovieCrew]
}

public struct MovieCast: Codable {
    public let character: String
    public let name: String
}

public struct MovieCrew: Codable {
    public let id: Int
    public let department: String
    public let job: String
    public let name: String
}
Create Movie Repository
Second, create a new File called MovieRepository. This is the class that will provide interface for the client to fetch movies from Movie DB API. It uses enum Endpoint so the client can pass the endpoint such as popular, now playing, upcoming, top rated movies to access the resources they want to consume. It also provides method to fetch single movie by passing the id of the Movie. Make sure to create your own API key from The Movie DB website.
Thanks to Codable protocol that our Model uses, JSONDecoder object can decode the response data automatically. We just need to configure the key decoding strategy to convert from snake cases because the API uses snake cases for the naming convention of the properties. For the date decoding strategy, we specify YYYY-MM-DD as the date format convention from the API.
//
//  MovieRepository.swift
//  MovieKit
//
//  Created by Alfian Losari on 11/24/18.
//  Copyright © 2018 Alfian Losari. All rights reserved.
//
import Foundation

public class MovieRepository {

    public static let shared = MovieRepository()
    private init() {}
    private let apiKey = "YOUR_API_KEY"
    private let baseAPIURL = "https://api.themoviedb.org/3"
    private let urlSession = URLSession.shared

    private let jsonDecoder: JSONDecoder = {
        let jsonDecoder = JSONDecoder()
        jsonDecoder.keyDecodingStrategy = .convertFromSnakeCase
        let dateFormatter = DateFormatter()
        dateFormatter.dateFormat = "YYYY-MM-DD"
        jsonDecoder.dateDecodingStrategy = .formatted(dateFormatter)
        return jsonDecoder
    }()

    public enum Endpoint: String, CustomStringConvertible, CaseIterable {
        case nowPlaying = "now_playing"
        case upcoming
        case popular
        case topRated = "top_rated"

        public var description: String {
            switch self {
            case .nowPlaying: return "Now Playing"
            case .upcoming: return "Upcoming"
            case .popular: return "Popular"
            case .topRated: return "Top Rated"
            }
        }

        public init?(description: String) {
            guard let first = Endpoint.allCases.first(where: { $0.description == description }) else {
                return nil
            }
            self = first
        }

    }

    public enum MovieError: Error {
        case apiError
        case invalidEndpoint
        case invalidResponse
        case noData
        case serializationError
    }

    public func fetchMovies(from endpoint: Endpoint, params: [String: String]? = nil, successHandler: @escaping (_ response: MoviesResponse) -> Void, errorHandler: @escaping(_ error: Error) -> Void) {

        guard var urlComponents = URLComponents(string: "\(baseAPIURL)/movie/\(endpoint.rawValue)") else {
            errorHandler(MovieError.invalidEndpoint)
            return
        }

        var queryItems = [URLQueryItem(name: "api_key", value: apiKey)]
        if let params = params {
            queryItems.append(contentsOf: params.map { URLQueryItem(name: $0.key, value: $0.value) })
        }
        urlComponents.queryItems = queryItems

        guard let url = urlComponents.url else {
            errorHandler(MovieError.invalidEndpoint)
            return
        }

        urlSession.dataTask(with: url) { (data, response, error) in
            if error != nil {
                errorHandler(MovieError.apiError)
                return
            }

            guard let httpResponse = response as? HTTPURLResponse, 200..<300 ~= httpResponse.statusCode else {
                errorHandler(MovieError.invalidResponse)
                return
            }

            guard let data = data else {
                errorHandler(MovieError.noData)
                return
            }

            do {
                let moviesResponse = try self.jsonDecoder.decode(MoviesResponse.self, from: data)
                successHandler(moviesResponse)
            } catch {
                errorHandler(MovieError.serializationError)
            }
        }.resume()

    }


    public func fetchMovie(id: Int, successHandler: @escaping (_ response: Movie) -> Void, errorHandler: @escaping(_ error: Error) -> Void) {
        guard let url = URL(string: "\(baseAPIURL)/movie/\(id)?api_key=\(apiKey)&append_to_response=videos,credits") else {
            errorHandler(MovieError.invalidEndpoint)
            return
        }

        urlSession.dataTask(with: url) { (data, response, error) in
            if error != nil {
                errorHandler(MovieError.apiError)
                return
            }

            guard let httpResponse = response as? HTTPURLResponse, 200..<300 ~= httpResponse.statusCode else {
                errorHandler(MovieError.invalidResponse)
                return
            }

            guard let data = data else {
                errorHandler(MovieError.noData)
                return
            }

            do {
                let movie = try self.jsonDecoder.decode(Movie.self, from: data)
                successHandler(movie)
            } catch {
                errorHandler(MovieError.serializationError)
            }
        }.resume()

    }

}
Create Movie Collection View Cell
Next, create a new File called MovieCollectionViewCell, with the subclass of UICollectionViewCell and also create the XIB file. This cell will display the poster and the average vote rating of the movie.
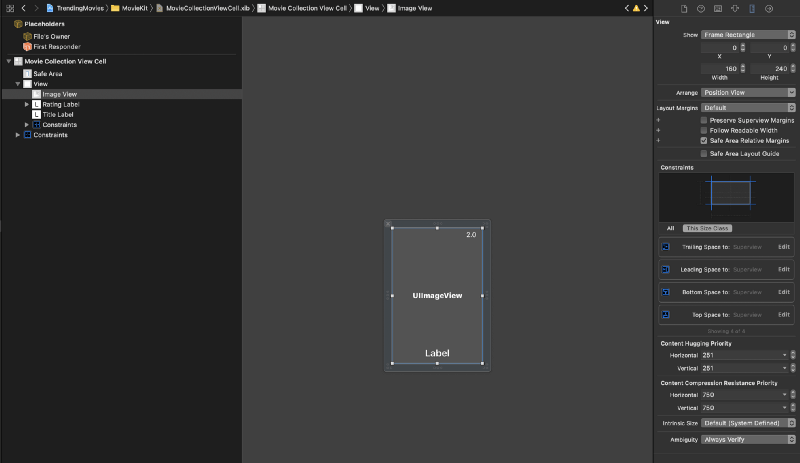
Inside the XIB, set the size of the Cell to 160x240. Then, drag a UIImageView and set the constraint for leading, trailing, top, bottom to the superview with the constant of 0. Next, drag a UILabel for the rating, set the font to Caption 1, and the trailing and top constraint constant to 0 to the superview. At last, drag a UILabel for the title, set the font to Headline, and set the bottom, trailing, leading constant to 8, and the lines to 3.
Inside the MovieCollectionViewCell, connect all the outlets from the XIB. We also create a property for the Movie and create a didSet observer to setup the UI based on the property from the Movie object. To download the image, we use Kingfisher as the Image library to handle download and caching.
//
//  MovieCollectionViewCell.swift
//  MovieKit
//
//  Created by Alfian Losari on 11/25/18.
//  Copyright © 2018 Alfian Losari. All rights reserved.
//
import UIKit
import Kingfisher

public class MovieCollectionViewCell: UICollectionViewCell {

    @IBOutlet weak var ratingLabel: UILabel!
    @IBOutlet weak var imageView: UIImageView!
    @IBOutlet weak var titleLabel: UILabel!

    public static var nib: UINib {
        return UINib(nibName: "MovieCollectionViewCell", bundle: Bundle(for: MovieCollectionViewCell.self))
    }

    public var movie: Movie! {
        didSet {
            self.titleLabel.text = movie?.title
            self.imageView.kf.setImage(with: movie?.posterURL, placeholder: nil, options: nil, progressBlock: nil) { (_, error, _, _) in
                self.titleLabel.isHidden = error == nil
            }

            let voteCount = movie?.voteCount ?? 0
            if voteCount > 0 {
                ratingLabel.text = movie.voteAveragePercentText
            } else {
                ratingLabel.isHidden = true
            }

        }
    }

    override public func awakeFromNib() {
        super.awakeFromNib()
        imageView.kf.indicatorType = .activity
        ratingLabel.backgroundColor = UIColor(white: 0.25, alpha: 0.5)
    }

    public override func prepareForReuse() {
        super.prepareForReuse()
        titleLabel.isHidden = false
        ratingLabel.isHidden = false
    }

}
We finally created all the components that we will share between the Main app and the extensions later. Now, let’s move back to the main App Target. Make sure that you add the new MovieKit target inside the Podfile and add the Kingfisher pod inside like so. Then, run pod update to make sure the project compiles. You can also remove the Kingfisher dependency from the main App Target because it won’t be used there.
target 'MovieKit' do
  use_frameworks!
  pod 'Kingfisher', '~> 4.0'
end
Build The Main App UI with Movie List View Controller
As we won’t be using storyboard for the app, delete the main.storyboard file from Project Navigator and the Main Interface in General tab inside the project.
Create a new File called MovieListViewController with the subclass of UICollectionViewController. To display grid interface with 3 items on each row, we will be using UICollectionViewFlowLayout.
We will use a custom initializer that accepts 2 parameters, enum Endpoint and MovieRepository. The enum Endpoint determines the resources of movies that we want to fetch, while the MovieRepository is the remote data source that provides the interface for the client to fetch the data. We keep array of Movie as an instance property that will be reload the collection view every time the value of the array change.
In viewDidLoad, we setup the collection view layout and set the item size of each cells by dividing the width of the screen by 3. We also register the XIB for the MovieCollectionViewCell and assign it reusable identifier. At last, we utilize UIRefreshControl with a target selector that will fetch the data every time the user do pull to refresh on the collection view and assign the response to Movie array to reload the UI with new data.
//
//  MovieListViewController.swift
//  TrendingMovies
//
//  Created by Alfian Losari on 11/24/18.
//  Copyright © 2018 Alfian Losari. All rights reserved.
//
import UIKit
import MovieKit
import Intents

class MovieListViewControlller: UICollectionViewController {

    let activityIndicator = UIActivityIndicatorView(style: .whiteLarge)
    var endpoint: MovieRepository.Endpoint
    var movieRepository: MovieRepository
    var movies = [Movie]() {
        didSet {
            collectionView.reloadData()
        }
    }

    init(endpoint: MovieRepository.Endpoint, movieRepository: MovieRepository = MovieRepository.shared) {
        self.endpoint = endpoint
        self.movieRepository = movieRepository
        super.init(collectionViewLayout: UICollectionViewFlowLayout())
    }

    required init?(coder aDecoder: NSCoder) {
        fatalError("init(coder:) has not been implemented")
    }

    override func viewDidLoad() {
        super.viewDidLoad()
        setupCollectionView()
        refresh()
    }

    override func viewWillAppear(_ animated: Bool) {
        super.viewWillAppear(animated)
        navigationController?.navigationBar.prefersLargeTitles = true
    }

    private func setupCollectionView() {
        title = endpoint.description

        activityIndicator.center = view.center
        view.addSubview(activityIndicator)

        let refreshControl = UIRefreshControl(frame: .zero)
        refreshControl.addTarget(self, action: #selector(refresh), for: .valueChanged)
        collectionView.refreshControl = refreshControl

        collectionView.register(MovieCollectionViewCell.nib, forCellWithReuseIdentifier: "Cell")

        let layout = collectionView.collectionViewLayout as! UICollectionViewFlowLayout
        let screenWidth = UIScreen.main.bounds.width

        layout.minimumInteritemSpacing = 1
        layout.minimumLineSpacing = 2
        layout.sectionInset.top = 1
        layout.sectionInset.bottom = 1

        let itemWidth: CGFloat = (screenWidth / 3.0).rounded(.down)
        let itemSize = CGSize(width: itemWidth - 1.0 , height: (itemWidth * 3) / 2)
        layout.itemSize = itemSize
    }


    @objc private func refresh() {
        fetchMovies()
    }

    private func fetchMovies() {
        if movies.isEmpty {
            activityIndicator.startAnimating()
        }

        movieRepository.fetchMovies(from: endpoint, params: ["page": String(page)], successHandler: {[weak self] (response) in
            DispatchQueue.main.async {
                self?.activityIndicator.stopAnimating()
                self?.collectionView.refreshControl?.endRefreshing()
                self?.movies = result
            }
        }) {[weak self] (error) in
            DispatchQueue.main.async {
                self?.activityIndicator.stopAnimating()
                self?.collectionView.refreshControl?.endRefreshing()
                self?.collectionView.reloadData()
            }
        }
    }

    override func collectionView(_ collectionView: UICollectionView, numberOfItemsInSection section: Int) -> Int {
         return movies.count
    }

    override func collectionView(_ collectionView: UICollectionView, cellForItemAt indexPath: IndexPath) -> UICollectionViewCell {
        let cell = collectionView.dequeueReusableCell(withReuseIdentifier: "Cell", for: indexPath) as! MovieCollectionViewCell
        let movie = movies[indexPath.row]
        cell.movie = movie
        return cell
    }

}
Inside the AppDelegate we will set up our UIWindow root view controller using a UITabBarController containing MovieListViewController for all the cases within the enum Endpoint.
//
//  AppDelegate.swift
//  TrendingMovies
//
//  Created by Alfian Losari on 11/24/18.
//  Copyright © 2018 Alfian Losari. All rights reserved.
//
import UIKit
import MovieKit

@UIApplicationMain
class AppDelegate: UIResponder, UIApplicationDelegate {

    var window: UIWindow?

    func application(_ application: UIApplication, didFinishLaunchingWithOptions launchOptions: [UIApplication.LaunchOptionsKey: Any]?) -> Bool {
        setupViewControllers()
        return true
    }

    private func setupViewControllers() {
        let tabBarController = UITabBarController()

        let viewControllers = MovieRepository.Endpoint.allCases.map { e -> UIViewController in
            let movieListController = MovieListViewControlller(endpoint: e)
            movieListController.title = e.description
            return UINavigationController(rootViewController: movieListController)
        }

        tabBarController.setViewControllers(viewControllers, animated: false)
        window = UIWindow(frame: UIScreen.main.bounds)
        window?.rootViewController = tabBarController
        window?.makeKeyAndVisible()
    }

}
We finally finished our main app! Before we try to open the app’s info plist and allow the App Transport Security Settings to allow arbitrary load from all domains, finally build and run the App to see it in action!.
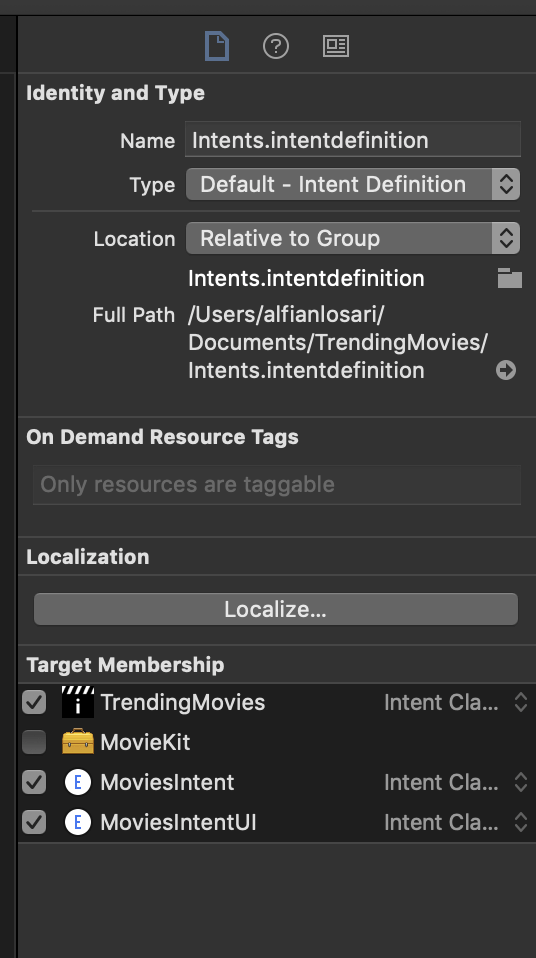
Create SiriKit Intent Definition File
Next, create a new File and use SiriKit Intent Definition File as the template. Click on the File to open the Intent Editor. Within this editor, we can create our custom intents and response. It will also generate the classes for our targets, in this case the app and the extensions we will create later.
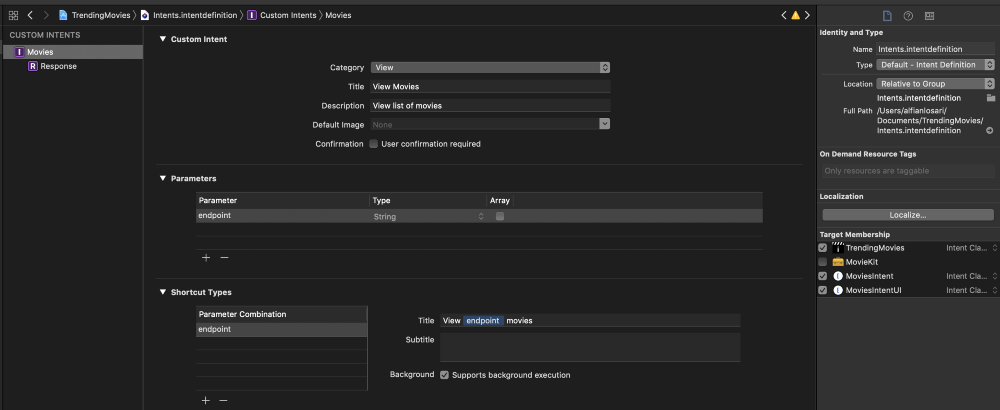
Click on the + button at the bottom to create new Intent we call Movies. Set the category to View, title to View Movies, and description to View list of movies. Then, add a single parameter named endpoint with the type of String. At last, create one shortcut types with endpoint as the parameter combination. Set the title to use the endpoint as the input like the screenshot below. Make sure you check the Supports background execution checkbox.
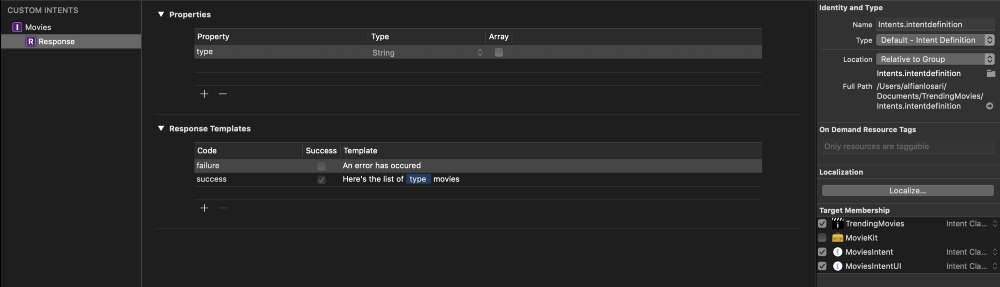
For the response, add one property named type as String. Then, set the response failure and success templates phrases like the screenshot below.
Create Intent Extension
Next, create a new Target using Intents Extension as the template. Set the product name to MoviesIntent and make sure to check include UI Extension checkbox. Xcode will also ask to activate the build scheme. Make sure that you confirm to activate the scheme for the extensions.
Go back to the Intent Definition file and include the created extensions as the target for the Intent classes.
Open IntentHandler file, here we need to handle the intent using our MoviesIntentHandling protocol that is generated from the Sirikit intent definition file. Check if the intent is the MoviesIntent. Then, we return a MovieIntentHandler class that implements the MovieIntentHandling to handle the intent.
Inside the handler, we make sure that the endpoint parameter is existed within the intent. Then, complete the intent by passing success as response code and passing the endpoint for the response type property.
//
//  IntentHandler.swift
//  MoviesIntent
//
//  Created by Alfian Losari on 11/24/18.
//  Copyright © 2018 Alfian Losari. All rights reserved.
//
import Intents

class IntentHandler: INExtension {

    override func handler(for intent: INIntent) -> Any {
        guard intent is MoviesIntent else {
            return self
        }
        return MoviesIntentHandler()
    }

}

class MoviesIntentHandler: NSObject, MoviesIntentHandling {

    func handle(intent: MoviesIntent, completion: @escaping (MoviesIntentResponse) -> Void) {
        guard let endpoint = intent.endpoint else {
            completion(MoviesIntentResponse(code: .failure, userActivity: nil))
            return
        }

        completion(MoviesIntentResponse.success(type: endpoint))
    }

}
Create Intent UI Extension
Open the MainInterface.storyboard file inside the MoviesIntentUI extension, then drag a collection view as the root view for the view controller.
Inside the IntentViewController, create an outlet property for the collection view and reference it within the storyboard. In viewDidLoad, we set the view controller as the UICollectionViewDataSource. We also register the MovieCollectionViewCell nib to the collection view.
Inside the configureViewmethod, we check the intent response parameter is available. Then, initialize the enum endpoint using the response.
After that, we use the endpoint to fetch the data from the repository. Inside the success handler, we set the size of collection view layout item size and assign the result to the movies instance property that will reload the collection view.
//
//  IntentViewController.swift
//  MoviesIntentUI
//
//  Created by Alfian Losari on 11/24/18.
//  Copyright © 2018 Alfian Losari. All rights reserved.
//
import IntentsUI
import MovieKit


class IntentViewController: UIViewController, INUIHostedViewControlling {

    @IBOutlet weak var collectionView: UICollectionView!
    let repository = MovieRepository.shared

    var movies = [Movie]() {
        didSet {
            collectionView.reloadData()
        }
    }

    override func viewDidLoad() {
        super.viewDidLoad()
        collectionView.dataSource = self
        collectionView.delegate = self
        collectionView.register(MovieCollectionViewCell.nib, forCellWithReuseIdentifier: "Cell")
    }

    // MARK: - INUIHostedViewControlling

    // Prepare your view controller for the interaction to handle.
    func configureView(for parameters: Set<INParameter>, of interaction: INInteraction, interactiveBehavior: INUIInteractiveBehavior, context: INUIHostedViewContext, completion: @escaping (Bool, Set<INParameter>, CGSize) -> Void) {
        guard let intent  = interaction.intent as? MoviesIntent,
            let endpointString = intent.endpoint, let endpoint = MovieRepository.Endpoint(description: endpointString) else {
                completion(true, parameters, self.desiredSize)
                return
        }

        repository.fetchMovies(from: endpoint, successHandler: { (response) in
            DispatchQueue.main.async {
                let layout = self.collectionView.collectionViewLayout as! UICollectionViewFlowLayout
                let screenWidth = self.view.bounds.width

                layout.minimumInteritemSpacing = 1
                layout.minimumLineSpacing = 2
                layout.sectionInset.top = 1
                layout.sectionInset.bottom = 1

                let itemWidth: CGFloat = (screenWidth / 3.0).rounded(.down)
                let itemSize = CGSize(width: itemWidth - 1.0 , height: (itemWidth * 3) / 2)
                layout.itemSize = itemSize

                self.movies = response.results
            }
        }) { (error) in

        }

        completion(true, parameters, self.desiredSize)
    }

    var desiredSize: CGSize {
        let size = self.extensionContext!.hostedViewMaximumAllowedSize
        return size
    }

}

extension IntentViewController: UICollectionViewDataSource, UICollectionViewDelegate {

    func collectionView(_ collectionView: UICollectionView, numberOfItemsInSection section: Int) -> Int {
        return movies.count
    }

    func collectionView(_ collectionView: UICollectionView, cellForItemAt indexPath: IndexPath) -> UICollectionViewCell {
        let cell = collectionView.dequeueReusableCell(withReuseIdentifier: "Cell", for: indexPath) as! MovieCollectionViewCell

        cell.movie = movies[indexPath.item]
        return cell
    }
}
Donate Intent from Movie List View Controller
At last, to add the intent as the shortcut, we need to donate the intent inside our MovieListViewController. Also, make sure that you add Siri privacy usage description authorization inside the app info.plist to authorize Siri usage within the app.
We will create a function called donateIntent. Inside we request authorization for Siri. Once it is authorized, we create the MoviesIntent and assign the view controller endpoint description as the parameter and the suggested invocation phrase for the shortcut. At last, we create INInteraction object passing our intent and donate it. We will invoke this function in the view controller viewDidLoad.
class MovieListViewControlller: UICollectionViewController {
    ...
    override func viewDidLoad() {
       ...
       donateIntent()
    }
    private func donateIntent() {
       INPreferences.requestSiriAuthorization { [weak self] (authorization) in
           guard let strongSelf = self else { return }
           guard authorization == INSiriAuthorizationStatus.authorized else {
                return
           }

           let intent = MoviesIntent()
           intent.endpoint = strongSelf.endpoint.description
           intent.suggestedInvocationPhrase = "\(strongSelf.endpoint.description) movies"
           let interaction = INInteraction(intent: intent, response: nil)
           interaction.donate(completion: { (error) in
               if let error = error {
                    print(error.localizedDescription)
               }
           })
       }
    }
...
}
Test Shortcuts
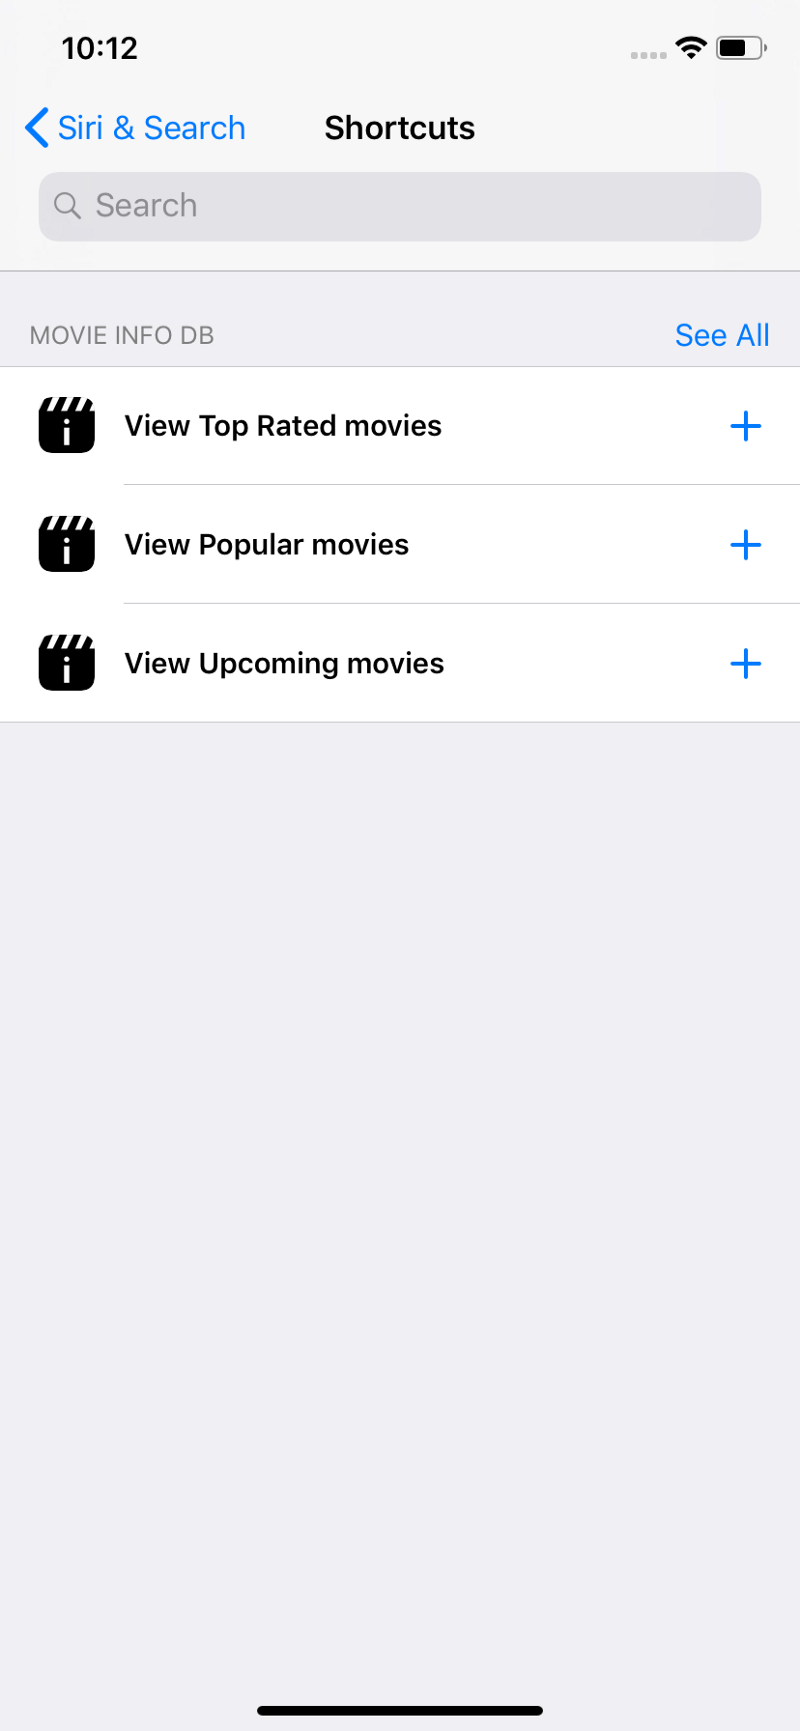
Build and run the app. Navigate to all the tabs to donate the intent for each endpoint. After that, navigate to setting -> Siri and search to see the recommended shortcut. Our app shortcut should be available to add. Add the shortcut and record the custom phrase to trigger the shortcut.
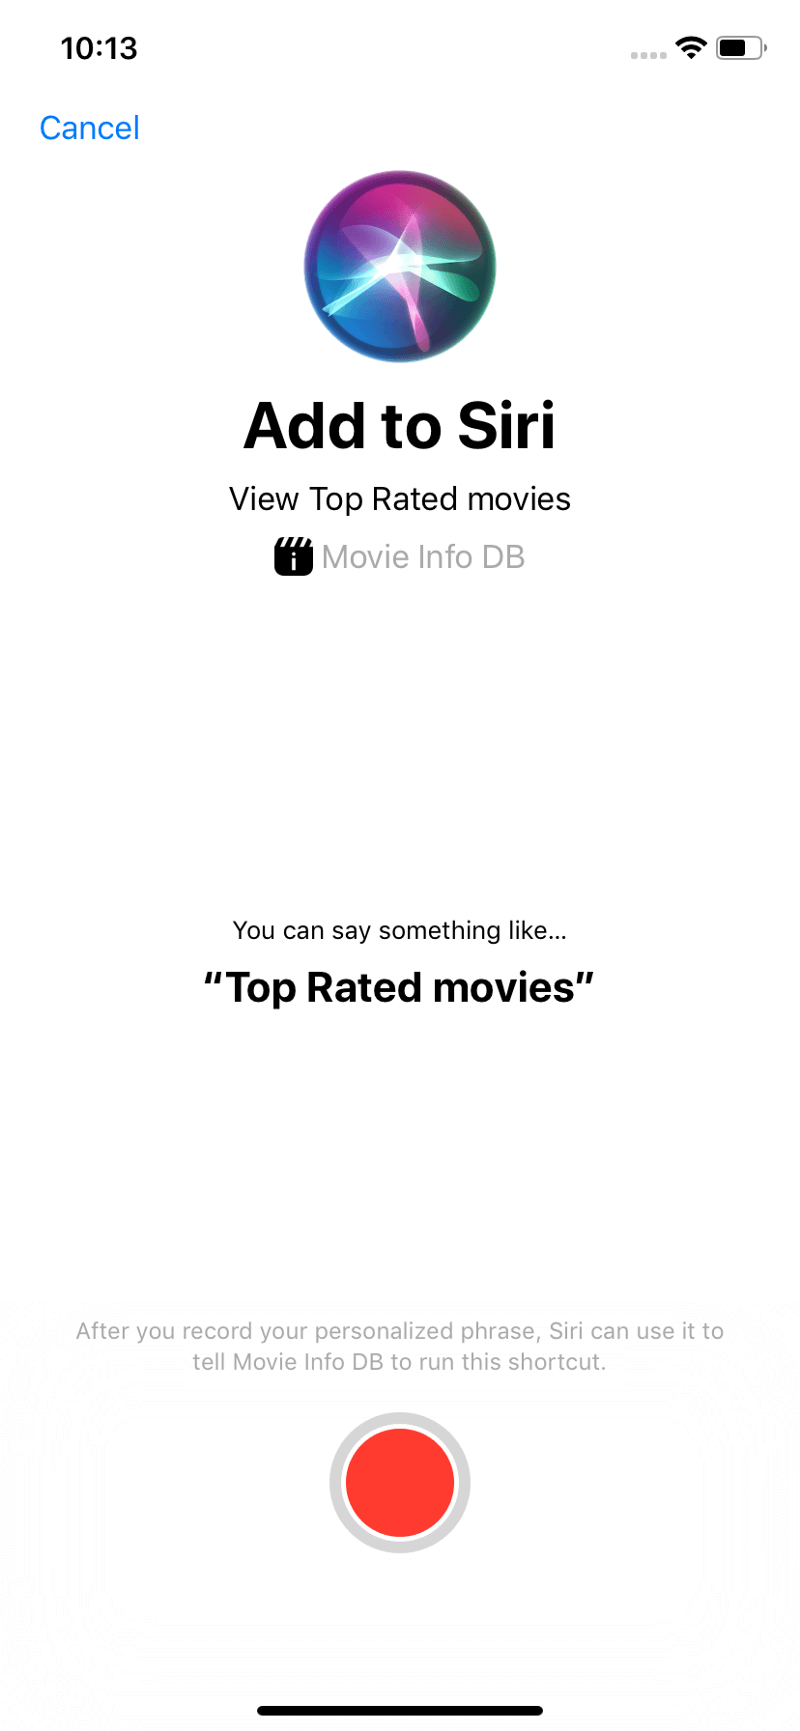
At last, try to speak hey Siri to trigger Siri then speak your custom recorded phrase to trigger the shortcut.

Conclusion
Building voice interactive app using Siri Shortcut is really amazing and pretty straightforward using the SiriKit Framework. With this, we can provide users new simplified experience for the action they like to use just using a customize voice command. I really believe that voice interaction between human and machine are going to become more and more advance in upcoming years. This kind of combination between technology and arts really makes my heart singing as a developer that can use this technology as building blocks to build solutions for the people and businesses.
This is a guest post by Alfian Losari. The article was first published on Medium.


