

There is a wealth of problems in computer science where using a priority queue as your underlying data structure can greatly improve the time complexity of your algorithm. One example is Dijkstra’s Shortest Path Algorithm, where a priority queue is used to search a graph for the shortest path between two vertices.
Sadly, Swifts standard library does not come with a default implementation of a priority queue, so we are going to look into how we can implement a heap based priority queue on our own.
To follow along in your own IDE, you can get the source code by clicking on this link!
What Is A Priority Queue?
A priority queue is a data structure that allows for efficient sorting of objects with a relative priority. You can throw a bunch of objects into the queue and it will hand them back, one by one, based on how important they are compared to each other.
Let’s say that you have created a bunch of tasks for your computer to run at some specific point in the future. Adding them to a priority queue will let your computer dequeue the tasks and get the objects that are due for execution before the ones that are still waiting for their deadline.
To implement our queue, we are going to use a heap structure!
What Is A Heap?
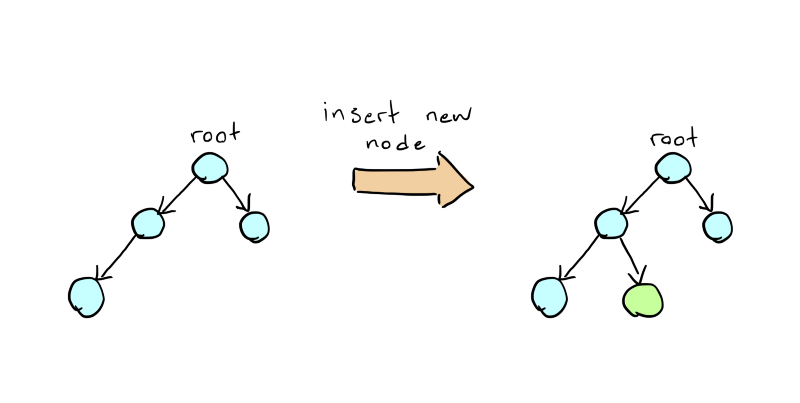
Think of a heap as being a tree, where each node has at most 2 children. A heap also comes with the restriction that it needs to add all new nodes to the top level, as far to the left as possible. Take a look at the following image:
A heap also maintains a property relating to the relative size of each node. A min heap (which is the one we’re going to use) maintains the property that each node is smaller than both of its child nodes, whereas a max heap goes the other way around.
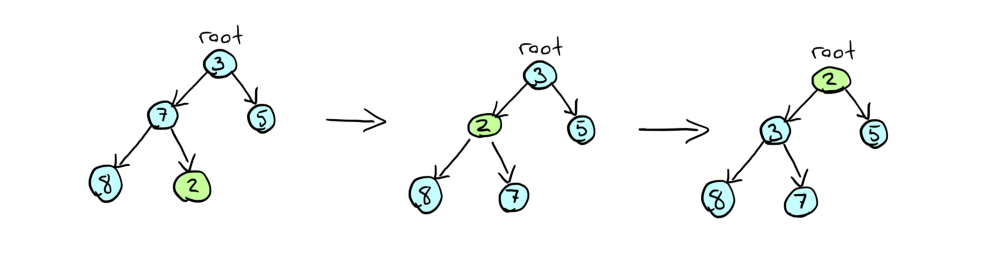
To be able to maintain this property, we’re going to need to do some manipulations to get the correct ordering of nodes. When we insert a new node, we are going to add it to the first available spot from the left in the top level of the tree. If the min heap property does not hold when this is done, we will start swapping the node with its parent until we reach a state where we once again have a min heap. The image below will show you what happens when we insert the number 2 into an already existing min heap:
When we dequeue (or remove, for that matter) an object from our queue, we will limit ourselves to doing so from one end. We are going to implement this in a way that you can only ever remove the root element. When that element is removed, it is replaced by the rightmost element at the top level of our tree. Since that new element will almost certainly be too big to stay in the root, we will move it downwards, swapping it with the smallest child until we have restored our min heap.
A Quick Note About The Implementation Itself
We are going to use an array to make a lightning fast and space efficient implementation of this tree structure. I am not going to go into too much detail about the mathematics of it, but if you’re interested, you can check out this link that explains exactly how and why the maths look like they do.
All set? Let’s go!
Designing The Protocol
As always, we need to start by defining what kind of functionality our object should present to an outside user. We do this by declaring a protocol that our class will later conform to. For our queue, I’ve declared the following Queue protocol:
protocol Queue {
  associatedtype DataType: Comparable

  /**
  Inserts a new item into the queue.
  - parameter item: The item to add.
  - returns: Whether or not the insert was successful.
  */
  @discardableResult func add(_ item: DataType) -> Bool

  /**
  Removes the first item in line.
  - returns: The removed item.
  - throws: An error of type QueueError.
  */
  @discardableResult func remove() throws -> DataType

  /**
  Gets the first item in line and removes it from the queue.
  - returns: An Optional containing the first item in the queue.
  */
  func dequeue() -> DataType?

  /**
  Gets the first item in line, without removing it from the queue.
  - returns: An Optional containing the first item in the queue.
  */
  func peek() -> DataType?

  /**
  Clears the queue.
  */
  func clear() -> Void
}
This protocol specifies exactly what outside users can expect from the queue that we are going to implement. This protocol also specifies that one of the methods may throw, and the documentation tells us that it will throw an error of type QueueError, so we’re going to have to implement that as well!
enum QueueError: Error {
  case noSuchItem(String)
}
This one is short and to the point. In case the user tries to remove an item from an empty queue, we are going to throw this error.
Now that the preparations are done, let’s get to the queue itself.
Implementing The Priority Queue
We are going to start by declaring our PriorityQueue class and implement initializers and our backing storage, as well as some nice-to-have methods. The code is going to look like this:
/**
 A PriorityQueue implementation based on a Heap data structure.
 */

class PriorityQueue<DataType: Comparable> {
  /**
   The backing storage for our queue.
   */
  private var queue: Array<DataType>

  /**
   The current size of the queue.
   */
  public var size: Int {
    return self.queue.count
  }

  public init() {
    self.queue = Array<DataType>()
  }
}
You may notice that we’re not even touching the Queue protocol here. When coding anything, we usually want to keep things separated from each other. We want to create an overview and know where to find the things we’re looking for. Some classes tend to get kind of big, and one way to deal with that is to implement the class using extension scopes. That way, each extension will tend to one task (like conforming to a protocol, handling backing storage and initializing, or declaring a nested class) and things will be much easier to find later. Let’s try that here, by first implementing a private Int extension that performs some predefined index calculations for us:
private extension Int {
  var leftChild: Int {
    return (2 * self) + 1
  }

  var rightChild: Int {
    return (2 * self) + 2
  }

  var parent: Int {
    return (self - 1) / 2
  }
}
This extension will only be available from within our PriorityQueue file, due to the private access control. What it does is that it collects some of the calculations that we are going to use to get the children and parents of a specific node. Instead of doing a bunch of math in our implementations, we can call the .leftChild property to get the left child index, and so on.
Let’s get to the Queue protocol conformance. It looks like this:
extension PriorityQueue: Queue {
  @discardableResult
  public func add(_ item: DataType) -> Bool {
    self.queue.append(item)
    self.heapifyUp(from: self.queue.count - 1)
    return true
  }

  @discardableResult
  public func remove() throws -> DataType {
    guard self.queue.count > 0 else {
      throw QueueError.noSuchItem("Attempt to remove item from an empty queue.")
    }
    return self.popAndHeapifyDown()
  }

  public func dequeue() -> DataType? {
    guard self.queue.count > 0 else {
      return nil
    }
    return self.popAndHeapifyDown()
  }

  public func peek() -> DataType? {
    return self.queue.first
  }

  public func clear() {
    self.queue.removeAll()
  }

  /**
  Pops the first item in the queue and restores the min heap order of the queue by moving the root item towards the end of the queue.
  - returns: The first item in the queue.
  */
  private func popAndHeapifyDown() -> DataType {
    let firstItem = self.queue[0]

    if self.queue.count == 1 {
      self.queue.remove(at: 0)
      return firstItem
    }

    self.queue[0] = self.queue.remove(at: self.queue.count - 1)

    self.heapifyDown()

    return firstItem
  }

  /**
   Restores the min heap order of the queue by moving an item towards the beginning of the queue.
   - parameter index: The index of the item to move.
   */
  private func heapifyUp(from index: Int) {
    var child = index
    var parent = child.parent

    while parent >= 0 && self.queue[parent] > self.queue[child] {
      swap(parent, with: child)
      child = parent
      parent = child.parent
    }
  }

  /**
   Restores the min heap order of the queue by moving the root item towards the end of the queue.
   */
  private func heapifyDown() {
    var parent = 0

    while true {
      let leftChild = parent.leftChild
      if leftChild >= self.queue.count {
        break
      }

      let rightChild = parent.rightChild
      var minChild = leftChild
      if rightChild < self.queue.count && self.queue[minChild] > self.queue[rightChild] {
        minChild = rightChild
      }

      if self.queue[parent] > self.queue[minChild] {
        self.swap(parent, with: minChild)
        parent = minChild
      } else {
        break
      }
    }
  }

  /**
   Swaps the items located at two different indices in our backing storage.
   - parameter firstIndex: The index of the first item to swap.
   - parameter secondIndex: The index of the second item to swap.
   */
  private func swap(_ firstIndex: Int, with secondIndex: Int) {
    let firstItem = self.queue[firstIndex]
    self.queue[firstIndex] = self.queue[secondIndex]
    self.queue[secondIndex] = firstItem
  }
}
This one gets a little bit bigger, so you may want to read it one or two more times. On top are all the protocol methods that we specified earlier, and below them are private helper functions that will only be available inside this particular class. I’ve documented the helper methods so that you can get a quick overview of what they’re doing. Also, take a look at how the Int extensions are used in this implementation. Pretty neat functionality to have, if I may say so myself!
Wrapping up
Now, that’s all the functionality we need for our PriorityQueue. We’re going to add conformance to the CustomStringConvertible protocol, just to be able to pass a queue into the print function and actually get something readable back:
extension PriorityQueue: CustomStringConvertible {
  public var description: String {
    return self.queue.description
  }
}
Sweet!
That’s it for this time! Now you know how to implement a priority queue based on a heap data structure. Feel free to comment if you have questions.
To learn more about iOS Development, check out my previous articles:
This is a guest post by Jimmy M Andersson. The article was first published on Medium.
Twitter : https://twitter.com/jimmymanderssonEmail: [email protected].


