

In the earlier tutorial, we created an animated menu bar in SwiftUI. What if you want to reuse the code in other projects? Of course, you can copy & paste the code from one project to another but there is a better way to reuse the code by using Swift Package.
Swift packages are reusable components that developers can import in their projects. With Swift Package Manager, the built-in tool for creating and managing Swift packages, you can easily share reusable code in the form of Swift packages.
In this tutorial, I will walk you through the process of creating Swift packages and show you how to turn the code of the animated menu bar into a reusable SwiftUI component.
Please note that I use Xcode 13 to create the demo code. However, you should be able to follow procedures even if you are using a lower version of Xcode.
Creating Swift Packages
There are two ways to create a Swift package. You can either use command line or Xcode.
Using Command Line
To create a Swift package using command line, open Terminal and key in the following commands:
mkdir AnimatedMenuBar
cd AnimatedMenuBar
swift package init
The folder name is the package name. Here, we use the name AnimatedMenuBar. Once you hit the return key, you will see the following messages:
Creating library package: AnimatedMenuBar
Creating Package.swift
Creating README.md
Creating .gitignore
Creating Sources/
Creating Sources/AnimatedMenuBar/AnimatedMenuBar.swift
Creating Tests/
Creating Tests/AnimatedMenuBarTests/
Creating Tests/AnimatedMenuBarTests/AnimatedMenuBarTests.swift
This generates the basic skeleton of the Swift package including the source and tests. You can further edit README.md file to provide a description of the package. Package.swift is the manifest file which defines the package’s name and its contents using the PackageDescription module.
// swift-tools-version:5.3
// The swift-tools-version declares the minimum version of Swift required to build this package.

import PackageDescription

let package = Package(
    name: "AnimatedMenuBar",
    products: [
        // Products define the executables and libraries a package produces, and make them visible to other packages.
        .library(
            name: "AnimatedMenuBar",
            targets: ["AnimatedMenuBar"]),
    ],
    dependencies: [
        // Dependencies declare other packages that this package depends on.
        // .package(url: /* package url */, from: "1.0.0"),
    ],
    targets: [
        // Targets are the basic building blocks of a package. A target can define a module or a test suite.
        // Targets can depend on other targets in this package, and on products in packages this package depends on.
        .target(
            name: "AnimatedMenuBar",
            dependencies: []),
        .testTarget(
            name: "AnimatedMenuBarTests",
            dependencies: ["AnimatedMenuBar"]),
    ]
)
Note that the package manifest must begin with the string // swift-tools-version:, followed by a version number such as // swift-tools-version:5.3.
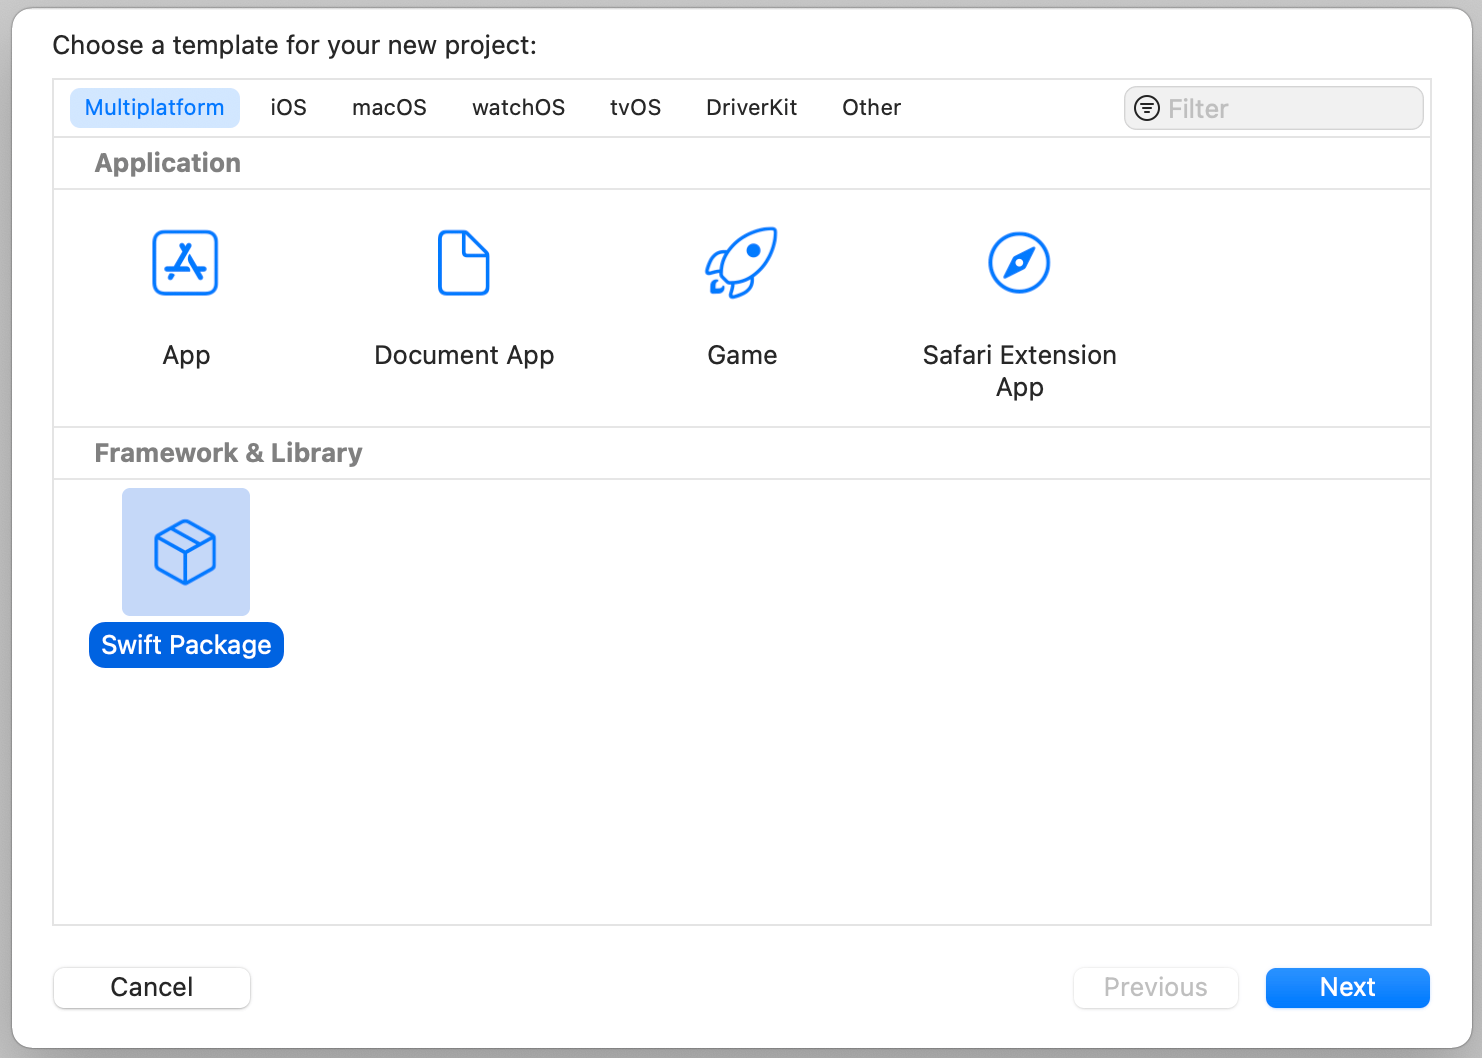
Using Xcode
If you prefer to use Xcode to create the package, you can choose File > New > Project… and select Swift Package under Multiplatform.
Updating the Source
The AnimatedMenuBar.swift file under the Sources folder only contains the default content generated by Xcode:
public struct AnimatedMenuBar {
    public private(set) var text = "Hello, World!"

    public init() {
    }
}
You have to update the file with the code for creating the animated menu bar. In this case, we reuse the code that we have walked you through in the previous tutorial.
import SwiftUI

@available(iOS 14, macOS 11.0, *)
public struct AnimatedMenuBar: View {
    @Binding var selectedIndex: Int
    @Namespace private var menuItemTransition

    var menuItems = [ "Travel", "Nature", "Architecture" ]

    public init(selectedIndex: Binding<Int>, menuItems: [String] = [ "Travel", "Nature", "Architecture" ]) {
        self._selectedIndex = selectedIndex
        self.menuItems = menuItems
    }

    public var body: some View {

        HStack {
            Spacer()

            ForEach(menuItems.indices) { index in

                if index == selectedIndex {
                    Text(menuItems[index])
                        .padding(.horizontal)
                        .padding(.vertical, 4)
                        .background(Capsule().foregroundColor(Color.purple))
                        .foregroundColor(.white)
                        .matchedGeometryEffect(id: "menuItem", in: menuItemTransition)
                } else {
                    Text(menuItems[index])
                        .padding(.horizontal)
                        .padding(.vertical, 4)
                        .background(Capsule().foregroundColor(Color( red: 244, green: 244, blue: 244)))
                        .onTapGesture {
                            selectedIndex = index
                        }
                }

                Spacer()
            }

        }
        .frame(minWidth: 0, maxWidth: .infinity)
        .padding()
        .animation(.easeInOut, value: selectedIndex)

    }
}
For Swift package, the AnimatedMenuBar struct is required to set to public. And we need to create a custom init with public access level.
Except that, the rest of the code is almost the same. You may notice another difference that we use the @available attribute to annotate the struct with availability information. The line of code indicates that the struct is only available for iOS 14 and macOS 11.0 (or later).
Editing Test Code
By default, Xcode generates a test folder for you to include automated tests. You can modify the generated file named AnimatedMenuBarTests.swift to include your test code. However, for this demo, we are not going to write the code. You can just comment out the following line of code:
// XCTAssertEqual(AnimatedMenuBar().text, "Hello, World!")Adding Dependencies (Optional)
Though this package doesn’t depend on other Swift packages, you can edit the dependencies section to include your dependent packages if you need:
dependencies: [
    .package(url: "https://url/to/dependency", from: 1.0.0)
],
Adding Supported Platforms
While Swift packages are supposed to provide multiplatform support, you can use the platforms attribute in Package.swift if the package only supports a certain platform. Here is an example:
platforms: [
    .iOS(.v14),
    .macOS(.v11)
],
For this demo package, it’s available for iOS 14 and macOS 11.0 (or later).
Publishing the Package on GitHub
After you made all the changes, you should be able to build your package to use it locally. To further share the package with developers in your team or community, you can publish the package on GitHub.
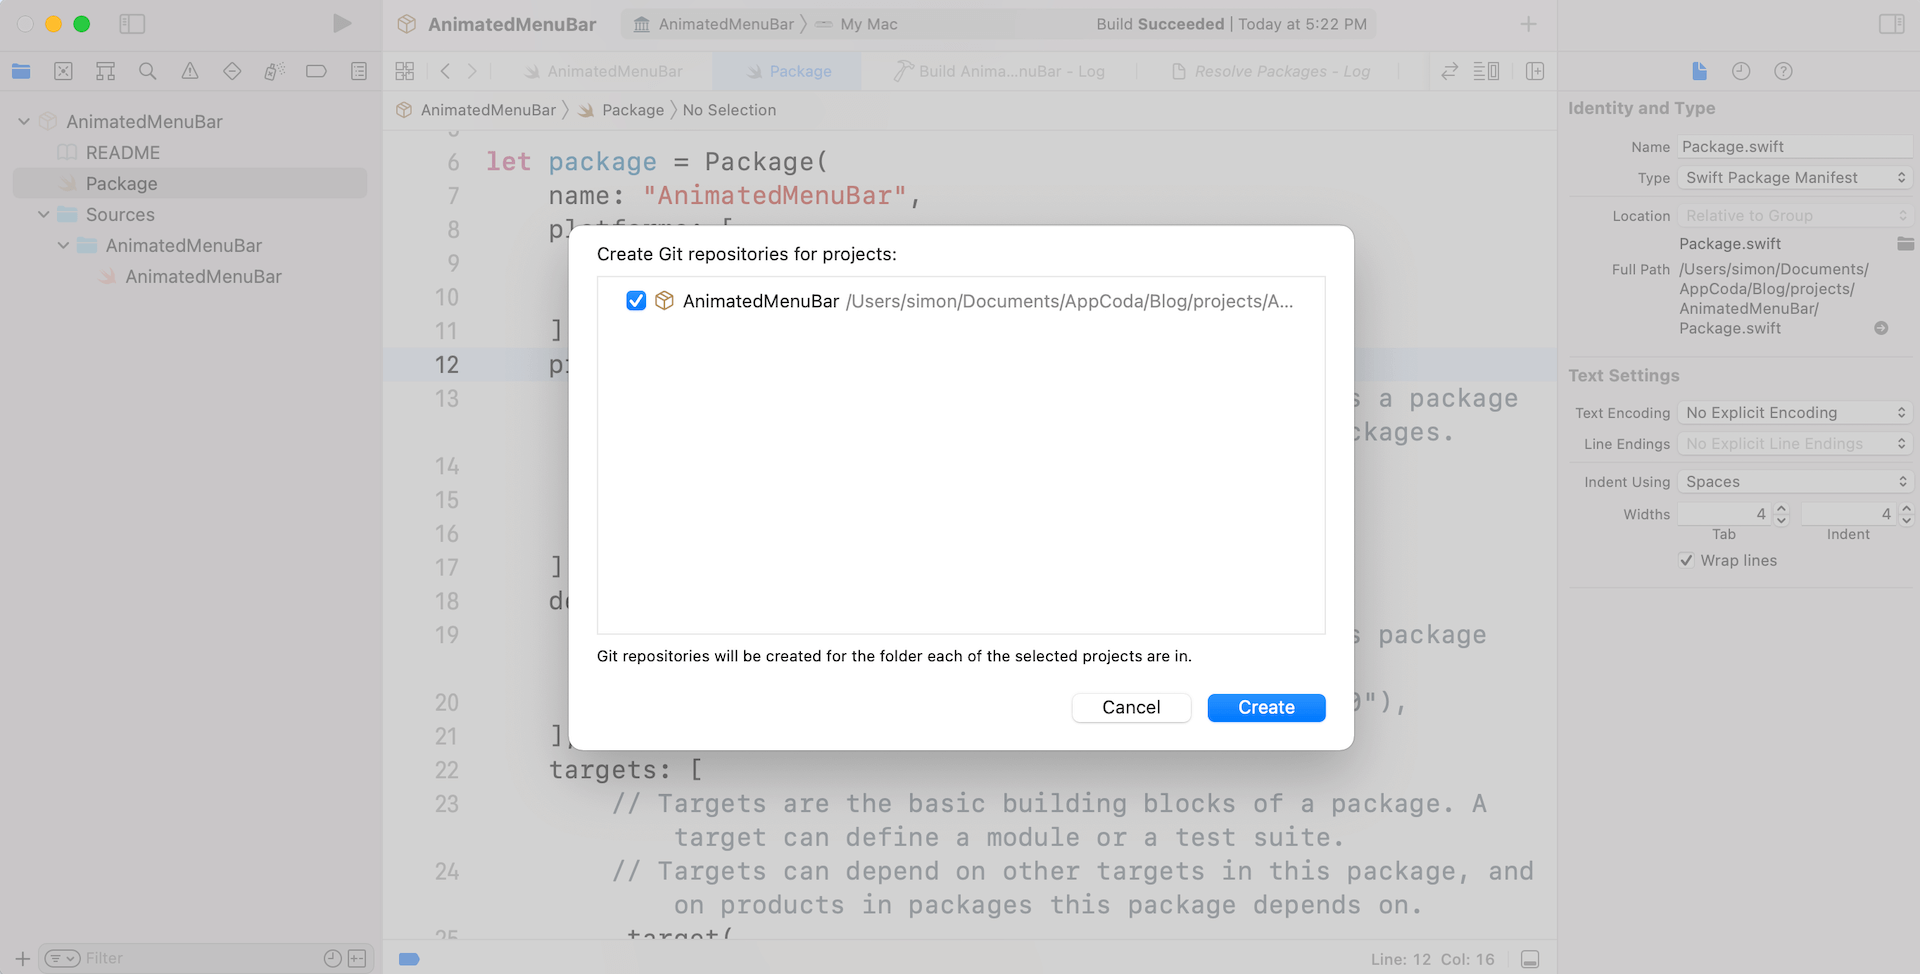
Go up to the Xcode menu and choose Source Control > New Git Repositories… to create a new respository.
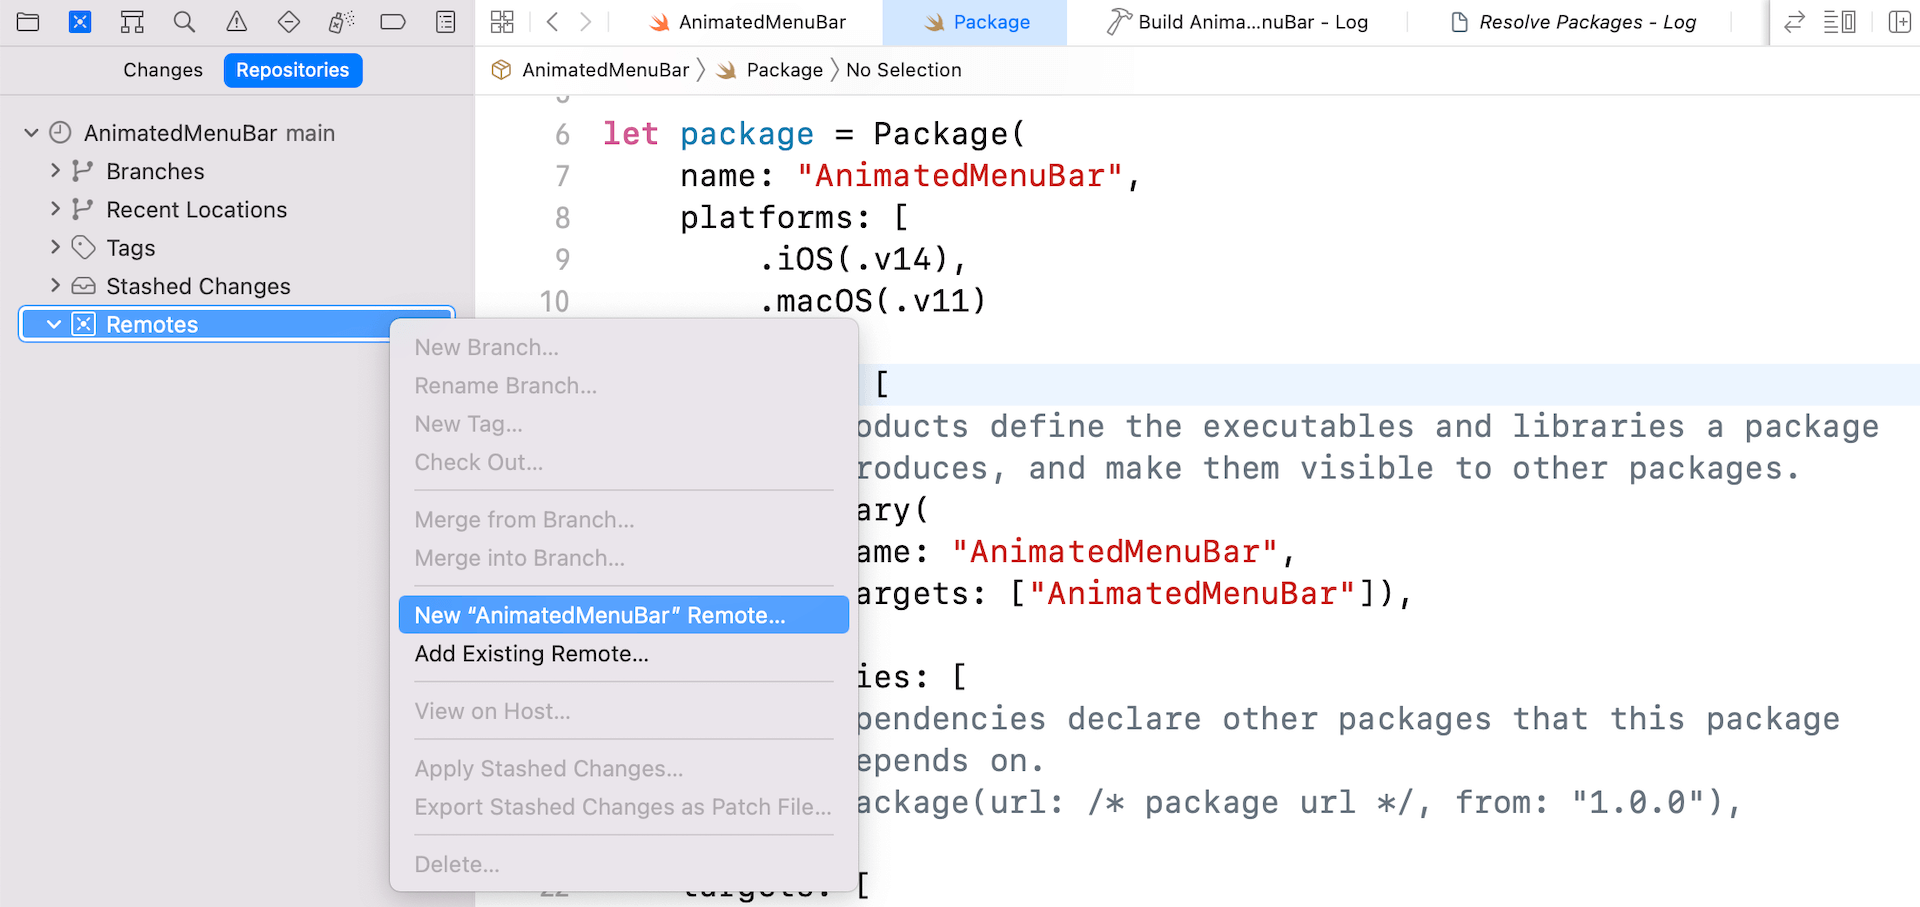
Next, switch over to the Source Control Navigator. Right click Remotes and choose New “AnimatedMenuBar ” Remote…
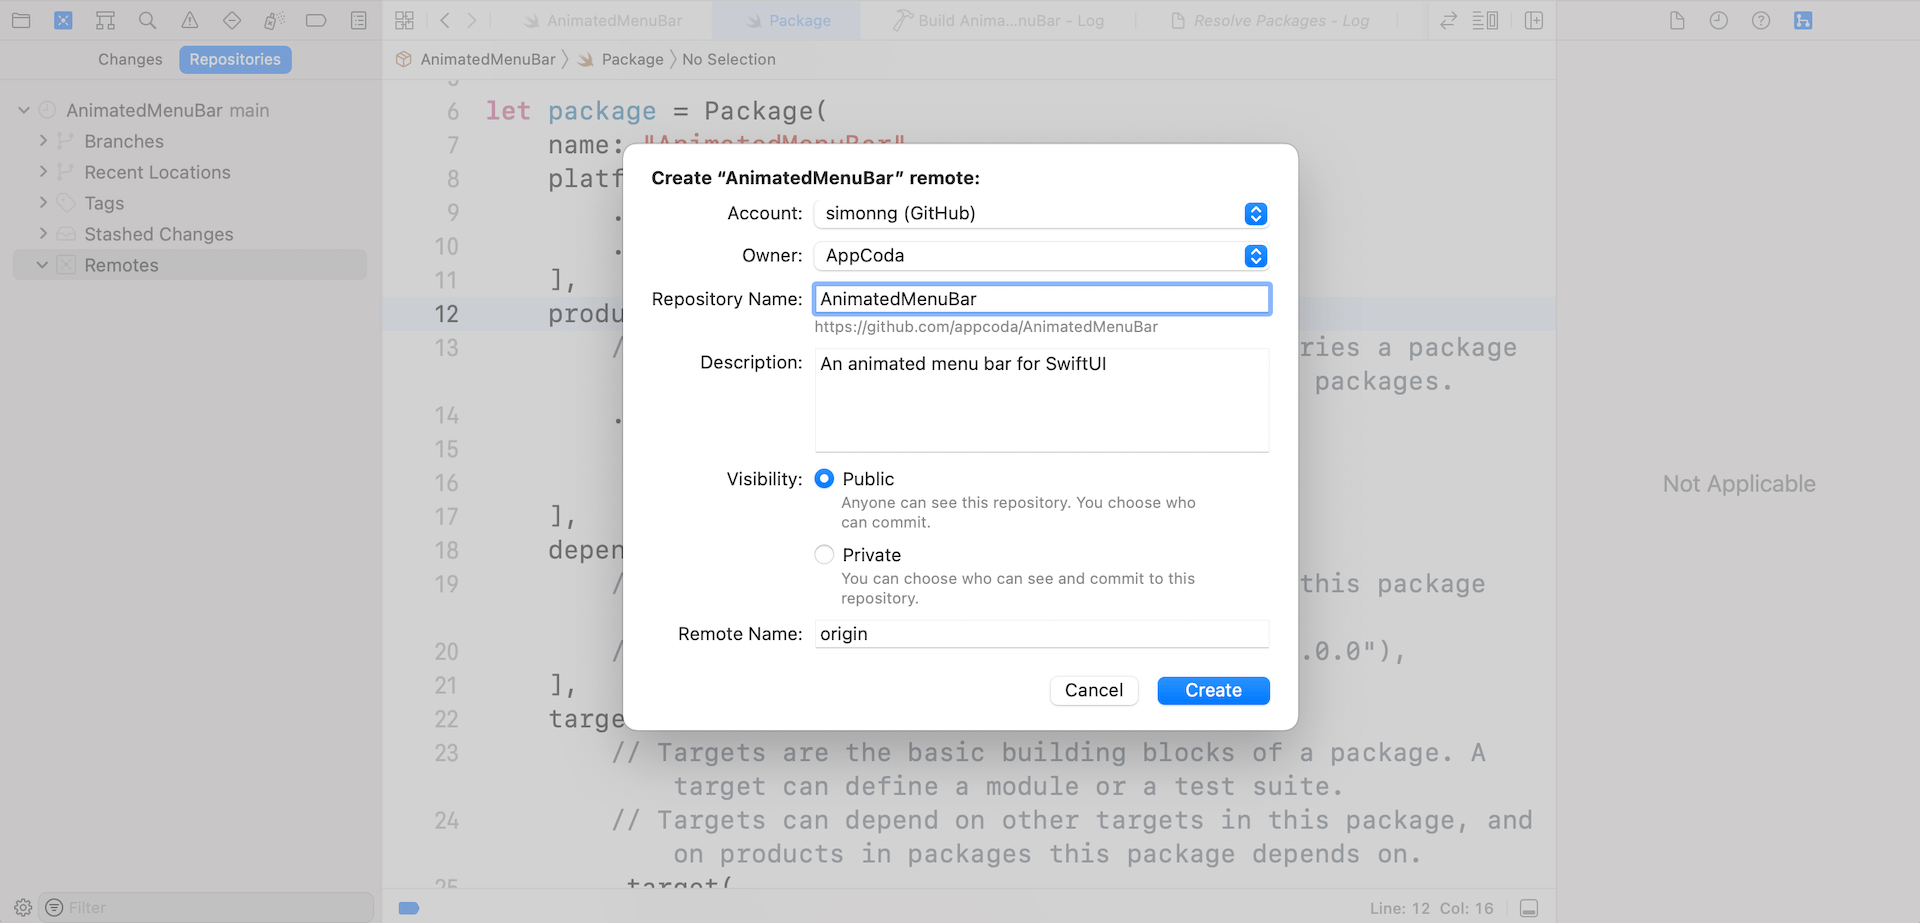
Assuming you’ve already configured your GitHub account in Xcode, you should be able to create a remote repository. Set the repository name to AnimatedMenuBar and key in your description of the package. Depending on your preference, you can make the package available to public or just keep it to your own project. For this demo, I set it to public.
Once you hit the Create button, Xcode will create the repository on GitHub and upload the local files to the repository.
Currently, the package is not assigned with a version number. To set a version for the package, go to the Source Control Navigator. Right click the entry of the initial commit and choose Tag.
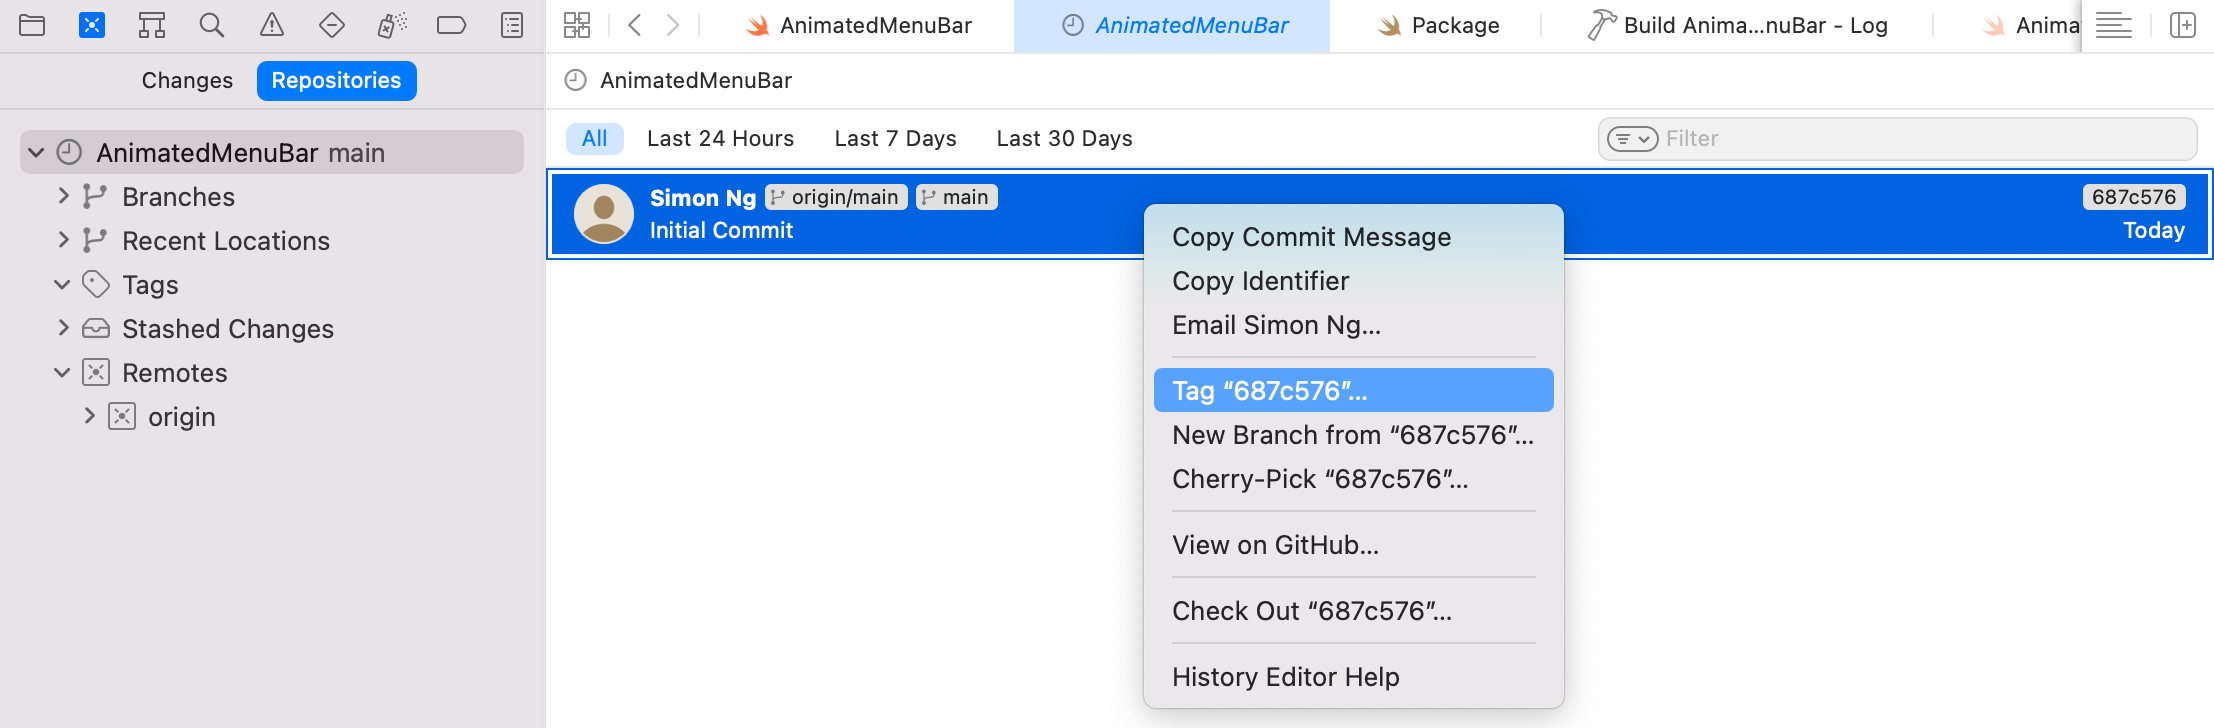
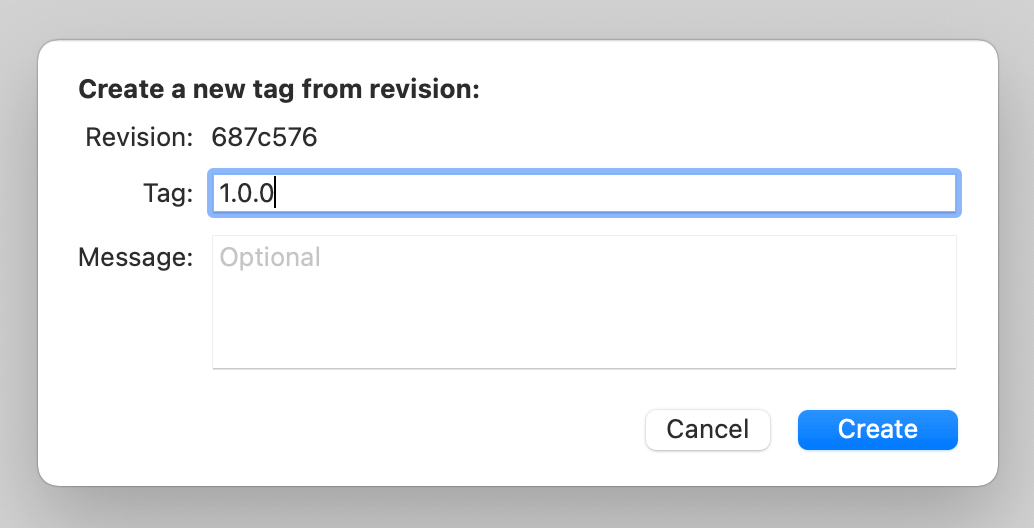
Next, set the tag to 1.0.0 and click Create to confirm the change.
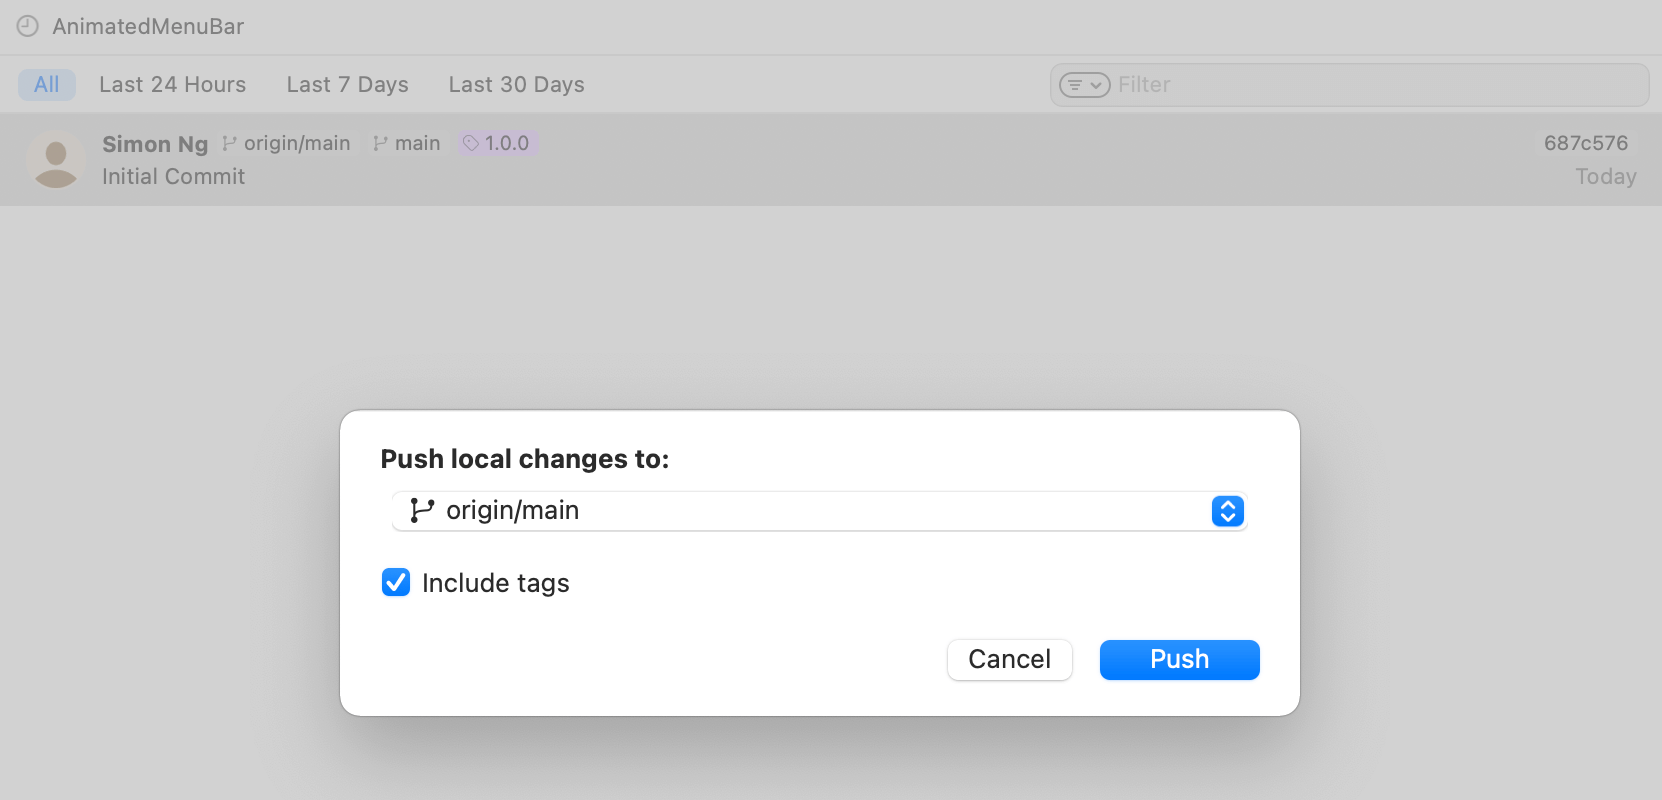
The change you just made is only available locally. To set the tag on the remote repository, you need to push the changes. Go up to the Xcode menu, choose Source Control > Push. Please make sure you tick the Include tags checkbox before hitting the Push button.
That’s it! You’ve successfully published the Swift package onto GitHub. And, it is accessible via https://github.com/appcoda/AnimatedMenuBar.
Using Swift Package
To use the Swift package in any Xcode project, choose File > Add Package… and key in the package URL in the search bar.
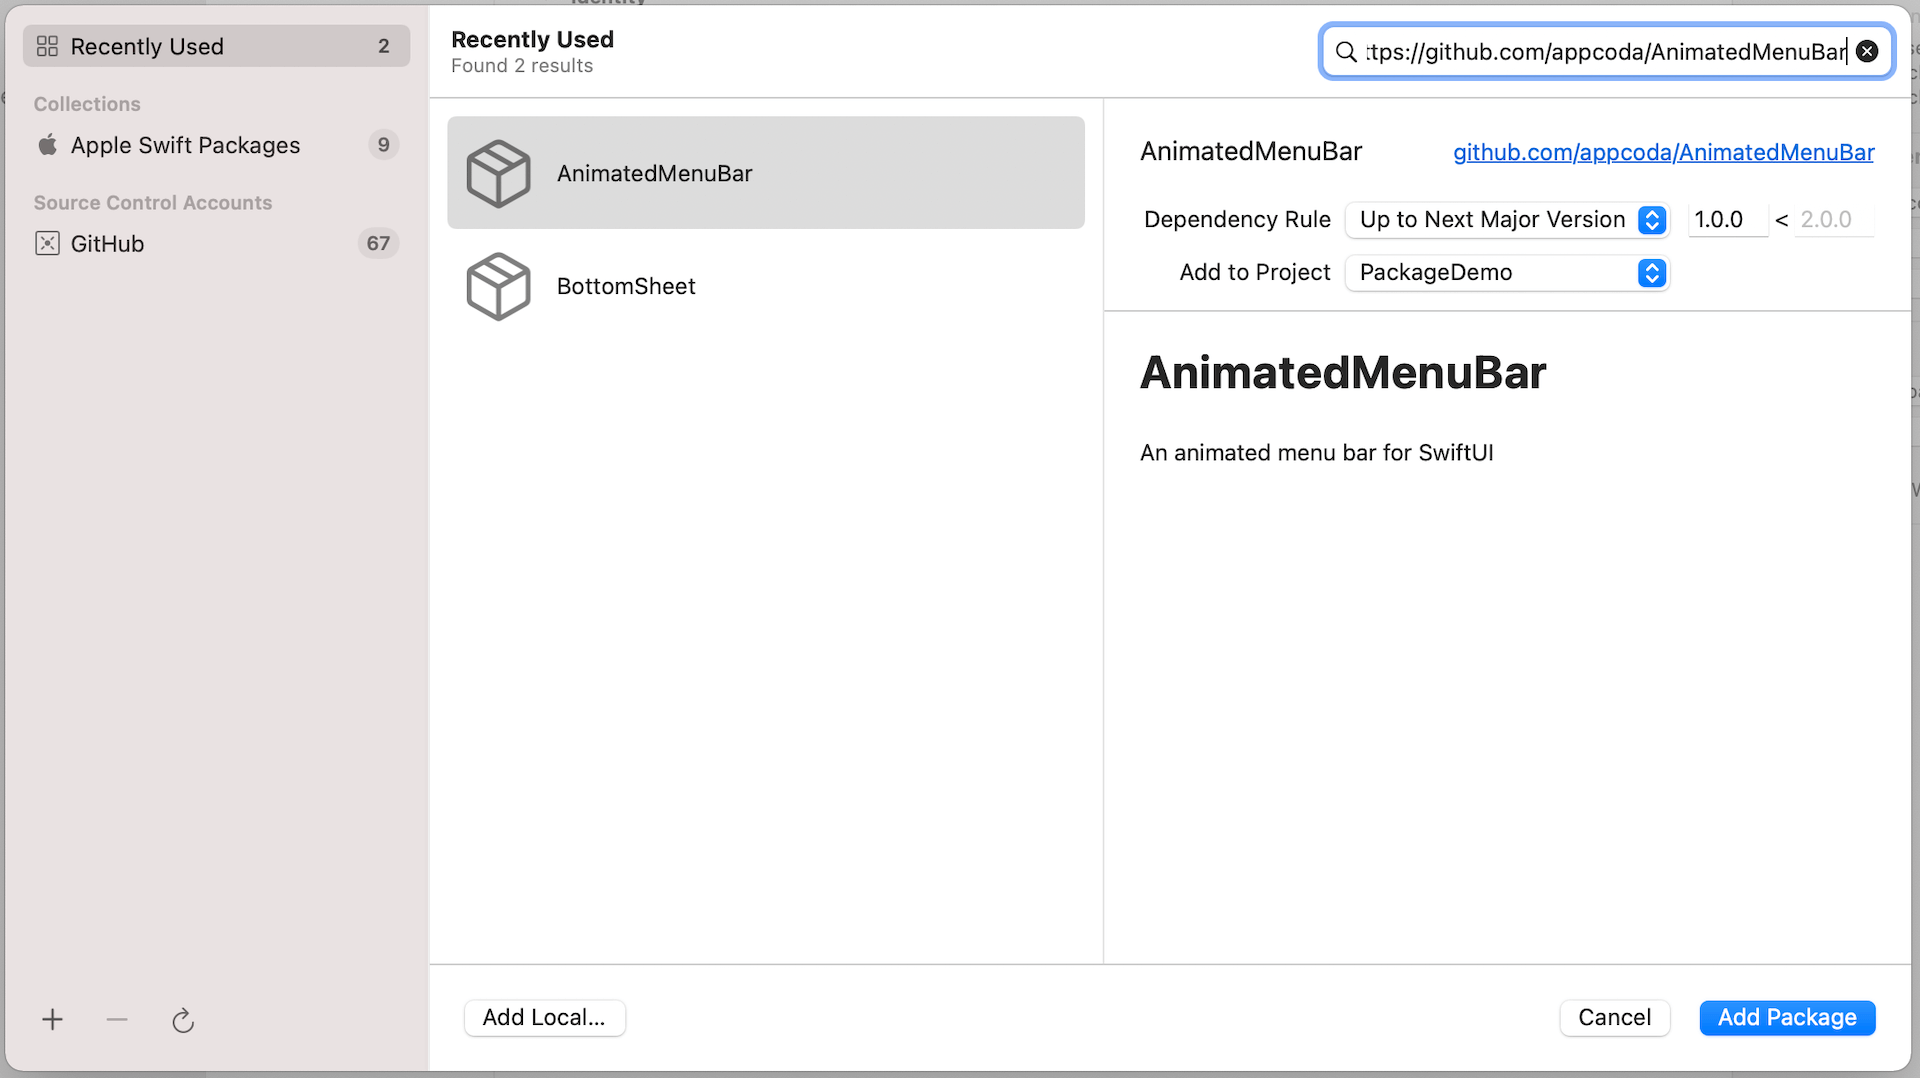
Xcode should then show you the package description and version. Click Add Package to download and add the package to your project.
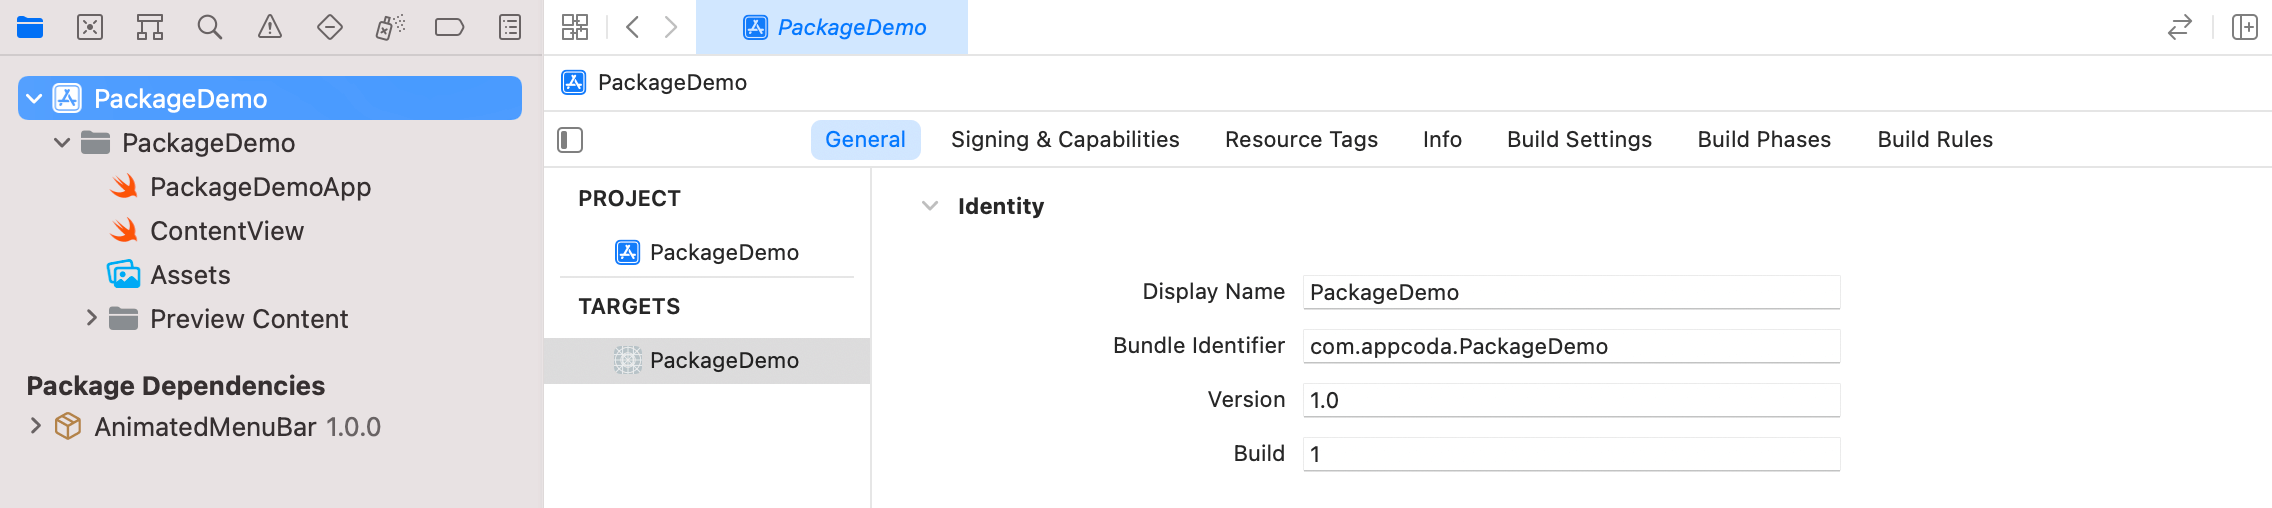
Once the package is downloaded, you should see the package under Package Dependencies in the project navigator. Now you are ready to use the AnimatedMenuBar view in the project.
All you need to do is import the AnimatedMenuBar package and use the AnimatedMenuBar view like this:
import SwiftUI
import AnimatedMenuBar

struct ContentView: View {
    @State var tabIndex = 0

    var body: some View {
        AnimatedMenuBar(selectedIndex: $tabIndex)
    }
}
Summary
In this tutorial, I have walked you through the steps to create a Swift package for reusing some common SwiftUI views. The technique shouldn’t be limited to the reuse of SwiftUI views. You can apply it to common components that can be shared between teams and projects.
What do you think about Swift packages? Have you used Swift Package Manager to create shareable components? Please leave me comment and let me know.


