

Hello and welcome to a new tutorial! One of the most common concepts met and used in Swift by all developers is protocols, and I don’t think there’s even one developer who doesn’t know about them. Protocols can be used to serve various purposes, however, what remains always the same is what the documentation from Apple says:
A protocol defines a blueprint of methods, properties, and other requirements that suit a particular task or piece of functionality. The protocol can then be adopted by a class, structure, or enumeration to provide an actual implementation of those requirements. Any type that satisfies the requirements of a protocol is said to conform to that protocol.
In fewer words, a Swift protocol defines a number of methods and properties that the adopting types (classes, structures, enumerations) must implement. All those defined methods and properties are called requirements.
What makes protocols particularly interesting is the ability to provide a default implementation for the defined requirements simply by just extending them (protocols). And that feature is what actually makes protocols quite powerful and a popular topic in Swift development. By being able to define a series of methods that “describe” a set of functionalities and have a standard implementation of them, classes, structures and enumerations that are not even related among them (the opposite of what happens with inheritance in classes for example) can acquire common, additional features which extend their functionalities.
If you are a new developer, then I really encourage you to read more on protocols as there’s a lot of interesting information to find out.
Now, what protocols have to do with app settings and anything that the title of this post says? Well, let me explain and make the connection. For a long time, I was bothered by the fact that UserDefaults has been the only mechanism to save small bits of data fast, such as settings and user preferences. User Defaults are undeniably good, but it’s a general and a non-“Swifty” solution (and to be honest, I’ve rarely used them). What I needed was app-specific solutions tailored to the needs of each application I was making. The first step towards that was easy: Creating classes or structures with properties that represent app settings and user preferences. However, the downside is that all of them require methods to perform file operations (saving, loading, deleting). Methods that should be written once and used everywhere and with any type. Using classes and inheritance with a parent class to implement the standard functionality was out of the table, as it would rule out structures (structs). And here’s where protocols come into the play!
By having a protocol defining a series of methods that will be responsible for file manipulation and a protocol extension to provide a default implementation, every single class or structure adopting it would get the same file-related functionalities! And not just that. Multiple classes and structures supporting various kind of settings can co-exist in the same app that way, and various parts of data can be handled separately. Using different words, such a protocol is like a plug-and-play mechanism which allows to save and load data on any custom type that adopts it.
This is a solution that I’ve been using for a long time, and it’s now time to discuss it here. Obviously, the content of this post is addressed mostly to new Swift developers as it will help to get their head around protocols and see an actual use of them. Advanced developers have undoubtedly come up with solutions like that already, but regardless, everyone is encouraged to keep on reading!
The Roadmap
So, our goal here today is to create such a protocol that will allow any adopting type to easily save and load its data to and from files. We will name it SettingsManageable and we’ll go step by step, starting from nothing and going up to the last command needed to make everything work. Keep in mind however that my focus is to present how to deal easily with app settings and generally setting-related types, and not any class or struct that should save data in various formats. For that purpose, files created by the implementation we’ll do next are going to be property lists (.plist). After all, when thinking about settings, editing property lists is what usually comes to mind. To make things even more interesting, we’ll make it possible to handle default settings initially existing in the app bundle (settings that we can edit in Xcode’s property list editor).
After finishing the implementation, we’ll see a couple of simple examples of how this protocol can be used. Even though we are going to deal with property list data here, you’re welcome to make the extra mile and make the protocol even more general, so it can be used by any custom type and support other formats as well, such as JSON or plain text.
Lastly, there’s a starter project for you to download. In the project, you will find a couple of custom types representing settings that we’ll use to put in action the protocol we’ll make. Once you download it, please open it in Xcode and keep going.
Getting Started: Create The Protocol
Let’s dive into the action by opening the starter project and by creating a new file where we’ll implement the protocol. In Xcode, press Command+N on the keyboard or go to the File > New > File… menu. Select the Swift File as the template of the file and click on the Next button.
Next, you must give a name to the new file. Name it after the protocol’s name: SettingsManageable. Then press Return or click on the Create button to let Xcode actually create the new file.
Once the new file is ready, go to the Project Navigator and select to open it. Define the protocol:
protocol SettingsManageable {

}
I explained a bit earlier that we’ll implement the default behaviour of the methods that we’ll define in the SettingsManageable protocol in an extension, so we can get the desired functionality out of the box just by adopting the protocol. With that in mind, go right after the closing curly bracket of the protocol above, leave a couple of empty lines and define its extension:
extension SettingsManageable where Self: Codable {

}
It’s really important to give the proper attention to the condition we set here. By suffixing the extension with the where Self: Codable condition, we are actually require from any custom types that will adopt the SettingsManageable protocol to also adopt the Codable protocol.
Why do we need Codable? Because we’ll be encoding and decoding the values of the properties of the custom types that will adopt the SettingsManageable to and from property list data.
In case of classes or structs that do not adopt the Codable protocol but adopt the SettingsManageable, then don’t expect the implementation we’ll provide right next to work.
Defining And Implementing Protocol’s Requirements
This is the most interesting part of the post, as we’ll implement all those methods that will make any class or struct adopting SettingsManageable automatically save and load themselves, and therefore we, as developers, can treat them as settings or preferences that can be altered and updated with no effort at all. From now on, for each method that we’ll define in the protocol, we’ll be providing the respective implementation in the protocol’s extension. And with that said, let’s get going!
Getting The File’s URL
The values of the properties of any custom type (class, struct, even enumeration) that will adopt the SettingsManageable protocol will be stored in property list files. We’ll be keeping those files in the Caches directory of the app, and this is where we’ll start from: Getting the URL to the settings file!
Add the following method definition to the protocol:
protocol SettingsManageable {
    func settingsURL() -> URL
}
In the protocol’s extension we implement it:
extension SettingsManageable where Self: Codable {
    func settingsURL() -> URL {
        let cachesDirectory = FileManager.default.urls(for: .cachesDirectory, in: .userDomainMask)[0]
        return cachesDirectory.appendingPathComponent("\(Self.self).plist")
    }
}
In the first line we get the URL to the Caches directory. In the second line we append the name of the custom type adopting SettingsManageable along with the “.plist” extension to that URL, and we return it.
Note that "\(Self.self)" gives us the name of the type that adopts SettingsManageable on the fly. That’s cool, because each class or struct will have a matching .plist file stored in the Caches directory named after its own name, and no duplicates will exist. For example, a class that adopts SettingsManageable named “Settings” will have a file called “Settings.plist” in the Caches directory, while a struct adopting SettingsManageable named “AppColors” will have a file “AppColors.plist” respectively.
Saving (Updating) A SettingsManageable Instance
The method we implemented right above is undeniably useful, but it’s definitely an assistive method made for our own convenience and we could manage things even without it. The first vital method comes now, where we’ll deal with something really important: Saving the properties of the adopting type to the property list file. The term “saving” refers to two distinct actions:
- Encoding to property list.
- Writing to file.
In the SettingsManageable protocol again, add the following declaration:
protocol SettingsManageable {
    ...

    func update() -> Bool
}
We call it update() as its purpose is to update the stored settings to the file after any changes made on them. Under the hood, all properties are going to be encoded and written to file each time this method gets called. Also, this method returns true or false to let us know whether it succeeded on its purpose or not.
Now, I guess that you’re aware of the JSONEncoder class which allows to easily convert any Codable object to JSON. Chances are that you have used it already! However, did you know that besides JSONEncoder there’s also the PropertyListEncoder class which encodes any Codable object to a property list object?
Oh, yes, there is, and we are going to use it! In the protocol’s extension, start with the following:
func update() -> Bool {
    do {
        let encoded = try PropertyListEncoder().encode(self)
        return true
    } catch {
        print(error.localizedDescription)
        return false
    }
}
As you can see, the actual work is done with this: PropertyListEncoder().encode(self). At first, we create an instance of the PropertyListEncoder class, and then we call the encode(_:) method to encode self (the custom type adopting SettingsManageable protocol) to a property list object, which is nothing else but a Data object!
If encoding fails then the encode(_:) method throws an exception with the error occurred, therefore using the try keyword in a do-catch statement is necessary. Note that here we do not take any special actions in case of an exception, we just print the error and we return false. It’s up to you to take any additional actions if you want.
The above does not write the encoded data to file. Inside the do block, add one more line as shown here:
do {
    let encoded = try PropertyListEncoder().encode(self)
    try encoded.write(to: settingsURL())
    return true
}
The write(to:) method of the Data class can also throw an exception, so marking it with the try keyword is also mandatory. Note that we are using the settingsURL() method we implemented previously for getting the URL to the file.
With just two important lines of code, we managed to encode and write the conforming type to a property list file. The entire method should now look like this:
func update() -> Bool {
    do {
        let encoded = try PropertyListEncoder().encode(self)
        try encoded.write(to: settingsURL())
        return true
    } catch {
        print(error.localizedDescription)
        return false
    }
}
Before we go any further, let me give you an alternative implementation of the above method. Suppose that we don’t want to have it return a Boolean value. Instead, we want from our method to throw the exception that was raised by any of the methods we used in it. In that case, first change its declaration in the SettingsManageable protocol:
func update() throwsThen, in the protocol extension change it according to this:
func update() throws {
    let encoded = try PropertyListEncoder().encode(self)
    try encoded.write(to: settingsURL())
}
See that there’s no need to use a do-catch statement in this case. The method will propagate any potential errors since we marked it as throwing with the throws keyword. That means though that we should be checking for exceptions every time we call it. I personally don’t find it too practical, as I want to update settings easily and without much effort. A flag showing whether updating succeeded or failed would be sufficient, and I’ll stick to that. However, for your own convenience, I also give you this alternative solution so you choose what you like the best. Note that I won’t present alternatives to the methods that are coming next, but you can easily get to them if you convert them according to what I just showed here.
Loading Settings From File
Let’s pass now to loading data from a file, the counterpart of saving that we just talked about. The path we’ll follow is simple, as all we have to do is:
- Check if the file exists.
- Load the contents of the file as a
Dataobject. - Decode data using the
PropertyListDecoderclass, the counterpart ofPropertyListEncoder.
Similarly to what we did before, this method will also return a Boolean value indicating success or not. In the SettingsManageable protocol make the following addition:
protocol SettingsManageable {
    ...

    mutating func load() -> Bool
}
The method is marked as mutating, as it’s going to modify the instance of the type that adopts the SettingsManageable protocol (simply put, it’s going to change self).
The implementation of the method is quite simple and similar to what we did in the previous part. The addition here is the file existence check. Add the following implementation to the protocol extension body:
mutating func load() -> Bool {
    if FileManager.default.fileExists(atPath: settingsURL().path) {
        do {
            let fileContents = try Data(contentsOf: settingsURL())
            self = try PropertyListDecoder().decode(Self.self, from: fileContents)
            return true
        } catch {
            print(error.localizedDescription)
            return false
        }
    }
}
Once again we make use of the settingsURL() method to get the URL to the file. However, this time we need the path as a String which we get through the path property. Once we make sure that the file exists, we load the file contents to the fileContents constant, and then we initialize self (the type adopting the SettingsManageable protocol) with the loaded data after we decoded it using the PropertyListDecoder class. If all those succeed, then we return true, but if an error occurs and an exception is raised, then we just print it to the console and we return false.
The method is incomplete the way it is right now, as we don’t return a value in case the condition in the if statement is false, meaning the file does not exist. If there’s no file to load settings from, then we’ll just create it! How? By calling the update() method we implemented in the previous step!
mutating func load() -> Bool {
    if FileManager.default.fileExists(atPath: settingsURL().path) {
        ...
    } else {
        return update()
    }
}
Now the method returns a value in all cases. If the file does not exist because we use the app for first time or it was deleted, the method will create it by calling the update() method. If exists, then it will load its content, it will decode it and it will initialize the object with the decoded data.
Initial Settings From Plist In The App Bundle
Since we are talking about settings, it’s reasonable to think of their initial values. In programming level, properties of classes or structures that adopt SettingsManageable should be assigned with initial, default values. However, it might not always be practical or desirable to do so. It might be better or easier to create initial settings to a property list file using Xcode’s property list editor and have that file reside in the app bundle. We are going to cover this case in this part, however, there’s one important rule to remember:
Keys in a property list file should have the same name to the properties in the classes or structures that represent these settings!
In the opposite case, decoding will fail.
Let’s get going by defining a new method in the SettingsManageable protocol:
protocol SettingsManageable {
    ...

    mutating func loadUsingSettingsFile() -> Bool
}
In the implementation of this method (in the protocol extension), the first thing we do is to check if the original settings file actually exists in the app bundle or not:
mutating func loadUsingSettingsFile() -> Bool {
    guard let originalSettingsURL = Bundle.main.url(forResource: "\(Self.self)", withExtension: "plist")
     else { return false }
}
Remember: The settings file name should have the same name to the class or structure adopting SettingsManageable.
Next, we’ll check if the property list file exists in the Caches directory. If it does not exist, then we’ll copy it from the app bundle to the Caches directory:
do {
    if !FileManager.default.fileExists(atPath: settingsURL().path) {
        try FileManager.default.copyItem(at: originalSettingsURL, to: settingsURL())
    }

} catch {
    print(error.localizedDescription)
    return false
}
If the file already exists, the condition will result to false and the copy operation won’t take place! Now, we can do exactly what we did before; we’ll load the file contents into a Data object and then we’ll decode it:
do {
    ...

    let fileContents = try Data(contentsOf: settingsURL())
    self = try PropertyListDecoder().decode(Self.self, from: fileContents)
    return true

} catch { ... }
The logic we just applied works regardless of whether the settings file exists or not in the Caches directory. If it does not exist it will be copied first from the app bundle to the Caches directory, and then the contents will be decoded for initializing the settings object.
Deleting Settings File
Encoding and writing the data of custom types to property list files and reading them back is now complete. Next, we must provide a way so any file created can be easily removed. For that purpose we’ll add the following method to the SettingsManageable protocol:
protocol SettingsManageable {
    ...

    func delete() -> Bool
}
Its implementation in the protocol extension hides no secrets:
func delete() -> Bool {
    do {
        try FileManager.default.removeItem(at: settingsURL())
        return true
    } catch {
        print(error.localizedDescription)
        return false
    }
}
If removing the file as shown above succeeds, the method will return true. If any error occurs while trying to remove it, then it will return false.
Resetting Settings
A useful functionality would be to make it possible to switch back to original settings at any time. This actually means to delete the property list file from the Caches directory and write it back with the initial values in it.
When the original setting values exist in a .plist file in the app bundle, then resetting to the initial values is easy and straightforward. Just deleting the .plist file from the Caches directory and copying back the original one will do the job. However, when initial values have been assigned to properties directly and there’s no original file in the app bundle then things can get a bit more tricky! Already loaded values that replace the default ones will be re-written back to file when resetting, and that’s obviously wrong!
To work around this, we need to keep a copy of the original settings before they’re overridden. That copy will actually be a copy of the very first .plist file created in the Caches directory. We will be using it to revert back the initial settings upon resetting and that way we won’t care if previous settings have been loaded already, avoiding also the risk to re-write them back.
For the purpose of what I just said we need two more methods; two methods to backup the .plist file and to restore it again. Since these are sort of “internal” operations and we don’t want them available so they can be explicitly invoked, we won’t define them in the protocol. Instead, we’ll mark them as private in the protocol extension where we’ll implement them. The first one is about backing up the original file, and here it is:
private func backupSettingsFile() {
    do {
        try FileManager.default.copyItem(at: settingsURL(), to: settingsURL().appendingPathExtension("init"))
    } catch {
        print(error.localizedDescription)
    }
}
The file with the initial settings will have the “init” extension. For example, if the original settings file is called “AppSettings.plist”, the backup will be called “AppSettings.plist.init”.
The method that copies the initial settings .plist to the normal .plist file is this:
private func restoreSettingsFile() -> Bool {
    do {
        try FileManager.default.copyItem(at: settingsURL().appendingPathExtension("init"), to: settingsURL())
        return true
    } catch {
        print(error.localizedDescription)
        return false
    }
}
With the above two methods built, let’s pay a visit back to the load() method, and specifically to the else case where the property list file is written for the first time in the Caches directory if it doesn’t exist already. At the moment here’s how it looks like:
mutating func load() -> Bool {
    if FileManager.default.fileExists(atPath: settingsURL().path) {
        ...
    } else {
        return update()
    }
}
We are going to change it and we’ll call the backupSettingsFile() method right after the update() method, as long as the update() returns true. Here’s how it looks like after modifying it:
mutating func load() -> Bool {
    if FileManager.default.fileExists(atPath: settingsURL().path) {
        ...
    } else {
        if update() {
            backupSettingsFile()
            return true
        } else { return false }
    }
}
We can now focus on the implementation of a new method that will perform the settings reset operation! In the SettingsManageable protocol add this:
protocol SettingsManageable {
    ...

    mutating func reset() -> Bool
}
In the protocol extension, we’ll implement it. We’ll start by deleting the current property list file from the Caches directory:
mutating func reset() -> Bool {
    if delete() {

    }

    return false
}
For the next steps let’s be a bit careful. We want to make the reset() method independent on the loading method that’s being used to load settings. For that reason, we’ll try first to load initial settings from a settings file in the app bundle with the loadUsingSettingsFile() method. If that succeeds, the initial settings will be copied in the Caches directory. If that fails because there’s no such file in the app bundle, then we’ll try to restore previously backed up initial settings first using the restoreSettingsFile() method, and then we’ll call the load() method to actually load the settings.
Here’s that “scenario” in code:
mutating func reset() -> Bool {
    if delete() {
        if !loadUsingSettingsFile() {
            if restoreSettingsFile() {
                return load()
            }
        } else {
            return true
        }
    }
    return false
}
If the loadUsingSettingsFile() method returns true, then the execution will go to the inner else case and the method will also return true. Otherwise, if restoring the initial settings file is successful the method will return the result of the load() method. The above implementation will work regardless of how initial settings have been defined; directly assigned to properties or through a property list file in the app bundle. You might be thinking that all this effort to implement a reset feature is not necessary, but trust me, it is. There will definitely be times where you’ll need this feature and there will be no time to make it!
Getting Property List Contents As A Dictionary
All the above methods we implemented in the SettingsManageable protocol aim to give saving and loading functionalities to any class and structure adopting it. Saved data is encoded to property list files using the PropertyListEncoder, and it gets decoded with the PropertyListDecoder. Admittedly, working with property list data and the related classes that we met here is not as common as when working with JSON data and the JSONEncoder and JSONDecoder classes. So, since this post gives an opportunity to talk about property lists, let’s use it to go one step further and see one more thing: How to use the PropertyListSerialization class and get a property list as a dictionary.
For the sake of the example here, we’ll define one more method in the SettingsManageable protocol:
protocol SettingsManageable {
    ...

    func toDictionary() -> [String: Any?]?
}
This method will return a dictionary with [String: Any?] values, or nil if something bad happens along the way and the property list file cannot be decoded properly to a dictionary. Note that the datatype of the value in the returned dictionary is set to Any?, and that covers the case where a value is nil.
In the protocol extension now where we’ll be providing a default implementation for the above method, the first step is to check if the property list file exists. We’ve done that already a couple of times earlier. Also, we’ll load the file contents into a Data object:
func toDictionary() -> [String: Any?]? {
    do {
        if FileManager.default.fileExists(atPath: settingsURL().path) {
            let fileContents = try Data(contentsOf: settingsURL())
        }
    } catch {
        print(error.localizedDescription)
    }

    return nil
}
See that if the file does not exist we just return nil. Getting into the point now, PropertyListSerialization class provides a method called propertyList(from:options:format:) which returns a property list object from a Data object (in our case the fileContents object). We use it as follows:
let dictionary = try PropertyListSerialization.propertyList(from: fileContents, options: .mutableContainersAndLeaves, format: nil)Using the try keyword is necessary as that method can throw errors. The result of it is an Any object, so we get the dictionary simply by casting to it:
let dictionary = try PropertyListSerialization.propertyList(from: fileContents, options: .mutableContainersAndLeaves, format: nil) as? [String: Any?]The complete method now is this:
func toDictionary() -> [String: Any?]? {
    do {
        if FileManager.default.fileExists(atPath: settingsURL().path) {
            let fileContents = try Data(contentsOf: settingsURL())
            let dictionary = try PropertyListSerialization.propertyList(from: fileContents, options: .mutableContainersAndLeaves, format: nil) as? [String: Any?]
            return dictionary
        }
    } catch {
        print(error.localizedDescription)
    }

    return nil
}
PropertyListSerialization class is the equivalent of JSONSerialization class but for property lists (in case JSONSerialization is familiar to you). With the Codable protocol existing in Swift, chances to use the PropertyListSerialization class are low; most often you’ll be using PropertyListEncoder and PropertyListDecoder classes. However, given the fact that we’re discussing about property list it’s a good chance to mention it too.
Now, how about going from a dictionary to a property list file using the PropertyListSerialization class?
Well, I leave that to you as an optional exercise. As a hint, what I would look into would be a method called data(fromPropertyList:format:options:).
Putting The SettingsManageable Protocol In Action
Time to try out all the implementation we’ve done so far. In the starter project you are going to find two demo files with a class and a struct named AppSettings and PlayerSettings respectively. We are going to use them and see our protocol in action!
Starting with the AppSettings.swift file, the AppSettings class simulates a few settings that could be found in a real application. The first thing that you will notice here is that this class is following the Singleton pattern since it has a static shared instance and a private initializer. I chose to go that way for a simple reason: When dealing with app settings, it might not be such a great idea to create multiple instances of the class that handles them; the risk to overwrite data is always present. With a singleton class, there’s just one instance of it and the risk to mess settings data is minimized significantly. However, if you don’t agree to that approach, feel free to remove the private keyword from the init() method, delete the static shared instance and use it as any other class by initializing instances whenever necessary. We’ll see that in the next example with the PlayerSettings struct. Also, you will notice that initial values to settings are given as default property values.
The first thing we need here is to make the AppSettings class adopt the SettingsManageable protocol. Don’t forget that is should adopt the Codable protocol as well:
class AppSettings: Codable, SettingsManageable {
    ...
}
Since we’re talking about app settings, it’s necessary to have them available right after the app starts. So, open the AppDelegate.swift file and go to the application(_:didFinishLaunchingWithOptions:) method. Update it and load the settings using the load() method we implemented earlier:
func application(_ application: UIApplication, didFinishLaunchingWithOptions launchOptions: [UIApplication.LaunchOptionsKey: Any]?) -> Bool {
    // Override point for customization after application launch.

    _ = AppSettings.shared.load()

    return true
}
If the app runs for first time, then the initial settings will be written to the “AppSettings.plist” file in the Caches directory when the load() method will be called. At the same time, those initial settings will be backed up to the “AppSettings.plist.init” file so we can reset them when necessary. If the .plist file exists already when the app starts, then settings will be loaded and assigned to the properties of the AppSettings shared instance.
In the ViewController.swift file now, go to the tryAppSettings() method. We’ll change a couple of settings as shown here:
func tryAppSettings() {
    AppSettings.shared.fontSize = 21.0
    AppSettings.shared.playSFX = false
}
Let’s update the settings file, and then let’s see what’s written in it:
if AppSettings.shared.update() {
    if let dictionary = AppSettings.shared.toDictionary() {
        print(dictionary.compactMapValues  { $0 })
    }
}
In the above snippet besides the update() we also make use of the toDictionary() method and we load the file contents into a dictionary. Then we print the values of that dictionary excluding any nil values.
Also, to verify if the files have been successfully created or not, add the following line; it will print the actual path to the Caches directory of the app and you can use it to navigate there using the Finder:
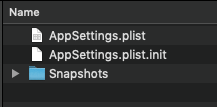
print(AppSettings.shared.settingsURL().path)If you run the app here’s what you’ll get in the console:

If you use the printed path you’ll also see the two created files in Finder:
Let’s try now to reset our settings. Right after all the above commands, add the following:
if AppSettings.shared.reset() {
    if let dictionary = AppSettings.shared.toDictionary() {
        print(dictionary.compactMapValues  { $0 })
    }
}
Run again. This time you should see first the updated values, and then the original ones again. That means that restoring the initial values is working as expected!

Let’s pass now to the PlayerSettings.swift file and to the PlayerSettings structure which represents a few fake game settings regarding players. At first, let’s have the PlayerSettings structure adopt the Codable and SettingsManageable protocols:
struct PlayerSettings: Codable, SettingsManageable {
    ...
}
On the contrary to the properties of the AppSettings class, here the initial values are not assigned directly to them. Instead, they exist in the PlayerSettings.plist file in the app bundle and you can find it in the Project Navigator. When you open it, notice that the key names in the .plist file are same as the properties names.
Back to the ViewController.swift file, we’ll go to the tryPlayerSettings() method. The first thing to do is to initialize a PlayerSettings object and load the settings, but this time we’ll use the loadUsingSettingsFile() method. Also, we’ll print the results similarly as before:
func tryPlayerSettings() {
    var playerSettings = PlayerSettings()
    if playerSettings.loadUsingSettingsFile() {
        if let dictionary = playerSettings.toDictionary() {
            print(dictionary.compactMapValues  { $0 })
        }
    }

}
Here’s what is printed in the console when the app runs:
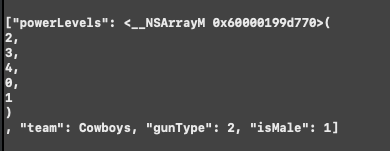
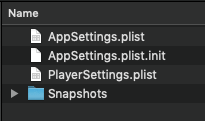
And here’s the PlayerSettings.plist file as it co-exists along with the AppSettings.plist file:
Let’s change a few properties now, let’s update the .plist file and let’s print again:
playerSettings.isMale = false
playerSettings.gunType = 1
playerSettings.powerLevels?[0] = 1
playerSettings.powerLevels?[1] = 1
playerSettings.powerLevels?[3] = 5
playerSettings.powerLevels?[4] = 5
_ = playerSettings.update()
if let dictionary = playerSettings.toDictionary() {
    print("\n", dictionary.compactMapValues  { $0 })
}
Note that in a real application we should check if the indices we use are not out of bounds!
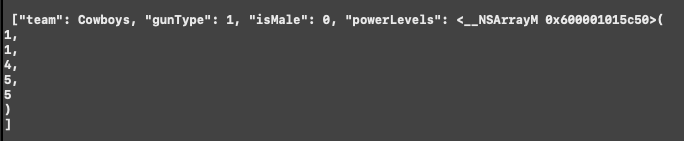
Here are the updated settings as taken from the .plist file:
Finally, let’s try to reset and verify that the original settings .plist file will replace the currently modified one in the Caches directory:
_ = playerSettings.reset()
if let dictionary = playerSettings.toDictionary() {
    print("\n", dictionary.compactMapValues  { $0 })
}
Back to initial settings! Everything is working as expected eventually!
Summary
We’ve finally come to the end of this post. I hope you enjoyed it and that you found something useful here today. The whole concept presented is simple, but it clearly demonstrates how protocols and their extensions can be used to provide additional functionality to other types and to automate tasks that are pretty much necessary to every application. Also, by utilizing solutions like the one we talked about here, the work speed is increased and you don’t have to worry about simple matters such as how to save and load settings; more time for more important tasks. Now that you’ve finished reading this, think about how to improve your own tasks; it might be easier than you believe. Thanks for reading and we’ll see you again soon!
For reference, you can refer to download the complete project on GitHub.


