
We’ve covered UIPageViewController before. The original tutorial demonstrates how to create UIPageViewController using Interface Builder. To make it compatible with iOS 7 and Xcode 5, we completely rewrite the whole tutorial. In addition, we’ll use Storyboard to create UIPageViewController.
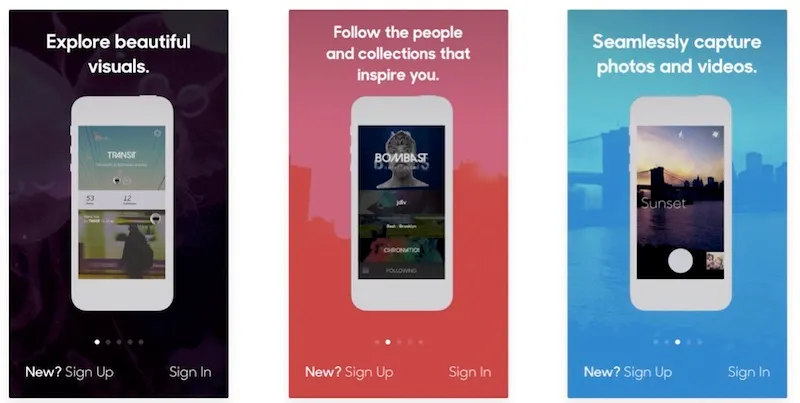
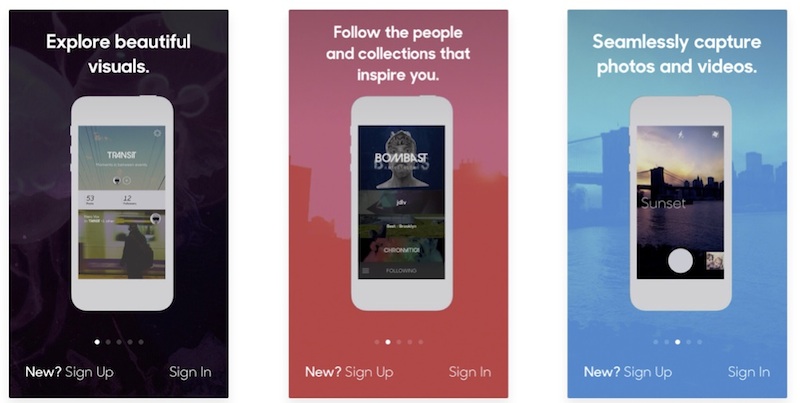
For the very first time you launch an app, you’ll probably find a series of walkthrough (or tutorial) screens to give you a brief introduction of the features. It’s a common practice to explain how the app works. In this tutorial, we’ll show you how to build a similar type of walk through screens by using UIPageViewController.
The UIPageViewController class was first introduced in iOS 5 SDK that lets developers build pages of content, where each page is managed by its own view controller. The class was further improved in iOS 6 to support the scrolling transition. With page view, users can easily navigate between multiple pages through simple gesture. The page view controller is not limited to create walkthrough screens. You can find examples of page view implementation in games like Angry Birds to show the available levels or book apps to display pages of content.

The UIPageViewController is a highly configurable class. You’re allowed to define:
- the orientation of the page views – vertical or horizontal
- the transition style – page curl transition style or scrolling transition style
- the location of the spine – only applicable to page curl transition style
- the space between pages – only applicable to scrolling transition style to define the inter-page spacing
We’ll create a simple app together in order to demonstrate how UIPageViewController works. However, we’ll not demonstrate every option of UIPageViewController. We’ll just use the scrolling transition style to display a series of walkthrough screens. Don’t worry. With the basic understanding of the UIPageViewController, I believe you should be able to explore other features in the page view controller.
Let’s get started.
A Glance at the Demo App
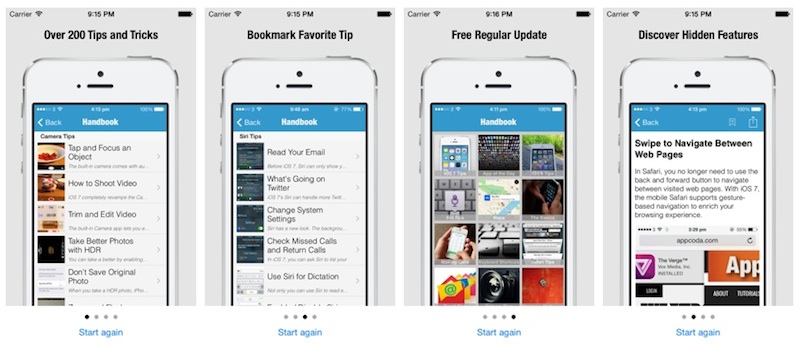
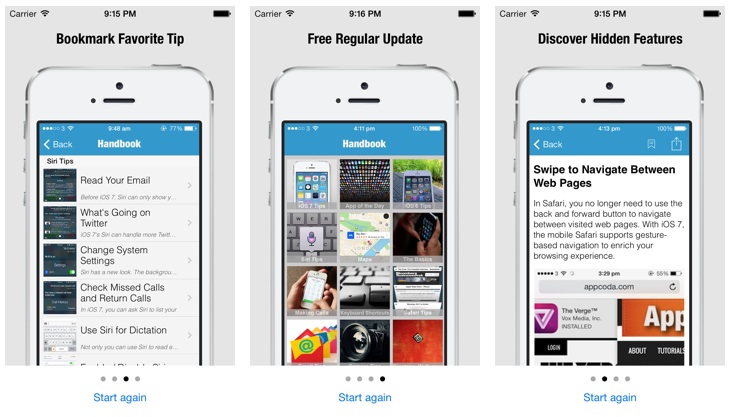
The demo app we are going to create is very simple. It displays 4 pages of screens to give users a brief introduction to the user interface. User can navigate between pages by swiping through the screen. Whenever user taps the “Start again” button to go back to the first page of tutorial. This type of walkthrough/tutorial screens shouldn’t be new to you as they are commonly found in apps such as Snapguide and Airbnb.

Creating the Project
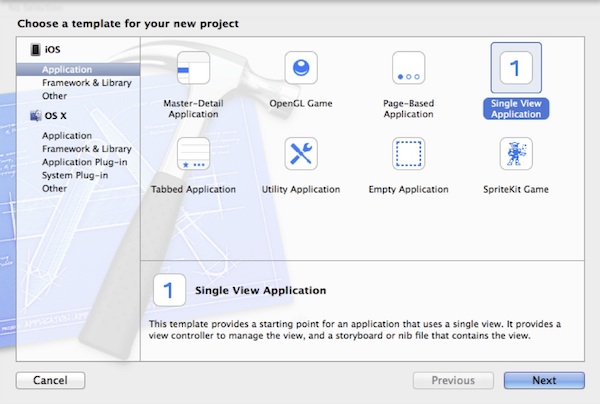
Launch Xcode and create a new Project by using the Single View Application template. It might seem a little bit strange to select the Single View Application template as Xcode already comes with a Page-Based Application template, which contains a fully functional app based on the UIPageViewController. However, this template is a little bit complex and it will take us more time to clean-up the code of the template than to start from scratch. Needless to say, we can better grasp the concept behind the UIPageViewController when we start from scratch.

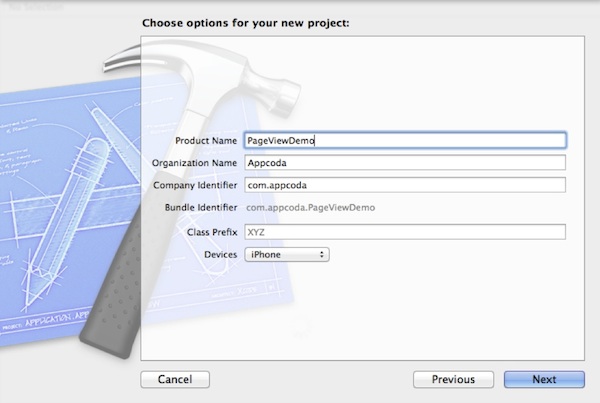
Okay, let’s move on. In the next screen enter PageViewDemo as the product name and set com.appcoda in the company identifier field. Select iPhone for the Devices option. Press next and create the project.

Creating Page View Controller in Storyboard
Next, select the Main.storyboard. As usual, you should find a default view controller generated by Xcode. Leave it as it is. Drag a Page View Controller from the Object Library into the storyboard. Then add another View Controller and put it in the same storyboard.

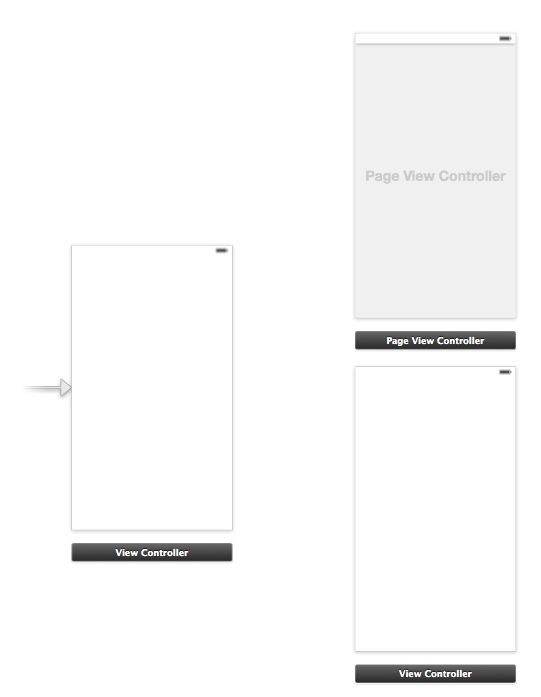
For this project, the original view controller is used as the root view controller for holding the page view controller. The view controller you’ve just added will be used for displaying the page content. Throughout the article, we refer the original view controller as the root view controller and the other view controller as page content controller.
You may wonder why we just add a single view controller for 4 pages of content. Shouldn’t we use four view controllers instead of one? As you can see from the final deliverable, the walkthrough screens are very similar. It’s better to share the same view controller for different screens.
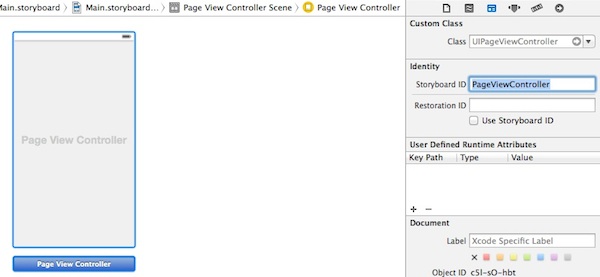
Next, assign a Storyboard ID for the page view controller and the page content controller. You can simply select the controller and set the ID under Identity Inspector. Set the Storyboard ID of the page view controller as “PageViewController” and name the ID of the page content controller as “PageContentController”. Later we’ll refer to these IDs in our code.

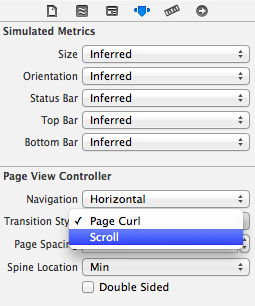
By default, the transition style of the page view controller is set as Page Curl. The page curl style is perfect for book apps. For walkthrough screens, we prefer to use scrolling style. So change the transition style to Scroll under Attribute Inspector.
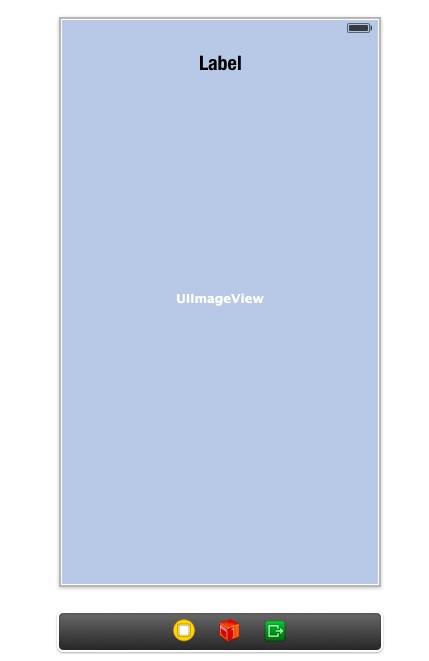
We’ll design the user interface of page content view controller. Drag an image view and a label into the controller. You’re free to change the font type and size. But your view controller should be similar to the below screenshot.

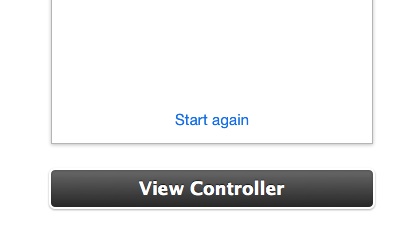
For the default view controller, add a “Start again” button and put it at the below of the screen.

Creating View Controller Class
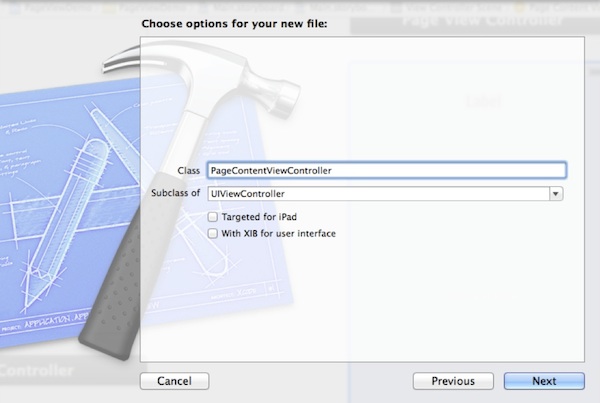
The next step is to create view controller class and associate it with the corresponding view controller. From the menu, select File -> New -> File … and choose the “Objective-C class” template. Name the class as PageContentViewController and make it a subclass of UIViewController.

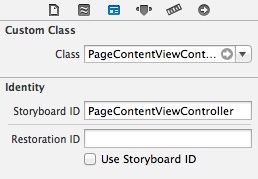
Go back to Storyboard. Select the page content view controller and set the custom class to PageContentViewController under Identify Inspector.

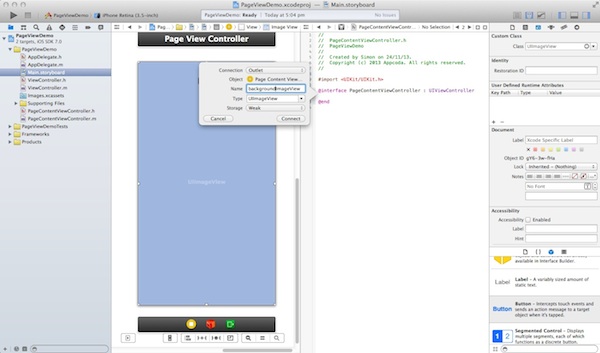
Next, we’ll create outlets for the image view and label. Switch to the Assistant Editor and make sure the PageContentViewController.h is opened. Control and drag from the image view to the PageContentViewController.h and create an IBOutlet. Set the name as backgroundImageView for the image view. For the label, set the name of the outlet as titleLabel.

After the change, the PageContentViewController.h should look like this:
#import

@interface PageContentViewController : UIViewController
@property (weak, nonatomic) IBOutlet UIImageView *backgroundImageView;
@property (weak, nonatomic) IBOutlet UILabel *titleLabel;

@end
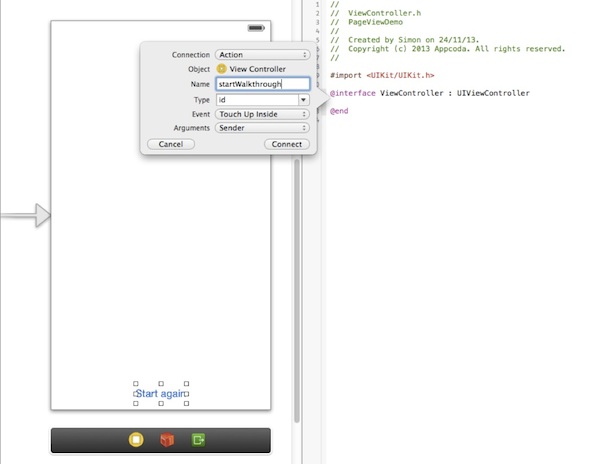
Next, select the root view controller and make sure the ViewController.h is opened. Create an action for the “Start again” button and name the action as “startWalkthrough”.

Okay, we’ve completed the design of user interface and created all the outlets. Let’s move onto the implementation of the view controller classes.
Implementing the Page Content View Controller
It’s very straightforward to implement the page content view controller. First, add the following properties in PageContentViewController.h:
@property NSUInteger pageIndex;
@property NSString *titleText;
@property NSString *imageFile;
The pageIndex stores the current page index (or page number). The view controller is designed to display an image and a title. So we create two parameters for passing the title text and image file. Next, open PageContentViewController.m and change the viewDidLoad: method:
- (void)viewDidLoad
{
    [super viewDidLoad];

    self.backgroundImageView.image = [UIImage imageNamed:self.imageFile];
    self.titleLabel.text = self.titleText;
}
Implementing the Page View Controller
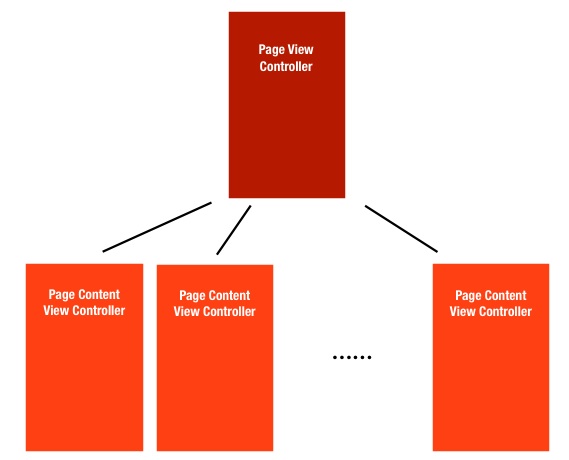
The UIPageViewController class is classified as a container controller. The container controller is used to contain and manage multiple view controllers shown in the app, as well as, controlling the way one view controller switches to another. Here the UIPageViewController is the container controller that lets the user navigate from page to page, where each page is managed by its own view controller object. The following illustration depicts the relationship between the page view controller and the page content view controller.
In order to make UIPageViewController work, we must adopt the UIPageViewControllerDataSource protocol. The data source for a page view controller is responsible for providing the content view controllers on demand. By implementing the data source protocol, we tell the page view controller what to display for each page.
In this case, we use the ViewController class as the data source for the UIPageViewController instance. Therefore it is necessary to declare the ViewController class as implementing the UIPageViewControllerDataSource protocol.
The ViewController class is also responsible to provide the data of the page content (i.e. images and titles). Open the ViewController.h. Modify the @interface declaration, add a new property to hold the UIPageViewController, as well as, properties for both images and titles:
#import
#import "PageContentViewController.h"

@interface ViewController : UIViewController

- (IBAction)startWalkthrough:(id)sender;
@property (strong, nonatomic) UIPageViewController *pageViewController;
@property (strong, nonatomic) NSArray *pageTitles;
@property (strong, nonatomic) NSArray *pageImages;

@end
In the ViewController.m, initialize the pageTitles and pageImages in the viewDidLoad method:
- (void)viewDidLoad
{
    [super viewDidLoad];

    _pageTitles = @[@"Over 200 Tips and Tricks", @"Discover Hidden Features", @"Bookmark Favorite Tip", @"Free Regular Update"];
    _pageImages = @[@"page1.png", @"page2.png", @"page3.png", @"page4.png"];
}
We have created the data model for the page content. Next, we have to implement at least two methods of the UIPageViewControllerDataSource protocol:
- viewControllerAfterViewController – provides the view controller after the current view controller. In other words, we tell the app what to display for the next screen.
- viewControllerBeforeViewController – provides the view controller before the current view controller. In other words, we tell the app what to display when user switches back to the previous screen.
Add the following lines of code before the end of the ViewController.m file:
#pragma mark - Page View Controller Data Source

- (UIViewController *)pageViewController:(UIPageViewController *)pageViewController viewControllerBeforeViewController:(UIViewController *)viewController
{
    NSUInteger index = ((PageContentViewController*) viewController).pageIndex;

    if ((index == 0) || (index == NSNotFound)) {
        return nil;
    }

    index--;
    return [self viewControllerAtIndex:index];
}

- (UIViewController *)pageViewController:(UIPageViewController *)pageViewController viewControllerAfterViewController:(UIViewController *)viewController
{
    NSUInteger index = ((PageContentViewController*) viewController).pageIndex;

    if (index == NSNotFound) {
        return nil;
    }

    index++;
    if (index == [self.pageTitles count]) {
        return nil;
    }
    return [self viewControllerAtIndex:index];
}
The above methods are very straightforward. First, we get the current page index. Depending the method, we simply increase/decrease the index number and return the view controller to display. Of course, we have to verify if we have reached the boundaries of the pages and return nil in that case.
As you may notice, we haven’t created the viewControllerAtIndex: method. It is a helper method that is designed to create the page content view controller on demand. It takes in the index parameter and creates the corresponding page content controller.
In the ViewController.m, add the helper method:
- (PageContentViewController *)viewControllerAtIndex:(NSUInteger)index
{
    if (([self.pageTitles count] == 0) || (index >= [self.pageTitles count])) {
        return nil;
    }

    // Create a new view controller and pass suitable data.
    PageContentViewController *pageContentViewController = [self.storyboard instantiateViewControllerWithIdentifier:@"PageContentViewController"];
    pageContentViewController.imageFile = self.pageImages[index];
    pageContentViewController.titleText = self.pageTitles[index];
    pageContentViewController.pageIndex = index;

    return pageContentViewController;
}
Recalled that we have set a storyboard ID for the view controllers when designing the user interface. The ID is used as reference for creating the view controller instance. To instantiate a view controller in storyboard, you can use the instantiateViewControllerWithIdentifier: method with a specific storyboard ID.
PageContentViewController *pageContentViewController = [self.storyboard instantiateViewControllerWithIdentifier:@"PageContentViewController"];
To display a page indicator, you have to tell iOS the number of pages (i.e. dots) to display in the page view controller and which page must be selected at the beginning. Add the following two methods at the end of the ViewController.m file:
- (NSInteger)presentationCountForPageViewController:(UIPageViewController *)pageViewController
{
    return [self.pageTitles count];
}

- (NSInteger)presentationIndexForPageViewController:(UIPageViewController *)pageViewController
{
    return 0;
}
Again the above code is very straightforward. We simply tell iOS that we have the total number of pages to display in the page view controller and the first page should be selected by default.
Initializing the UIPageViewController
The final step is to create and initialize the UIPageViewController. The best place to do that is in the viewDidLoad method. Open the ViewController.m file and change the method to:
- (void)viewDidLoad
{
    [super viewDidLoad];
	// Create the data model
    _pageTitles = @[@"Over 200 Tips and Tricks", @"Discover Hidden Features", @"Bookmark Favorite Tip", @"Free Regular Update"];
    _pageImages = @[@"page1.png", @"page2.png", @"page3.png", @"page4.png"];

    // Create page view controller
    self.pageViewController = [self.storyboard instantiateViewControllerWithIdentifier:@"PageViewController"];
    self.pageViewController.dataSource = self;

    PageContentViewController *startingViewController = [self viewControllerAtIndex:0];
    NSArray *viewControllers = @[startingViewController];
    [self.pageViewController setViewControllers:viewControllers direction:UIPageViewControllerNavigationDirectionForward animated:NO completion:nil];

    // Change the size of page view controller
    self.pageViewController.view.frame = CGRectMake(0, 0, self.view.frame.size.width, self.view.frame.size.height - 30);

    [self addChildViewController:_pageViewController];
    [self.view addSubview:_pageViewController.view];
    [self.pageViewController didMoveToParentViewController:self];

}
Let’s see what the method does. We first create the PageViewController instance. Next we specify the data source, in this case it is the class itself. We then create the first page content controller, add it to an array of controllers and assign it to the page view controller for display.
Lastly, we change the size of the page view controller and add the page controller view to the current view.
Customize the Page Indicator
If you compile and run the app now, your app should run properly but you may find the page indicator missing. Actually the page indicator is there but the color of the dots is the same as the color of the view. So let’s change its color.
In the AppDelegate.m, add the following lines of code in the didFinishLaunchingWithOptions: method:
    UIPageControl *pageControl = [UIPageControl appearance];
    pageControl.pageIndicatorTintColor = [UIColor lightGrayColor];
    pageControl.currentPageIndicatorTintColor = [UIColor blackColor];
    pageControl.backgroundColor = [UIColor whiteColor];
Compile and Run the App
And there we go, start the application and see how the UIPageViewController works. You should be able to load the page view controller by using the iPhone Simulator. Try to swipe through the screen to navigate between pages.

Back to the First Page
There is still one thing left. The “Start again” is not yet implemented. When tapped, we expect the page view controller will scroll back to the first page. You can use the setViewControllers: method of the UIPageViewController to switch page. To go back to the first page of the page view controller, change the startWalkthrough: method of ViewController.m:
- (IBAction)startWalkthrough:(id)sender {
    PageContentViewController *startingViewController = [self viewControllerAtIndex:0];
    NSArray *viewControllers = @[startingViewController];
    [self.pageViewController setViewControllers:viewControllers direction:UIPageViewControllerNavigationDirectionReverse animated:NO completion:nil];
}
Run the app again. The app will bring you back to the first page when tapping the “Start again” button.
Summary
In this tutorial, we cover the basics of UIPageViewController and demonstrate how to implement the controller by using Storyboard. The UIPageViewController is a very handy class for implementing walkthrough screens in your app. That said, the usage of UIPageViewController is unlimited. You can use it to display whatever information as you like such as pages of web view. The UIPageViewController is highly configurable. This tutorial only covers the scroll transition style. But don’t you know that you can easily use the class to build a simple book app? Simply change the transition style from scroll to page curl and see what you’ll get. So don’t stop here. Try to change the available options and learn about UIPageViewController.
For your complete reference, you can download the Xcode project from here. As always, please leave us comment and share your thought.


