Working with UITableView in Xcode 5 Using Storyboard
When we first started the iOS programming course, we wrote a tutorial about UITableView and showed you how to create a simple table app using UITableView. This is one of our most popular tutorials. However, you may find it no longer works in Xcode 5. The latest version of Xcode promotes the use of Storyboard over Interface Builder. Storyboard is no longer an option when creating a new Xcode project. It’s the default. This is one of the reasons why you couldn’t follow the steps in the UITableView tutorial to create the app.
Anyway, we decide to completely update the table view tutorial for Xcode 5 and iOS 7. And here you are.
Enter the UITableView tutorial.
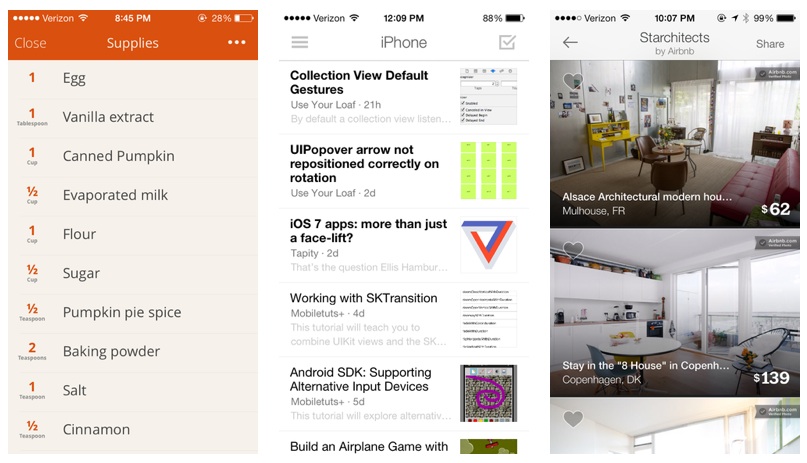
First, what’s a Table View in iPhone app? Table view is one of the common UI elements in iOS apps. Most apps, in some ways, make use of Table View to display list of data. The best example is the built-in Phone app. Your contacts are displayed in a table view. Another example is the Mail app. It uses Table View to display your mail boxes and emails. Not only designed for showing textual data, Table View allows you to present the data in the form of images. The YouTube and Airbnb apps are great examples for the usage.

Creating a SimpleTable Project
With an idea of table view, let’s get our hands dirty and create a simple app. Don’t just read the tutorial if you’re serious about learning iOS programming. Stop reading, open your Xcode and code! This is the best way to study programming.
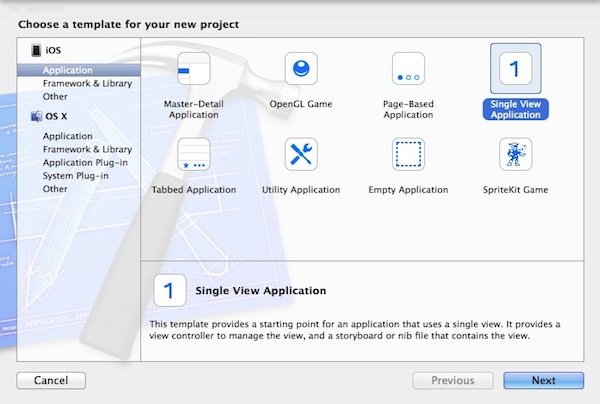
Once launched Xcode, create a new project using the “Single View application” temple.

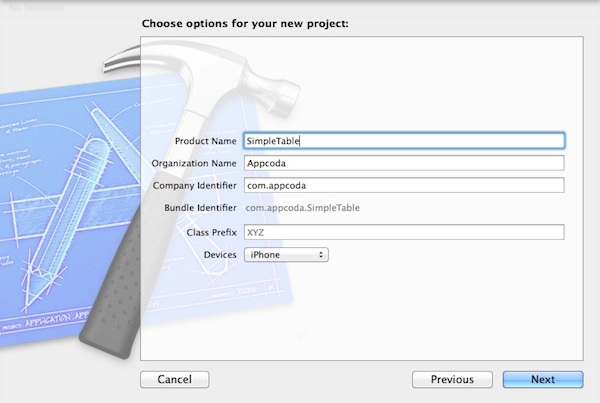
Click “Next” to continue. Again, fill in all the required options for the Xcode project:
Product Name: SimpleTable – This is the name of your app.
Company Identifier: com.appcoda – It’s actually the domain name written the other way round. If you have a domain, you can use your own domain name. Otherwise, you may use mine or just fill in “edu.self”.
Class Prefix: SimpleTable – Xcode uses the class prefix to name the class automatically. In future, you may choose your own prefix or even leave it blank. But for this project, let’s keep it simple and set it to “SimpleTable”.
Device Family: iPhone – Just use “iPhone” for this project.
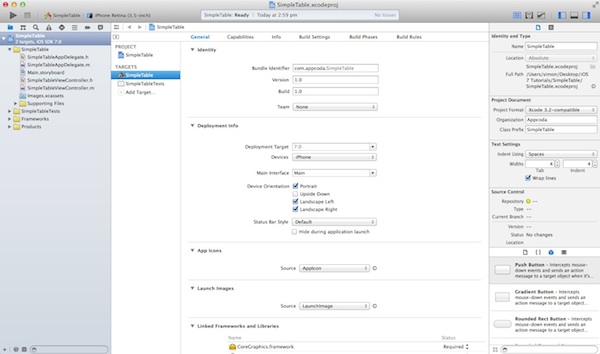
Click “Next” to continue. Xcode then asks you where you saves the “SimpleTable” project. Pick any folder (e.g. Desktop) to save your project. As before, deselect the option for Source Control. Click “Create” to continue. Simply pick a folder to save your project. As you confirm, Xcode automatically creates the “SimpleTable” project based on the options you’ve provided. The resulting screen looks like this:

Designing the View
First, we’ll create the user interface and add the table view. Select Main.storyboard to switch to the Storyboard interface.

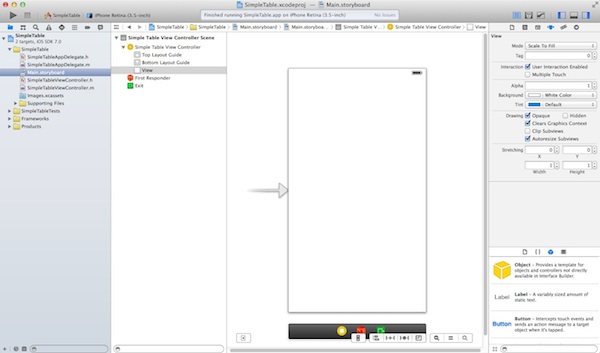
In the Object Library, select the “Table View” object and drag it into the view.


Drag a Table View from Object Library and add it to the view
Resize its height a little bit, so that it doesn’t cover the status bar. Your screen should look like below after inserting the table view.


Drag a table view from Object Library
Run Your App for the First Time
Before moving on, try to run your app using the Simulator. Click the “Run” button to build your app and test it.
The Simulator screen will look like this:


Easy, right? You already designed the table view in your app. For now, however, it doesn’t contain any data. Next up, we’ll write some code to add the table data.
Adding Table Data
Go back to the Project Navigator and select “SimpleTableViewController.h”. Append “
1 2 3 4 5 |
#import <UIKit/UIKit.h> @interface SimpleTableViewController : UIViewController <UITableViewDelegate, UITableViewDataSource> @end |
The “UITableViewDelegate” and “UITableViewDataSource” are known as protocol in Objective-C. Basically, in order to display data in Table View, we have to conform to the requirements defined in the protocols and implement all the mandatory methods.
UITableViewDelegate and UITableViewDataSource
Earlier, we’ve added the “UITableViewDelegate” and “UITableViewDataSource” protocols in the header file. It may be confusing. What’re they?
The UITableView, the actual class behind the Table View, is designed to be flexible to handle various types of data. You may display a list of countries or contact names. Or like this example, we’ll use the table view to present a list of recipes. So how do you tell UITableView the list of data to display? UITableViewDataSource is the answer. It’s the link between your data and the table view. The UITableViewDataSource protocol declares two required methods (tableView:cellForRowAtIndexPath and tableView:numberOfRowsInSection) that you have to implement. Through implementing these methods, you tell Table View how many rows to display and the data in each row.
UITableViewDelegate, on the other hand, deals with the appearance of the UITableView. Optional methods of the protocols let you manage the height of a table row, configure section headings and footers, re-order table cells, etc. We do not change any of these methods in this example. Let’s leave them for the later tutorial.
Okay, let’s continue to code the app. Select “SimpleTableViewController.m” and define an instance variable for holding the table data.
1 2 3 4 |
@implementation SimpleTableViewController { NSArray *recipes; } |
In the viewDidLoad: method, add the following code to declare the “recipes” array. We initialize an array with a list of recipes.
1 2 3 4 5 6 |
- (void)viewDidLoad { [super viewDidLoad]; // Initialize table data recipes = [NSArray arrayWithObjects:@"Egg Benedict", @"Mushroom Risotto", @"Full Breakfast", @"Hamburger", @"Ham and Egg Sandwich", @"Creme Brelee", @"White Chocolate Donut", @"Starbucks Coffee", @"Vegetable Curry", @"Instant Noodle with Egg", @"Noodle with BBQ Pork", @"Japanese Noodle with Pork", @"Green Tea", @"Thai Shrimp Cake", @"Angry Birds Cake", @"Ham and Cheese Panini", nil]; } |
What is an array?
An array is a fundamental data structure in computer programming. You can think of an array as a collection of data elements. Consider the recipes array in the above code, it represents a collection of textual elements. You may visualize the array like this:

Each of the array elements is identified or accessed by an index. An array with 10 elements will have indices from 0 to 9. That means, recipes[0] returns the first element of the “recipes” array.
In Objective C, NSArray is the class for creating and managing array. You can use NSArray to create static array for which the size is fixed. If you need a dynamic array, use NSMutableArray instead.
NSArray offers a set of factory methods to create an array object. In our code, we use “arrayWithObjects” to instantiate a NSArray object and preload it with the specific elements (e.g. Hamburger).
You can also use other built-in methods to query and manage the array. Later, we’ll call the “count” method to query the number of data elements in the array. To learn more about the usage of NSArray, you can always refer to Apple’s official document.
Finally, we have to add two datasource methods: tableView:numberOfRowsInSection and tableView:cellForRowAtIndexPath. These two methods are part of the UITableViewDataSource protocol. It’s mandatory to implement the methods when configuring a UITableView. The first method is used to inform the table view how many rows are in the section. So let’s add the below code. The count: method simply returns the number of items in the “tableData” array.
1 2 3 4 |
- (NSInteger)tableView:(UITableView *)tableView numberOfRowsInSection:(NSInteger)section { return [recipes count]; } |
Next, we implement the other required methods.
1 2 3 4 5 6 7 8 9 10 11 12 13 |
- (UITableViewCell *)tableView:(UITableView *)tableView cellForRowAtIndexPath:(NSIndexPath *)indexPath { static NSString *simpleTableIdentifier = @"SimpleTableCell"; UITableViewCell *cell = [tableView dequeueReusableCellWithIdentifier:simpleTableIdentifier]; if (cell == nil) { cell = [[UITableViewCell alloc] initWithStyle:UITableViewCellStyleDefault reuseIdentifier:simpleTableIdentifier]; } cell.textLabel.text = [recipes objectAtIndex:indexPath.row]; return cell; } |
The cellForRowAtIndexPath: method is called every time when a table row is displayed. The below illustration will give you a better understanding about how UITableView and UITableDataSource work.


How UITableView and UITableDataSource work together
Okay, let’s hit the “Run” button and try out your final app. Oops! you still got a blank app! It’s the same as before.
Why is it still blank? We’ve already written the code for generating the table data and implemented the required methods. But why the Table View isn’t shown up as expected?
There is still one thing left.
Connecting the DataSource and Delegate
Like the “Hello World” button in the first tutorial, we have to establish the connection between the Table View and the two methods we just created.
Go back to the Main.storyboard. Select the table view. Press and hold the control key on your keyboard, click the table view and drag to the “Simple Table View Controller” icon of the dock. Your screen should look like below:


Connecting Table View with its Datasource and Delegate
Release both buttons and a pop-up shows both dataSource & delegate. Select “dataSource” to make a connection between the Table View and its data source. Repeat the above steps and make a connection with the delegate.


Connect dataSource and delegate
That’s it. To ensure the connections are linked properly, you can select the Table View again. In the upper part of the Utility area, you can reveal the existing connections in the “Connection Inspector” (i.e. the rightmost tab).


Show the Connections Inspector
Test Your App
Finally, it’s ready to test your app. Simply hit the “Run” button and let the Simulator load your app:

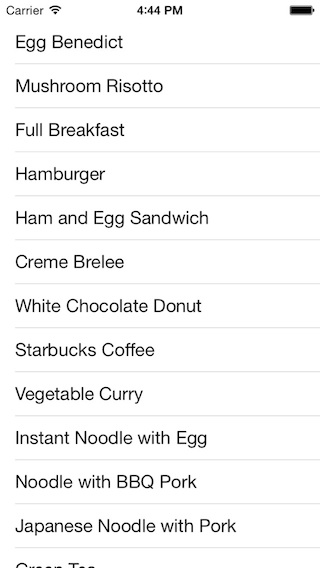
Add Thumbnail to Your Table View
The table view is too plain, right? What about adding an image to each row? The iOS SDK makes it extremely easy to do this. You just need to add a line of code for inserting a thumbnail for each row.
First, download this sample image. Alternatively, you can use your own image but make sure you name it “creme_brulee.jpg”. In Project Navigator, right-click the “SimplyTable” folder and select “Add Files to SimpleTable…”.

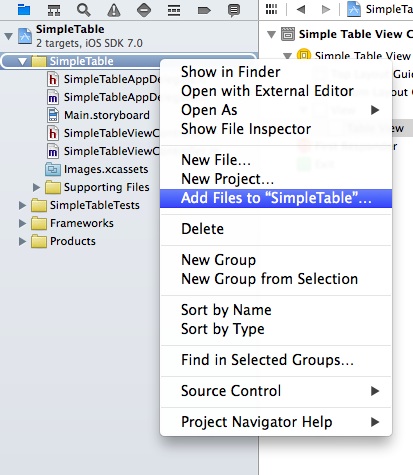
Select the image file you just downloaded and check “Copy items to destination group’s folder” checkbox. By selecting the option, the image will be copied to the project folder. Click “OK” to add the file.


Pick your image file and add to the project
Now edit the SimpleTableViewController.m. Add the following line of code in “tableView:cellForRowAtIndexPath” method and put it right before “return cell”:
1 |
cell.imageView.image = [UIImage imageNamed:@"creme_brelee.jpg"]; |
Your code should look like this after editing:
1 2 3 4 5 6 7 8 9 10 11 12 13 14 15 |
- (UITableViewCell *)tableView:(UITableView *)tableView cellForRowAtIndexPath:(NSIndexPath *)indexPath { static NSString *simpleTableIdentifier = @"SimpleTableCell"; UITableViewCell *cell = [tableView dequeueReusableCellWithIdentifier:simpleTableIdentifier]; if (cell == nil) { cell = [[UITableViewCell alloc] initWithStyle:UITableViewCellStyleDefault reuseIdentifier:simpleTableIdentifier]; } cell.textLabel.text = [recipes objectAtIndex:indexPath.row]; cell.imageView.image = [UIImage imageNamed:@"creme_brelee.jpg"]; return cell; } |
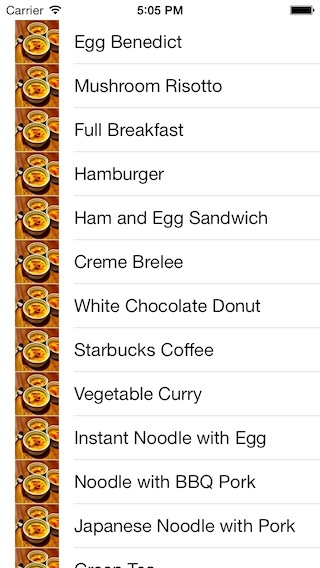
The table view cell comes with a default property for showing image. The line of code simply loads the image and display it in the image area of the table cell. Now, hit the “Run” button again and your SimpleTable app should display the image in each row.

Summary
It’s simple to create a table view, right? Table view is one of the most commonly used elements in iOS programming. If you’ve followed the tutorial and build the app, you should have a basic idea about how to create the table view. I try to keep everything simple in the demo app. In reality, the table data will not be stored directly in the code. Usually, it’s loaded from file, database or somewhere else. In later tutorials, you’ll learn how to store and load the table data from a file. But before moving on, make sure you thoroughly understand how the table view works. Otherwise, go through the tutorial again.
For your complete reference, you can download the Xcode project from here.
Comments
Neil Giarratana
AuthorGreat tutorial but found one bug. In the third code snippet, the data is assigned to tableData but I think it’s supposed to be recipes instead (which is consistent with the sample code that can be downloaded). An error comes back with the following:
“Use of undeclared identifier ‘tableData'”
Replacing tableData with recipes makes all ok.
Simon Ng
AuthorNeil, thanks for pointing it out! It’s now fixed.
matheusvill
AuthorI noticed that a constraint on the TableView is missing which is necessary to work when dragging until the end of the list.
Evan30
Authorgreat tutorial, but i like to ask a little question please…. What if i want the datasource to be fetch informations from twitter or youtube, what what i do.. And another one, i want to embed their search bar to an app.
Thanks…
Vishwas Shashidhar
AuthorI think both the sites provide data in a format called JSON, you need to make use of that and present the content in a table view…
amit
Authori am doing every thing that tutorial said but i am unable to see data source & delegate when i drag
Eric Sebastien Dechaux
Authordrag it the other way around, from the table view to the table view controller (yellow icon at the bottom)
Jonathan Groves
AuthorDid you add a UITableView like the instructions say? Or did you drag a UITableViewController?
vanylapep
Authorchecking if the cell is nil is a pretty old way of doings.. I don’t need that’s needed anymore with iOS7 ..
Jonathan Groves
AuthorNSArray objects have to be terminated with nil. Refer to the NSArray Class Reference provided by Apple.
vanylapep
AuthorAlso, can you provide a tutorial where in the table view cell, we have a button that triggers an action. Like for example a “like this” button.
Ambitious Kid
AuthorGreat tutorial thus far, but I’m stuck at the array part of it…
I understand that we have to add 2 datasource methods, but I don’t know where I need to put the code for the tableView:numberOfRowsInSection & tableView:cellForRowAtIndexPath at…
Eric Sebastien Dechaux
AuthorIn SimpleTableViewController.m add them just after:
– (void)didReceiveMemoryWarning
{
[super didReceiveMemoryWarning];
// Dispose of any resources that can be recreated.
}
Eric
AuthorHi There, I have a problem when I double click on Main.storyboard, it is opening Table View Controller Scene by default and I can not get rid of it. I tried to drag the Table View Controller on the view but then I have both and of course when I run the app it is empty and I don’t see the lines… Any Idea?
Eric
Authorsorry I meant to say it is opening View Controller Scene by default…
Eric
Authorok I figured it out by myself 😉 I had to move the arrow to point to the Table View Controller instead of the View Controller…
Peter
AuthorHello, thanks for the great tut. I have one “simple” question, its just to understand how the xcode project works. following example: if i follow the mentioned steps, everything works fine. what i made for tests was, removing the viewcontroller and and a new one. after this, i made the same connections in interface builder as in tutorial (datasource,delegate) but what i get is following error message “unrecognized selector sent to instance”
….
2014-02-05 09:45:48.896
ViewControllerTest[32618:70b] -[UIViewController
tableView:numberOfRowsInSection:]: unrecognized selector sent to instance
0x8a575c0
2014-02-05 09:45:48.899
ViewControllerTest[32618:70b] *** Terminating app due to uncaught exception
‘NSInvalidArgumentException’, reason: ‘-[UIViewController
tableView:numberOfRowsInSection:]: unrecognized selector sent to instance
0x8a575c0’
Only if i create a new project the error will dissapear, but i’m sure the problem can be solved. for me it looks like, the connection between the controller and the code do not work.
Any hints? Thanks in advance
Shawn Frank
Authordid you add this to your header files ? If you can put your project
somewhere online so I can look at it, it would be nice.
Peter
Authorthe solution is very easy. after i removed the view controller , the new view controller i added to the storyboard was not linked to my class name. i had only the choose my class name at custom class setting..thats it….
Jonathan Groves
AuthorYou didn’t need to add a new view controller to the storyboard – Simon’s instructions were clearly to add a table view, not a table view controller…
MK
AuthorIt worked perfectly. Thanks Peter-
Pradip
AuthorHi Peter,
I am facing same issue. Can you please explore more about this??I have used table view only not view controller..not able to see data and getting same error which u were getting
Sherwyn Goh
AuthorHi there,
At the storyboard, I can’t seem to drag the table view into the main view, it shrinks down into an icon when I try. I believe its because of the format? Its prepared to receive only a regular view controller, not a table view controller? thanks in advance
Jonathan Groves
AuthorIt didn’t say to drag a table view controller, but to drag a table view…
Guest
AuthorHi, I can’t drag the tableview controller onto the view that is initially there in the storyboard, can you help? Thanks !
Jonathan Groves
AuthorThe instructions say “In the Object Library, select the “Table View” object and drag it into the view.” Table View, – not Table View Controller…
Yung-chung Lin
AuthorIt seems I did every step in the tutorial, but I still could not get it working.
My Xcode is Version 5.0.2 (5A3005)
Mohamed Othman
Authorsorry i get lost can u add the whole code at the end
Simon Ng
AuthorYou can find the download link at the end of the article. It’s already there.
Roger
AuthorHi Simon,
Thanks for your great tutorial!
I’m wondering why you don’t simply use a UITableViewController instead of adding the table view to a UIViewController&implementing all the protocols manually? Is there a good reason or specific scenarios that we can’t use UITableViewController?
Cheers~
Erick Alingcastre
AuthorWhen I followed this tutorial, I am getting an error on the tableview implementation file. On the implementation statement, it comes up with an error message that says: “Method ‘tableView: cellForRowIndexPath:’ in Protocol not implemented”. What would cause this error?
Ian Paterson
Authormake sure that you have the syntax correct, I was having this issue until i realized i had a lower case v where i needed an uppercase V, just check the selected error area and you should find where you’ve messed up
Antwon L.
AuthorHey Simon, thanks for the great tutorial on the UITableView in xcode5. I really like how the tutorial gives instructions for each individual step so even the most inexperienced coder can follow the tutorial. When I first followed the tutorial, I initially got errors on the program, but I later found they were just my typos!
However, I noticed that when I ran the finished app on the “iphone retina 3.5-inch” emulator and scrolled down to the lowermost part of the table, the last two items, the “Angry Birds Cake” and the “Ham and Cheese Panini”, were cut off. This problem doesn’t appear in the “iphone retina 4.0-inch” emulators though. Could it have something to do with the way the emulator is set up? Is the simple table app only meant for 4.0 inch iphones?
Thanks
Simon Ng
AuthorThe tutorial doesn’t cater for both 3.5 and 4 inch screens. The focus is to give a basic idea of UITableView. In order to support both screen resolutions, one easy way is to use Table View Controller in Storyboard. The table view controller automatically handles different screen resolutions.
Nick Jones
AuthorI just can’t get this to work. I’ve added all the requisite code to “SimpleTableViewController.m” but I can’t get the data to load into the table. I’ve control+dragged to the icon in the dock and selected “dataSource” and “delegate” as instructed but my table still shows up empty when I run the app.
DoctorCobweb
Authori got hung up also on this. have you made sure that your table view controller is using the custom SimpleTableViewController? check it by clicking on the storyboard file, then on the yellow circle icon in the graphical display & checking out the Identity Inspector section on the right hand side.
in the Custom Class section you need to select your custom controller ‘SimpleTableViewController’.
hopefully this helps.
Nick Jones
AuthorActually it turns out that I had not built the UI correctly. I added a “Simple Table View Controller” to the storyboard instead of just a table view. Once I figured this out it started working like a champ.
Jacky
AuthorAs a beginner, I dont know why the code – (UITableViewCell *)tableView:(UITableView *)tableView cellForRowAtIndexPath:(NSIndexPath *)indexPath
Can you explane more detail for the required mothods?
DoctorCobweb
Authorthis method is responsible for configuring the data needed for each cell in your tableView. you are given the indexPath argument which identifies the cell you are going to configure in the method body.
and in the method body you do such things like 1) add text to the cell 2) add an image to the cell …etc.
once you’re done configuring that cell, for the given indexPath, you return the cell (which is of type UITableViewCell), which allows the cell to be rendered/displayed.
it helps to know that this method is called multiple times! in fact, you know exactly how many times it will be called by counting how many rows are currently being displayed onscreen in the simulator. as you scroll down and checkout more rows, this method will be called again and again, for each new row being displayed.
dylan
AuthorI connected the table view to the data source and the delegate but when i run the app the simulator is just a black screen and it then takes me to xcode where the debug section has popped up. On the left of the debug area it has self= and underneath, recipe=. On the right side it says (lldb). any ideas on what I’m doing wrong? any help would be appreciated
Shaun Almond
AuthorAfter I connected the TableView to my two methods my table view was still blank lines…. and I missing something?
Also, in the very beginning whenever I tried to drag “TableView” from the objects into the existing view it wouldn’t let me. I had to drop the table view on the storyboard next to the default one, and then delete that one. Could that be part of my problem?
sunflowerflow
Authorgreat tutorial, helps me a lot!
gowtham
Authori tried but it was getting error undeclared identifier tableView
Josh Chen
AuthorIn the Airbnb app, in each of the table cell, it can swipe to left and right to view more pictures. Do they use UIPageViewController for it? Do you know any library can achieve it? Thank you
Jessy Catterwaul
AuthorSays “temple”, not “template”.
Daniel Billingham
AuthorGood stuff. As a complete beginner it took a couple of goes, but i got there in the end. Thanks for the post.
sajinseethi
AuthorHow can I get the item from the selected cell on to a variable ?
Ang
Authorwhere do you put the arrays??? help asap
Nitin Nikam
AuthorGreat,,,,,,
Very useful… very helpfull
kunoir
AuthorNot working in Xcode 5.1.1. Anyone else having issues?
Richard Burton
AuthorThis is not a tutorial for UITableView. It’s a (great) tutorial for UITableViewController. Please change the title 🙂
Simon Ng
AuthorWhat a great feedback! Thanks Richard 🙂
Ruben Martinez Jr.
AuthorThanks for this! I looked at dozens of tutorials and yours was the only up to date and as well explained!
Lars
AuthorWhat step would I need to add to go from a UITableView to another UITableView, to a singleview with various text and pictures?
Helios Narcissus
AuthorWow, you have a talent for teaching. What if i want the image to appear inside the cell? Yes , there is indeed an image, but I want to have it appear inside the table cell, like inserting a viewImage inside the cell. how do you do this?
Aarti Oza
AuthorHow to set different different image for each content in Table View ??
gopi
AuthorGreat tutorial but i need to add a list like menu with a title chat which displays chat items and other menu titled soups displays soup list . Same time when i click chat items titlebar, the soups menu should hidden and soup titlebar should go down with arrow-> and chat items should be displayed similarly when i click soup list chat items should be hidden and chat titlebar should move up move up with arrow -> . How to do please help me
sohel
AuthorHello,
its good but i have small issue that i set fix height and width of image but it not take image height and width in table view
Kevin Paszalek
AuthorThank you for this excellent tutorial. When I run my code the method for creating cells only gets called 8 times. Anyone have any idea why this would be so? Thanks!
shubam
AuthorHow to set different different image for each content in Table View ??