

If you look at Apple’s “What’s New in iOS” 12 page, you’ll find a section entitled “Interactive Controls in Notifications,” which exclaims:
Notification content app extensions now support user interactivity in custom views. If the content of your app’s notifications needs to prompt user interaction, add controls like buttons and switches.
In this tutorial, I’m going to show you how to give your local and remote (push) notifications a custom user interface (UI). Users can now interact with a notification’s content area. iOS 12 has given us the ability to add a UIViewController subclass to notifications which we can customize. We can add controls like UIButton, UIImageView, and UISwitch to the view controller, wire up custom functionality using IBOutlet and IBAction, and arrange our custom UI using Auto Layout — all within the notification itself. We can provide support for more than a single tap. We can develop pretty much any type of user experience we want, within notification space limitations and timing considerations.
I’ll show you how a user can take action in response to a notification by interacting only with a customized notification interface, and conveniently not having to open up an app. I’ll be showcasing software released to developers just ten days ago (June 19), specifically iOS 12 beta 2 and Xcode 10 beta 2.
By the end of this tutorial, you’ll be able allow to your app users to get a notification, see a custom UI, click on a button, and get a confirmation — all inside a notification, like so:
Sample app use case/scenario
The demo you just watched in my ani-GIF is based on creating and handling a notification using new iOS 12 functionality and is meant to simulate a real world scenario. Suppose you have a checking account at a bank that offers an iOS app for managing your money and transactions. You’ve got the app on your iPhone.
Suppose further that your bank offers overdraft protection for $2.00/month, but you’ve opted out because you’re usually good at keeping your checking account balanced. Because this bank is smart, even if you’ve opted out of overdraft protection, the bank will send you a notification offering to cover your overdraft for a one-time $25.00 fee. They’ll cover your overdraft if you consent in their new iOS 12 interactive notification.
Sometimes paying an overdraft fee is preferable to a scar on your credit report, and preferable to paying all the other fees that all parties may charge you in the event of a non-payment. Remember this is a prototype and not a real banking app.
Sample Xcode project
I’ve included a sample Xcode 10 project, written in Swift, so you can follow along with my code during this tutorial. You can download it from GitHub.
Not to be confused with…
The new iOS 12 notification feature I’m describing in this tutorial is not to be confused with previous operating system versions’ features that allowed you to, for example, tack predefined “Accept” and “Decline” buttons onto the bottom of notifications. An example of this type of behavior is shown and described in an Apple developer documentation article entitled “Declaring Your Actionable Notification Types”.
A Note About Beta Software
Be aware that I’m describing beta software which may be buggy and is subject to change. As Apple states here …
Please note that since the public beta software has not yet been commercially released by Apple, it may contain errors or inaccuracies and may not function as well as commercially released software.
… and here:
Documentation provided by Apple may contain preliminary information about a beta version of an API or technology in development. This information is subject to change, and your software implemented according to this documentation should be tested with final operating system software. For the most up-to-date information, be sure to read the release notes for the version of software that you are using.
Writing the Code to Send a Notification
To follow along with my tutorial, create a new Xcode 10 project based on the iOS Single View App template.
As an iOS developer, you should be familiar with local and remote (push) notifications by now. While I will cover the basic setup for sending notifications, I’ll assume you can follow along without a large amount of detailed guidance on my part.
Obviously, I have to send a local or remote notification before I can receive one. To save time and help you to concentrate of customizing notifications instead of getting lost in the intricacies of push notifications, I’m going to stick to local notifications. Notifications and any custom UI and interactive features will be the same regardless of whether a notification was sent locally or remotely. Nevertheless, I will highlight a few important steps required when sending remote notifications.
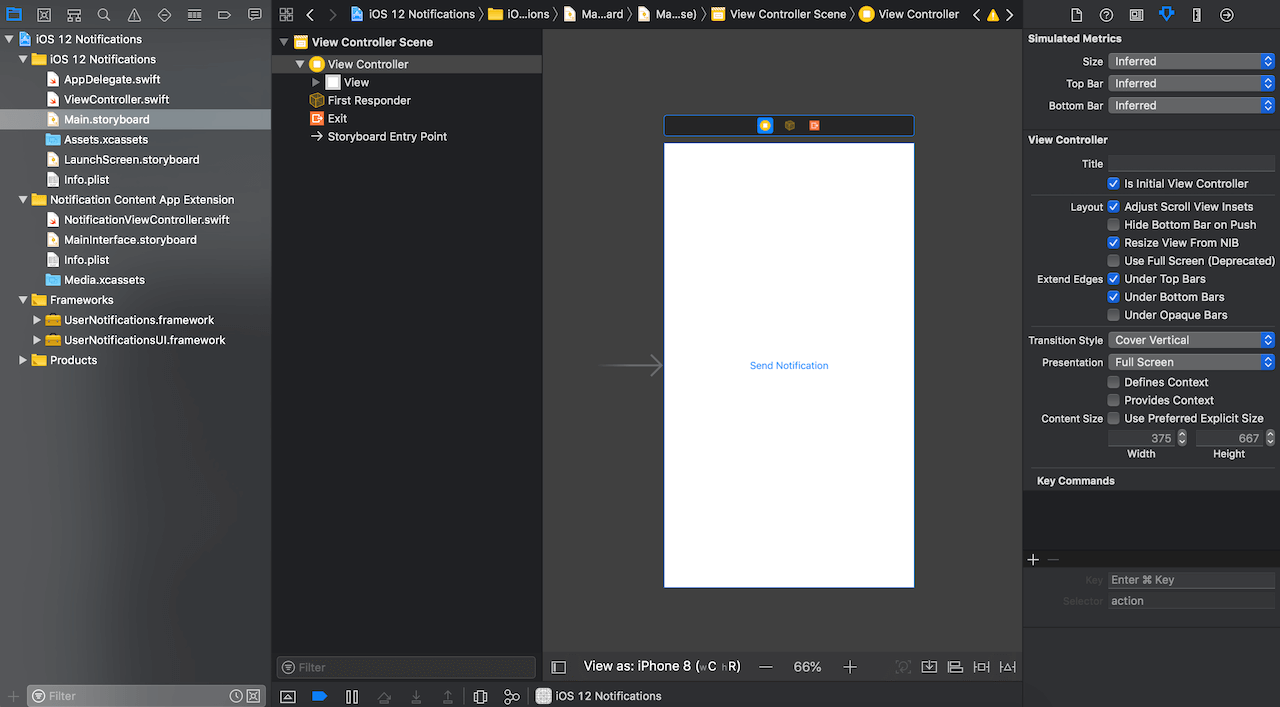
Keep in mind that the app I’m building here is named “iOS 12 Notifications.” You’ll see the app name in several images, so keep that name in mind.
Requesting permission from the user
You must ask users of your app for permission to send them notifications. This is a required step. For our purposes here, a good choice for placing the code for asking for permission is in our Xcode project’s AppDelegate.swift file. Whenever coding notifications, don’t forget to import UserNotifications. Here’s the code:
...
// SDK required for notifications
import UserNotifications
...
    func application(_ application: UIApplication, didFinishLaunchingWithOptions launchOptions: [UIApplication.LaunchOptionsKey: Any]?) -> Bool {
        // Override point for customization after application launch.

        // Request user's permission to send notifications.
        UNUserNotificationCenter.current().requestAuthorization(options: [.alert, .badge, .sound]) { (granted, error) in
            if granted {
                print("Notifications permission granted.")
            }
            else {
                print("Notifications permission denied because: \(error?.localizedDescription).")
            }
        }

        return true
    }
...
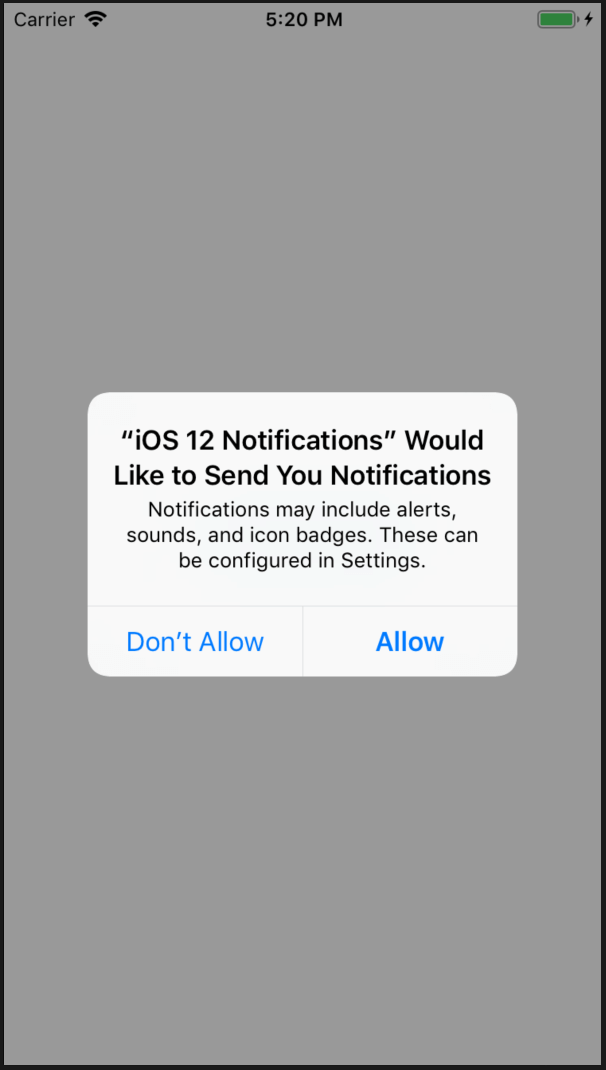
When the user first runs the app we’re building in this tutorial, they’ll have to opt into notifications in order to enjoy iOS 12’s new interactive notification features. When they start the app, they’ll get the following alert, and they need to tap the “Allow” button:
The following message was printed to my Xcode 10’s console after I tapped “Allow:”
Notifications permission granted.
Define the notification type (category identifier)
iOS requires that we define strings to differentiate between different types of notifications that our apps can send and receive. This allows us to recognize and prepare for supporting notifications with different UIs, styles, actions, etc. The Apple documentation on the new iOS 12 notification custom UI feature is quite explicit about this step.
To define a “notification’s category value–its type,” for this tutorial, I added the following code to my sample app’s ViewController.swift file in the viewDidLoad() method. Note that there are two lines of code, with corresponding numbered comments, that I will explain below in detail.
...
// SDK required for notifications
import UserNotifications
...
class ViewController: UIViewController {

    override func viewDidLoad() {
        super.viewDidLoad()
        // Do any additional setup after loading the view, typically from a nib.

        // #1.1 - Create "the notification's category value--its type."
        let debitOverdraftNotifCategory = UNNotificationCategory(identifier: "debitOverdraftNotification", actions: [], intentIdentifiers: [], options: [])
        // #1.2 - Register the notification type.
        UNUserNotificationCenter.current().setNotificationCategories([debitOverdraftNotifCategory])
    }
...
#1.1 – I’m creating an instance of the UNNotificationCategory class using the init(identifier:actions:intentIdentifiers:options:) initializer. Since my notification will have a custom interface, all’s I care about here is the identifier instance property. I leave the remaining parameters empty. Note that Apple says “You may specify nil for this parameter if you do not want to display custom actions” regarding the actions argument, but the beta compiler will only accept an empty ([]) array.
#1.2 – I’m calling setNotificationCategories(_:) with my one debitOverdraftNotifCategory constant of type UNNotificationCategory to register my app’s notification type. Remember for our purposes, we’re only concerned about “Each object in the categories parameter contains a string for identifying the notification’s type.”
Creating and sending a local notification
As stated earlier, I’m not going into enormous detail on the topic of creating and sending a notification. My code is very readable, well-commented, and you can always read up on an overview of the process at links like this one or more specifically at this link.
To check for user notification preferences, create notification content, define a trigger which determines when my notification will actually be sent, and put it all together to formally request the scheduling of my notification for sending, I added the following code to my sample app’s ViewController.swift file in the sendNotificationButtonTapped(_:) method, an @IBAction connected to a single button in my app’s storyboard. The inline commentary should be enough explanation for creating and sending a notification for the purposes of this tutorial. Note that there are two lines of code, with corresponding numbered comments, that I will explain below in detail. Here’s the code:
...
    @IBAction func sendNotificationButtonTapped(_ sender: Any) {

        // find out what are the user's notification preferences
        UNUserNotificationCenter.current().getNotificationSettings { (settings) in

            // we're only going to create and schedule a notification
            // if the user has kept notifications authorized for this app
            guard settings.authorizationStatus == .authorized else { return }

            // create the content and style for the local notification
            let content = UNMutableNotificationContent()

            // #2.1 - "Assign a value to this property that matches the identifier
            // property of one of the UNNotificationCategory objects you
            // previously registered with your app."
            content.categoryIdentifier = "debitOverdraftNotification"

            // create the notification's content to be presented
            // to the user
            content.title = "DEBIT OVERDRAFT NOTICE!"
            content.subtitle = "Exceeded balance by $300.00."
            content.body = "One-time overdraft fee is $25. Should we cover transaction?"
            content.sound = UNNotificationSound.default

            // #2.2 - create a "trigger condition that causes a notification
            // to be delivered after the specified amount of time elapses";
            // deliver after 10 seconds
            let trigger = UNTimeIntervalNotificationTrigger(timeInterval: 10, repeats: false)

            // create a "request to schedule a local notification, which
            // includes the content of the notification and the trigger conditions for delivery"
            let uuidString = UUID().uuidString
            let request = UNNotificationRequest(identifier: uuidString, content: content, trigger: trigger)

            // "Upon calling this method, the system begins tracking the
            // trigger conditions associated with your request. When the
            // trigger condition is met, the system delivers your notification."
            UNUserNotificationCenter.current().add(request, withCompletionHandler: nil)

        } // end getNotificationSettings

    } // end func sendNotificationButtonTapped
...
#2.1 – Remember that in steps #1.1 and #1.2, I assigned the string “debitOverdraftNotification” as the identifier property of a UNNotificationCategory object and registered it with the UNUserNotificationCenter? Regarding the categoryIdentifier property, Apple says:
Assign a value to this property that matches the identifier property of one of the UNNotificationCategory objects you previously registered with your app. If you assign a string that does not match one of your registered categories, the system displays your notification without custom actions and without routing it through your app extensions.
As you’ll see below, we want to route this notification through an app extension that I’ll write below.
For those of you interested in push notifications, according to Apple, to “add a category identifier to a remote notification, include the category key in the aps dictionary of your JSON payload, as shown” below:
{
   "aps" : {
      "category" : "debitOverdraftNotification"
      "alert" : {
         "title" : "DEBIT OVERDRAFT NOTICE!"
         "body" : "One-time overdraft fee is $25. Should we cover transaction?"
      },
   },
...
}
#2.2 – By default, notifications won’t show up when the app is in the foreground. You can change this behavior, but we won’t get into it here. To get around that, I schedule my notification to be sent 10 seconds after its corresponding request is passed to add(_:withCompletionHandler:). To keep it simple, I tap the button whose @IBAction is shown above, press the “Home” button so my “iOS 12 Notifications” app goes into the background, and wait for the notification to appear:
Notice that I have to tap, hold, and pull down on the notification to expose this new iOS 12 notification feature. (I assume you’ll have to test your notifications in iOS 12 to find out if they have extended UIs.) The blue “info” (i) image and blue “Cover” button are what I added as my custom notification interface.
What I’ve experienced is a bit different from what Apple describes in its beta documentation:
When an iOS device receives a notification containing an alert, the system displays the contents of the alert in two stages. Initially, it displays an abbreviated banner with the title, subtitle, and two to four lines of body text from the notification. If the user presses the abbreviated banner, iOS displays the full notification interface, including any notification-related actions. The system provides the interface for the abbreviated banner, but you can customize the full interface using a notification content app extension.
Writing the Code to Customize a Notification UI
Notice the last sentence in my previous quote from Apple: “you can customize the full interface using a notification content app extension.” So we’ll add a “notification content app extension” to my sample app’s Xcode 10 project. This extension adds a UIViewController subclass which adopts the UNNotificationContentExtension protocol.
Adding a new extension to your Xcode 10 project
Before showing you how to add an iOS 12 notification content app extension to the Xcode 10 sample app, let me share what Apple advertises as the features you get when adding such an extension:
The notification content app extension manages a view controller that displays your custom notification interface. This view controller can supplement or replace the default system interface for your notifications. You can use your view controller to:
• Customize the placement of items, including the alert’s title, subtitle, and body text.
• Substitute different fonts or styling for interface elements.
• Display app–specific data–for example, data stored in app-specific keys of the notification’s payload.
• Include custom images or branding.Your app extension must configure its view controller using the data immediately available, such as the contents of the notification and the files present in your app extension’s bundle. If you use an app group to share data between your app and your app extension, you may also use any files found in the app group. To ensure your notifications are delivered in a timely manner, configure the views as quickly as possible. Don’t perform any long-running tasks, like trying to retrieve data over the network.
If you’ve been following along, make sure your sample app project is open in Xcode 10. Let’s add the new required extension:
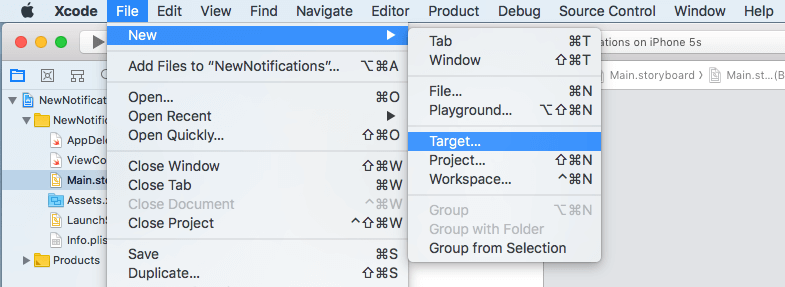
- Go to File -> New -> Target, like so:
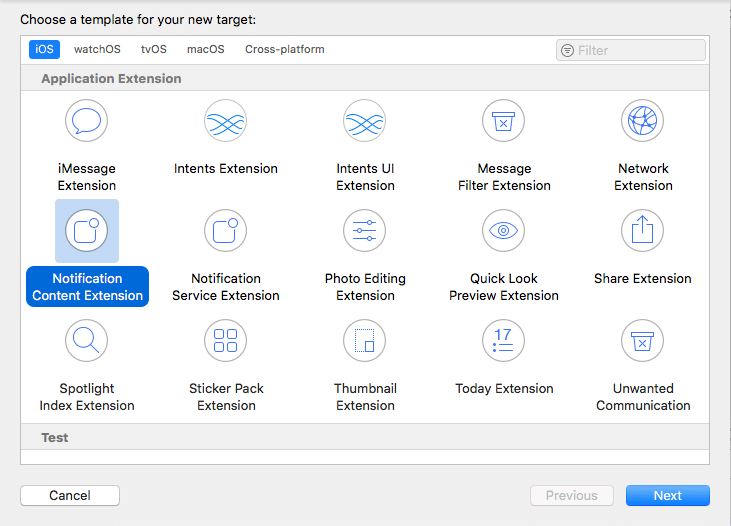
- In the next panel that opens, make sure the iOS tab is selected, choose the Notification Content Extension template, and click the Next button, as shown here:
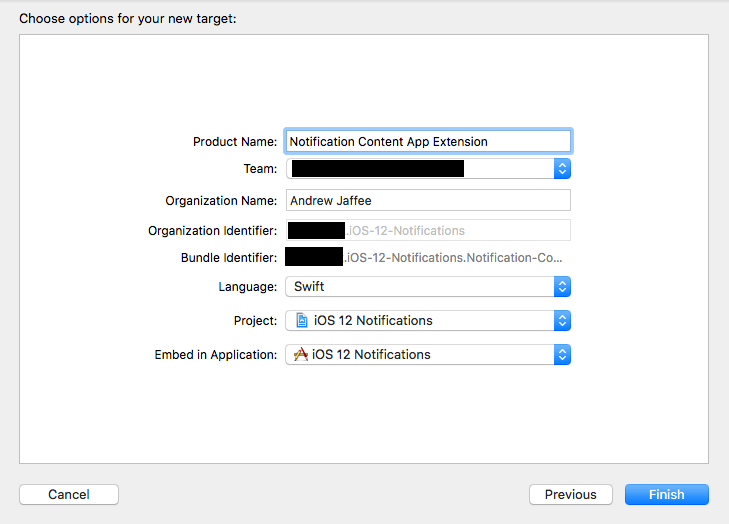
- In the next screen, fill in the Product Name field and choose a valid Team for your new extension, and click the Finish button, like this:
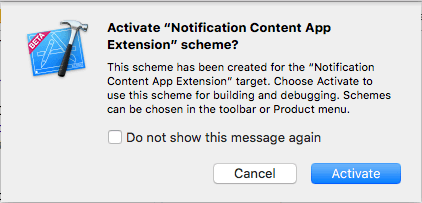
- Xcode will prompt you to activate your new extension. Click the “Activate” button in the dialog presented to you:
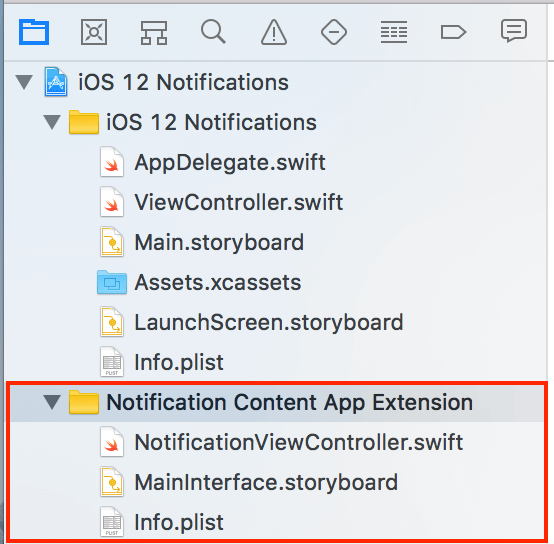
Your Xcode 10 project will now have the virtual folder and files as highlighted in red here:
Testing an extension in Xcode
Remember that if you want to set breakpoints in an extension’s code, run the app and accompanying extension, and hit those breakpoints, you’ll need to Set the active scheme in Xcode 10 to your extension and “run” the extension paired with its app. It’ll be easier if I just show you:
About the extension’s default code
The default code and storyboard provided by your new extension can point you in the right direction for getting started with in-notification custom UIs. Open the extension’s Info.plist file and review the NSExtension dictionary.
Do you remember how I assigned the string “debitOverdraftNotification” as the identifier property of a UNNotificationCategory object and registered it with the UNUserNotificationCenter?
Since you’re now looking at the extension’s Info.plist file, let’s change the value for the UNNotificationExtensionCategory key from the default of “myNotificationCategory” to “debitOverdraftNotification”. This routes our notification to the extension. Here’s the change we want to make:

Run the app and see for yourself:
Setting the UNNotificationExtensionCategory key to “debitOverdraftNotification” is the key step in getting this extension to intercept notifications sent by my app and giving this notification a custom UI.
Notice that green rectangle in the notification UI contains the string I assigned to the body property of the UNMutableNotificationContent object that I created and sent as part of a notification in my sample app’s ViewController.swift file. My string, “One-time overdraft fee is $25. Should we cover transaction?,” is displayed in a UILabel hosted by a UIViewController subclass, NotificationViewController. Speaking in terms of MVC, the UILabel is the view in MainInterface.storyboard, and NotificationViewController is the controller in the extension’s NotificationViewController.swift file.
We’ve looked at the extension’s Info.plist file, so now let’s briefly review its other two files. Here’s the MainInterface.storyboard file:
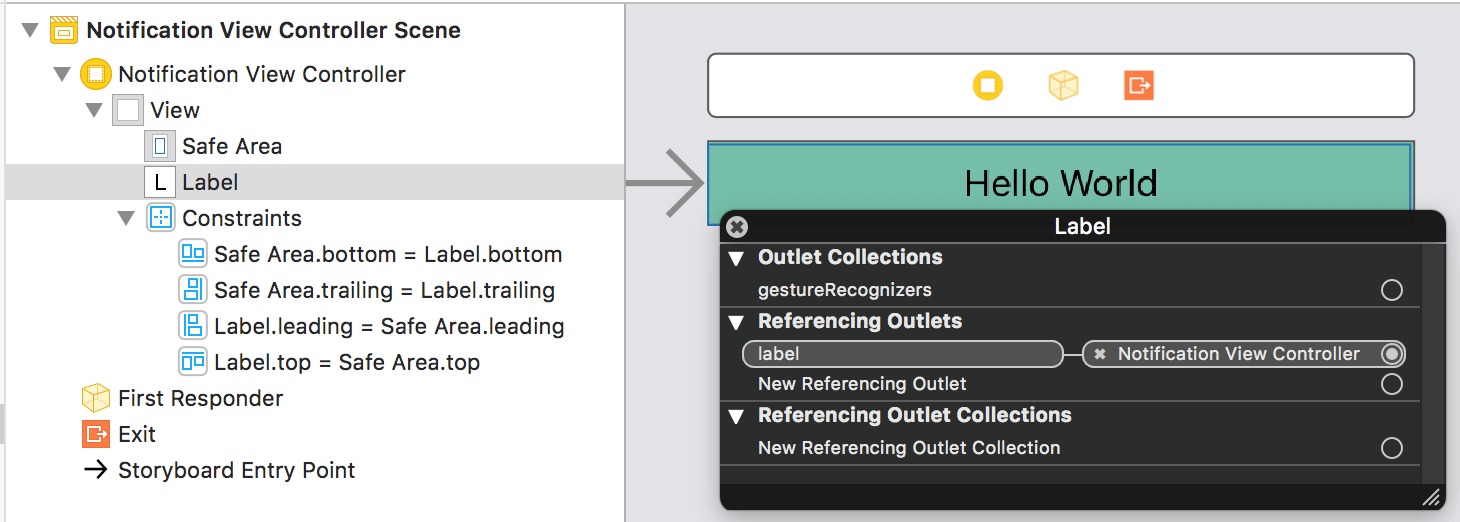
This is a basic storyboard. You should be able to review and understand its structure. I’ve control-clicked to show you that the UILabel has an @IBOutlet to the NotificationViewController. Here’s the NotificationViewController.swift file’s contents:
import UIKit
import UserNotifications
import UserNotificationsUI

class NotificationViewController: UIViewController, UNNotificationContentExtension {

    @IBOutlet var label: UILabel?

    override func viewDidLoad() {
        super.viewDidLoad()
        // Do any required interface initialization here.
    }

    func didReceive(_ notification: UNNotification) {
        self.label?.text = notification.request.content.body
    }

}
Since the NotificationViewController class adopts the UNNotificationContentExtension protocol, it must implement the didReceive(_:) instance method. This is where the notification payload is accessed and my body string from the message I sent from my app can be now displayed inside the notification, as we just saw above in my ani-GIF.
Notice that the UNNotificationContentExtension protocol uses the same nomenclature, e.g., didReceive(_:), as does the UNUserNotificationCenterDelegate with its userNotificationCenter(_:didReceive:withCompletionHandler:) method.
You should now have a good idea of how I’m going to encode my notification content app extension to fulfill the requirements of the bank account app use case I proposed above, and which is shown implemented and working here:
Configuring the extension’s Info.plist file
When starting work on a notification content app extension, it’s best to start with the Info.plist file. Most developers can concentrate solely on the NSExtension dictionary portion of the file. We’ll start out by configuring (four) keys which I’ll explain a bit later. For now, just make edits so that your Info.plist file looks like this in Property List format…
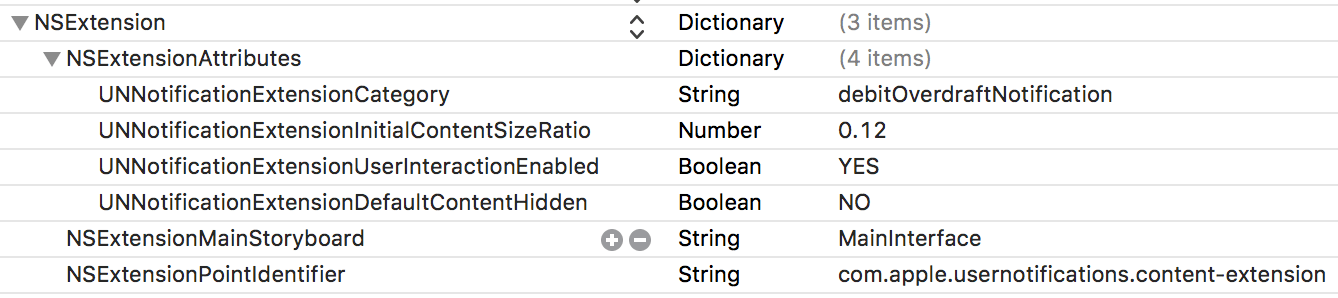
… or this in Source Code (XML format):
...
    NSExtension

        NSExtensionAttributes

            UNNotificationExtensionCategory
            debitOverdraftNotification
            UNNotificationExtensionInitialContentSizeRatio
            0.12
            UNNotificationExtensionUserInteractionEnabled

            UNNotificationExtensionDefaultContentHidden


        NSExtensionMainStoryboard
        MainInterface
        NSExtensionPointIdentifier
        com.apple.usernotifications.content-extension
Let’s go through each of the four keys we edited or added. There’s documentation on the first three here. View this link, specifically the section entitled “Support Interactive Controls,” for info about the fourth key. Note that I’m using the Xcode 10 storyboard default of laying out my UI using the iPhone 8:
1) UNNotificationExtensionCategory (Required): We covered this ad infinitum already. Again, remember that I assigned the string “debitOverdraftNotification” as the identifier property of a UNNotificationCategory object and registered it with the UNUserNotificationCenter.
2) UNNotificationExtensionInitialContentSizeRatio (Required): “A floating-point number that represents the initial size of your view controller’s view expressed as a ratio of its height to its width.” You can probably just leave this at the default value of 1 for now — and that’s the default value. I get the feeling Apple is still working out some kinks here. When you add the extension, Apple sets the height of the NotificationViewController in MainInterface.storyboard to a fixed 37 points. That’s probably just about right because, for ergonomic reasons, you don’t want to baffle users with an overly complex UI in a notification. I’ve been experimenting with this key and that’s why I used a value of 0.12, which I calculated by solving the following equation:
320 * x = 37
x = ~0.12
I did so because, if UNNotificationExtensionInitialContentSizeRatio is set to 1, iOS 12 initially creates a very tall notification and then quickly self-corrects the notification’s height, making it shorter, to reflect my extension view controller’s intrinsic content size. You’ll see this mainly the first time the app/extension are run.
Be careful when changing the extension view controller’s height. Be especially careful when changing its width!
3) UNNotificationExtensionDefaultContentHidden: The Apple definition is sufficient. Let me just say that I feel my original notification as-is conveys all the customer needs to make a decision. I add an icon to highlight the fact that I have a “Cover” button that they can press if they want to pay the $25.00 fee and cover their overdraft — or they can dismiss the notification using the built-in (X) button. From Apple: “A Boolean. When set to true, the system displays only your custom view controller in the notification interface. When set to false, the system displays the default notification content in addition to your view controller’s content. Custom action buttons and the Dismiss button are always displayed, regardless of this setting. If you don’t specify this key, the default value is set to false.”
4) UNNotificationExtensionUserInteractionEnabled: If you want your custom interface to respond to user gestures, you better set this to true. Do not do anything like adding gesture recognizers to your extension’s view controller. You’ll get crazy results.
5) UNNotificationExtensionOverridesDefaultTitle: I didn’t use this key in this tutorial, but you could see where it would come in handy: “A Boolean. When set to true, the system uses the title property of your view controller as the title of the notification. When set to false, the system sets the notification’s title to the name of your app. If you don’t specify this key, the default value is set to false.”
Configuring the extension’s MainInterface.storyboard file
You’ve read my use case/scenario and watched an ani-GIF that shows my sample app and extension working. You should be able to understand my MainInterface.storyboard file:
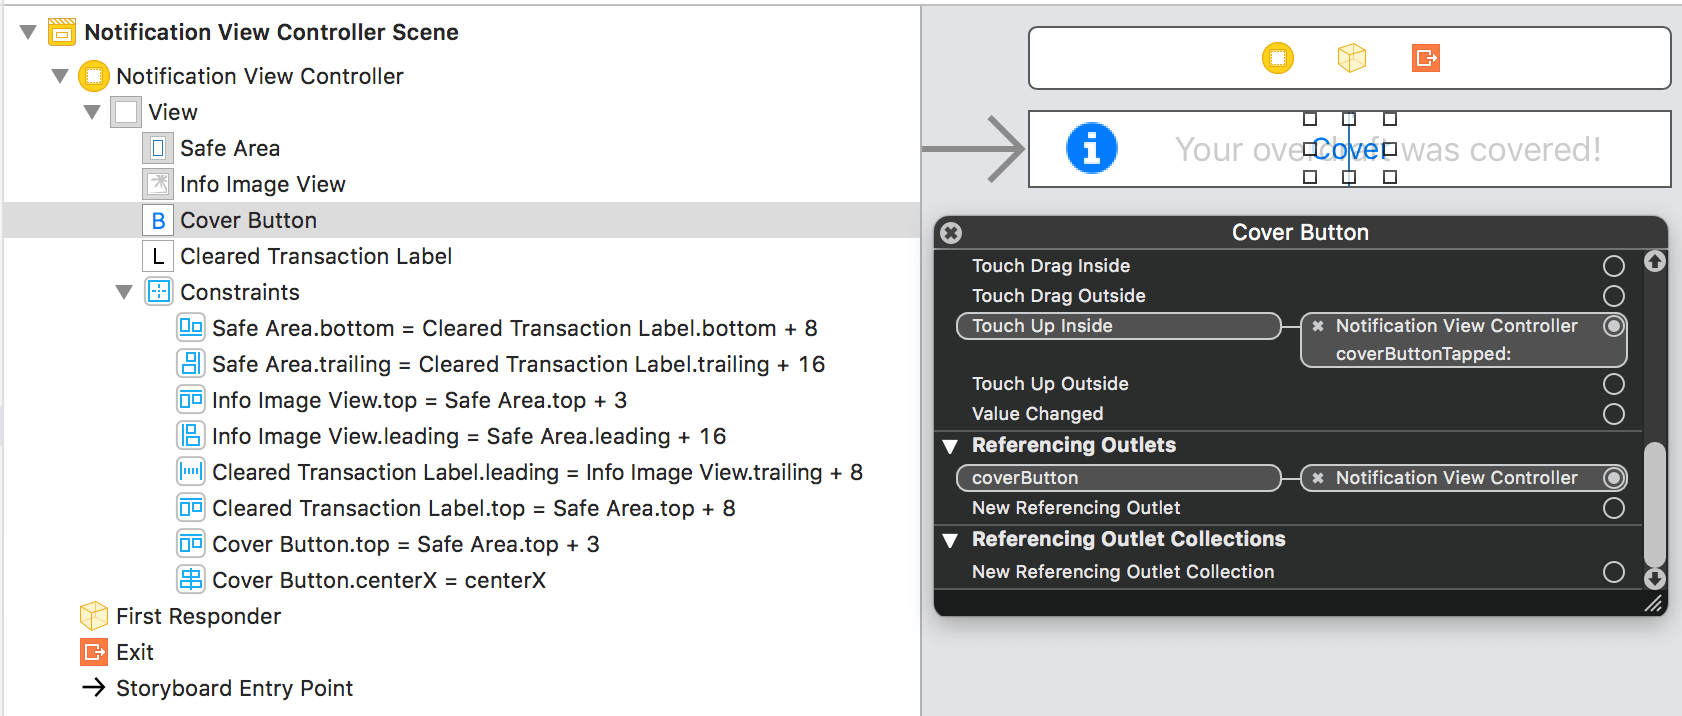
There’s a UIImageView whose @1x, @2x, and @3x source images are stored in a Media.xcassets folder that I added to the extension. I’ve control-clicked to show you that the UIButton named “Cover” has an @IBAction to the method coverButtonTapped(_:) in file NotificationViewController.swift. There are several @IBOutlet variables that I use for animation. I leave it to you to study my sample app’s storyboard.
Encoding the extension’s NotificationViewController.swift file
By now, you should have a good idea of what I’m doing in my custom UI for my notification. Still, I’m going to describe my code in a series of steps — steps that are also comments in my code shown below. I’ll show you my code first, then describe the steps/comments.
import UIKit
// #3.1 - import notification SDKs
import UserNotifications
import UserNotificationsUI

// #3.2 - adopt a protocol that let's us intercept
// notifications
class NotificationViewController: UIViewController, UNNotificationContentExtension {

    // #3.3 - these outlets allow me to animate buttons
    @IBOutlet weak var clearedTransactionLabel: UILabel!
    @IBOutlet weak var coverButton: UIButton!

    override func viewDidLoad() {
        super.viewDidLoad()
        // Do any required interface initialization here.

        // #3.4 - hide this label initially;
        // we'll only show it if "Cover" is tapped
        clearedTransactionLabel.alpha = 0.0
    }

    // #3.5 - called when a notification is received;
    // a good opportunity to decrypt things like
    // account or transaction numbers from the payload;
    // also good for parsing any other info, like the amount
    // to cover, out of the payload
    func didReceive(_ notification: UNNotification) {
        print("Extension received notification.")
    }

    // #3.6 - called when the user clicks "Cover"
    // in the notification; we could build a
    // payload to call a REST API to send
    // the transaction to cover the overdraft
    @IBAction func coverButtonTapped(_ sender: Any) {
        print("[Cover] button tapped.")

        // #3.7 - fade out the "Cover" button and
        // fade in the "Your overdraft was covered!"
        // message
        UIView.animate(withDuration: 2.0) {
            self.coverButton.alpha = 0.0
            self.clearedTransactionLabel.textColor = UIColor.red
            self.clearedTransactionLabel.alpha = 1.0
        }

    }

} // end class NotificationViewController
#3.1 – You should know by now why I need to import these frameworks.
#3.2 – Since the NotificationViewController class adopts the UNNotificationContentExtension protocol, it must implement the didReceive(_:) instance method. This view controller would be useless without adopting the UNNotificationContentExtension protocol.
#3.3 – These outlets allow me to animate (fade in/fade out) several buttons, giving users a pleasurable experience.
#3.4 – I hide the “Your overdraft was covered!” label initially. It only makes sense to show it if the “Cover” button is tapped.
#3.5 – didReceive(_:) is only called when a notification is intercepted by this extension. (Why? Because this extension’s Info.plist registers for the “debitOverdraftNotification” notification category type.) This method is a good place to do things like decrypt the bank account or transaction numbers from the payload. It also presents us with a good opportunity for parsing any other important information, like the overdraft dollar amount to cover, out of the payload.
#3.6 – This @IBAction is called when the user clicks the “Cover” button in my custom notification UI. While there a multitude of ways we could process a financial transaction, secure REST APIs are popular and well-supported nowadays. We could build a payload, probably encrypted, to call our REST API, sending the transaction to cover the overdraft.
#3.7 – When the user taps the “Cover” button, I fade it out and simultaneously fade in the “Your overdraft was covered!” message.
Note that you can see that my extension is responding, printing “[Cover] button tapped.” to the console as you press the “Cover” button. If you configure Xcode 10 as I discussed above in the section entitled “Testing an extension in Xcode”, you’ll see this:
Conclusion
People are always looking for better ways to save time by staying connected and accomplishing tasks more efficiently and conveniently. Apple technology for notifications has marched forward and iOS 12 has made some important improvements towards these ends.
Getting notified about important events and being able to responding immediately inside a notification, with a custom UI, is definitely a step forward for iOS. A custom UI supporting many of Apple’s controls is definitely an improvement over notifications that are constrained to only having buttons tacked onto the bottom of the notifications.
My banking use case and prototype app highlights iOS 12’s new features for allowing users to respond to events in real time. Several other examples come to to mind.
Imagine that several unusually large purchases were made on one of your credit cards. Your credit provider could send you a notification with several buttons: one to have a customer service representative call you immediately, one to freeze your account, and one to show you details about the unusual transactions.
Imagine that you need to keep some kind of facility’s temperature within a certain range. You could have sensors hooked up to a workstation. The workstation could generate push notifications that contain a slider with which you could adjust the facility’s temperature in real time.
The sky’s the limit. With iOS 12’s new notification features, you can make major improvements to your apps.


