

If you’ve ever built an application that required a webview to load web content in your native app, then you have probably experienced the frustrations that came with using UIWebView. UIWebView is quite limited and its performance lags behind that of Mobile Safari. JavaScript, which powers just about every web application, performs poorly in native mobile applications.
However, all of this has changed with the introduction of the WebKit framework in iOS 8. With the WebKit framework, comes WKWebView which replaces UIWebView in UIKit and WebView in AppKit, offering a consistent API across the two platforms.
The WebKit framework enables developers to create web enabled native apps that can utilize the power and Speed of Nitro, which is the JavaScript engine that powers Safari.

WKWebView boasts of 60fps smooth scrolling, KVO, built-in gestures and native communication between app and webpage.
In the span of two articles, we’ll build two applications which will explore some of the features that WebKit (in particular, WKWebView) offers. For the first application (built in this tutorial), we’ll create a web browser that has some of the functionalities of Safari. The second article will go deeper into Webkit and show the more powerful features like injecting JavaScript into a web page to modify content and extract data.
Getting Started
To get started, create a new project. Make it a Single View Application named Browser and select Swift as the language and make it Universal.

In ViewController.swift import the WebKit framework.
import WebKit
Next add the following variable to the class.
var webView: WKWebView
Add the following method to the class. It initializes the web view with frame of size zero. Later we’ll add auto layout constraints to the webview so that it adapts to whichever device and orientation it is run on.
required init(coder aDecoder: NSCoder) {
    self.webView = WKWebView(frame: CGRectZero)
    super.init(coder: aDecoder)
}
At the bottom of viewDidLoad() add the following statement which will add the webView to the main View.
view.addSubview(webView)
Next add the following constraints at the bottom of viewDidLoad()
webView.setTranslatesAutoresizingMaskIntoConstraints(false)
let height = NSLayoutConstraint(item: webView, attribute: .Height, relatedBy: .Equal, toItem: view, attribute: .Height, multiplier: 1, constant: 0)
let width = NSLayoutConstraint(item: webView, attribute: .Width, relatedBy: .Equal, toItem: view, attribute: .Width, multiplier: 1, constant: 0)
view.addConstraints([height, width])
Here we first disable auto-generated constraints with the first statement and then we define the height and width constraints for the webView. The webView will have the same height and width as its superview’s height and width.
We’ll load a default URL when the app starts. Later we’ll add a text field that the user can use to enter a URL. Add the following at the bottom of viewDidLoad()
let url = NSURL(string:"http://www.appcoda.com")
let request = NSURLRequest(URL:url!)
webView.loadRequest(request)
Run the application. It will load the homepage of Appcoda. When you scroll down, notice that you can see the page scrolling underneath the translucent navigation bar. We’ll disable this. Open Main.storyboard and select the View Controller. In the Attributes Inspector, uncheck the Under Top Bars option in the Extend Edges group. When you run the app again, the nav bar should now be solid and you won’t see the webpage underneath it.

Next we’ll enable url input from the user.
In the storyboard file, drag a view onto the navigation bar in the view controller. In the Attribute Inspector, set its Background to Clear Color. Since you can’t apply auto layout constraints within a navigation bar, we’ll set its size in code.
Open the Assistant Editor and create an outlet for the view by control-dragging from the view to the ViewController class. Name the outlet barView. You should have the following in your code.
@IBOutlet weak var barView: UIView!
Add the following to viewDidLoad() after the call to super.viewDidLoad()
barView.frame = CGRect(x:0, y: 0, width: view.frame.width, height: 30)
This sets the size of the barView when the app loads.
Add the following method to the class.
override func viewWillTransitionToSize(size: CGSize, withTransitionCoordinator coordinator: UIViewControllerTransitionCoordinator) {
    barView.frame = CGRect(x:0, y: 0, width: size.width, height: 30)
}
This will set the size of the barView when the device orientation changes.
On running the app you should see the view stretched out on the navigation bar. When you change orientations or devices, the view adapt its size accordingly.
Next drag a Text Field onto the view. Using the Pin button at the bottom of the canvas, pin its top, bottom, right and left with a spacing of 0.
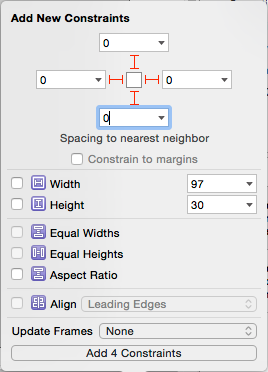
Fix the Auto Layout issues by selecting Editor > Resolve Auto Layout Issues > Selected View > Update
Frames
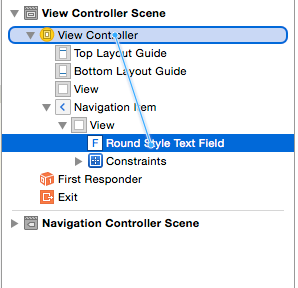
Create an outlet for the text field. Name it urlField. You should have the following.
@IBOutlet weak var urlField: UITextField!
We want the view controller to receive UITextFieldDelegate protocol methods, so in the Document Outline, control-drag from the text field to the view controller and select delegate from the popup.
With the text field selected, set the following in the Attributes Inspector.
- Clear Button: Appears while editing
- Correction: No
- Keyboard Type: URL
- Return Key: Go
Change the class declaration as follows so that it conforms to the UITextFieldDelegate protocol.
class ViewController: UIViewController, UITextFieldDelegate
Next add the following UITextFieldDelegate protocol method to the class.
func textFieldShouldReturn(textField: UITextField) -> Bool {
    urlField.resignFirstResponder()
    webView.loadRequest(NSURLRequest(URL: NSURL(string: urlField.text)!))
    return false
}
This dismisses the keyboard and loads the URL given by the user. Test it with a url. You have to enter the full url, i.e. http://google.com. Since this can be a bit cumbersome to your users, you could write code that checks the url string for ‘http://’ and if not present, appends it to the beginning of the url string, thus allowing users to enter such urls as google.com. We won’t get into this here.
Navigating Through History
Our browser is working but still lacks some features that we’ve come to expect of web browsers, namely loading indicator, back and forward buttons, reload button e.t.c.
With KVO (Key Value Observing) loading progress, page title and URL are now observable properties of WKWebView. You can use these values to update your UI accordingly.
First, we’ll add the back, forward and reload buttons.
In the storyboard, select View Controller and then in the Attributes Inspector, under Simulated Metrics, change Bottom Bar to None.
Drag a Toolbar onto the view and place it at the bottom. Pin its left, right and bottom with a spacing of 0, making sure Constrain to margins is unchecked.
In viewDidLoad() edit the webView’s height constraint to take this into account.
let height = NSLayoutConstraint(item: webView, attribute: .Height, relatedBy: .Equal, toItem: view, attribute: .Height, multiplier: 1, constant: -44)
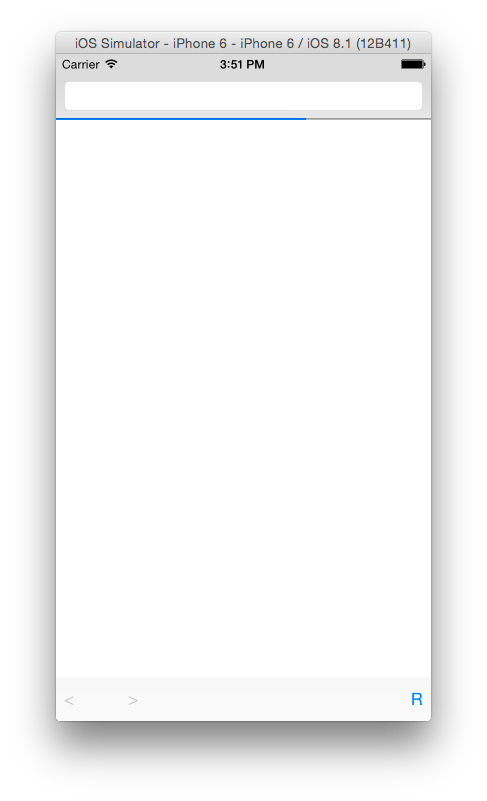
Remove the existing button item from the toolbar and drag the following in order: a Bar Button Item, a Fixed Space Bar Button Item, a Bar Button Item, Flexible Space Bar Button Item and a Bar Button Item. The toolbar should look as shown.
![]()
Edit the bar button items text to and R respectively. These will be our Back, Forward and Reload buttons. In a real app, it would be better to use icons on the buttons, but for ease, we’ll use text. The toolbar should look as shown.
![]()
Create outlets for each of the bar button items. Name them backButton, forwardButton and reloadButton respectively. You should have the following in your code.
@IBOutlet weak var backButton: UIBarButtonItem!
@IBOutlet weak var forwardButton: UIBarButtonItem!
@IBOutlet weak var reloadButton: UIBarButtonItem!
Then create actions for the same buttons and name them back, forward and reload respectively. For each action, change the Type to UIBarButtonItem. You should have the following in your code.
@IBAction func back(sender: UIBarButtonItem) {
}

@IBAction func forward(sender: UIBarButtonItem) {
}

@IBAction func reload(sender: UIBarButtonItem) {
}
At the bottom of viewDidLoad() add the following. We don’t want the back and forward buttons to be enabled when the app first loads.
backButton.enabled = false
forwardButton.enabled = false
Add the following to viewDidLoad() after the constraints are added, and before the code that creates and loads a request. This adds the class as an observer of the loading property.
webView.addObserver(self, forKeyPath: "loading", options: .New, context: nil)
Add the following method to the class. It will be called whenever the observable property changes. The state of the back and forward buttons will be changed according to the current state of the web view.
override func observeValueForKeyPath(keyPath: String, ofObject object: AnyObject, change: [NSObject : AnyObject], context: UnsafeMutablePointer) {
    if (keyPath == "loading") {
        backButton.enabled = webView.canGoBack
        forwardButton.enabled = webView.canGoForward
    }
}
Modify the back(), forward() and reload() functions as shown.
@IBAction func back(sender: UIBarButtonItem) {
    webView.goBack()
}

@IBAction func forward(sender: UIBarButtonItem) {
    webView.goForward()
}

@IBAction func reload(sender: UIBarButtonItem) {
    let request = NSURLRequest(URL:webView.URL!)
    webView.loadRequest(request)
}
Run the application and test the buttons. The back and forward should be disabled at first. When you navigate to a page, the back button should be enabled. When you go back, the forward button should be enabled. Tapping R should reload the page.
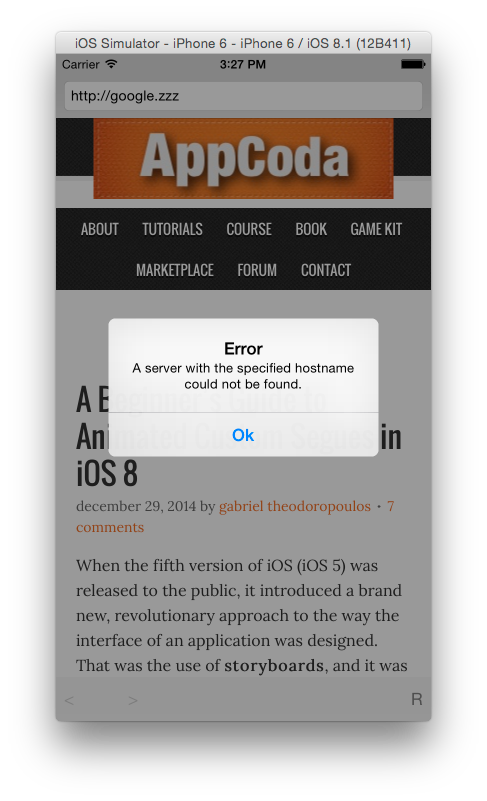
Handling Errors
You can’t always rely on the user to always type in a correct url. We’ll write code to catch errors and notify the user.
First modify the class declaration as shown.
class ViewController: UIViewController, UITextFieldDelegate, WKNavigationDelegate
The WKWebView has a property named navigationDelegate which expects an object that conforms to the WKNavigationDelegate protocol. The protocol provides different methods dealing with navigation events, including loading errors.
Add the following to the bottom of init(). With this, the class will be the navigation delegate of the web view.
self.webView.navigationDelegate = self
Next add the following method to the class. This is the delegate method that gets called when there is an error.
func webView(webView: WKWebView!, didFailProvisionalNavigation navigation: WKNavigation!, withError error: NSError!) {
    let alert = UIAlertController(title: "Error", message: error.localizedDescription, preferredStyle: .Alert)
    alert.addAction(UIAlertAction(title: "Ok", style: .Default, handler: nil))
    presentViewController(alert, animated: true, completion: nil)
}
Run and test the app with an incorrect url.
Displaying Progress
To finish off, we’ll add a progress indicator to the app.
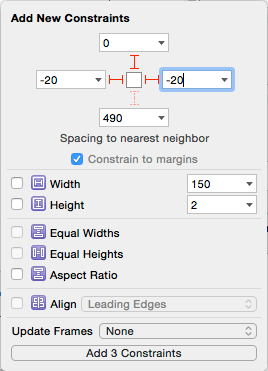
In the storyboard file, drag a Progress View onto the view and place it below the navigation bar. Pin its top, right and left as shown.
Create an outlet for the Progress View and name it progressView. You should have the following.
@IBOutlet weak var progressView: UIProgressView!
In ViewController, replace the statement
view.addSubview(webView)
with this
view.insertSubview(webView, belowSubview: progressView)
In viewDidLoad(), add the following below the statement that calls addObserver() on the webView, before the creation and loading of the url request.
webView.addObserver(self, forKeyPath: "estimatedProgress", options: .New, context: nil)
Add the following to the bottom of observeValueForKeyPath() after the other if statement.
if (keyPath == "estimatedProgress") {
    progressView.hidden = webView.estimatedProgress == 1
    progressView.setProgress(Float(webView.estimatedProgress), animated: true)
}
This updates the progress view as the value of estimatedProgress changes or hides it when loading completes.
Add the following method to the class. It is a WKNavigationDelegate protocol method that gets called when the page load completes. We use it here to reset the progress view value after each request.
func webView(webView: WKWebView!, didFinishNavigation navigation: WKNavigation!) {
    progressView.setProgress(0.0, animated: false)
}
Run the app and you should see a blue progress line as the app loads.
Conclusion
We have looked at the basics of the new WebKit framework. We’ve seen how to add some of the features offered by Safari, namely loading urls, navigating through history, detecting and handling errors and displaying progress. In part 2 of this tutorial, we’ll go deeper into webview and look at how to inject JavaScript into a web page to build a more powerful application.
You can download the code to this tutorial here.


