

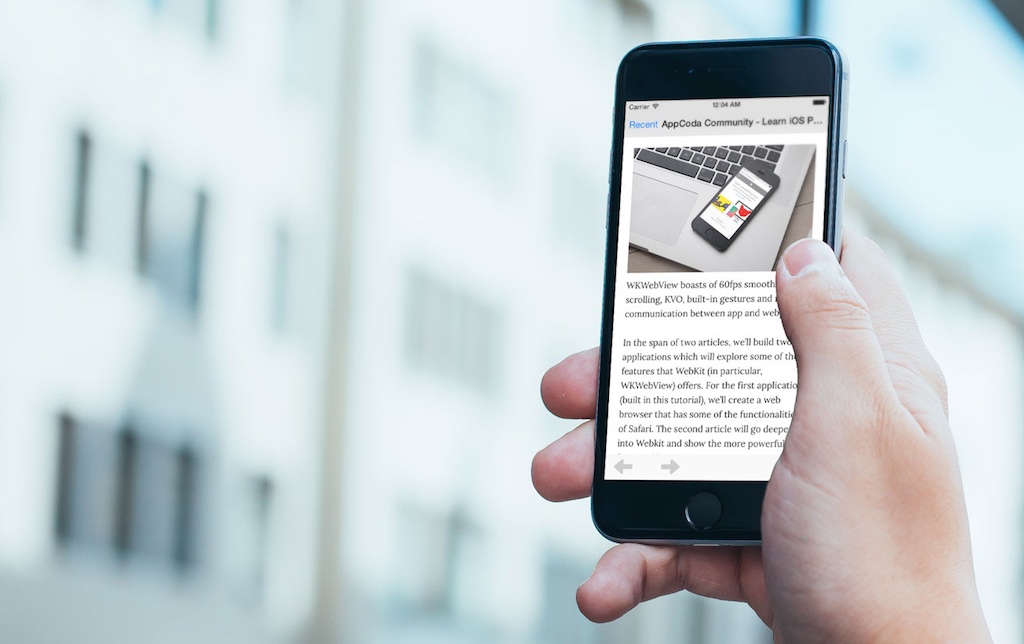
In the first part of the WebKit tutorial, we covered the basics of the WebKit framework. In this tutorial, we’ll dive deeper into WebKit and look at how we can customize web pages loaded by our native app. We’ll also see how we can extract data from web pages and use it in our app.
We’ll build an app that is specifically meant to browse appcoda.com. To follow along, download the starter project. The starter project is a simple browser named Coda, much like the one we built in the first part of this tutorial. The only difference is that it doesn’t have a text field for the user to input a url to be loaded and I replaced the Back, Forward and Reload buttons text with icons.
Handling External Links
If you run the app and click on an external link, the web view will load that link’s content. The app is meant to be a dedicated Appcoda browser therefore we’ll have to prevent the loading of external links. If a user taps an external link, the page will be opened in Safari.
What we want here is to customize the way pages are loaded. To do this, we have to intervene with the usual page loading process. Before we look at how this is done, let’s look at the page loading process.
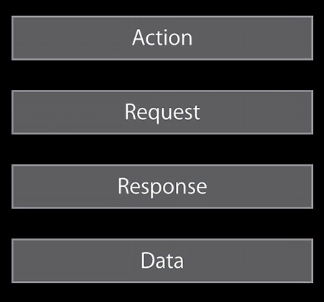
The page loading process starts with an Action. This is anything that triggers a page load like tapping a link, using the back, forward or reload buttons, JavaScript setting the window.location property, subframe loading or a call to WKWebView loadRequest(). Then a Request is sent off to the server and we get back a Response (this could be a positive response or an error message like 404). Then the server sends back some Data and the process completes.
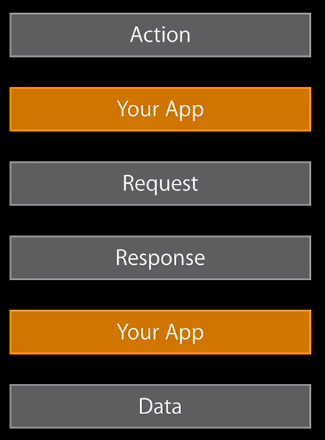
WebKit allows your app to inject itself after the Action and Response phases, and to decide whether to continue the load, cancel it or tweak it according to your needs.
Add the following method to ViewController.
func webView(webView: WKWebView!, decidePolicyForNavigationAction navigationAction: WKNavigationAction!, decisionHandler: ((WKNavigationActionPolicy) -> Void)!) {
    if (navigationAction.navigationType == WKNavigationType.LinkActivated && !navigationAction.request.URL.host!.lowercaseString.hasPrefix("www.appcoda.com")) {
        UIApplication.sharedApplication().openURL(navigationAction.request.URL)
        decisionHandler(WKNavigationActionPolicy.Cancel)
    } else {
        decisionHandler(WKNavigationActionPolicy.Allow)
    }
}
The above is a WKNavigationDelegate protocol method that gets called several times during the page load. One of its parameters is an WKNavigationAction object which contains information that can help you decide whether to continue page load or not. In the above code, we use two of its properties, navigationType and request. We only want to interrupt external links that have been initiated by a user and so we check for the navigationType. We then check the request url to determine whether it is an external link. If both conditions are met, then the URL is opened by the device’s browser (Safari) and WKNavigationActionPolicy.Cancel stops the process. Otherwise the page loads as usual and renders in the web view.
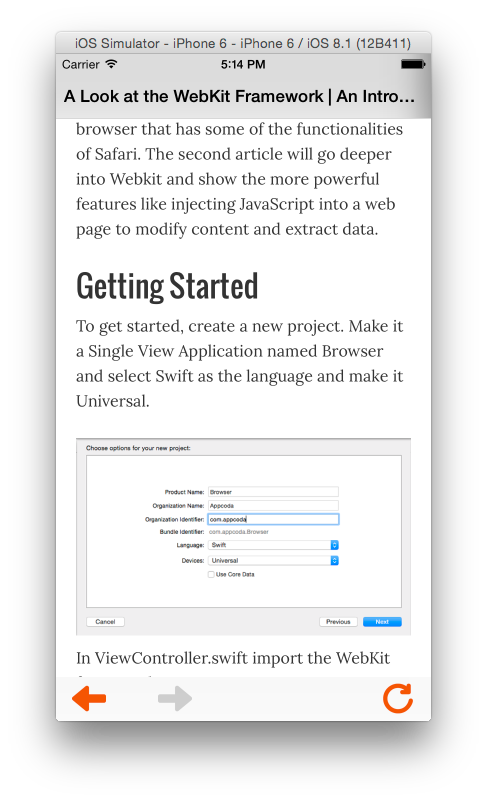
Run the app and any tap on an external link will open up Safari which will load the page.
Setting the Page Title
It would be useful to have the page title showing as an indicator to where the user is on the website. In the previous article we looked at some observable properties of WKWebView like loading and estimatedProgress. title is another observable property which we’ll use to get the title of the currently loaded page.
Add the following to viewDidLoad() right underneath the other calls to addObserver()
webView.addObserver(self, forKeyPath: "title", options: .New, context: nil)
Then in observeValueForKeyPath(_:, ofObject:) add the following at the bottom of the function, right after the other if statements.
if (keyPath == "title") {
    title = webView.title
}
Run the app and browse around and the title on the navigation bar will update accordingly.
Modifying Web Page Content
The Coda app now works well as an exclusive Appcoda browser, but there are a few things we can do to improve the user experience.
By their very nature, mobile apps are known to present data and information in a concise way. Users expect to see just the information they need and not have to scroll through a lot of other data to get to it.
At the moment, the Coda app displays everything on the Appcoda web page. We want to omit some things that aren’t related to the content. We’ll remove the sidebar and the section at the bottom of the page that shows the Appcoda Swift book.
To do this, we’ll use JavaScript to inject CSS rules into the web page that will hide these sections. First we need to inspect the website and determine the elements to target.
To inspect a webpage, you use the Developer tools which are usually available in all the major browsers. You can also install them as plugins/add-ons to your browser e.g. Firebug for Firefox. I am going to be using the Chrome Developer tools but you can use whichever browser and tools you want. The process will basically be the same.
To open the Chrome developer tools, go to View > Developer > Developer Tools.
This will open the Developer window at the bottom of the screen. The Developer window is split into sections with the top showing the page source on the left and CSS on the right. At the bottom, is the JavaScript Console where you can write your code and have it executed on the page.
We need to check for the id attributes that mark the sections we want to hide.
The sidebar is found on all pages on the site but the book section is only found on an article page. Click on any article and open the Developer Tools. To start off, right click on the sidebar and select Inspect Element. In the Developer tools window, the html code corresponding to the place you clicked on will be highlighted. If you hover your mouse on the code, a highlight will appear on the area in the webpage that corresponds to the code. We want to get an id (or class) of the root element that encloses the whole sidebar.
Depending on where you landed on when you selected Inspect Element, move upwards collapsing the tags and checking to see that it is only the sidebar that is highlighted on the page. The last tag to be collapsed will be the root element. In our case, it is a div tag with an id of ‘sidebar’.
It is best to first write and test your code in the browser before taking it into your app, because if you get it wrong, debugging it there would be a lot harder. We’ll test our CSS and JavaScript on the browser first.
Click on the div tag that we’ve identified above. On the right of the view, you’ll see its CSS styles. Click on the + button in that window which will add a style rule as shown below.
div#sidebar {
}
For the above rule add the following:
display:none;
When you add the above, the sidebar should disappear from the page.
Delete the style rule to bring the sidebar back. We’ll now add the code to the DOM with JavaScript. Below the html view, is the JavaScript console. Paste the following to the console.
var styleTag = document.createElement("style");
The above creates the element and assigns it to a variable. Next add the following which will add the css rule to the style element we created. I have included the class name for the book section as well.
styleTag.textContent = 'div#sidebar, .after-post.widget-area {display:none;}';
Lastly, add the following to add the style tag to the DOM. Immediately the code is executed, the sidebar and book section will disappear from the page.
document.documentElement.appendChild(styleTag);
The above process is what is required to hide sections from a web page.
Back in Xcode, create a new file with File > New > File > iOS > Other > Empty and name it hideSections.js. Add the following to the file.
var styleTag = document.createElement("style");
styleTag.textContent = 'div#sidebar, .after-post.widget-area {display:none;}';
document.documentElement.appendChild(styleTag);
In ViewController, replace init() with the following.
required init(coder aDecoder: NSCoder) {
    let config = WKWebViewConfiguration()
    let scriptURL = NSBundle.mainBundle().pathForResource("hideSections", ofType: "js")
    let scriptContent = String(contentsOfFile:scriptURL!, encoding:NSUTF8StringEncoding, error: nil)
    let script = WKUserScript(source: scriptContent!, injectionTime: .AtDocumentStart, forMainFrameOnly: true)
    config.userContentController.addUserScript(script)
    self.webView = WKWebView(frame: CGRectZero, configuration: config)
    super.init(coder: aDecoder)
    self.webView.navigationDelegate = self
}
The above code creates a WKWebViewConfiguration object which holds some properties that allow the creation of the bridge between native code and the hosted web content. The JavaScript is then loaded and wrapped in an instance of WKUserScript. The script is then added to the configuration’s userContentController and then the webView is initialized with the configuration.
When creating the instance of WKUserScript, we specify when the script should be injected and whether it acts on the whole page or a specific frame.
Run the application and you’ll no longer see the sidebar(in iPhone, this was appearing towards the bottom of the page) and book section content.
Extracting Data From the Web Page
The homepage of the Appcoda website shows a summary of the last 10 articles to be posted. When viewing this page on our web view, you have to do a lot of scrolling to get to the bottom articles. We want to have an easier way to get to the recent articles. We’ll create a table view which will hold a list of the recent articles.
We’ll get this list by extracting data from the homepage. I won’t go into inspecting html here again. I’ll just give the JavaScript I used to extract the posts and explain what it does.
If you run the following in the JavaScript console while you are on the homepage, a list of post titles and their urls will be printed to the console.
var postsWrapper = document.querySelector('#content')
var posts = postsWrapper.querySelectorAll('.post.type-post.status-publish')

for (var i = 0; i < posts.length; i++) {
    var post = posts[i];
    var postTitle = post.querySelector('h2.entry-title a').textContent;
    var postURL = post.querySelector('h2.entry-title a').getAttribute('href');
    console.log("Title: ", postTitle, " URL: ", postURL);
}
If you look at the structure of html for the posts on the page, it will be something as shown below.
In the JavaScript code above, we get the element with the id of 'content'. This is the div that is the immediate parent of the list of posts. We then get all elements which are under this div and assign them to the variable posts. This will hold an array of the post divs. We then iterate over this array, and get the text content of the anchor tag that is found in the h2 element of each post div. We also get the value of the anchor tag's href attribute which holds the URL of the post. We then print this to the console.
In Xcode, create a new file with File > New > File > iOS > Other > Empty. Name it getPosts.js. Paste the following to the file.
var postsWrapper = document.querySelector('#content')
var posts = postsWrapper.querySelectorAll('.post.type-post.status-publish')

function parsePosts() {
    pos = []

    for (var i = 0; i < posts.length; i++) {
        var post = posts[i];
        var postTitle = post.querySelector('h2.entry-title a').textContent;
        var postURL = post.querySelector('h2.entry-title a').getAttribute('href');
        pos.push({'postTitle' : postTitle, 'postURL' : postURL});
    }

    return pos
}

var postsList = parsePosts();
webkit.messageHandlers.didGetPosts.postMessage(postsList);
The above gets the values of all the post titles and urls and saves them to an array. The last line enables JavaScript and native code communication. webkit.messageHandlers is a global object that facilitates the triggering of callbacks in the native code. didGetPosts represents a message with the same name in the native code. postMessage passes data through to the callback.
In the storyboard, drag a Bar Button Item to the navigation bar and place it on the left side. Change its text to 'Recent'. Create an outlet for it and name it recentPostsButton. You should have the following in code.
@IBOutlet weak var recentPostsButton: UIBarButtonItem!
At the bottom of viewDidLoad(), add the following. We want the button disabled until the posts list is loaded.
recentPostsButton.enabled = false
In ViewController, add the following below the import statements.
let MessageHandler = "didGetPosts"
Add the following property to the class.
var postsWebView: WKWebView?
Add the following to the bottom of viewDidLoad()
let config = WKWebViewConfiguration()
let scriptURL = NSBundle.mainBundle().pathForResource("getPosts", ofType: "js")
let scriptContent = String(contentsOfFile:scriptURL!, encoding:NSUTF8StringEncoding, error: nil)
let script = WKUserScript(source: scriptContent!, injectionTime: .AtDocumentEnd, forMainFrameOnly: true)
config.userContentController.addUserScript(script)
config.userContentController.addScriptMessageHandler(self, name: MessageHandler)
postsWebView = WKWebView(frame: CGRectZero, configuration: config)
postsWebView!.loadRequest(NSURLRequest(URL:NSURL(string:"http://www.appcoda.com")!))
Here we load the JavaScript just like we did with the other JavaScript file, only this time we want to inject it .AtDocumentEnd when the whole DOM has been constructed. We also add the MessageHandler to the
WKWebViewConfiguration and initialize an instance of WKWebView with the configuration before loading a request with the URL of the homepage.
Update the class declaration so that it conforms to the WKScriptMessageHandler protocol.
class ViewController: UIViewController, WKNavigationDelegate, WKScriptMessageHandler
We'll create a model class to hold the post data. Create a class with File > New > File > iOS > Source > Cocoa Touch Class. Name it Post and make it a subclass of NSObject. Paste the following to the class.
import UIKit

class Post: NSObject {

    var postTitle: String = ""
    var postURL: String = ""

    init(dictionary: Dictionary) {
        self.postTitle = dictionary["postTitle"]!
        self.postURL = dictionary["postURL"]!
        super.init()
    }

}
Add the following variable to ViewController.
var posts: [Post] = []
Add the following required WKScriptMessageHandler protocol method to the class.
func userContentController(userContentController: WKUserContentController, didReceiveScriptMessage message: WKScriptMessage) {
    if (message.name == MessageHandler) {
        if let postsList = message.body as? [Dictionary] {
            for ps in postsList {
                let post = Post(dictionary: ps)
                posts.append(post)
            }
            recentPostsButton.enabled = true
        }
    }
}
This checks to see if the name of the received message matches with what we are expecting and if it does, it extracts the array of dictionaries attached to the message and creates Post objects with this data before adding each post to the posts array. Then the recentPostsButton is enabled.
Open the storyboard and add a Table View Controller onto the canvas. Select it and embed it in a navigation controller with Editor > Embed In > Navigation Controller.
Control-drag from the Recent button on the View Controller scene to the new navigation controller and select popover presentation from the popup. Select the segue that has been added and set its Identifier to recentPosts.
Create a new file with File > New > File > iOS > Source > Cocoa Touch class. Name it PostsTableViewController and make it a subclass of UITableViewController.
In the storyboard, select the Table View Controller and set its class to PostsTableViewController in the Identity Inspector. Select the prototype cell of the table view and set its Identifier in the Attributes Inspector to postCell.
Edit the PostsTableViewController class as shown.
import UIKit

class PostsTableViewController: UITableViewController {

    var posts: [Post] = []

    override init(style: UITableViewStyle) {
        super.init(style: style)
    }

    required init(coder aDecoder: NSCoder) {
       	super.init(coder: aDecoder)
    }

    override func viewDidLoad() {
        super.viewDidLoad()
        self.title = "Recent Articles"
        tableView.reloadData()
    }

    override func numberOfSectionsInTableView(tableView:
        UITableView?) -> Int {
        return 1
    }

    override func tableView(tableView: UITableView?, numberOfRowsInSection section: Int) -> Int {
        return posts.count
    }

    override func tableView(tableView: UITableView, cellForRowAtIndexPath indexPath: NSIndexPath) -> UITableViewCell {
        let cell = tableView.dequeueReusableCellWithIdentifier("postCell", forIndexPath: indexPath) as UITableViewCell
        let post = posts[indexPath.row]
        cell.textLabel?.text = post.postTitle
        return cell
    }
}
Here we implement the table view controller data source methods that will populate the table view with the post titles.
Add the following to ViewController.
override func prepareForSegue(segue: UIStoryboardSegue, sender: AnyObject!) {
    if (segue.identifier == "recentPosts") {
        let navigationController = segue.destinationViewController as UINavigationController
        let postsViewController = navigationController.topViewController as PostsTableViewController
        postsViewController.posts = posts
    }
}
This is called when the Recent button is tapped, right before the table view controller is shown. It passes the list of posts to the table view controller.
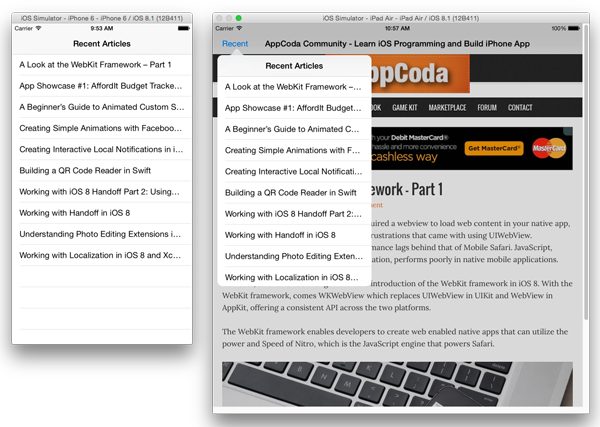
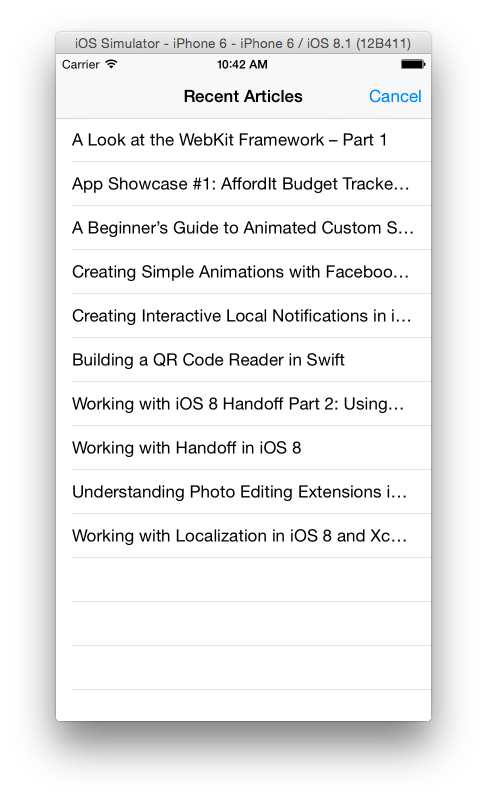
Run the app. On tapping the Recent button, you will be presented with a table view with a list of recent articles. On the iPhone, this takes up the whole screen but on the iPad, it appears in a popover.
When you tap on a table cell, nothing happens. We want the tapped on article to be loaded on the web view.
In ViewController, add the following below the import statements.
let PostSelected = "postSelected"
We will be posting a notification when a table cell is selected. The above constant holds the name of the notification.
In PostsTableViewController add the following method.
override func tableView(tableView: UITableView, didSelectRowAtIndexPath indexPath: NSIndexPath) {
    let post = posts[indexPath.row]
    NSNotificationCenter.defaultCenter().postNotificationName(PostSelected, object: post)
    dismissViewControllerAnimated(true, completion: nil)
}
This posts a notification each time a cell is selected and dismisses the table view controller.
In ViewController, add the following at the bottom of viewDidLoad()
NSNotificationCenter.defaultCenter().addObserver(self, selector: "postSelected:", name: PostSelected, object: nil)
The above sets the view controller as an observer of the notifications posted when a cell is selected in the table view.
Add the following to ViewController.
func postSelected(notification:NSNotification) {
    webView.loadRequest(NSURLRequest())
    let post = notification.object as Post
    webView.loadRequest(NSURLRequest(URL:NSURL(string:post.postURL)!))
}
This gets the post object attached to the notification and loads the post URL in the web view.
Run the application and you should be able to navigate to any recent article you select from the table view.
At the moment, when we tap on the Recent button, we have no way of dismissing the table view, unless we select a recent article to be loaded. We'll add a cancel button.
In the storyboard, drag a Bar Button Item to the right hand side of the navigation bar in the table view controller. Set its Identifier to Cancel in the Attributes Inspector.
Open Assistant Editor and control-drag from the Cancel button to the PostsTableViewController class to create an action. Name it cancel and make sure the Type is set to UIBarButtonItem. Edit the action as shown.
@IBAction func cancel(sender: UIBarButtonItem) {
    dismissViewControllerAnimated(true, completion: nil)
}
You should now have a Cancel button that dismisses the table view when tapped.
Conclusion
The new WebKit framework gives developers the ability to create apps that interact seamlessly with hosted web pages. We've looked at how to customize a web page's appearance, extract data from it and use the data in our app's interface.
If your app is a container for web content, then using the WebKit framework will result in an app whose performance and look-and-feel are on par with native apps. WebKit might be a game-changer for such apps, which previously felt sluggish to use.
If you want to find out more about the framework, this WWDC video is a good place to start.
You can download the completed project here.


