

This is the second article for our Core Data series. Previously, we gave you a brief introduction of Core Data and created a simple app to store all your device information. However, we only showed you how to insert records into data store through Core Data API and left out the update & delete operations.
In this tutorial, we’ll continue to work on the app and focus on the following areas of Core Data:
- Updating or deleting an object using Core Data API
- Viewing the raw SQL statement for debugging purpose
Updating or Delete an Object using Core Data
In the last tutorial, we already discussed how to fetch and save a managed object using Core Data API. So how can you update or delete an existing managed object from database?
Deleting an Object
Let’s talk about the delete operation first. To allow user to delete a record from the table view, as you know, we can simply implement the “canEditRowAtIndexPath” and “commitEditingStyle” methods. Add the following code to the DeviceViewController.m:
- (BOOL)tableView:(UITableView *)tableView canEditRowAtIndexPath:(NSIndexPath *)indexPath
{
    // Return NO if you do not want the specified item to be editable.
    return YES;
}


- (void)tableView:(UITableView *)tableView commitEditingStyle:(UITableViewCellEditingStyle)editingStyle forRowAtIndexPath:(NSIndexPath *)indexPath
{
    NSManagedObjectContext *context = [self managedObjectContext];

    if (editingStyle == UITableViewCellEditingStyleDelete) {
        // Delete object from database
        [context deleteObject:[self.devices objectAtIndex:indexPath.row]];

        NSError *error = nil;
        if (![context save:&error]) {
            NSLog(@"Can't Delete! %@ %@", error, [error localizedDescription]);
            return;
        }

        // Remove device from table view
        [self.devices removeObjectAtIndex:indexPath.row];
        [self.tableView deleteRowsAtIndexPaths:[NSArray arrayWithObject:indexPath] withRowAnimation:UITableViewRowAnimationFade];
    }
}
We’ll not go into the details about how to remove a row from table view as we’ve already covered in our earlier tutorial. Let’s focus on the code of commitEditingStyle method for deleting the managed object from database.
Like saving data, we first grab the manage object context. The context provides a method called “deleteObject” that allows you to delete the specific object from database. Lastly, we invoke the “save” method to commit the change. Following the removal of the object from database, we also remove the record from the table view.
Now, let’s run the app and try to remove a record from database. Your app should look similar to the following:
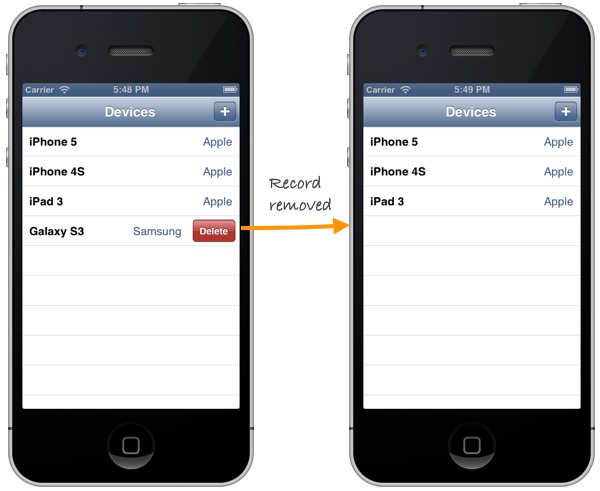
Delete a device from database
Updating an Object
Next, we’ll enhance the app to let user update the device information. Go to the Storyboard and add a new segue for the table cell. This segue is used to connect a table cell and the detail view controller. When user selects any device in the table view, the detail view controller will be displayed to show the information of the selected device.
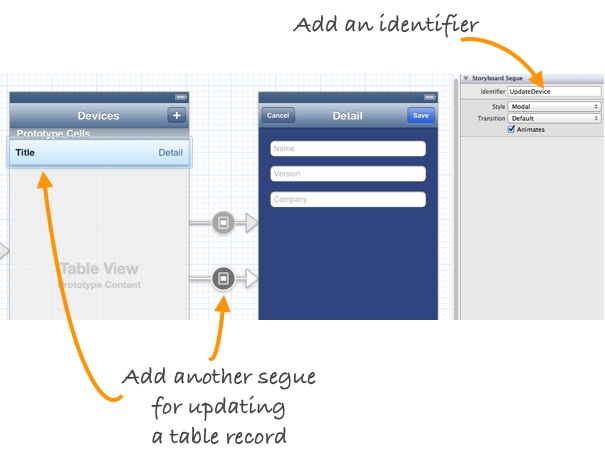
Add a new segue for updating device
To differentiate the segue from the one for adding a new device, we set an identifier as “UpdateDevice”. Next, add the prepareForSegue method in DeviceViewController.m:
- (void)prepareForSegue:(UIStoryboardSegue *)segue sender:(id)sender
{
    if ([[segue identifier] isEqualToString:@"UpdateDevice"]) {
        NSManagedObject *selectedDevice = [self.devices objectAtIndex:[[self.tableView indexPathForSelectedRow] row]];
        DeviceDetailViewController *destViewController = segue.destinationViewController;
        destViewController.device = selectedDevice;
    }
}
When user selects a specific device in the table view, it’ll go through the “UpdateDevice” segue. We then retrieve the selected device and pass it to the detail view controller.
Next, add a new properties in the DeviceDetailViewController.h for saving the selected device:
@property (strong) NSManagedObject *device;
As always, add the synthesis statement in the DeviceDetailViewController.m:
@implementation DeviceDetailViewController
@synthesize device;
To display the information of the selected device, we have to change the “viewDidLoad” method:
- (void)viewDidLoad
{
    [super viewDidLoad];
	// Do any additional setup after loading the view.
    if (self.device) {
        [self.nameTextField setText:[self.device valueForKey:@"name"]];
        [self.versionTextField setText:[self.device valueForKey:@"version"]];
        [self.companyTextField setText:[self.device valueForKey:@"company"]];
    }

}
Let’s stop here and try to run the app again. As your app launches, tap any of the device records and the device information should appear in the detail view.
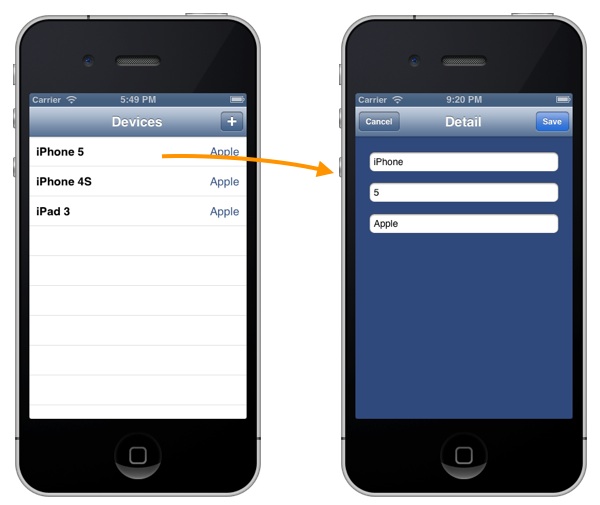
Display Detailed Device Information
However, the app is not finished yet. If you try to edit the information of an existing device, it will not update the device information properly. Go back to the DeviceDetailViewController.m and modify the “save:” method:
- (IBAction)save:(id)sender {
    NSManagedObjectContext *context = [self managedObjectContext];

    if (self.device) {
        // Update existing device
        [self.device setValue:self.nameTextField.text forKey:@"name"];
        [self.device setValue:self.versionTextField.text forKey:@"version"];
        [self.device setValue:self.companyTextField.text forKey:@"company"];

    } else {
        // Create a new device
        NSManagedObject *newDevice = [NSEntityDescription insertNewObjectForEntityForName:@"Device" inManagedObjectContext:context];
        [newDevice setValue:self.nameTextField.text forKey:@"name"];
        [newDevice setValue:self.versionTextField.text forKey:@"version"];
        [newDevice setValue:self.companyTextField.text forKey:@"company"];
    }

    NSError *error = nil;
    // Save the object to persistent store
    if (![context save:&error]) {
        NSLog(@"Can't Save! %@ %@", error, [error localizedDescription]);
    }

    [self dismissViewControllerAnimated:YES completion:nil];
}
We’ll update the device information if any of the devices is selected. If there is no selected device, we’ll then create a new device and add it into the database.
Try to test the app again. The update feature should now work properly:

Now you can update the device info properly!
Viewing the Raw SQL Statement
Thanks to Core Data. Even without learning SQL and database, you’re able to perform create, select, update and delete operation. However, for those with database background, you may want to know the exact SQLs executed behind the scene.
To enable SQL output for debugging purpose, click “MyStore” and select “Edit Scheme”.
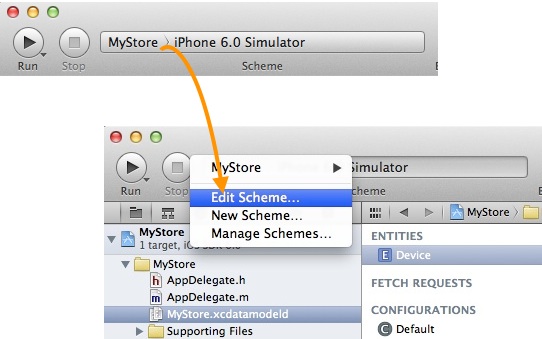
Edit scheme in Xcode project
Under “Argument Passed on Launch” section, click the “+” button and add the “-com.apple.CoreData.SQLDebug 1” parameter:

Add SQL Debug Parameter
Click “OK” to confirm. Now run your app again and you’ll see the raw SQL statement (e.g. SELECT and UPDATE) displayed in the output window.
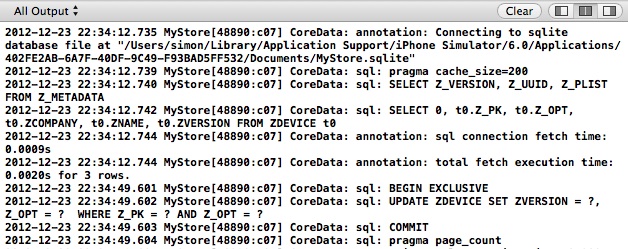
SQL statement for Core Data Debugging
What’s Coming Next
We hope you enjoy the tutorial and have a better understanding about Core Data. For your reference, you can download the complete source code here.
In the later tutorials, we’ll talk about object relationship and show you how to optimize the app using NSFetchedResultsController.


