Dealing with databases and handling data in general is an important and crucial part of any app. I had covered a topic on how to manage a SQLite database using SwiftyDB some months ago on another post. Today, I’m coming back aiming to talk about databases again, but this time I’m going to present you another library that you may have known about already: The FMDB.
Both of those libraries serve the same goal; to let you handle SQLite databases, and manage your app’s data efficiently. However, they’re not similar at all to the way they are used. SwiftyDB offers a high-level programming API hiding all the SQL details and other advanced operations behind the scenes, while FMDB provides a way better fine-grained data handling by just being a more low-level API. It still “hides” the connection and communication details to the SQLite database under the hood, but that’s the boring stuff after all; what most developers want is to write their custom queries and to perform operations over the data. But generally speaking, one can be better than the other on specific cases, and that always depends on each application’s nature and purpose. So, both of them are great tools that can become perfect fit for our needs.
Focusing on the FMDB library now only, this one is actually a SQLite wrapper, meaning that it provides us with the SQLite features in a higher level so we don’t have to deal with the connection stuff, as well as with the actual writing and reading of data to and from the database. It’s the best option for developers who want to use their SQL knowledge and write their own SQL queries, but without having to write their own SQLite manager. It works with both Objective-C and Swift, and as it’s really fast to integrate it into a project, productivity has no cost in that case.
We’ll take our walk through the FMDB library by using some simple examples in a small demonstrative app we’ll implement next. We’ll start by creating a new database programmatically, and we’ll see all the usual operations that can apply to the data: Insert, update, delete and select. For more information I encourage you to see the original Github page. Of course, as I’m planning to talk about a database-related topic I assume that you have a basic SQL language understanding, otherwise maybe you should familiarise yourself with it first before you continue.
Anyway, if you’re a database lover like me, then just follow me; we are just about to see some quite interesting things!
Demo App Overview
Our demo app in this tutorial is going to display a list of movies that their details can be presented in a new view controller (yes I know, I’ve used movies as sample data in the past too, but IMDB consists of an excellent data source). Along with the details, we’ll be able to mark a movie as watched and give some likes (ranging from 0 to 3).
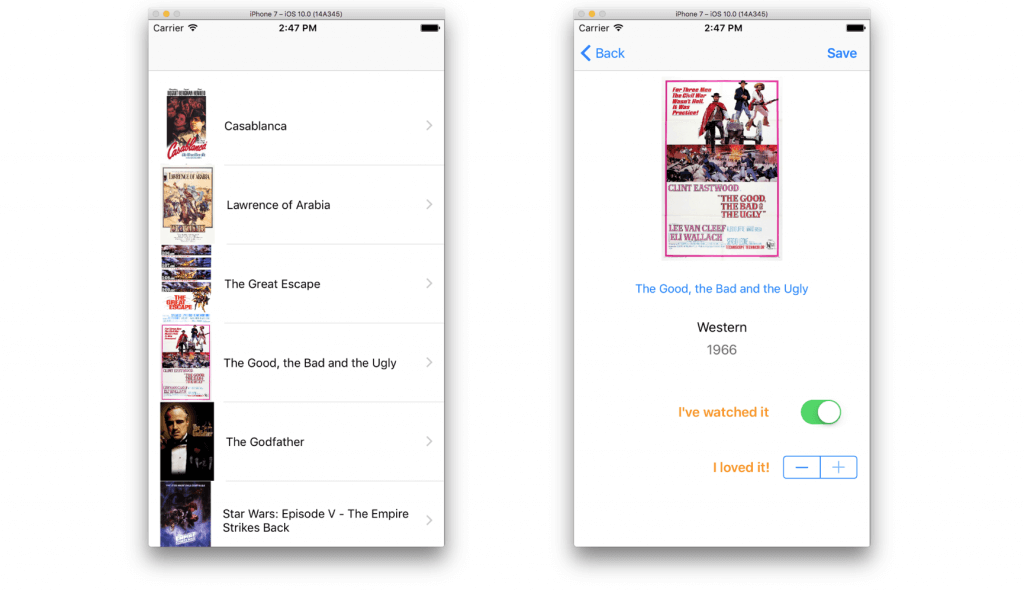
The data for the movies will be stored in a SQLite database, which of course we’ll manage by using the FMDB library. The initial movie data will be inserted into the database from a tab separated file (.tsv) file that I’ve already prepared. Our goal is to focus on the database stuff mostly, therefore there’s a starter project for you to grab before you continue. In that starter project you’ll find already made the default app implementation, as well as the original .tsv file that we’ll use to get the initial data for the movies from.
Providing some more details about the demo app, I have to say first of all that it’s a navigation-based app, with two view controllers: The first one called MoviesViewController and contains a tableview where we’ll display the title and an image for each movie (there are 20 movies in total). Just for the records, the movie images are not stored locally; instead they’re fetched asynchronously on the fly, when the list is being displayed. We’ll see that later. By tapping on a movie cell the second view controller named MovieDetailsViewController will be presented. The following details for each movie will be displayed there:
- Image
- Title – This is going to be a button, which when tapped the movie’s webpage in the IMDB website will be opened in Safari
- Category
- Year
On top of those, we’ll also have a switch to indicate if a specific movie has been watched or not, and a stepper control to increase or decrease the number of likes we’d like to give to each movie. The updated movie details will be obviously stored into the database.
Further than that, in the MoviesViewController.swift file you’ll also find a struct named MovieInfo. Its properties match to the fields of the table that we’ll maintain in the database, and an object of the MovieInfo struct will represent a movie programmatically. I won’t make any discussion at this point about the database and our work with it, as we’ll see everything in details. I’ll just mention again that we’ll meet all the operations that can be done: Database creation (programmatically), data insertion, update, delete and select. We’ll keep things simple, but whatever we’ll meet can be applied in a larger scale too.
So, once you download the starter project and you walk yourself around, please continue reading. We’ll start by adding the FMDB library to the starter project, and then we’ll see how each database operation is implemented and works. Additionally, we’ll see some best practices that can make your life as a developer easier.
Integrating FMDB In Your Swift Project
The normal and usual way to integrate the FMDB library into your project is by installing it through CocoaPods and according to the directions that can be found here. However, and especially for Swift projects, it’s way faster to download the repository as a zip file, and then to add specific files into your project. You’ll be asked to add a bridging header file as well, because the FMDB library is written in Objective-C and the bridging file is required for allowing the two languages work together.
Let’s see some details. We’ll get started by opening the link I gave you above in a browser. At the (almost) top-right side there’s a green button titled “Clone or download“. Click it, and then you’ll find another button saying “Download ZIP“. Click it too and let the repository get downloaded as a zip file on your computer.
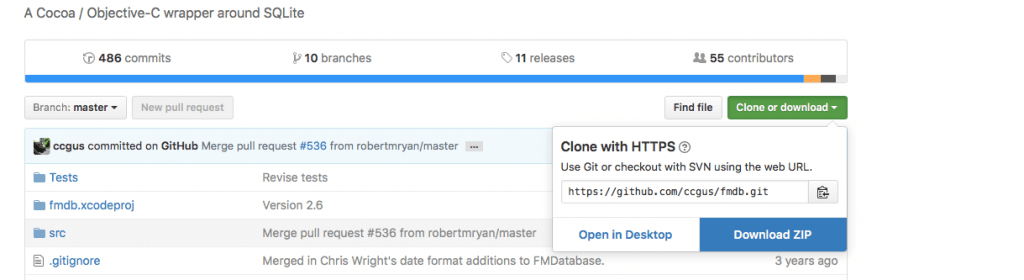
Once you open the zip and decompress its contents, navigate to the fmdb-master/src/fmdb directory (in Finder). The files you’ll find there are those that you need to add to the starter project. It would be a group idea though first to create a new Group in the Project navigator for these files, so you keep them separately from the rest files of the project. Select them (there’s also a .plist file, you don’t really need it), and then drag and drop into the Project navigator in Xcode.
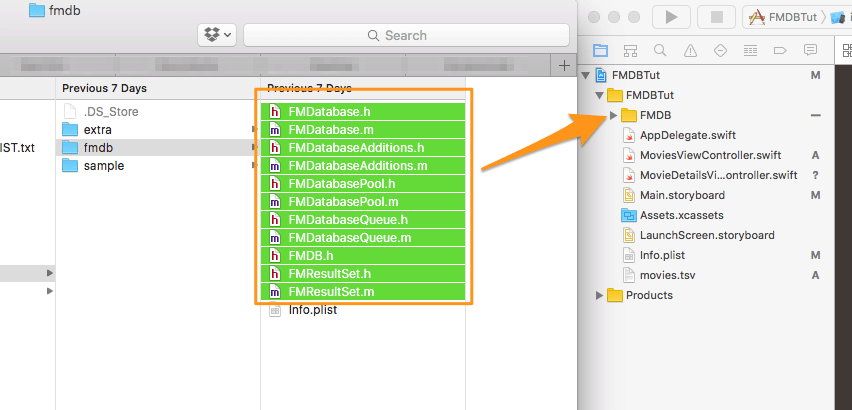
After having added the files into the project, Xcode will ask you to create a bridging header file.
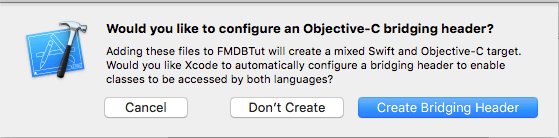
Accept that if you want to avoid making it manually on your own. One more file will be added to the project, called FMDBTut-Bridging-Header.h. Open it and write the following line:
|
1 |
#import "FMDB.h" |
Now, the FMDB classes will be available throughout our Swift project, and we’re ready to start making use of them.
Creating a Database
Working with the database almost always involves the same general action steps: Establish a connection to it, load or modify the stored data, and finally close the connection. That’s something that we can do from any class in the project, as we know that the FMDB classes are available whenever we need them. Doing so, however, in my opinion is not a good tactic, and it can lead to future update or debugging problems if the database-related code is spread all over the project. What I always like to do, is to create a class that will do the following:
- Handle the communication with the database through the FMDB API – We won’t have to write more than once code that checks if the actual database file really exists, or if the database is opened or not.
- Implement database-related methods – We will operate on the data by creating specific custom methods depending on our needs, and we’ll call those methods from other classes just to make use of the data.
As you understand, we are going to create a kind of a higher-level database API based on the FMDB, but totally related to the purposes of our app. To give a greater flexibility to the way this class will work, we’ll make it a singleton and we’ll be able to use it without creating new instances (new objects) of it when we need it. Regarding singletons, this link, as well as a fast research on the web will enlighten you if you need so.
Let’s pass from theory to action now, and let’s turn to our starter project. Begin by creating a new class for our database manager (in Xcode go to File menu > New > File… -> Cocoa Touch Class). When you’ll be asked by Xcode to give a name, set the DBManager value, and make sure that you make it a subclass of the NSObject class. Continue reading when you finish the creation of the new file.
Open the DBManager class now, and add the following line to make it a singleton:
|
1 |
static let shared: DBManager = DBManager() |
I strongly recommend you go and do some reading about singletons in Swift, and understand how the above line will work for our purposes. In any case, from now on we just have to write something like DBManager.shared.Do_Something() and it’ll work. No need for initialising new instances of the class (but still you can do so if you have a strong desire for that).
Further than the above, we need to declare three more important properties to our app:
- The database file name – It’s not necessary to have it as a property, but it’s recommended for reusable purposes.
- The path to the database file.
- A FMDatabase object (from the FMDB library) that will be accessing and operating on the actual database.
Here we go:
|
1 2 3 4 5 |
let databaseFileName = "database.sqlite" var pathToDatabase: String! var database: FMDatabase! |
Hey, wait! We’re missing an init() method that has to exist in our class:
|
1 2 3 4 5 6 |
override init() { super.init() let documentsDirectory = (NSSearchPathForDirectoriesInDomains(.documentDirectory, .userDomainMask, true)[0] as NSString) as String pathToDatabase = documentsDirectory.appending("/\(databaseFileName)") } |
Obviously, the init() method isn’t empty; it’s our best place to specify the path to the app’s documents directory and compose the path to the database file.
Let’s create now our database in a new custom method that we’ll call createDatabase() (what else?). That method will return a Bool value indicating whether the database was successfully created or not. Even though it’s not obvious from now and you’ll better understand the purpose of the return value later, I’m telling in advance that we’ll insert some initial data into the database, but we will do that if only we know whether the database has been really created or not. The database creation and the initial data insertion are two actions that will happen just once, the first time that the app will get launched.
Let’s see now how the actual database file is getting created:
|
1 2 3 4 5 6 7 8 9 10 |
func createDatabase() -> Bool { var created = false if !FileManager.default.fileExists(atPath: pathToDatabase) { database = FMDatabase(path: pathToDatabase!) } return created } |
Two noteworthy things here:
- We proceed to the database creation and whatever comes next if only the database file doesn’t exist. That’s important, because we don’t want to create the database file again and destroy the original database.
- The line:
database = FMDatabase(path: pathToDatabase!)is creating the database file specified by the initialiser’s argument, if only the file is not found (what we want here actually). No connection is being established at that point though. We just know that after that line we can use thedatabaseproperty to have access to our database.
Don’t mind about the created flag yet. We’ll set its proper value at the proper time.
Back to our new method, we continue by making sure that the database has been created, and by opening it:
|
1 2 3 4 5 6 7 8 9 10 11 12 13 14 15 16 17 18 19 |
func createDatabase() -> Bool { var created = false if !FileManager.default.fileExists(atPath: pathToDatabase) { database = FMDatabase(path: pathToDatabase!) if database != nil { // Open the database. if database.open() { } else { print("Could not open the database.") } } } return created } |
The database.open() is a key line above, as we are allowed to act on the database data only after it’s been opened. Later, we’ll close the database (the connection to it actually) in a similar fashion as above.
Let’s create a table in the database now. For simplicity reasons, we won’t create other tables. The fields of that table (which we’ll name movies) are the same to the properties of the MovieInfo struct, so if you just open the MoviesViewController.swift file in Xcode you’ll see them. To make it easy, I’m giving you just the query right next (where you can also see the fields and their datatypes):
|
1 |
let createMoviesTableQuery = "create table movies (movieID integer primary key autoincrement not null, title text not null, category text not null, year integer not null, movieURL text, coverURL text not null, watched bool not null default 0, likes integer not null)" |
The following line will execute the above query, and it will create the new table on our database:
|
1 |
database.executeUpdate(createMoviesTableQuery, values: nil) |
The executeUpdate(...) method is used for all the queries that can modify the database (in other words, non Select queries). The second argument takes an array of values that we probably want to pass along with the query, but for now we don’t need to use it. We’ll see it later.
The above will trigger an error in Xcode, because that method can throw an exception if any error occurs. That fact makes us change the last line into that:
|
1 2 3 4 5 6 7 8 |
do { try database.executeUpdate(createMoviesTableQuery, values: nil) created = true } catch { print("Could not create table.") print(error.localizedDescription) } |
Note that the created flag becomes true if only the table gets created successfully, and you can see that in the do statement’s body.
Right next I’m giving you the createDatabase() method in one piece. Pay attention after the catch statement where we close the database, no matter what has happened before:
|
1 2 3 4 5 6 7 8 9 10 11 12 13 14 15 16 17 18 19 20 21 22 23 24 25 26 27 28 29 30 31 |
func createDatabase() -> Bool { var created = false if !FileManager.default.fileExists(atPath: pathToDatabase) { database = FMDatabase(path: pathToDatabase!) if database != nil { // Open the database. if database.open() { let createMoviesTableQuery = "create table movies (movieID integer primary key autoincrement not null, title text not null, category text not null, year integer not null, movieURL text, coverURL text not null, watched bool not null default 0, likes integer not null)" do { try database.executeUpdate(createMoviesTableQuery, values: nil) created = true } catch { print("Could not create table.") print(error.localizedDescription) } // At the end close the database. database.close() } else { print("Could not open the database.") } } } return created } |
Some Best Practices
Before we continue, I’d like to present a couple of best practices that will make our life easier, and keep us out of potential troubles in the future. What I’ll show you here might not be necessary for our demo app as it’s a small one and our operations to the database are going to be quite limited. However, if you’re working on big projects then it really worths to stick to what you’ll see next, as it’ll save you enough time, it’ll prevent you from repeating the same code and also prevent you from making typo mistakes.
So, let’s start with something that will make our life easier, and that will save us some time in big projects. Whenever we want to establish a connection to the database for retrieving data or for performing any kind of update operation (insert, update, delete), we have to follow specific steps: To make sure that the database object has been initialised, if not to initialise it, then to open the database using the open() method and if everything is okay to proceed to the real work. These steps have to be repeated every time we need to do something with the database, and now think how boring, anti-productive and time consuming process would be to make all those checks and optional actions whenever you just want to open the database. Thinking a little smarter, why not to create a method that does all the above, so we just have to call it (just a single line) whenever we need it instead of doing all the above?
In our DBManager class we’ll create such a method, the following one:
|
1 2 3 4 5 6 7 8 9 10 11 12 13 14 15 |
func openDatabase() -> Bool { if database == nil { if FileManager.default.fileExists(atPath: pathToDatabase) { database = FMDatabase(path: pathToDatabase) } } if database != nil { if database.open() { return true } } return false } |
At first the method checks if the database object has been initialised already or not, and it does so in case it’s still nil. Then, it tries to open the database. The return value of that method is a Bool value. When it’s true, the database has been successfully opened, otherwise either the database file doesn’t exist, or another error has been occurred and the database could not be opened. But generally, if the method returns true, then we’ve setup a handler to our database ready to be used (the database object), and most importantly, by implementing that method we don’t have to write the above lines every time we need to open the database. Feel free to extend the above implementation, and add more conditions, checks or error messages if you want.
In the previous part we composed a SQL query that creates the movies table:
|
1 |
let createMoviesTableQuery = "create table movies (movieID integer primary key autoincrement not null, title text not null, category text not null, year integer not null, movieURL text, coverURL text not null, watched bool not null default 0, likes integer not null)" |
That query is just fine, but there are potential risks in every subsequent query we’ll write next. The danger lies to the field names, and to the fact that we have to write the name literals in every query that we’ll create. If we continue doing so, then we might mistype the name of one or more fields, and that will result to errors. For example, if we are not careful enough, it’s easy to type wrongly “movieId” instead of “movieID”, or “movieurl” instead of “movieURL”. And it’s statistically certain that these kind of errors will happen if there are many queries regarding several tables. Okay, no big deal because sooner or later you’ll spot the problem(s), but why to lose time for that? There’s a good way to get rid of that risk, and that is to assign the field names (of all tables, in our case just one table) in constant properties. Let’s see what we can do in our case:
Go to the beginning of the DBManager class, and add the following:
|
1 2 3 4 5 6 7 8 |
let field_MovieID = "movieID" let field_MovieTitle = "title" let field_MovieCategory = "category" let field_MovieYear = "year" let field_MovieURL = "movieURL" let field_MovieCoverURL = "coverURL" let field_MovieWatched = "watched" let field_MovieLikes = "likes" |
I added the “field” prefix to make it easy to find the field you want when typing in Xcode. If you start by writing “field” then Xcode will auto-suggest all the properties that contain that term, and it’s easy to find the field name you’re interested in. The second part of each name is actually a short description about each field. You could advance it even more, and include the table name in each property as well:
|
1 |
let field_Movies_MovieID = "movieID" |
That’s not necessary here, we have just one table, but it makes a big difference if you have multiple tables and you follow the above naming convention.
By assigning the field names into constants, there’s no need to type any field name again, as we’ll be using the constants all over the place ensuring that no typo errors will exist. If we update our query, here’s how it’ll look like at the end:
|
1 |
let createMoviesTableQuery = "create table movies (\(field_MovieID) integer primary key autoincrement not null, \(field_MovieTitle) text not null, \(field_MovieCategory) text not null, \(field_MovieYear) integer not null, \(field_MovieURL) text, \(field_MovieCoverURL) text not null, \(field_MovieWatched) bool not null default 0, \(field_MovieLikes) integer not null)" |
There is no real need to use the above two practices I just showed in your projects. I’m just suggesting and recommending them, but it’s totally up to you to decide if you’ll be using them, if you’ll stick to the traditional way to write stuff, or if you’ll even find another better way to evolve them. But as far as our demo app is concerned, I’ll make use of both of them. And by saying that, it’s time to proceed.
Inserting Records
In this part we’ll insert some initial data into the database, and the source for that data is going to be the file called movies.tsv that already exists in the starter project (just spot it in the Project navigator). This file contains data for 20 movies, and the movie records in it are separated by the characters “\r\n” (without the quotes). A tab character (“\t”) separates the data for a single movie, and that format will make our parsing work really easy. The order of the data is the following:
- Movie title
- Category
- Year
- Movie URL
- Movie cover URL (A URL to an image of the movie, usually a front cover)
For the rest of the fields that exist in the table but there’s no data here, we’ll just insert some default values.
In the DBManager class, we’ll implement a new method that will do all the work for us. We’ll start by making use of the method implemented in the previous part so we open the database in one line only:
|
1 2 3 4 5 6 |
func insertMovieData() { // Open the database. if openDatabase() { } } |
The logic we’ll follow is this:
- At first we’ll locate the “movies.tsv” file, and we’ll load its contents into a String object.
- Then we’ll separate the movies data by breaking the string based on the /r/n substring, and we’ll come up with an array of strings (
[String]). Each position will hold the string with the data of a single movie. - Next, and by using a loop, we’ll go through all movies and fetch them one by one, and we’ll break each movie string similarly as above but this time based on the tab character (“\t”). That will result to a new array, where each position of it will contain a different piece of data of each movie. It’ll be really straightforward to use the data then, and compose the insert queries we want.
Beginning by the first point, let’s get the path of the “movies.tsv” file and let’s load its contents into a string object:
|
1 2 3 4 5 6 7 8 9 |
if let pathToMoviesFile = Bundle.main.path(forResource: "movies", ofType: "tsv") { do { let moviesFileContents = try String(contentsOfFile: pathToMoviesFile) } catch { print(error.localizedDescription) } } |
Creating a string with the contents of file can throw an exception, so using the do-catch statement is necessary. Now let’s proceed to the second point and let’s break the contents of the string into an array of strings based on the “\r\n” characters:
|
1 |
let moviesData = moviesFileContents.components(separatedBy: "\r\n") |
Reaching the third point now, let’s make a for loop and let’s break the data of each movie into arrays as well. Note that before the loop we’ll initialise another string value (called query) which we’ll use to compose the insert commands in a few seconds.
|
1 2 3 4 5 6 7 8 9 10 11 12 13 |
var query = "" for movie in moviesData { let movieParts = movie.components(separatedBy: "\t") if movieParts.count == 5 { let movieTitle = movieParts[0] let movieCategory = movieParts[1] let movieYear = movieParts[2] let movieURL = movieParts[3] let movieCoverURL = movieParts[4] } } |
Inside the body of the above if statement we’ll be composing our insert queries. As you’ll see in the next snippet, each query ends with a semicolon (;) symbol for a simple reason: We want to execute multiple queries at once, and SQLite will manage to distinguish them based on the ; symbol. Note two more things also: Firstly, for the field names I’m using the constant values we created previously. Secondly, pay attention to single quote symbols “‘” to string values inside the query. It’s possible to face problems if you omit any required ‘ symbol.
|
1 |
query += "insert into movies (\(field_MovieID), \(field_MovieTitle), \(field_MovieCategory), \(field_MovieYear), \(field_MovieURL), \(field_MovieCoverURL), \(field_MovieWatched), \(field_MovieLikes)) values (null, '\(movieTitle)', '\(movieCategory)', \(movieYear), '\(movieURL)', '\(movieCoverURL)', 0, 0);" |
For the last two fields we specify some default values for now. Later we’ll execute update queries to change them.
By the time the for loop ends, the query string will contain all the insert queries we want to execute (20 queries in total here). Executing multiple statements at once is easy with FMDB, as all we have to do is to make use of the executeStatements(_:) method through the database object:
|
1 2 3 4 |
if !database.executeStatements(query) { print("Failed to insert initial data into the database.") print(database.lastError(), database.lastErrorMessage()) } |
The lastError() and lastErrorMessage() shown above will become really useful to you in case the insert operation fails. Those two methods will report the encountered problem and most probably where exactly the error is, so you can easily fix it. That code snippet of course, has to be written after the closing of the loop.
Even though it might not sound important, do not forget (I repeat, do not forget) to close the connection to the database, so complete the code by adding a database.close() command. Here’s the insertMovieData() in one piece, after having completed its implementation:
|
1 2 3 4 5 6 7 8 9 10 11 12 13 14 15 16 17 18 19 20 21 22 23 24 25 26 27 28 29 30 31 32 33 34 35 36 |
func insertMovieData() { if openDatabase() { if let pathToMoviesFile = Bundle.main.path(forResource: "movies", ofType: "tsv") { do { let moviesFileContents = try String(contentsOfFile: pathToMoviesFile) let moviesData = moviesFileContents.components(separatedBy: "\r\n") var query = "" for movie in moviesData { let movieParts = movie.components(separatedBy: "\t") if movieParts.count == 5 { let movieTitle = movieParts[0] let movieCategory = movieParts[1] let movieYear = movieParts[2] let movieURL = movieParts[3] let movieCoverURL = movieParts[4] query += "insert into movies (\(field_MovieID), \(field_MovieTitle), \(field_MovieCategory), \(field_MovieYear), \(field_MovieURL), \(field_MovieCoverURL), \(field_MovieWatched), \(field_MovieLikes)) values (null, '\(movieTitle)', '\(movieCategory)', \(movieYear), '\(movieURL)', '\(movieCoverURL)', 0, 0);" } } if !database.executeStatements(query) { print("Failed to insert initial data into the database.") print(database.lastError(), database.lastErrorMessage()) } } catch { print(error.localizedDescription) } } database.close() } } |
Even though I gave enough attention on how to handle the data from the “movies.tsv” file and convert it in a way that can be used easily in code, the important is somewhere else regarding our topic: How to create multiple queries (remember to separate them with the ; symbol), and how to make a batch execution of them. That’s a feature of FMDB, and that’s the lesson for this part.
Before we say that we’re done here, there’s a last thing left to do; we must call our new methods that create the database and insert the initial data into the database. Open the AppDelegate.swift file, and spot the applicationDidBecomeActive(_:) delegate method. Add there the next two lines:
|
1 2 3 4 5 |
func applicationDidBecomeActive(_ application: UIApplication) { if DBManager.shared.createDatabase() { DBManager.shared.insertMovieData() } } |
Loading Data
In the MoviesViewController class there’s a tableview with the basic implementation already done, however it’s “waiting” for us to get that implementation completed so it’s possible to list the movies that we’ll load from the database. The datasource for that tableview is an array called movies, and it’s a collection of MovieInfo objects. The struct MovieInfo, which is also found in the MoviesViewController.swift file, consists of the programmatic representation of the movies table in the database, and an object of it describes a single movie. With that in mind, what we want in this part is to load the existing movies from the database and assign the details in MovieInfo objects, which we’ll use then to populate the data on the tableview.
Returning to the DBManager class once again, the most important goal here is to see how SELECT queries get executed in FMDB, and we’ll manage that by loading the movies data inside the body of a new custom method:
|
1 2 3 |
func loadMovies() -> [MovieInfo]! { } |
The return value of it is a collection of MovieInfo objects, what exactly we need in the MoviesViewController class. We’ll begin implementing that method by declaring a local array to store the results that will be loaded from the database, and by opening the database of course:
|
1 2 3 4 5 6 7 8 9 |
func loadMovies() -> [MovieInfo]! { var movies: [MovieInfo]! if openDatabase() { } return movies } |
Our next step is to create the SQL query that tells the database which data to load:
|
1 |
let query = "select * from movies order by \(field_MovieYear) asc" |
That query is executed as shown next:
|
1 2 3 4 5 6 |
do { let results = try database.executeQuery(query, values: nil) } catch { print(error.localizedDescription) } |
The executeQuery(...) method of the FMDatabase object gets two parameters: The query string, and an array of values that should be passed along with the query. If no values exist, setting nil is okay. The method returns a FMResultSet (it’s a FMDB class) object that contains any retrieved data, and we’ll see in a few moment how we access the returned data.
With the above query we’re just asking from FMDB to fetch all the movies ordered in an ascending order based on the release year. This is just a simple query given as an example, but more advanced queries can be created as per your needs too. Let’s see another one, a slightly more complicated one, where we load the movies of a specific category only, ordered by the year again, but in a descending order:
|
1 |
let query = "select * from movies where \(field_MovieCategory)=? order by \(field_MovieYear) desc" |
You see that the category name for the where clause is not specified in the query itself. Instead, we set a placeholder in the query and we’ll provide the actual value like it’s shown below (we’re saying to FMDB to load only the movies that belong to the Crime category):
|
1 |
let results = try database.executeQuery(query, values: ["Crime"]) |
Another example, where we load all the movies data for a specific category and release year greater than the year that we’ll specify, ordered by their ID values in a descending order:
|
1 |
let query = "select * from movies where \(field_MovieCategory)=? and \(field_MovieYear)>? order by \(field_MovieID) desc" |
The above expects two values to be provided along with the query:
|
1 |
let results = try database.executeQuery(query, values: ["Crime", 1990]) |
As you understand, there’s nothing particularly difficult when creating or executing queries, but still, feel free to create your own queries and experiment more on that.
Let’s continue now, and let’s make use of the returned data. In the following snippet we’re using a while loop to go through all returned records. For each one we are initialising a new MovieInfo object that we append to the movies array, and eventually create the collection of the data that will be displayed to the tableview.
|
1 2 3 4 5 6 7 8 9 10 11 12 13 14 15 16 17 |
while results.next() { let movie = MovieInfo(movieID: Int(results.int(forColumn: field_MovieID)), title: results.string(forColumn: field_MovieTitle), category: results.string(forColumn: field_MovieCategory), year: Int(results.int(forColumn: field_MovieYear)), movieURL: results.string(forColumn: field_MovieURL), coverURL: results.string(forColumn: field_MovieCoverURL), watched: results.bool(forColumn: field_MovieWatched), likes: Int(results.int(forColumn: field_MovieLikes)) ) if movies == nil { movies = [MovieInfo]() } movies.append(movie) } |
There’s an important, and mandatory requirement in the above code which always applies, no matter if you’re expecting multiple or single data to be fetched: The results.next() method should be always called. When having multiple records is used with the while statement; for single record results you can use it with an if statement:
|
1 2 3 |
if results.next() { } |
Another detail you should keep in mind: Each movie object is initialised using the default initialiser for the MovieInfo struct. That’s possible to happen in our example, because we are asking all the fields to be returned for each record that will be retrieved in our query (select * from movies ...). If, however, you decide that you want to get a subset of the fields (for example, select (field_MovieTitle), (field_MovieCoverURL) from movies where ...) then the above initialiser won’t work and the app will just crash. And that happens because any results.XXX(forColumn:) method that tries to fetch data for not loaded fields will find nil instead of real values. So, watch that out and always keep in mind what fields you’ve asked to be loaded from the database when you handle the results, and you’ll manage to keep yourself out of troubles.
Let’s see now the method we created here in one piece:
|
1 2 3 4 5 6 7 8 9 10 11 12 13 14 15 16 17 18 19 20 21 22 23 24 25 26 27 28 29 30 31 32 33 34 35 36 37 |
func loadMovies() -> [MovieInfo]! { var movies: [MovieInfo]! if openDatabase() { let query = "select * from movies order by \(field_MovieYear) asc" do { print(database) let results = try database.executeQuery(query, values: nil) while results.next() { let movie = MovieInfo(movieID: Int(results.int(forColumn: field_MovieID)), title: results.string(forColumn: field_MovieTitle), category: results.string(forColumn: field_MovieCategory), year: Int(results.int(forColumn: field_MovieYear)), movieURL: results.string(forColumn: field_MovieURL), coverURL: results.string(forColumn: field_MovieCoverURL), watched: results.bool(forColumn: field_MovieWatched), likes: Int(results.int(forColumn: field_MovieLikes)) ) if movies == nil { movies = [MovieInfo]() } movies.append(movie) } } catch { print(error.localizedDescription) } database.close() } return movies } |
And let’s make use of it, so we manage to populate the movies data on the tableview. Open the MoviesViewController.swift file, and implement the viewWillAppear(_:) method. Add the following two lines that will load the movies data using the above method, and that will trigger a reload on the tableview:
|
1 2 3 4 5 6 |
override func viewWillAppear(_ animated: Bool) { super.viewWillAppear(animated) movies = DBManager.shared.loadMovies() tblMovies.reloadData() } |
But yet, we have to specify the contents of each cell in the tableView(_:, cellForRowAt indexPath:) method. As this is not an essential part of our topic, I’m giving the implementation all at once:
|
1 2 3 4 5 6 7 8 9 10 11 12 13 14 15 16 17 18 19 |
func tableView(_ tableView: UITableView, cellForRowAt indexPath: IndexPath) -> UITableViewCell { let cell = tableView.dequeueReusableCell(withIdentifier: "cell", for: indexPath) let currentMovie = movies[indexPath.row] cell.textLabel?.text = currentMovie.title cell.imageView?.contentMode = UIViewContentMode.scaleAspectFit (URLSession(configuration: URLSessionConfiguration.default)).dataTask(with: URL(string: currentMovie.coverURL)!, completionHandler: { (imageData, response, error) in if let data = imageData { DispatchQueue.main.async { cell.imageView?.image = UIImage(data: data) cell.layoutSubviews() } } }).resume() return cell } |
Each movie image is downloaded asynchronously and is displayed on the cell when its data becomes available. I hope that the URLSession block doesn’t confuse you; written in multiple lines it would look like this:
|
1 2 3 4 5 6 7 8 9 10 11 |
let sessionConfiguration = URLSessionConfiguration.default let session = URLSession(configuration: URLSessionConfiguration.default) let task = session.dataTask(with: URL(string: currentMovie.coverURL)!) { (imageData, response, error) in if let data = imageData { DispatchQueue.main.async { cell.imageView?.image = UIImage(data: data) cell.layoutSubviews() } } } task.resume() |
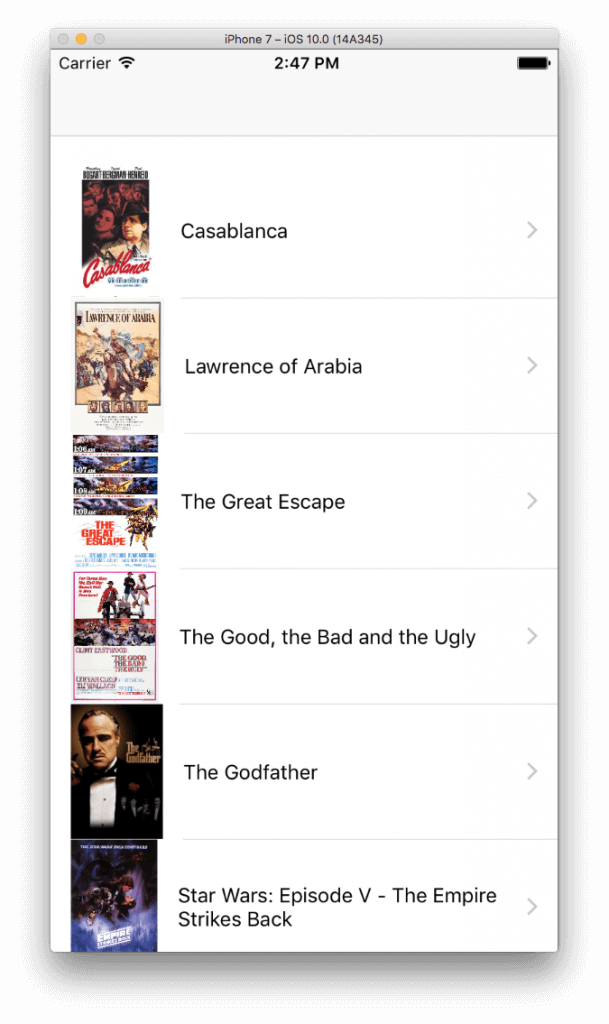
Anyway, you can now run the app for first time. At first launch, the database will be created and the initial data will be inserted to it. Next, the data will be loaded and the movies will be displayed on the tableview, like it’s shown in the next screenshot:
Updating
We need our app to display the movie details when we tap on a cell in the tableview, meaning that we want to present the MovieDetailsViewController and fill it with the details of the selected movie. Even though the easiest approach would be to just pass the selected MovieInfo object to the MovieDetailsViewController, we’ll choose a different path. We’ll pass the movie ID, and then we’ll load the movie from the database. I’ll explain the purpose of that later.
We’ll begin by updating the method that prepares the segue that will present the MovieDetailsViewController, so we still stick to the MoviesViewController.swift file. There’s an initial implementation of it, so just update it as follows (add the two lines in the inner if statement):
|
1 2 3 4 5 6 7 8 |
override func prepare(for segue: UIStoryboardSegue, sender: Any?) { if let identifier = segue.identifier { if identifier == "idSegueMovieDetails" { let movieDetailsViewController = segue.destination as! MovieDetailsViewController movieDetailsViewController.movieID = movies[selectedMovieIndex].movieID } } } |
The selectedMovieIndex property gets its value in the following tableview method that’s already implemented in the starter project:
|
1 2 3 4 |
func tableView(_ tableView: UITableView, didSelectRowAt indexPath: IndexPath) { selectedMovieIndex = indexPath.row performSegue(withIdentifier: "idSegueMovieDetails", sender: nil) } |
Also, there’s a property named movieID in the MovieDetailsViewController, so the above code will work just fine.
Now that we passed the selected movie’s ID to the next view controller, we need to write a new method that will load the data for the movie specified by that ID. There will be no database-related stuff that we haven’t already seen before inside that method. However, there will be a difference: Normally you would expect this method to return a MovieInfo object. Well, not! Instead of a return value, we’ll use a completion handler to pass the fetched data back to the MovieDetailsViewController class, and that’s exactly my purpose at that point; to show how you can use completion handlers instead of return values when fetching data from the database.
Let’s go to the DBManager.swift file, and let’s see the header line of our new method:
|
1 2 3 |
func loadMovie(withID ID: Int, completionHandler: (_ movieInfo: MovieInfo?) -> Void) { } |
As you see, there are two parameters here: The first is the ID of the movie we want to load. The second is the completion handler, which in turn has one parameter, the loaded movie as a MovieInfo object.
Regarding its implementation now, here it is at once. Whatever you’ll see there has been discussed already:
|
1 2 3 4 5 6 7 8 9 10 11 12 13 14 15 16 17 18 19 20 21 22 23 24 25 26 27 28 29 30 31 32 33 34 |
func loadMovie(withID ID: Int, completionHandler: (_ movieInfo: MovieInfo?) -> Void) { var movieInfo: MovieInfo! if openDatabase() { let query = "select * from movies where \(field_MovieID)=?" do { let results = try database.executeQuery(query, values: [ID]) if results.next() { movieInfo = MovieInfo(movieID: Int(results.int(forColumn: field_MovieID)), title: results.string(forColumn: field_MovieTitle), category: results.string(forColumn: field_MovieCategory), year: Int(results.int(forColumn: field_MovieYear)), movieURL: results.string(forColumn: field_MovieURL), coverURL: results.string(forColumn: field_MovieCoverURL), watched: results.bool(forColumn: field_MovieWatched), likes: Int(results.int(forColumn: field_MovieLikes)) ) } else { print(database.lastError()) } } catch { print(error.localizedDescription) } database.close() } completionHandler(movieInfo) } |
At the end of the method we call the completion handler passing the movieInfo object, no matter if it’s been initialised with the movie values, or it’s nil because something went wrong.
In the MovieDetailsViewController.swift now, we’ll go straight ahead to the viewWillAppear(_:) method and we’ll call the above one:
|
1 2 3 4 5 6 7 8 9 10 11 12 13 14 |
override func viewWillAppear(_ animated: Bool) { super.viewWillAppear(animated) if let id = movieID { DBManager.shared.loadMovie(withID: id, completionHandler: { (movie) in DispatchQueue.main.async { if movie != nil { self.movieInfo = movie self.setValuesToViews() } } }) } } |
Two things to mention here: First, the movie object in the completion handler is assigned to the (already declared) movieInfo property, so we can use the fetched values throughout the class. Second, we use the main thread (DispatchQueue.main) because the setValuesToViews() method will update the UI, and that’s something that should always happen on the main thread. If the outcome of the above is successful and we manage to fetch a movie properly, then its details will be populated to the proper views. That’s something you can try even now if you run the app and select a movie:

But that’s not enough. We want to be able to update the database and the data for the specific movie, and keep track of the watched state (if we’ve watched the movie), as well as to rate it according to how much we liked it. It’s easy to achieve that, as we just need to write a new method in the DBManager class that will perform the update. So, back to the DBManager.swift file, let’s add the next one:
|
1 2 3 4 5 6 7 8 9 10 11 12 13 14 |
func updateMovie(withID ID: Int, watched: Bool, likes: Int) { if openDatabase() { let query = "update movies set \(field_MovieWatched)=?, \(field_MovieLikes)=? where \(field_MovieID)=?" do { try database.executeUpdate(query, values: [watched, likes, ID]) } catch { print(error.localizedDescription) } database.close() } } |
That method accepts three parameters: The ID of the movie we want to update, a Bool value indicating if the movie has been watched or not, and the number of likes we give to the movie. Creating the query is easy, and according to whatever we discussed previously. The interesting part here is the executeUpdate(...) method that we’ve seen already when we created the database. This method is the one that you have to use to perform any kind of changes to the database, or to say it otherwise, you use it when you don’t execute Select statements. The second parameter of that method is again an array of Any objects that you pass along with the query that will be executed.
Optionally, we could return a Bool value to indicate if the update was successful or not, but it’s not that interesting in our case. But undoubtedly it would have been an important addition if we would deal with more crucial data.
Let’s return now to the MovieDetailsViewController.swift file, as it’s about time to use the above method. Spot the saveChanges(_:) IBAction method, and add the following contents:
|
1 2 3 4 5 |
@IBAction func saveChanges(_ sender: AnyObject) { DBManager.shared.updateMovie(withID: movieInfo.movieID, watched: movieInfo.watched, likes: movieInfo.likes) _ = self.navigationController?.popViewController(animated: true) } |
With the above added, the app will update the movie with the watched state and the likes every time we tap on the Save button, and then it will return back to the MoviesViewController.
Delete Records
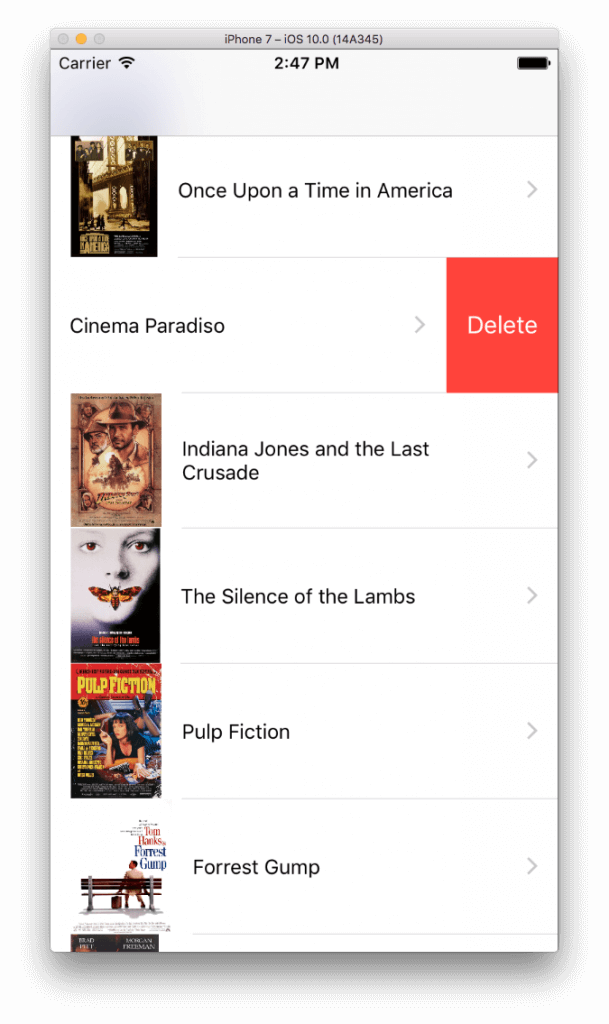
So far we’ve seen how to create a database programmatically, how to execute batch statements, how to load data and how to update. There’s one last thing remaining to be seen, and that is how to delete existing records. We’ll keep things simple, and we’ll allow the deletion of a movie by swiping a cell to the left side, so the usual red Delete button appears.
Before we get there, let’s pay a visit for last time in the DBManager class. Our task is to implement a new method that will perform the deletion of the record matching to the movie we’ve selected to delete. Once again, you’ll see that the executeUpdate(...) method of the FMDatabase class will be used to execute the query that we’ll create. Without losing any more time, let’s see that new method implemented:
|
1 2 3 4 5 6 7 8 9 10 11 12 13 14 15 16 17 18 19 |
func deleteMovie(withID ID: Int) -> Bool { var deleted = false if openDatabase() { let query = "delete from movies where \(field_MovieID)=?" do { try database.executeUpdate(query, values: [ID]) deleted = true } catch { print(error.localizedDescription) } database.close() } return deleted } |
There’s nothing new here that worths to be discussed, except for the fact that the method returns a Bool value to indicate if the deletion was successful or not. We’ll need that information, because we have to update the datasource of the tableview (the movies array) and the tableview accordingly as you’ll see next.
Now, let’s go to the MoviesViewController and let’s implement the following tableview method:
|
1 2 3 4 5 |
func tableView(_ tableView: UITableView, commit editingStyle: UITableViewCellEditingStyle, forRowAt indexPath: IndexPath) { if editingStyle == .delete { } } |
The above will enable the red Delete button and make it available for us when we swipe from right to left. We’ll complete the if statement by calling the deleteMovie(_:) method, and if it’s successful we’ll remove the matching MovieInfo object from the movies array. Lastly we’ll reload the tableview to make the respective movie cell go away:
|
1 2 3 4 5 6 7 8 |
func tableView(_ tableView: UITableView, commit editingStyle: UITableViewCellEditingStyle, forRowAt indexPath: IndexPath) { if editingStyle == .delete { if DBManager.shared.deleteMovie(withID: movies[indexPath.row].movieID) { movies.remove(at: indexPath.row) tblMovies.reloadData() } } } |
You can now run the app again and try to delete a movie. The database will be updated by deleting the movie you select, and that movie won’t be there whenever you run the app from now on.
Summary
If you are familiarised with SQL queries and you like to deal with the database in a fashion similar to what we’ve seen on this post, then FMDB is the appropriate tool for you. It’s easy to integrate it into your project, it’s easy to use it as an API as there are no many methods or classes you have to deal with, but most importantly it takes you out of the hassle to establish the required connection to the database and then “talk” to it. The rules that must be followed are few, with the most important one being that you have to open and close the database before and after any operation.
Even though in our example we had one table in our database only, it’s easy to apply what you’ve learnt in multiple tables as well. Besides that, there’s another point I’d like to mention about. We started the demo app by creating the database programmatically, but that’s not the only way to do it. You can create your database using an SQLite manager and specify the tables and their fields in an easy and graphical way, and then put the database file in your application bundle. However, you’ll have to copy it to the documents directory if you’re planning to make changes through the app into the database. But it’s totally up to you how you’ll create your database, I just had to mention that option as well.
Regarding the FMDB library, there are more advanced things that have not been covered here. However, talking about those things would be out of my original goal for this topic, so it might be a future discussion. So, now, all you have to do is to experiment with FMDB and see if it’s suitable for you or not. I really hope what you’ve read here to be of as much help as possible. Closing, a big thanks to the creator Gus Mueller, and don’t forget to visit the FMDB’s GitHub page. You’ll find more to read, and probably solutions to any issues that you may encounter. Enjoy!
For reference, you can check out the full project on GitHub.

Gabriel has been a software developer for almost about two decades and he’s got long experience in programming using various languages. iOS development is what he’s being doing since 2010. On top of that, he’s added macOS programming to his repertoire over the last few years. Using Swift of course! Follow Gabriel at Google+ and Twitter.
Comments
 Scott Brown
AuthorHello. Great article. I have an issue. I am getting db error 1: no such table. This seems to be a moody issue. Just to save time. I have gotten the data from the database in the past. I also have the database stored in documents. What else am I missing? I’d really like to solve this once and for all.
 Yusuf
Yusuf
AuthoriPhone 7 simulator giving error bro.Try another simulator.
 Claudio
AuthorHi Gabriel, Excellent article. It was just I was searching. It will change my life kkkkk.
Thank you a lot!
 Vinnie
AuthorThanks for the great article! Very helpful. If you wanted to keep the data stored for the next time the app is opened, how would you go about doing that?
 Marco Nogueira
AuthorThanks Gabriel, your code helped me fixing my code. I had a problem with my FMDatabase path and your code “database = FMDatabase(path: pathToDatabase!)” was the right way to fix it. [Xcode 8.2 and Swift 3].
 VARUN
VARUN
AuthorHow to build this project in objective c?
 kelomaniack
AuthorHey, thank you very much Gabriel! Very great article! Everything was really clear explained and was really helpful! Thanks!
 asdf
asdf
Authorcome on, make the tutorial without the starter project
 shaik bajibaba
AuthorHey , How to add the data in sqlite tables and see the stored data in Sqlite Database ?? Actually i have done one login form and register form , so i want to save the data in mysql database and want to see the data in the tables database in sqlite which i have entered for login and register forms in swift can u do this Budyy please reply me Email id : [email protected]
 rolling Ztoned
Authori wanted to create 2 tables into a db. with a primary key and foreign key and extract details from both tables based on foreign key. i was trying to write the query for this, so far no luck always gets syntax error.
coursesTable and profTable with a primary key of courseNo and foreignkey of courseName which is actually same for both tables..
how to create insert and load?
 Osama Ibrahim
Authorhello
i did all the above steps one by one but iam getting :
Use of undeclared type ‘FMDatabase’ !!!!!
 DevPPS
AuthorI was getting the same error. I moved all of the FMDB files out of the group and then the error went away.
 Alek
Alek
AuthorThis is actually a great tutorial, but does the SQLite database persist between closing the app and reopening etc?…
 Binal Patel
Authorwrite code in viewcontroller
import UIKit
class ViewController: UIViewController,UITableViewDataSource,UITableViewDelegate
{
@IBOutlet weak var mt: UITableView!
var strurl : String? = “nil”
var arrname:[String]=[]
var arrid:[String]=[]
var arrgender:[String]=[]
var arrhome:[String]=[]
var arrmobile:[String]=[]
var arroffice:[String]=[]
var arremail:[String]=[]
var arradd:[String]=[]
override func viewDidLoad() {
super.viewDidLoad()
callweb()
// Do any additional setup after loading the view, typically from a nib.
}
func callweb()
{
strurl = “http://api.androidhive.info/contacts”
let dco = URLSessionConfiguration.default //default config object
let du = URLSession(configuration: dco, delegate: nil, delegateQueue: OperationQueue.main) //default session
let url = URL(string: strurl!)
let urlR = NSMutableURLRequest(url: url!) //urlrequest
//let par:String? = “nil”
urlR.httpMethod = “GET”
//urlR.httpBody = par?.data(using: .utf8)
let task = du.dataTask(with: urlR as URLRequest, completionHandler:
{
(data,response,error) in
if let _:Data = data , let _:URLResponse = response , error == nil
{
print(“error ::: (String(describing: error?.localizedDescription))”)
}
let datastr = NSString(data: data!, encoding: String.Encoding.utf8.rawValue)
print(“response::: (String(describing: datastr))”)
do{
let allcontents = try JSONSerialization.jsonObject(with: data!, options: .mutableLeaves) as! [String:AnyObject]
// print(allcontents)
if let arrjson = allcontents[“contacts”]
{
print(“contacts ::: (arrjson)”)
for i in 0..<arrjson.count
{
let aobject = arrjson[i] as! [String:AnyObject]
print("aobject :::: (aobject)")
print(aobject["name"] as! String)
self.arrname.append(aobject["name"] as! String)
print(aobject["address"] as! String)
self.arradd.append(aobject["address"] as! String)
print(aobject["id"] as! String)
self.arrid.append(aobject["id"] as! String)
print(aobject["email"] as! String)
self.arremail.append(aobject["email"] as! String)
print(aobject["gender"] as! String)
self.arrgender.append(aobject["gender" as String] as! String)
let dp = aobject["phone"] as AnyObject
for _ in 0.. Int
{
return arrid.count
}
public func tableView(_ tableView: UITableView, cellForRowAt indexPath: IndexPath) -> UITableViewCell
{
let cell : custom = tableView.dequeueReusableCell(withIdentifier: “cell”) as! custom
cell.lblid.text = self.arrid[indexPath.row]
cell.lblname.text = self.arrname[indexPath.row]
cell.lbladd.text = self.arradd[indexPath.row]
cell.lblgender.text = self.arrgender[indexPath.row]
cell.lblemail.text = self.arremail[indexPath.row]
cell.lblhome.text = self.arrhome[indexPath.row]
cell.lblmobile.text = self.arrmobile[indexPath.row]
cell.lbloffice.text = self.arroffice[indexPath.row]
return cell
}
override func didReceiveMemoryWarning() {
super.didReceiveMemoryWarning()
// Dispose of any resources that can be recreated.
}
}
customcell file
import UIKit
class ViewController: UIViewController,UITableViewDataSource,UITableViewDelegate
{
@IBOutlet weak var mt: UITableView!
var strurl : String? = “nil”
var arrname:[String]=[]
var arrid:[String]=[]
var arrgender:[String]=[]
var arrhome:[String]=[]
var arrmobile:[String]=[]
var arroffice:[String]=[]
var arremail:[String]=[]
var arradd:[String]=[]
override func viewDidLoad() {
super.viewDidLoad()
callweb()
// Do any additional setup after loading the view, typically from a nib.
}
func callweb()
{
strurl = “http://api.androidhive.info/contacts”
let dco = URLSessionConfiguration.default //default config object
let du = URLSession(configuration: dco, delegate: nil, delegateQueue: OperationQueue.main) //default session
let url = URL(string: strurl!)
let urlR = NSMutableURLRequest(url: url!) //urlrequest
//let par:String? = “nil”
urlR.httpMethod = “GET”
//urlR.httpBody = par?.data(using: .utf8)
let task = du.dataTask(with: urlR as URLRequest, completionHandler:
{
(data,response,error) in
if let _:Data = data , let _:URLResponse = response , error == nil
{
print(“error ::: (String(describing: error?.localizedDescription))”)
}
let datastr = NSString(data: data!, encoding: String.Encoding.utf8.rawValue)
print(“response::: (String(describing: datastr))”)
do{
let allcontents = try JSONSerialization.jsonObject(with: data!, options: .mutableLeaves) as! [String:AnyObject]
// print(allcontents)
if let arrjson = allcontents[“contacts”]
{
print(“contacts ::: (arrjson)”)
for i in 0..<arrjson.count
{
let aobject = arrjson[i] as! [String:AnyObject]
print("aobject :::: (aobject)")
print(aobject["name"] as! String)
self.arrname.append(aobject["name"] as! String)
print(aobject["address"] as! String)
self.arradd.append(aobject["address"] as! String)
print(aobject["id"] as! String)
self.arrid.append(aobject["id"] as! String)
print(aobject["email"] as! String)
self.arremail.append(aobject["email"] as! String)
print(aobject["gender"] as! String)
self.arrgender.append(aobject["gender" as String] as! String)
let dp = aobject["phone"] as AnyObject
for _ in 0.. Int
{
return arrid.count
}
public func tableView(_ tableView: UITableView, cellForRowAt indexPath: IndexPath) -> UITableViewCell
{
let cell : custom = tableView.dequeueReusableCell(withIdentifier: “cell”) as! custom
cell.lblid.text = self.arrid[indexPath.row]
cell.lblname.text = self.arrname[indexPath.row]
cell.lbladd.text = self.arradd[indexPath.row]
cell.lblgender.text = self.arrgender[indexPath.row]
cell.lblemail.text = self.arremail[indexPath.row]
cell.lblhome.text = self.arrhome[indexPath.row]
cell.lblmobile.text = self.arrmobile[indexPath.row]
cell.lbloffice.text = self.arroffice[indexPath.row]
return cell
}
override func didReceiveMemoryWarning() {
super.didReceiveMemoryWarning()
// Dispose of any resources that can be recreated.
}
}
 Binal Patel
AuthorApp Constant.copyFile(“student.db”)
////////////////////
class ViewController: UIViewController,UITableViewDelegate,UITableViewDataSource {
var arrMainData:NSMutableArray!
@IBOutlet var tbl:UITableView!
override func viewDidLoad() {
super.viewDidLoad()
}
override func viewWillAppear(_ animated: Bool) {
fetchDatabaseData1()
}
func fetchDatabaseData1()
{
arrMainData = NSMutableArray()
arrMainData = DatabaseManager.getDB().getAllStudentData()
tbl.reloadData()
}
//uitableview delegate methods…
func tableView(_ tableView: UITableView, numberOfRowsInSection section: Int) -> Int {
return arrMainData.count
}
func tableView(_ tableView: UITableView, cellForRowAt indexPath: IndexPath) -> UITableViewCell {
let cell:customTableViewCell = tableView.dequeueReusableCell(withIdentifier: “cell”) as! customTableViewCell
let studInfo:StudentInfo = arrMainData[indexPath.row] as! StudentInfo
cell.lblRollNo.text = studInfo.rollNo
cell.lblname.text = studInfo.name
cell.lblMarks.text = studInfo.marks
cell.btnDelete.tag = indexPath.row//(must define tag here of button/imageview etc. inside cell)
cell.btnEdit.tag = indexPath.row//(must define tag here of button/imageview etc. inside cell)
return cell
}
@IBAction func btnDeleteAction(sender:AnyObject)
{
let btnDlete:UIButton = sender as! UIButton
let selectedIndex:Int = btnDlete.tag
let selectedRow:StudentInfo = arrMainData[selectedIndex] as! StudentInfo
let isDelete = DatabaseManager.getDB().deleteStudentData(studentInfo: selectedRow)
if isDelete
{
Constant.invokeAlertMethod(“Alert!”, strBody: “Record deleted successfully”, delegate: nil)
}
else
{
Constant.invokeAlertMethod(“Alert!”, strBody: “Record not deleted successfully”, delegate: nil)
}
self.fetchDatabaseData1()
}
@IBAction func btnUpdateActionCLicked(_ sender: AnyObject)
{
self.performSegue(withIdentifier: “editSegue”, sender: sender)
}
// MARK: – Navigation
// In a storyboard-based application, you will often want to do a little preparation before navigation
override func prepare(for segue: UIStoryboardSegue, sender: Any?)
{
// Get the new view controller using segue.destinationViewController.
// Pass the selected object to the new view controller.
if segue.identifier == “editSegue”
{
let btnEdit:UIButton = sender as! UIButton
let selectedIndex1:Int = btnEdit.tag
let secondVC = segue.destination as! InsertViewController
secondVC.studInfo = arrMainData[selectedIndex1] as! StudentInfo
secondVC.isEdit = true
}
}
override func didReceiveMemoryWarning() {
super.didReceiveMemoryWarning()
// Dispose of any resources that can be recreated.
}
}
/////////////////////////////
import UIKit
class customTableViewCell: UITableViewCell {
@IBOutlet var lblRollNo:UILabel!
@IBOutlet var lblname :UILabel!
@IBOutlet var lblMarks:UILabel!
@IBOutlet var btnDelete:UIButton!
@IBOutlet var btnEdit:UIButton!
override func awakeFromNib() {
super.awakeFromNib()
// Initialization code
}
override func setSelected(_ selected: Bool, animated: Bool) {
super.setSelected(selected, animated: animated)
// Configure the view for the selected state
}
}
////////////////
import UIKit
class InsertViewController: UIViewController {
@IBOutlet weak var txtName: UITextField!
@IBOutlet weak var txtMarks: UITextField!
var studInfo :StudentInfo!
var isEdit:Bool = false
override func viewDidLoad()
{
super.viewDidLoad()
if isEdit
{
print(studInfo)
print(studInfo.rollNo)
print(studInfo.name)
txtName.text = studInfo.name
print(studInfo.marks)
txtMarks.text = studInfo.marks
}
}
@IBAction func saveButtonClicked(_ sender: AnyObject)
{
if txtName.text == “”
{
Constant.invokeAlertMethod(“alert!”, strBody: “Please enter name first”, delegate: nil)
}
else if txtMarks.text == “”
{
Constant.invokeAlertMethod(“alert!”, strBody: “Please enter marks”, delegate: nil)
}
else
{
if isEdit
{
let student_info1 :StudentInfo = StudentInfo()
student_info1.rollNo = studInfo.rollNo
student_info1.name = txtName.text!
student_info1.marks = txtMarks.text!
let isUpdated = DatabaseManager.getDB().updateStudentData(_studentInfo:student_info1)
if isUpdated
{
Constant.invokeAlertMethod(“alert!”, strBody: “Record updated Successfully”, delegate: nil)
}
else
{
Constant.invokeAlertMethod(“alert!”, strBody: “Error in updating record”, delegate: nil)
}
}
else
{
// Insert code
let student_info :StudentInfo = StudentInfo()
student_info.name = txtName.text!
student_info.marks = txtMarks.text!
let inserted = DatabaseManager.getDB().studentInsrtData(_studInfo: student_info)//calling studentInsrtData Function from DatabaseManger class with getDB() Instance
if inserted
{
Constant.invokeAlertMethod(“alert!”, strBody: “Record inserted Successfully”, delegate: nil)
}
else
{
Constant.invokeAlertMethod(“alert!”, strBody: “Error in inserting record”, delegate: nil)
}
}
self.navigationController!.popViewController(animated: true)//back to previous viewcontroller
}
}
override func didReceiveMemoryWarning() {
super.didReceiveMemoryWarning()
// Dispose of any resources that can be recreated.
}
///////////////
import UIKit
import FMDB
let sharedInstane = DatabaseManager()
class DatabaseManager: NSObject
{
var database: FMDatabase? = nil
//get Database from whole path in app for perform CRUD Operation
class func getDB()->DatabaseManager
{
if sharedInstane.database == nil
{
sharedInstane.database = FMDatabase(path: Constant.getPath(“student.db”))
}
return sharedInstane
}
//function for insert query
func studentInsrtData(_studInfo:StudentInfo)->Bool
{
sharedInstane.database?.open()
let isInsert = sharedInstane.database!.executeUpdate(“INSERT INTO student_info(Name,Marks) VALUES (?,?)”, withArgumentsIn: [_studInfo.name,_studInfo.marks])
sharedInstane.database!.close()
return isInsert
}
//Function for Fetching Records from Database to tablview
func getAllStudentData() -> NSMutableArray
{
sharedInstane.database!.open()
let resultSet :FMResultSet! = sharedInstane.database!.executeQuery(“SELECT * FROM student_info”, withArgumentsIn: [])
let arrStudentinfo :NSMutableArray = NSMutableArray()
if resultSet != nil
{
while resultSet.next()
{
let student_info :StudentInfo = StudentInfo()
student_info.rollNo = resultSet.string(forColumn: “RollNo”)!
student_info.name = resultSet.string(forColumn: “Name”)!
student_info.marks = resultSet.string(forColumn: “Marks”)!
arrStudentinfo.add(student_info)
}
}
sharedInstane.database?.close()
return arrStudentinfo
}
//fUCNTION delete query
func deleteStudentData(studentInfo: StudentInfo) -> Bool
{
sharedInstane.database!.open()
let isDeleted = sharedInstane.database!.executeUpdate(“DELETE FROM student_info WHERE RollNo=?”, withArgumentsIn: [studentInfo.rollNo])
sharedInstane.database!.close()
return isDeleted
}
//function update query
func updateStudentData(_studentInfo:StudentInfo) -> Bool {
sharedInstane.database!.open()
let isUpdated = sharedInstane.database!.executeUpdate(“UPDATE student_info SET Name=?,Marks=? WHERE RollNo=?”, withArgumentsIn: [_studentInfo.name,_studentInfo.marks,_studentInfo.rollNo])
sharedInstane.database!.close()
return isUpdated
}
}
////////////////////
import UIKit
class StudentInfo: NSObject {
var rollNo:String = String()
var name:String = String()
var marks:String = String()
}
////////////////////
import UIKit
class Constant: NSObject {
class func getPath(_ fileName: String) -> String
{
let documentsURL = FileManager.default.urls(for: .documentDirectory, in: .userDomainMask)[0]
let fileURL = documentsURL.appendingPathComponent(fileName)
print(“Database Path:::(fileURL)”)
return fileURL.path
}
//CopyDatabase
class func copyFile(_ fileName: NSString)
{
let dbPath: String = getPath(fileName as String)
let fileManager = FileManager.default//NSFileManager class on File and directories
if !fileManager.fileExists(atPath: dbPath)
{
let documentsURL = Bundle.main.resourceURL
let fromPath = documentsURL!.appendingPathComponent(fileName as String)
var error : NSError?
do
{
//You can use NSFileManager class on File and directories for following operations Locate, Create, Copy, Move. It provides copyItemAtPath() function to copy files from source to destination.
try fileManager.copyItem(atPath: fromPath.path, toPath: dbPath)
}
catch let error1 as NSError
{
error = error1
}
//Custom Alert
let alert: UIAlertView = UIAlertView()
if (error != nil)
{
alert.title = “Error Occured”
alert.message = error?.localizedDescription
}
else
{
alert.title = “Successfully Copy”
alert.message = “Your database copy successfully”
}
alert.delegate = nil
alert.addButton(withTitle: “Ok”)
alert.show()
}
}
class func invokeAlertMethod(_ strTitle: NSString, strBody: NSString, delegate: AnyObject?)
{
let alert: UIAlertView = UIAlertView()
alert.message = strBody as String
alert.title = strTitle as String
alert.delegate = delegate
alert.addButton(withTitle: “Ok”)
alert.addButton(withTitle: “Cancel”)
alert.show()
}
}
 Binal Patel
Authorthirdparty
https://github.com/ccgus/fmdb
App
Util.copyFile(“Student.sqlite”)
//1)FMDatabase -> Used to represent single SQLite Database.
//2)FMResultSet-> Used to hold result of SQL query on FMDatabase object.
/////////////////////////
import UIKit
class StudentCell: UITableViewCell {
@IBOutlet weak var lblContent: UILabel!
@IBOutlet weak var btnEdit: UIButton!
@IBOutlet weak var btnDelete: UIButton!
override func awakeFromNib() {
super.awakeFromNib()
// Initialization code
}
/////////////////////
import UIKit
//Create Model Manager here…it ‘s called (Singleton class)
//1)What is Singleton Class?
//Singleton is a special type of class, in which only one instance of class exists for current process. Instance is shared across the entire application. It is useful when one or more ViewController uses the same instance throughout application.
//In our case, model manager uses object of Model class to perform various operations on database. It basically handles the object of model so we called it as Model Manager.
//2)Why we are using it in our application?
//Here we are creating singleton class to achieve following:
//2.1)Database instance remain globally persistent throughout the application.
//2.2)Thread safe
//2.3)Database should remain in consistent state all the time since our application can get interrupted.
//Create singleton class ModelManager.
//Define constant named sharedInstance of type ModelManager.
let sharedInstance = ModelManager()
//Querying Database through Model Manager
//Querying database basically includes following steps:
//Step-1)Open database connection.
//Step-2)Call method to execute SQL query.
//executeUpdate:withArgumentsInArray: (SQL Insert/update/delete query and its parameters as argument): This method executes a single SQL update statement, SQL statements that does not return any results, such as INSERT, UPDATE and DELETE.
//Step-3)executeQuery: (SQL select query and its parameters as argument.): This method executes SQL select statements and returns an FMResultSet object if successful, and nil for failure. FMResultSet returned by this method will be added to NSMUtableArray and x() method returns whole array.
//Step-4)Handle the result.
//Step-5)Close database connection.
class ModelManager: NSObject
{
var database: FMDatabase? = nil
//CopyDatabase
class func getInstance() -> ModelManager
{
if(sharedInstance.database == nil)
{
sharedInstance.database = FMDatabase(path: Util.getPath(_fileName: “Student.sqlite”))
}
return sharedInstance
}
//Insert Function Query
func addStudentData(_ studentInfo: StudentInfo) -> Bool
{
sharedInstance.database!.open()
let isInserted = sharedInstance.database!.executeUpdate(“INSERT INTO student_info (Name, Marks) VALUES (?, ?)”, withArgumentsIn: [studentInfo.Name, studentInfo.Marks])
sharedInstance.database!.close()
return isInserted
}
//Update Function Query
func updateStudentData(_ studentInfo: StudentInfo) -> Bool
{
sharedInstance.database!.open()
let isUpdated = sharedInstance.database!.executeUpdate(“UPDATE student_info SET Name=?, Marks=? WHERE RollNo=?”, withArgumentsIn: [studentInfo.Name, studentInfo.Marks, studentInfo.RollNo])
sharedInstance.database!.close()
return isUpdated
}
//dELETE Function Query
func deleteStudentData(_ studentInfo: StudentInfo) -> Bool
{
sharedInstance.database!.open()
let isDeleted = sharedInstance.database!.executeUpdate(“DELETE FROM student_info WHERE RollNo=?”, withArgumentsIn: [studentInfo.RollNo])
sharedInstance.database!.close()
return isDeleted
}
//Select Function Query
func getAllStudentData() -> NSMutableArray
{
sharedInstance.database!.open()
let resultSet: FMResultSet! = sharedInstance.database!.executeQuery(“SELECT * FROM student_info”, withArgumentsIn: nil)
let marrStudentInfo : NSMutableArray = NSMutableArray()
if (resultSet != nil)
{
while resultSet.next()
{
let studentInfo : StudentInfo = StudentInfo()
studentInfo.RollNo = resultSet.string(forColumn: “RollNo”)
studentInfo.Name = resultSet.string(forColumn: “Name”)
studentInfo.Marks = resultSet.string(forColumn: “Marks”)
marrStudentInfo.add(studentInfo)
}
}
sharedInstance.database!.close()
return marrStudentInfo
}
}
/////////////
// StudentInfo.swift
// DataBaseDemo
//
// Created by Harshil on 11/10/17.
// Copyright (c) 2017 Grras. All rights reserved.
//
import UIKit
//Create Model of database
//1)What is Model?
//->Model is used to handle all the fields of a single table from database.
//2)Why you should use model class?
//->You don’t need to remember name of the fields of a table since all the operation would be performed by creating model of data.
//->If schema of the table is modified, you need to update model class only.
//->Creating model is a good programming practice and provides ease of access.
//I have created StudentInfo.swift file of NSObject type as model class to fetch the data from StudentInfo table of my database.
class StudentInfo: NSObject
{
var RollNo: String = String()
var Name: String = String()
var Marks: String = String()
}
//////////////////
import UIKit
class HomeScreenViewController: UIViewController , UITableViewDataSource,UITableViewDelegate
{
var marrStudentData : NSMutableArray!
@IBOutlet weak var tbStudentData: UITableView!
override func viewDidLoad()
{
super.viewDidLoad()
}
override func viewWillAppear(_ animated: Bool)
{
self.getStudentData()
}
override func viewDidAppear(_ animated: Bool) {
}
override func viewWillDisappear(_ animated: Bool) {
}
override func viewDidDisappear(_ animated: Bool) {
}
override func didReceiveMemoryWarning() {
super.didReceiveMemoryWarning()
// Dispose of any resources that can be recreated.
}
//MARK: Other methods
func getStudentData()
{
marrStudentData = NSMutableArray()
marrStudentData = ModelManager.getInstance().getAllStudentData()
tbStudentData.reloadData()
}
//MARK: UITableView delegate methods
func tableView(_ tableView: UITableView, numberOfRowsInSection section: Int) -> Int
{
return marrStudentData.count
}
func tableView(_ tableView: UITableView, cellForRowAt indexPath: IndexPath) -> UITableViewCell {
let cell:StudentCell = tableView.dequeueReusableCell(withIdentifier: “cell”) as! StudentCell
let student:StudentInfo = marrStudentData.object(at: indexPath.row) as! StudentInfo
cell.lblContent.text = “Name : (student.Name) n Marks : (student.Marks)”
cell.btnDelete.tag = indexPath.row
cell.btnEdit.tag = indexPath.row
return cell
}
//MARK: UIButton Action methods
@IBAction func btnDeleteClicked(_ sender: AnyObject) {
let btnDelete : UIButton = sender as! UIButton
let selectedIndex : Int = btnDelete.tag
let studentInfo: StudentInfo = marrStudentData.object(at: selectedIndex) as! StudentInfo
let isDeleted = ModelManager.getInstance().deleteStudentData(studentInfo)
if isDeleted {
Util.invokeAlertMethod(“”, strBody: “Record deleted successfully.”, delegate: nil)
} else
{
Util.invokeAlertMethod(“”, strBody: “Error in deleting record.”, delegate: nil)
}
self.getStudentData()
}
@IBAction func btnEditClicked(_ sender: AnyObject)
{
self.performSegue(withIdentifier: “editSegue”, sender: sender)
}
//MARK: Navigation methods
override func prepare(for segue: UIStoryboardSegue, sender: Any?)
{
if(segue.identifier == “editSegue”)
{
let btnEdit : UIButton = sender as! UIButton
let editTag : Int = btnEdit.tag
let viewController : InsertRecordViewController = segue.destination as! InsertRecordViewController
viewController.isEdit = true
viewController.studentData = marrStudentData.object(at: editTag) as! StudentInfo
}
}
}
//////////////////
import UIKit
class InsertRecordViewController: UIViewController,UITextFieldDelegate
{
@IBOutlet weak var txtName: UITextField!
@IBOutlet weak var txtMarks: UITextField!
var isEdit : Bool = false
var studentData : StudentInfo!
override func viewDidLoad()
{
super.viewDidLoad()
if(isEdit)
{
txtName.text = studentData.Name;
txtMarks.text = studentData.Marks;
}
}
override func didReceiveMemoryWarning() {
super.didReceiveMemoryWarning()
// Dispose of any resources that can be recreated.
}
//MARK: UIButton Action methods
@IBAction func btnBackClicked(_ sender: AnyObject)
{
self.navigationController!.popViewController(animated:true)
}
@IBAction func btnSaveClicked(_ sender: AnyObject)
{
//Empty TextField Validation…
if(txtName.text == “”)
{
Util.invokeAlertMethod(“”, strBody: “Please enter name”, delegate: nil)
}
else if(txtMarks.text == “”)
{
Util.invokeAlertMethod(“”, strBody: “Please enter student marks.”, delegate: nil)
}
else
{
if(isEdit)
{
let studentInfo: StudentInfo = StudentInfo()
studentInfo.RollNo = studentData.RollNo
studentInfo.Name = txtName.text!
studentInfo.Marks = txtMarks.text!
let isUpdated = ModelManager.getInstance().updateStudentData(studentInfo)
if isUpdated
{
Util.invokeAlertMethod(“”, strBody: “Record updated successfully.”, delegate: nil)
}
else
{
Util.invokeAlertMethod(“”, strBody: “Error in updating record.”, delegate: nil)
}
}
else
{
let studentInfo: StudentInfo = StudentInfo()
studentInfo.Name = txtName.text!
studentInfo.Marks = txtMarks.text!
let isInserted = ModelManager.getInstance().addStudentData(studentInfo)
if isInserted
{
Util.invokeAlertMethod(“”, strBody: “Record Inserted successfully.”, delegate: nil)
}
else
{
Util.invokeAlertMethod(“”, strBody: “Error in inserting record.”, delegate: nil)
}
}
self.navigationController!.popViewController(animated: true)
}
}
//UITextfield Delgate methods
//VAlidation on Textfield
func textField(_ textField: UITextField, shouldChangeCharactersIn range: NSRange, replacementString string: String) -> Bool
{
if textField.tag == txtName.tag
{
let maxLength = 10
let currentString: NSString = textField.text! as NSString
let newString: NSString =
currentString.replacingCharacters(in: range, with: string) as NSString
return newString.length <= maxLength
}
let numberOnly = NSCharacterSet.init(charactersIn: "abcdefghijklmnopqrstuvwxyzABCDEFGHIJKLMNOPQRSTUVWXYZ")
let stringFromTextField = NSCharacterSet.init(charactersIn: string)
let strValid = numberOnly.isSuperset(of: stringFromTextField as CharacterSet)
return strValid
}
/*
// MARK: – Navigation
// In a storyboard-based application, you will often want to do a little preparation before navigation
override func prepareForSegue(segue: UIStoryboardSegue, sender: AnyObject?) {
// Get the new view controller using segue.destinationViewController.
// Pass the selected object to the new view controller.
}
*/
}
////////
Supporting file
#import "FMDatabase.h"
 Binal Patel
AuthorjSON
Josn
class ViewController: UIViewController,UITableViewDataSource,UITableViewDelegate
{
@IBOutlet weak var mt: UITableView!
var strurl : String? = “nil”
var arrname:[String]=[]
var arrid:[String]=[]
var arrgender:[String]=[]
var arrhome:[String]=[]
var arrmobile:[String]=[]
var arroffice:[String]=[]
var arremail:[String]=[]
var arradd:[String]=[]
override func viewDidLoad() {
super.viewDidLoad()
callweb()
// Do any additional setup after loading the view, typically from a nib.
}
func callweb()
{
strurl = “http://api.androidhive.info/contacts”
let dco = URLSessionConfiguration.default //default config object
let du = URLSession(configuration: dco, delegate: nil, delegateQueue: OperationQueue.main) //default session
let url = URL(string: strurl!)
let urlR = NSMutableURLRequest(url: url!) //urlrequest
//let par:String? = “nil”
urlR.httpMethod = “GET”
//urlR.httpBody = par?.data(using: .utf8)
let task = du.dataTask(with: urlR as URLRequest, completionHandler:
{
(data,response,error) in
if let _:Data = data , let _:URLResponse = response , error == nil
{
print(“error ::: (String(describing: error?.localizedDescription))”)
}
let datastr = NSString(data: data!, encoding: String.Encoding.utf8.rawValue)
print(“response::: (String(describing: datastr))”)
do{
let allcontents = try JSONSerialization.jsonObject(with: data!, options: .mutableLeaves) as! [String:AnyObject]
// print(allcontents)
if let arrjson = allcontents[“contacts”]
{
print(“contacts ::: (arrjson)”)
for i in 0..<arrjson.count
{
let aobject = arrjson[i] as! [String:AnyObject]
print("aobject :::: (aobject)")
print(aobject["name"] as! String)
self.arrname.append(aobject["name"] as! String)
print(aobject["address"] as! String)
self.arradd.append(aobject["address"] as! String)
print(aobject["id"] as! String)
self.arrid.append(aobject["id"] as! String)
print(aobject["email"] as! String)
self.arremail.append(aobject["email"] as! String)
print(aobject["gender"] as! String)
self.arrgender.append(aobject["gender" as String] as! String)
let dp = aobject["phone"] as AnyObject
for _ in 0.. Int
{
return arrid.count
}
public func tableView(_ tableView: UITableView, cellForRowAt indexPath: IndexPath) -> UITableViewCell
{
let cell : custom = tableView.dequeueReusableCell(withIdentifier: “cell”) as! custom
cell.lblid.text = self.arrid[indexPath.row]
cell.lblname.text = self.arrname[indexPath.row]
cell.lbladd.text = self.arradd[indexPath.row]
cell.lblgender.text = self.arrgender[indexPath.row]
cell.lblemail.text = self.arremail[indexPath.row]
cell.lblhome.text = self.arrhome[indexPath.row]
cell.lblmobile.text = self.arrmobile[indexPath.row]
cell.lbloffice.text = self.arroffice[indexPath.row]
return cell
}
override func didReceiveMemoryWarning() {
super.didReceiveMemoryWarning()
// Dispose of any resources that can be recreated.
}
}
/////////////////////
class custom: UITableViewCell {
@IBOutlet weak var lblname: UILabel!
@IBOutlet weak var lbladd: UILabel!
@IBOutlet weak var lblemail: UILabel!
@IBOutlet weak var lblid: UILabel!
@IBOutlet weak var lblgender: UILabel!
@IBOutlet weak var lblhome: UILabel!
@IBOutlet weak var lbloffice: UILabel!
@IBOutlet weak var lblmobile: UILabel!
override func awakeFromNib() {
super.awakeFromNib()
// Initialization code
}
 Binal Patel
AuthorJosn
class ViewController: UIViewController,UITableViewDataSource,UITableViewDelegate
{
@IBOutlet weak var mt: UITableView!
var strurl : String? = “nil”
var arrname:[String]=[]
var arrid:[String]=[]
var arrgender:[String]=[]
var arrhome:[String]=[]
var arrmobile:[String]=[]
var arroffice:[String]=[]
var arremail:[String]=[]
var arradd:[String]=[]
override func viewDidLoad() {
super.viewDidLoad()
callweb()
// Do any additional setup after loading the view, typically from a nib.
}
func callweb()
{
strurl = “http://api.androidhive.info/contacts”
let dco = URLSessionConfiguration.default //default config object
let du = URLSession(configuration: dco, delegate: nil, delegateQueue: OperationQueue.main) //default session
let url = URL(string: strurl!)
let urlR = NSMutableURLRequest(url: url!) //urlrequest
//let par:String? = “nil”
urlR.httpMethod = “GET”
//urlR.httpBody = par?.data(using: .utf8)
let task = du.dataTask(with: urlR as URLRequest, completionHandler:
{
(data,response,error) in
if let _:Data = data , let _:URLResponse = response , error == nil
{
print(“error ::: (String(describing: error?.localizedDescription))”)
}
let datastr = NSString(data: data!, encoding: String.Encoding.utf8.rawValue)
print(“response::: (String(describing: datastr))”)
do{
let allcontents = try JSONSerialization.jsonObject(with: data!, options: .mutableLeaves) as! [String:AnyObject]
// print(allcontents)
if let arrjson = allcontents[“contacts”]
{
print(“contacts ::: (arrjson)”)
for i in 0..<arrjson.count
{
let aobject = arrjson[i] as! [String:AnyObject]
print("aobject :::: (aobject)")
print(aobject["name"] as! String)
self.arrname.append(aobject["name"] as! String)
print(aobject["address"] as! String)
self.arradd.append(aobject["address"] as! String)
print(aobject["id"] as! String)
self.arrid.append(aobject["id"] as! String)
print(aobject["email"] as! String)
self.arremail.append(aobject["email"] as! String)
print(aobject["gender"] as! String)
self.arrgender.append(aobject["gender" as String] as! String)
let dp = aobject["phone"] as AnyObject
for _ in 0.. Int
{
return arrid.count
}
public func tableView(_ tableView: UITableView, cellForRowAt indexPath: IndexPath) -> UITableViewCell
{
let cell : custom = tableView.dequeueReusableCell(withIdentifier: “cell”) as! custom
cell.lblid.text = self.arrid[indexPath.row]
cell.lblname.text = self.arrname[indexPath.row]
cell.lbladd.text = self.arradd[indexPath.row]
cell.lblgender.text = self.arrgender[indexPath.row]
cell.lblemail.text = self.arremail[indexPath.row]
cell.lblhome.text = self.arrhome[indexPath.row]
cell.lblmobile.text = self.arrmobile[indexPath.row]
cell.lbloffice.text = self.arroffice[indexPath.row]
return cell
}
override func didReceiveMemoryWarning() {
super.didReceiveMemoryWarning()
// Dispose of any resources that can be recreated.
}
}
/////////////////////
class custom: UITableViewCell {
@IBOutlet weak var lblname: UILabel!
@IBOutlet weak var lbladd: UILabel!
@IBOutlet weak var lblemail: UILabel!
@IBOutlet weak var lblid: UILabel!
@IBOutlet weak var lblgender: UILabel!
@IBOutlet weak var lblhome: UILabel!
@IBOutlet weak var lbloffice: UILabel!
@IBOutlet weak var lblmobile: UILabel!
override func awakeFromNib() {
super.awakeFromNib()
// Initialization code
}