Building Action Extensions in iOS 8
Action extensions allow users to transform content originating in a host app without leaving the app. You can, for example edit images, change the text format, change the text itself, e.t.c. At WWDC 2014, Apple showed us a demo of an Action extension that translated the text of a web page to another language without leaving Safari.
Unlike the other extensions whose usage and purpose is clear, Action extensions do not have this clear-cut usage policy. For example, you can create an Action extension that shares content to social networks or one that can perform photo edits. In the Extensibility Programming Guide, Apple caution on picking the wrong extension point. In the case of Action extension, you should make sure that it’s appropriate for what you are trying to achieve and that another extension point won’t be more suitable for your purposes. In the previous given example, it would probably be more appropriate to use the share extension and the photo editing extension respectively instead of Action extensions.

Action extensions are made available to users only when the extension specifies that it can work with the type of content the user is currently using. For example, if the extension specifies that it only works with text, it isn’t made available when the user is viewing images.
When you create a new Action extension, Xcode creates a template which when used without changing its configurations, will appear in every single action sheet by default. It won’t perform any checking of the content types to determine whether or not it’s appropriate for the host app. If you attempt to submit it like this to the App Store review, it will be rejected – you need to specify under what circumstances your extension should appear.
You can create two types of Action extensions – one with a user interface and one without. If you chose the latter, it will be limited to Safari, but if you provide a user interface, then the extension can be made available to other apps given that the extension supports the type of content to be transformed. We’ll look at both types of Action extensions.
We’ll look at how to create both of these. For the one with a UI, we’ll create an extension that enables you to save URLs that you are viewing for later use, kind of like a watered-down Pocket. The container app will show you a list of saved URLs and you will be able to open them in a webview. The second example will be a quick example that showcases how to modify the content shown in Safari. This will be a UI-less extension. We’ll use the same container app for both extensions. Download the starter project to get started.
First you need to configure the App Group in the starter project. To use App Groups, you have to have a paid-for developer account. The container app and the extension will be sharing data, so we have to use App Groups. An App Group is used to define access to a shared container that both the container app and its extensions can access. I also use a framework so that I can share code between the container app and its extension. To read more on this, you can refer back to this Today Extension article where I go deeper into creating and using embedded frameworks to enable code reuse between container app and extension.
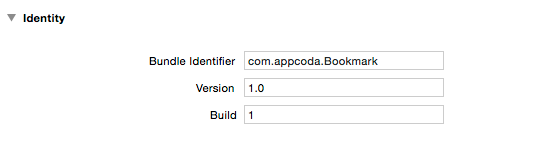
Select the Bookmark project in the Project Navigator and then select the Bookmark target. First change the app’s Bundle Identifier on the General tab so that it’s unique to you. Reverse DNS is usually commonly used, so just swap out ‘appcoda’ with your own domain or any other identifier.
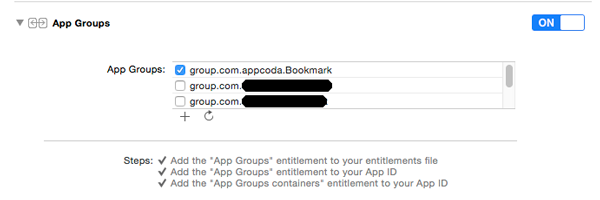
Then switch to the Capabilities tab and turn on the App Groups switch. Press the + button to add a new group and give it a unique name. App group identifiers should start with group. and usually use reverse DNS style naming. I’ll use group.com.appcoda.bookmark here. Substitute your own domain here as well.
Next update the reference to this App Group in your code. In the Project Navigator, expand the BookmarkKit group and open BookmarkService.swift. Find the getFileUrl() method and replace the group identifier string with your own. The function is shown below.
|
1 2 3 4 5 6 7 |
func getFileUrl() -> NSURL { if let containerUrl = NSFileManager.defaultManager().containerURLForSecurityApplicationGroupIdentifier("group.com.appcoda.Bookmark") { return containerUrl.URLByAppendingPathComponent("AppcodaBookmarkService.dat") } else { fatalError("Error obtaining shared container URL. Check your App Group configuration.") } } |
Run the application. You will be presented with an empty table view. This will hold our saved bookmarks. You can add your own URLs to the app with the + button on the navigation bar. You enter a URL and the title you want to give that bookmark. This is what will be shown on the tableview. For a real app, it might be better to use tags which can be used to group bookmarks, but we keep it simple here. There is also no delete or edit functionality.
When you select an item on the table view, the URL will be opened in a webview. Only valid URLs (you have to include http:// or https://) will be opened. To keep it simple, I haven’t done any error checking on the app, invalid URLs will be saved but they will not load on the webview, and won’t give any error messages.

You can type out a URL yourself or open Safari, browse to a page you want to save for later, copy the URL and open the app to save the URL. This seems to be a long process though, and that is where our extension will come in handy. With the extension, you will not need to leave Safari to save a URL.
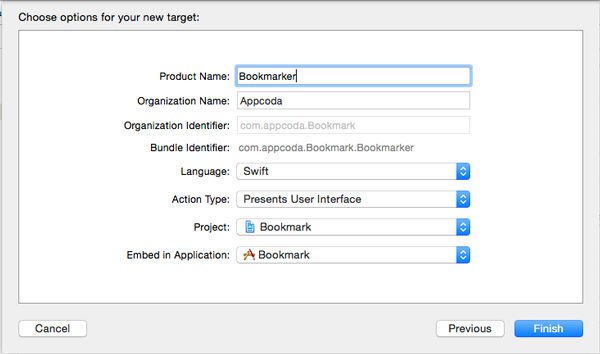
Select the Bookmark project in the Project Navigator. Then select Editor > Add Target > iOS > Application Extension > Action Extension and click on Next. Set the Product Name to Bookmarker. Leave the other fields at their default.
When prompted to activate the new scheme, click Activate.
Select the Bookmarker target and then on the Capabilities tab, add it to an App Group. Click App Groups switch and use the same App Group you added earlier by checking the box next to it. Don’t add a new App Group.

Switch to the General tab and under Linked Frameworks and Libraries, click the + button. Select BookmarkKit and click Add.

Looking at the Bookmarker group in the Project Navigator, you should see the following files.
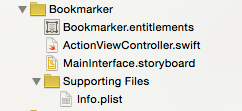
The entitlements file was generated by Xcode when you set up the App Group. It defines the entitlements required by the target. There is a storyboard file for the interface with a view controller set up. We use Info.plist to configure the extension.
As mentioned before, you need to specify the type of content your Action extension supports and the number of instances of that content it can handle, for example if it supported images, you could set it to work with only one image at a time, or you could allow the user to select several images to be processed by the extension at once. Bookmarker will only support one URL. Open the plist file for the Bookmarker extension and then expand the NSExtension > NSExtensionAttributes. The NSExtensionActivationRule key by default is set to TRUEPREDICATE. With this, your action extension will always appear in the action sheet. We’ll change the value of this key to specify the content our extension works with.
First, change its Type to Dictionary, then click on the + button next to the key name to add a key-value pair to it. Set the key’s name to NSExtensionActivationSupportsWebURLWithMaxCount, its Type to Number and Value to 1. You should have the following.
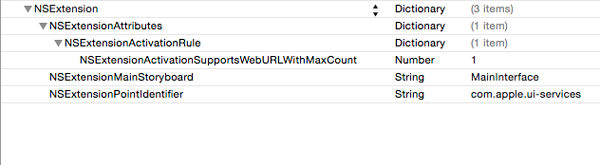
NSExtensionActivationSupportsWebURLWithMaxCount with a value of 1 tells the OS to offer your extension when an app that a user is using tries to share a single URL.
Since the extension will be dealing with webpages, we need a JavaScript file which will act as a bridge between the webpage and the extension. The JavaScript is run before the extension is invoked and if there is any data to be sent back to the webpage, the JavaScript file is called again to do this. If your extension doesn’t need to extract or modify webpage content, then there is no need for a JavaScript file. You would just use the view controller for data processing.
The JavaScript you write must meet the following requirements:
- There must be a global object called ExtensionPreprocessingJS.
- The object must have a run method, that takes a single argument.
Select the Bookmarker group in the Project Navigator and add a new file to it by going to File > New > File > iOS > Other > Empty. Name the file GetURL.js. Make sure the file’s target in the File Inspector is set to Bookmarker.
Add the following to the GetURL.js file.
|
1 2 3 4 5 6 7 8 9 10 11 |
var GetURL = function() {}; GetURL.prototype = { run: function(arguments) { arguments.completionFunction({ "currentUrl" : document.URL }); } }; var ExtensionPreprocessingJS = new GetURL; |
When the extension is invoked, the run method found in the specified JavaScript preprocessor is executed against the current web page. It returns a JSON object to a completion handler. This is how you pass data from the web page to your Swift or Objective-C code.
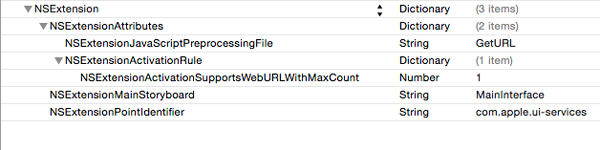
You need to add this in Info.plist so that the extension knows you provided a JavaScript preprocessor file. Open the plist file and add a new key to the NSExtensionAttributes dictionary. Name it NSExtensionJavaScriptPreprocessingFile set its Type to String and Value to GetURL.
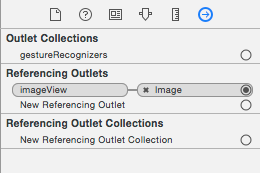
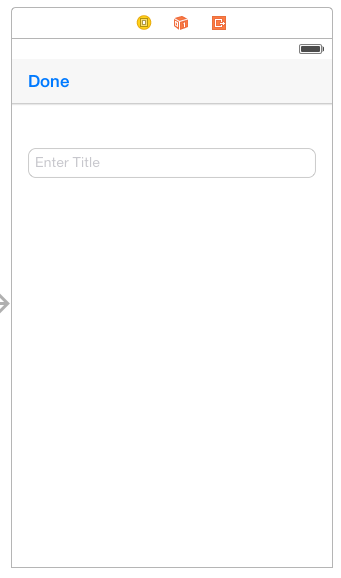
Now to set up the extension’s interface. Open MainInterface.storyboard. The view controller has been set up with an Image View and a Done button on the navigation bar. Select the Image View. Go to the Connections Inspector and remove the outlet connection by clicking on the x control. Then delete the image view.
Drag a Text Field to the View and place it below the navigation bar. In the Attributes Inspector, set ‘Enter Title’ as its placeholder text. Set constraints for the text field. I set the ones shown.
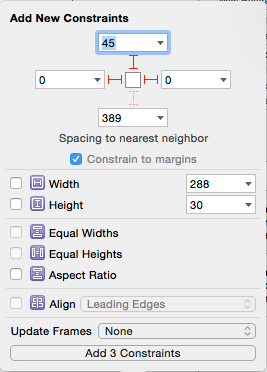
It should look something like the image below.
Use the Assistant editor to bring up the ActionViewController class file. Control-drag from the Text Field to the class and set an outlet named bookmarkTitle. You should have the following in code.
|
1 |
@IBOutlet weak var bookmarkTitle: UITextField! |
Delete the following statement.
|
1 |
@IBOutlet weak var imageView: UIImageView! |
Add the following to the class.
|
1 |
var bookmarkURL: NSURL! |
Modify the viewDidLoad() method as shown.
|
1 2 3 4 5 6 7 8 9 10 11 12 13 14 15 16 17 18 19 20 |
override func viewDidLoad() { super.viewDidLoad() let extensionItem = extensionContext?.inputItems.first as NSExtensionItem let itemProvider = extensionItem.attachments?.first as NSItemProvider let propertyList = String(kUTTypePropertyList) if itemProvider.hasItemConformingToTypeIdentifier(propertyList) { itemProvider.loadItemForTypeIdentifier(propertyList, options: nil, completionHandler: { (item, error) -> Void in let dictionary = item as NSDictionary NSOperationQueue.mainQueue().addOperationWithBlock { let results = dictionary[NSExtensionJavaScriptPreprocessingResultsKey] as NSDictionary let urlString = results["currentUrl"] as? String self.bookmarkURL = NSURL(string: urlString!) } }) } else { println("error") } } |
The host app provides instances of NSExtensionContext and its input item, NSExtensionItem. NSExtensionContext provides details of the context in which the extension was invoked. It may contain input items and these can contain multiple attachments that can be a number of things – URLs, videos, images e.t.c. We use hasItemConformingToTypeIdentifier() to determine whether the attachment contains a specific resource. In our case, we check whether the item provider has an item that conforms to kUTTypePropertyList. If so, we call loadItemForTypeIdentifier whose completion handler receives an instance of NSDictionary that represents the JSON passed in by the JavaScript preprocessor. We then get the url string from this.
Add the following import to the file.
|
1 |
import BookmarkKit |
Then modify the done() function as shown.
|
1 2 3 4 5 6 7 8 9 10 11 12 13 14 15 16 17 18 19 |
@IBAction func done() { var statusMessage: NSString if (bookmarkTitle.text.isEmpty) { statusMessage = "Cannot save bookmark without a title" } else { let bookmark = Bookmark(url: bookmarkURL, title: bookmarkTitle.text) let bookmarkService = BookmarkService.sharedService bookmarkService.addBookmark(bookmark) bookmarkService.saveBookmarks() statusMessage = "Saved successfully" } let extensionItem = NSExtensionItem() let statusDictionary = [ NSExtensionJavaScriptFinalizeArgumentKey : [ "statusMessage" : statusMessage ]] extensionItem.attachments = [ NSItemProvider(item: statusDictionary, typeIdentifier: kUTTypePropertyList as NSString)] self.extensionContext!.completeRequestReturningItems([extensionItem], completionHandler: nil) } |
The above method is called when the user taps on the Done button on the extension’s interface. If the user entered a title, we get the string and page url and create a Bookmark object and then we save it. We then create a message string to send back to the host app. An NSExtensionItem item is used to send data to the host app as well as from the host app. You can send data that can be used by the JavaScript preprocessor to modify the host app’s content. Here we only send a message that we’ll use in an alert box. You need to have a finalize() function in the JavaScript preprocessor that will receive data passed from the Swift or Objective-C code. The completeRequestReturningItems() method is called to pass data back to the host app.
Add the finalize() function to GetURL.js. The code should be as shown.
|
1 2 3 4 5 6 7 8 9 10 11 12 13 14 15 16 17 18 19 |
var GetURL = function() {}; GetURL.prototype = { run: function(arguments) { arguments.completionFunction({ "currentUrl" : document.URL }); }, finalize: function(arguments) { var message = arguments["statusMessage"]; if (message) { alert(message); } } }; var ExtensionPreprocessingJS = new GetURL; |
The finalize() function simply takes the arguments passed in and displays an alert with the passed in string.
We can now run the app. Make sure that the active scheme is set to Bookmarker. You can see the active scheme next to the Stop button on the top left of the screen or you can go to Product > Scheme > Bookmarker. Run the app and you will be presented with a window for you to choose an app to run. Select Safari and click Run. This tells iOS to launch Safari, which will be your host app. It also causes Xcode to attach its debugger to the extension’s process.
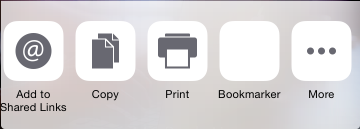
Navigate to a website with Safari. To save a bookmark, tap on the Share button at the bottom of the screen to bring up the share activity sheet. Action extensions appear in the lower section of the sheet.
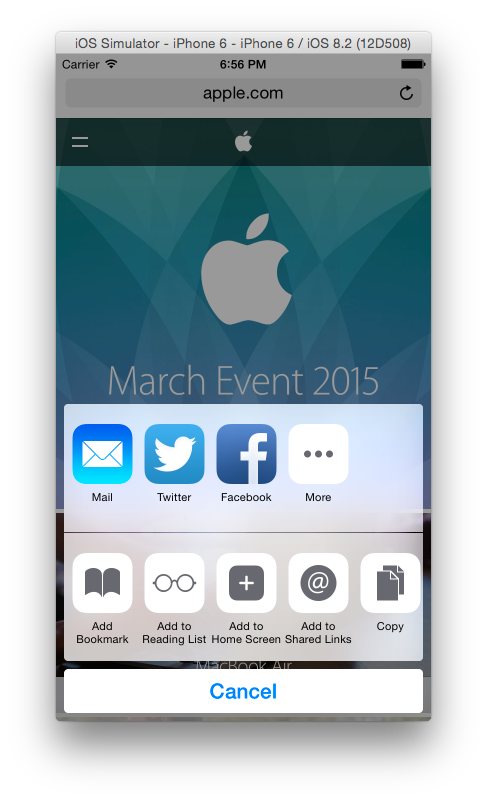
Scroll to the right of the action controls and tap on More. Activate the Bookmarker extension in the window that appears.
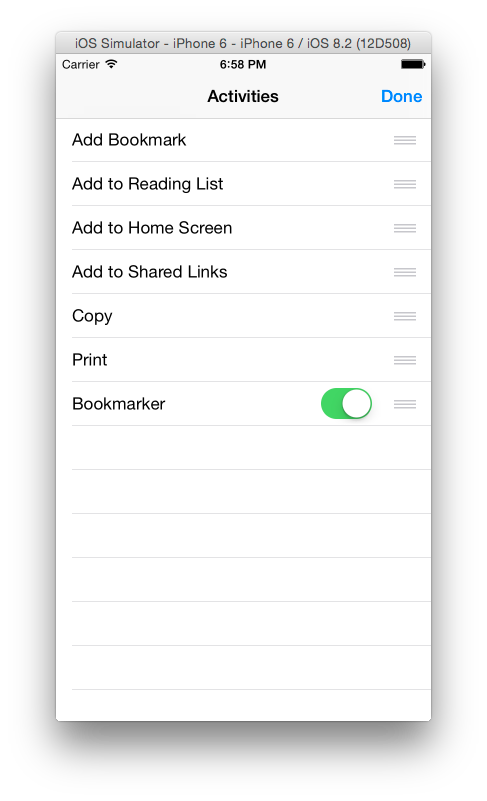
Now the Bookmarker extension will be visible.
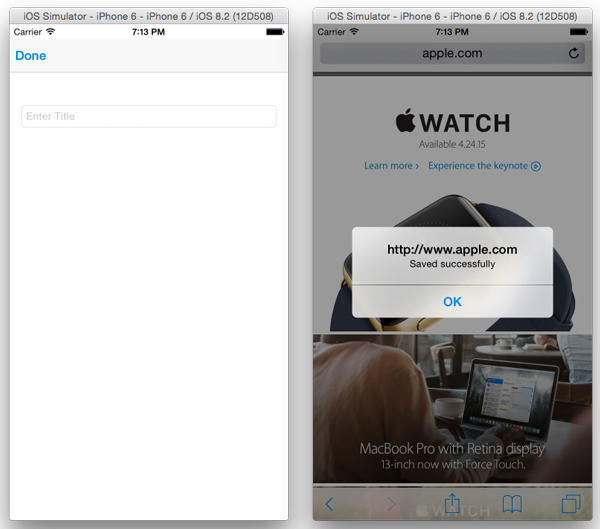
Tap on Bookmarker and the extension window should come up. Enter a title for the bookmark and hit Done. You will get back an alert on whether the save was successful.
Run the app and save some bookmarks. Launch the Bookmark app and you should see the bookmarks you added.
Note: There is an error message in the debugger “Failed to inherit CoreMedia permissions from xxxx”. This seems to be a common error, and I have encountered it when working with Today, Share and action extensions. The extension still works fine despite the error. Searching around, it seems to be common and in this Stackoverflow post, someone says that their extension works fine and was approved by Apple despite getting the error. So, it might be an Xcode bug. I’m not sure. You can leave your thoughts in the comment, if you know about it.
No UI Extension
Next we’ll look at a quick example of creating an Action extension with no UI. We’ll also see how we can modify a webpage’s content with an extension.
Next we’ll look at a quick example of creating an Action extension with no UI. We’ll also see how we can modify a webpage’s content with an extension.
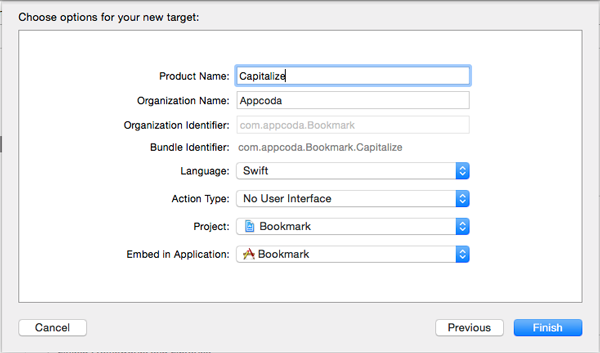
Create another Action Extension by going to Editor > Add Target > iOS > Application Extension > Action Extension and click on Next. Set the Product Name to Capitalize and Action Type to No User Interface. Activate the scheme when prompted to.
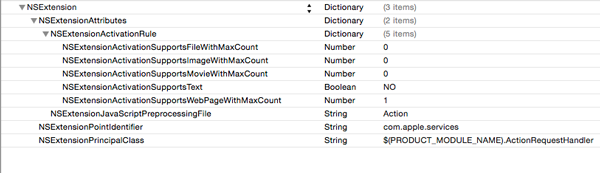
Open the plist file in the Capitalize group and change the NSExtensionActivationSupportsWebURLWithMaxCount extension activation rule to NSExtensionActivationSupportsWebPageWithMaxCount. This configures the extension to work with a web page. Leave Type and Value as they are.
The UI-less Action extension comes with a JavaScript preprocessor set up. Open Action.js and modify its contents as shown.
|
1 2 3 4 5 6 7 8 9 10 11 12 13 14 15 16 |
var Action = function() {}; Action.prototype = { run: function(arguments) { arguments.completionFunction({"content": document.body.innerHTML}); }, finalize: function(arguments) { document.body.innerHTML = arguments["content"]; } }; var ExtensionPreprocessingJS = new Action |
The above sends the documents content to the extension and then in the finalize() method, it sets the page’s content with the data received.
Open ActionRequestHandler.swift and replace its contents as shown. This class is called when the action extension is invoked.
|
1 2 3 4 5 6 7 8 9 10 11 12 13 14 15 16 17 18 19 20 21 22 23 24 25 26 27 28 29 30 31 32 33 34 35 36 37 38 39 40 41 42 43 44 45 46 47 48 49 50 51 52 53 54 55 56 57 58 |
import UIKit import MobileCoreServices class ActionRequestHandler: NSObject, NSExtensionRequestHandling { var extensionContext: NSExtensionContext? func beginRequestWithExtensionContext(context: NSExtensionContext) { self.extensionContext = context for item: AnyObject in context.inputItems { let inputItem = item as NSExtensionItem for provider: AnyObject in inputItem.attachments! { let itemProvider = provider as NSItemProvider if itemProvider.hasItemConformingToTypeIdentifier(kUTTypePropertyList as NSString) { itemProvider.loadItemForTypeIdentifier(kUTTypePropertyList as NSString, options: nil, completionHandler: { [unowned self] (result: NSSecureCoding!, error: NSError!) -> Void in if let dictionary = result as? NSDictionary { self.itemLoadCompletedWithPreprocessingResults(dictionary[NSExtensionJavaScriptPreprocessingResultsKey] as [NSObject: AnyObject]) } }); } } } } func itemLoadCompletedWithPreprocessingResults(javaScriptPreprocessingResults: [NSObject: AnyObject]) { let pageContent = javaScriptPreprocessingResults["content"] as NSString let capitalizedContent = pageContent.uppercaseString self.doneWithResults(["content": capitalizedContent]) } func doneWithResults(resultsForJavaScriptFinalizeArg: [NSObject: AnyObject]?) { if let resultsForJavaScriptFinalize = resultsForJavaScriptFinalizeArg { var resultsDictionary = [NSExtensionJavaScriptFinalizeArgumentKey: resultsForJavaScriptFinalize] var resultsProvider = NSItemProvider(item: resultsDictionary, typeIdentifier: String(kUTTypePropertyList)) var resultsItem = NSExtensionItem() resultsItem.attachments = [resultsProvider] self.extensionContext!.completeRequestReturningItems([resultsItem], completionHandler: nil) } else { self.extensionContext!.completeRequestReturningItems([], completionHandler: nil) } self.extensionContext = nil } } |
The above code looks familiar. We get the content passed in, capitalize it in itemLoadCompletedWithPreprocessingResults() and call doneWithResults() which sends the capitalized content back to the JavaScript preprocessor.
Run the app and test it out. You will get a very ugly webpage, which is to be expected because we got the page’s content – text, images, scripts, css – and sent it to be capitalized. The result of this is broken css styles, scripts that don’t work, broken image links e.t.c. A better approach would have been to use the JavaScript code to get text that is in paragraph and heading tags and only send that to be processed.
The extension we’ve made here isn’t very useful, but it demonstrates use of the UI-less Action extension and it also shows how you can manipulate a webpage’s content. Apple used it to translate a webpage into another language, 1Password uses it to autofill login forms with user credentials; so the Action extension is quite powerful.
Action Extension Icon
We haven’t added icons for our extensions and we won’t cover that in this tutorial. Though it is worth mentioning Apple’s guidelines on Action extension icons as given in the Extensibility Guide.
For the Action Extension icon, you should create a template image that represents the extension i.e. your icon image should be composed of a single color and it should be transparent. A template image is an image that iOS uses as a mask to create the final icon that users see in the activity view controller. Apple have specified some guidelines for creating a template image that looks good in the final UI:
- Use black or white with appropriate alpha transparency
- Don’t include a drop shadow
- Use antialiasing
If your app contains multiple Action extensions, you should provide unique icons for each of them.
That concludes this Action Extension guide. You can download the completed project here. Note that you’ll need to change the Bundle ID and App ID to your own unique IDs in order to make it work.

I am a web developer who also does mobile development from time to time. I have also been writing online for some time now, a process I find enjoyable and challenging, for, at times, it is when you have to explain something to someone, that you find there is still a lot to learn. You can find me on Twitter.