

Among many of the powerful frameworks Apple released at this year’s WWDC, the Vision framework was one of them. With the Vision framework, you can easily implement computer vision techniques into your apps with no higher knowledge at all! With Vision, you can have your app perform a number of powerful tasks such as identifying faces and facial features (ex: smile, frown, left eyebrow, etc.), barcode detection, classifying scenes in images, object detection and tracking, and horizon detection.
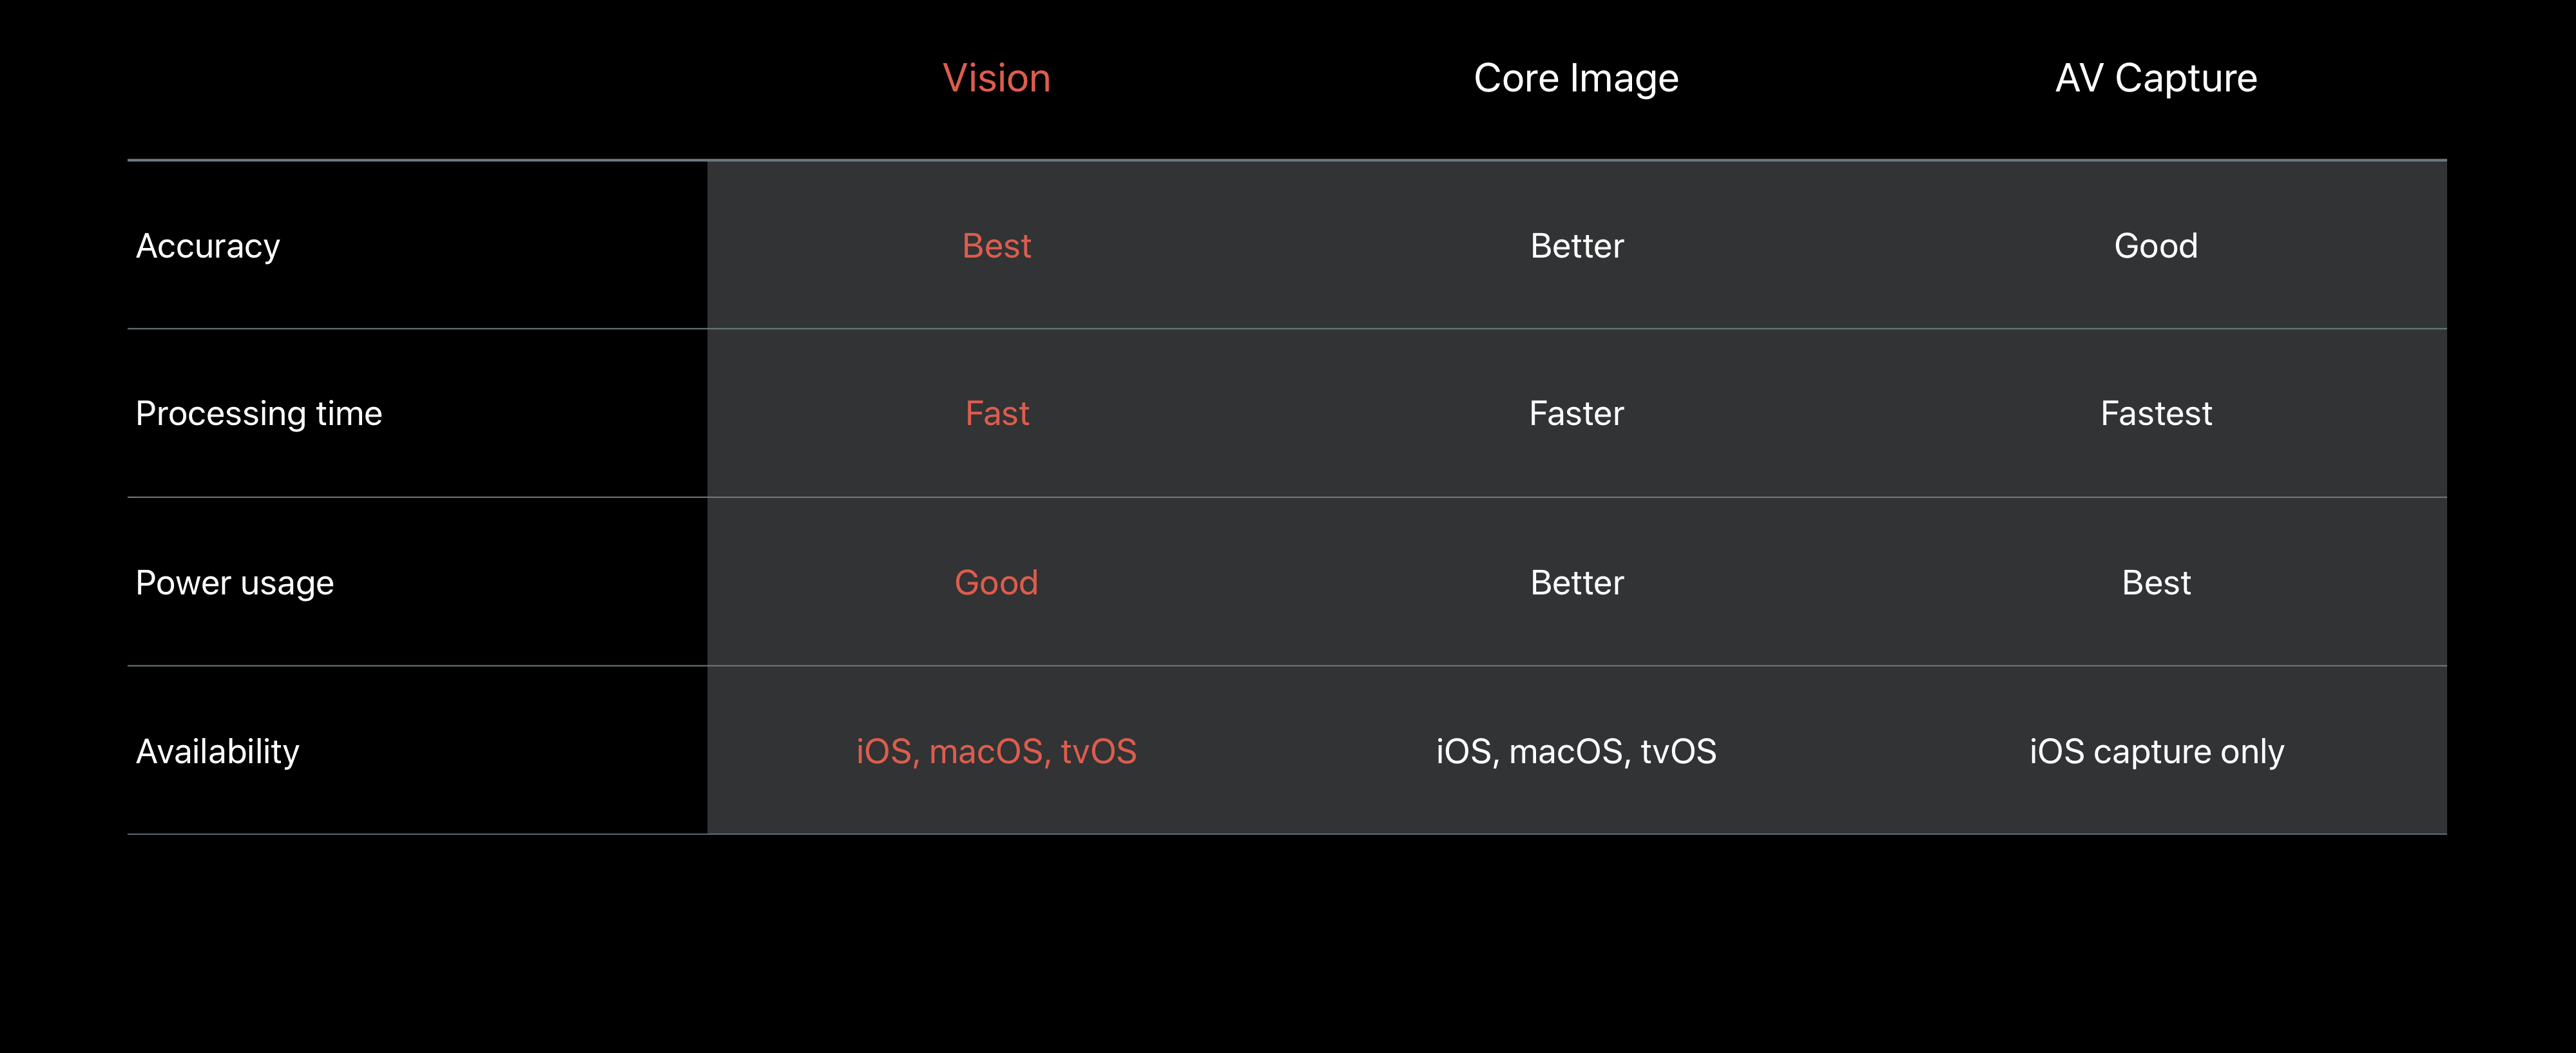
Now for those of you who have been programming in Swift for some time are probably wondering, what is the purpose of Vision when there is Core Image and AVFoundation? If we take a look at the table below presented in WWDC, we can see that Vision is far more accurate and available on more platforms. However it does require more processing time and power.
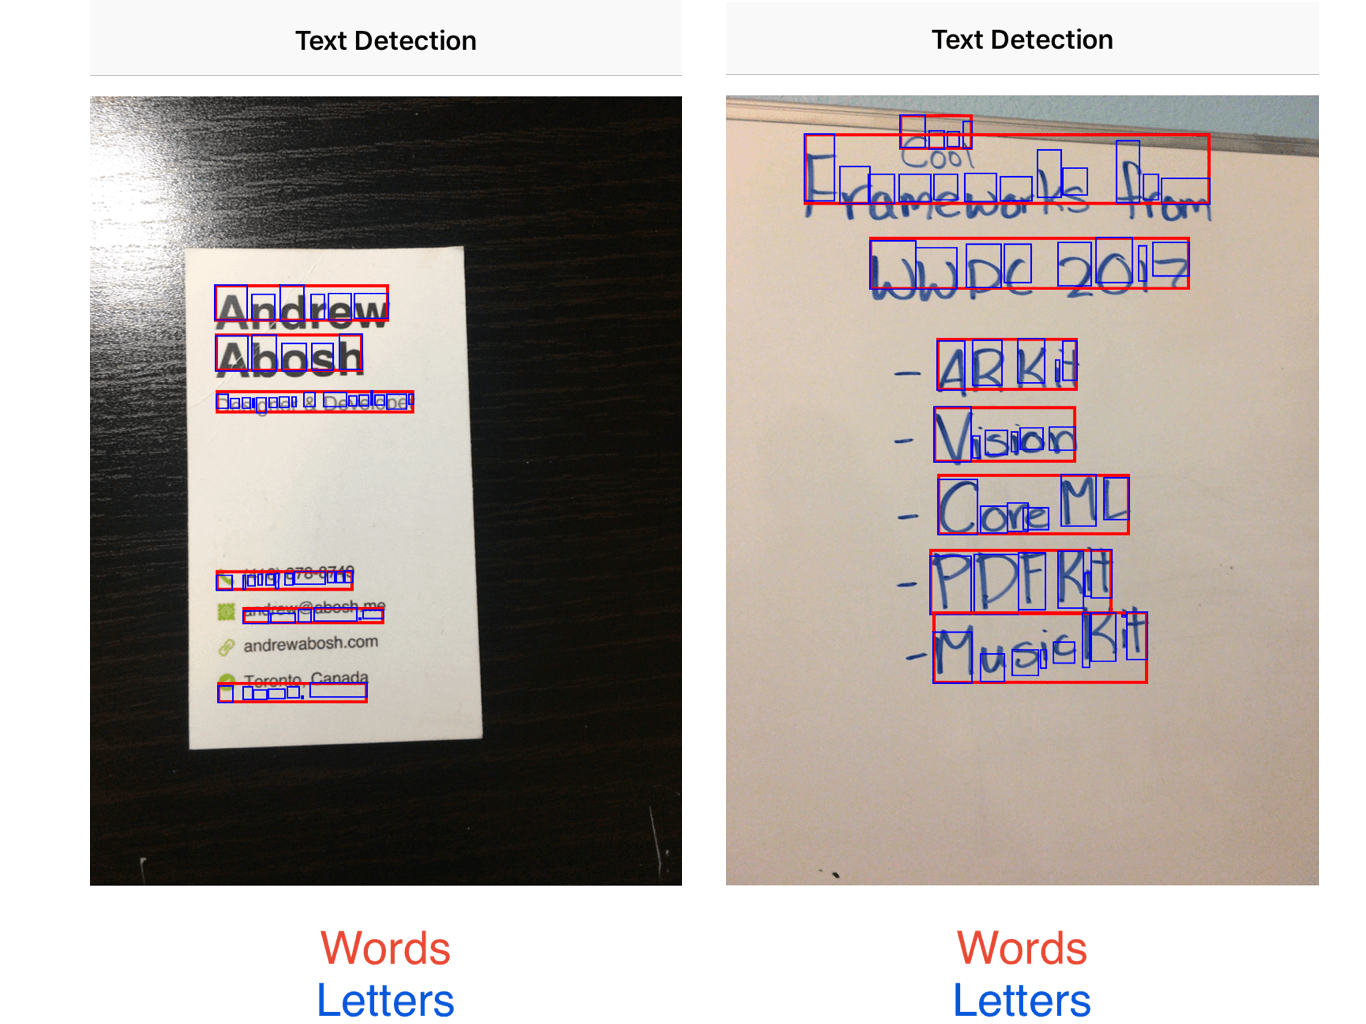
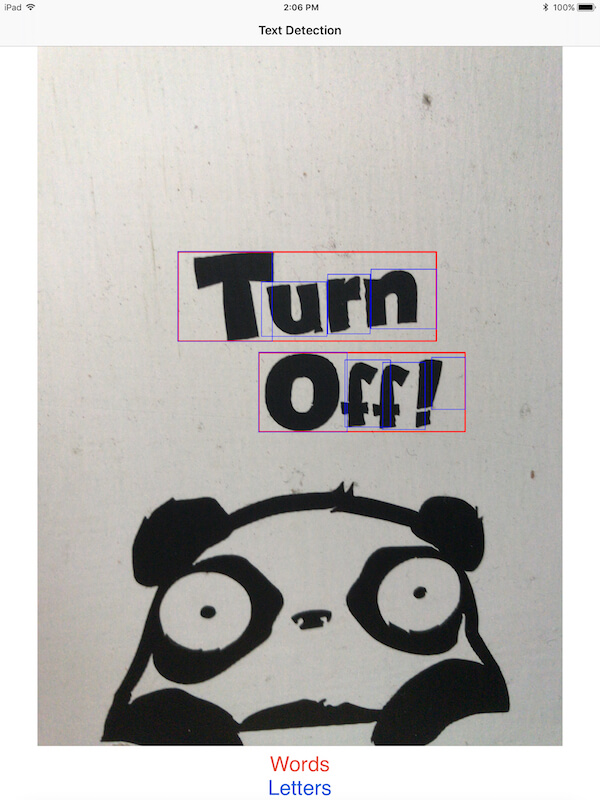
In this tutorial, we will be leveraging the Vision framework for text detection. We will build an app that will be able to detect text regardless of the font, object, and color. As shown in the picture below, the Vision framework can recognize text that are both printed and hand-written.
To save you time from building the UI of the app and focus on learning the Vision framework, download the starter project to begin with.
Please note that you will need Xcode 9 to complete the tutorial. You will also need a device that is running iOS 11 in order to test this tutorial. Also the code is written in Swift 4.
Creating a Live Stream
When you open the project, you see that the views in the storyboard are all ready and set up for you. Heading over to ViewController.swift, you will find the code skeleton with a couple of outlets and funcions. Our first step is to create the live stream that will be used to detect text. Right under the imageView outlet, declare another property for AVCaptureSession:
var session = AVCaptureSession()
This initalizes an object of AVCaptureSession that performs a real-time or offline capture. It is used whenever you want to perform some actions based on a live stream. Next, we need to connect the session to our device. Start by adding the following function in ViewController.swift.
func startLiveVideo() {
    //1
    session.sessionPreset = AVCaptureSession.Preset.photo
    let captureDevice = AVCaptureDevice.default(for: AVMediaType.video)

    //2
    let deviceInput = try! AVCaptureDeviceInput(device: captureDevice!)
    let deviceOutput = AVCaptureVideoDataOutput()
    deviceOutput.videoSettings = [kCVPixelBufferPixelFormatTypeKey as String: Int(kCVPixelFormatType_32BGRA)]
    deviceOutput.setSampleBufferDelegate(self, queue: DispatchQueue.global(qos: DispatchQoS.QoSClass.default))
    session.addInput(deviceInput)
    session.addOutput(deviceOutput)

    //3
    let imageLayer = AVCaptureVideoPreviewLayer(session: session)
    imageLayer.frame = imageView.bounds
    imageView.layer.addSublayer(imageLayer)

    session.startRunning()
}
If you have worked with AVFoundation before, you will find most of this code familiar. If you haven’t, don’t worry. We’ll go thorough the code line-by-line.
- We begin by modifying the settings of our
AVCaptureSession. Then, we set theAVMediaTypeas video because we want a live stream so it should always be continuously running. - Next, we define the device input and output. The input is what the camera is seeing and the output is what the video should appear as. We want the video to appear as a
kCVPixelFormatType_32BGRAwhich is a type of video format. You can learn more about pixel format types here. Lastly, we add the input and output to theAVCaptureSession. - Finally, we add a sublayer containing the video preview to the
imageViewand get the session running.
Call this function in the viewWillAppear method:
override func viewWillAppear(_ animated: Bool) {
    startLiveVideo()
}
Since the bounds of the image view is not yet finalized in viewWillAppear(), override the viewDidLayoutSubviews() method to update the layer’s bound:
override func viewDidLayoutSubviews() {
    imageView.layer.sublayers?[0].frame = imageView.bounds
}
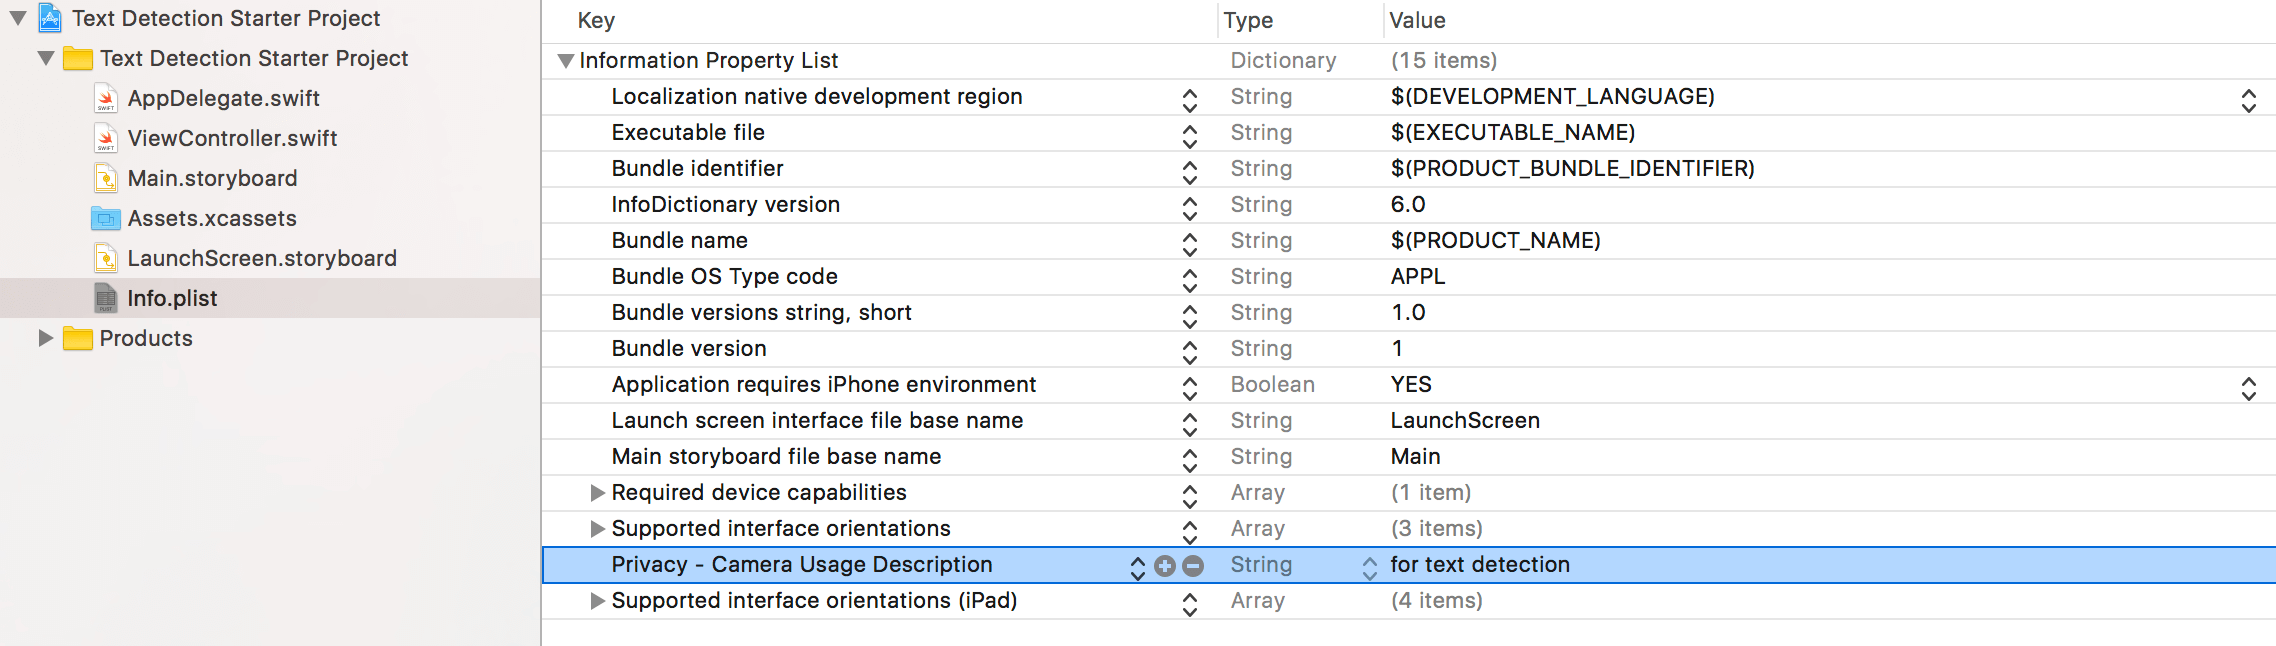
Before you give it a run, add an entry in Info.plist to provide a reason why you need to use the camera. This is required by Apple since the release of iOS 10:
The live stream should work as expected. However, there is no text detection going on because we haven’t implemented the Vision framework yet. This is what we will do next.
Implementing Text Detection
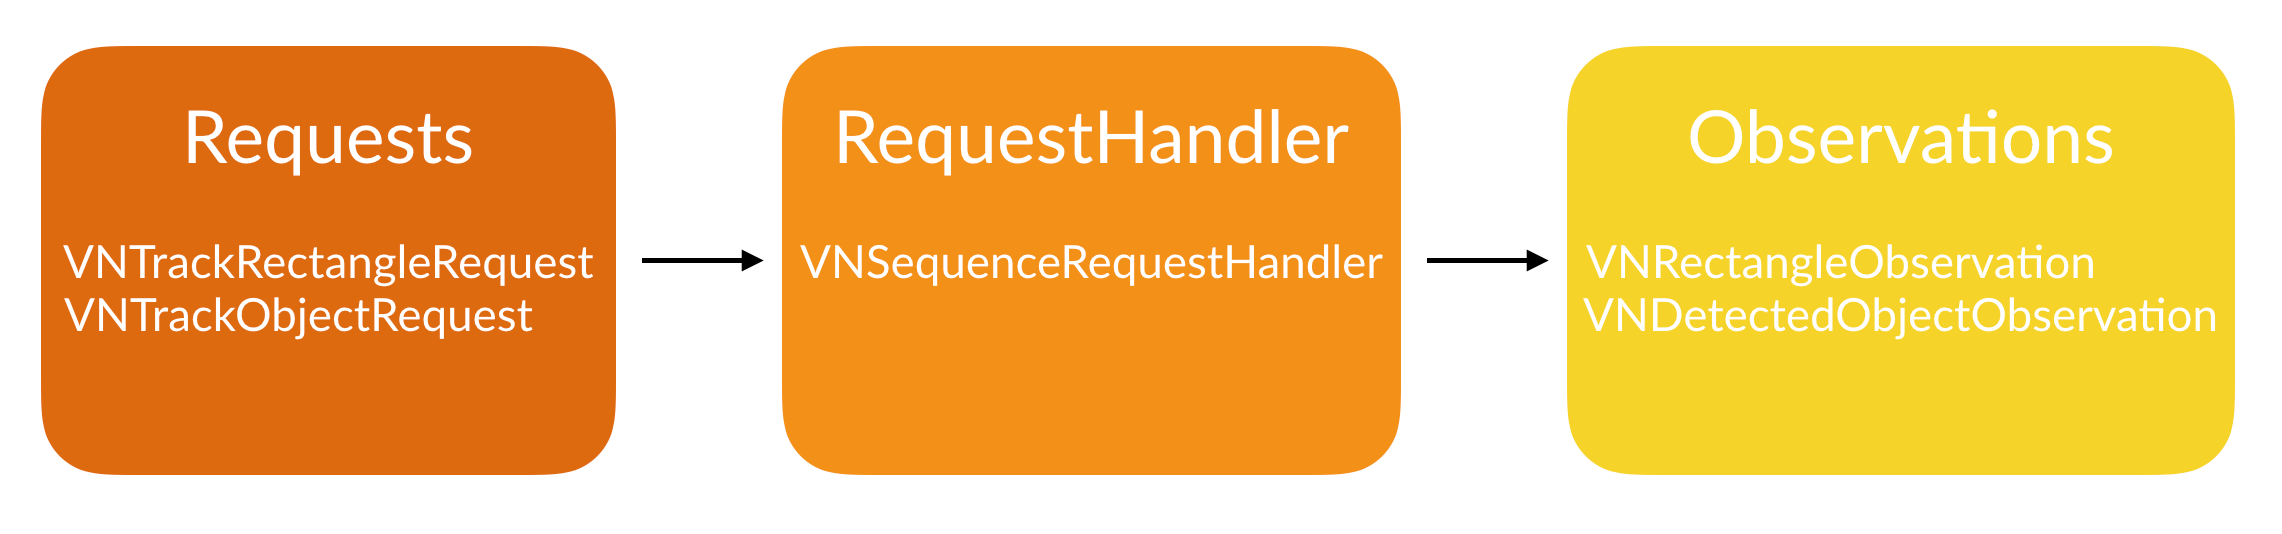
Before we implement the text detection part, we need to understand how the Vision framework works. Basically, there are 3 steps to implement Vision in your app, whic are:
- Requests – Requests are when you request the framework to detect something for you.
- Handlers – Handlers are when you want the framework to perform something after the request is made or “handle” the request.
- Observations – Observations are what you want to do with the data provided with you.
Now to start, let’s begin with a request. Right under the initialization of the variable session, declare another variable as follows:
var requests = [VNRequest]()
We have created an array that will contain a generic VNRequest. Next, let’s create the function that will start the text detection in the ViewController class.
func startTextDetection() {
    let textRequest = VNDetectTextRectanglesRequest(completionHandler: self.detectTextHandler)
    textRequest.reportCharacterBoxes = true
    self.requests = [textRequest]
}
In this function, we create a constant textRequest that is a VNDetectTextRectanglesRequest. Basically it is just a specific type of VNRequest that only looks for rectangles with some text in them. When the framework has completed this request, we want it to call the function detectTextHandler. We also want to know exactly what the framework has recognized which is why we set the property reportCharacterBoxes equal to true. Finally, we set the variable requests created earlier to textRequest.
Now, at this point you should get an error. This is because we have not defined the function that is supposed to handle the request. To get rid of the error, create the function like this:
func detectTextHandler(request: VNRequest, error: Error?) {
    guard let observations = request.results else {
        print("no result")
        return
    }

    let result = observations.map({$0 as? VNTextObservation})
}
In the code above, we begin by defining a constant observations which will contain all the results of our VNDetectTextRectanglesRequest. Next, we define another constant named result which will go through all the results of the request and transform them into the type of VNTextObservation.
Now update the viewWillAppear() method:
override func viewWillAppear(_ animated: Bool) {
    startLiveVideo()
    startTextDetection()
}
If you run your app now, you won’t see any difference. This is because while we told the VNDetectTextRectanglesRequest to report the character boxes, we never told it how to do so. This is what we’ll accomplish next.
Drawing the Boxes
In our app, we’ll have the framework to draw 2 boxes: one for each letter it detects and the other one for each word. Let’s start by creating the function for each word.
func highlightWord(box: VNTextObservation) {
    guard let boxes = box.characterBoxes else {
        return
    }

    var maxX: CGFloat = 9999.0
    var minX: CGFloat = 0.0
    var maxY: CGFloat = 9999.0
    var minY: CGFloat = 0.0

    for char in boxes {
        if char.bottomLeft.x < maxX {
            maxX = char.bottomLeft.x
        }
        if char.bottomRight.x > minX {
            minX = char.bottomRight.x
        }
        if char.bottomRight.y < maxY {
            maxY = char.bottomRight.y
        }
        if char.topRight.y > minY {
            minY = char.topRight.y
        }
    }

    let xCord = maxX * imageView.frame.size.width
    let yCord = (1 - minY) * imageView.frame.size.height
    let width = (minX - maxX) * imageView.frame.size.width
    let height = (minY - maxY) * imageView.frame.size.height

    let outline = CALayer()
    outline.frame = CGRect(x: xCord, y: yCord, width: width, height: height)
    outline.borderWidth = 2.0
    outline.borderColor = UIColor.red.cgColor

    imageView.layer.addSublayer(outline)
}
In this function we begin by defining a constant named boxes which is a combination of all the characterBoxes our request has found. Then, we define some points on our view to help us position our boxes. Finally, we create a CALayer with the given constraints defined and apply it to our imageView. Next, let’s create the boxes for each letter.
func highlightLetters(box: VNRectangleObservation) {
    let xCord = box.topLeft.x * imageView.frame.size.width
    let yCord = (1 - box.topLeft.y) * imageView.frame.size.height
    let width = (box.topRight.x - box.bottomLeft.x) * imageView.frame.size.width
    let height = (box.topLeft.y - box.bottomLeft.y) * imageView.frame.size.height

    let outline = CALayer()
    outline.frame = CGRect(x: xCord, y: yCord, width: width, height: height)
    outline.borderWidth = 1.0
    outline.borderColor = UIColor.blue.cgColor

    imageView.layer.addSublayer(outline)
}
Similar to the code we wrote earlier, we use the VNRectangleObservation to define our constraints that will make outlining the box easier. Now, we have all our function laid out. The final step is connecting all the dots.
Connecting the Dots
There are 2 main dots to connect. The first thing is the boxes to the “handle” function of our request. Let’s do that first. Update the detectTextHandler method like this:
func detectTextHandler(request: VNRequest, error: Error?) {
    guard let observations = request.results else {
        print("no result")
        return
    }

    let result = observations.map({$0 as? VNTextObservation})

    DispatchQueue.main.async() {
        self.imageView.layer.sublayers?.removeSubrange(1...)
        for region in result {
            guard let rg = region else {
                continue
            }

            self.highlightWord(box: rg)

            if let boxes = region?.characterBoxes {
                for characterBox in boxes {
                    self.highlightLetters(box: characterBox)
                }
            }
        }
    }
}
We begin by having the code run asynchronously. First, we remove the bottommost layer in our imageView (if you noticed, we were adding a lot of layers to our imageView). Next, we check to see if a region exists within the results from our VNTextObservation. Now, we call in our function which draws a box around the region, or as we defined it, the word. Then, we check to see if there are character boxes within the region. If there are, we call in the function which draws a box around each letter.
Now the last step in connecting the dots is to run our Vision code with the live stream. We need to take the video output and convert it into a CMSampleBuffer. In the extension of ViewController.swift insert the following code:
func captureOutput(_ output: AVCaptureOutput, didOutput sampleBuffer: CMSampleBuffer, from connection: AVCaptureConnection) {
    guard let pixelBuffer = CMSampleBufferGetImageBuffer(sampleBuffer) else {
        return
    }

    var requestOptions:[VNImageOption : Any] = [:]

    if let camData = CMGetAttachment(sampleBuffer, kCMSampleBufferAttachmentKey_CameraIntrinsicMatrix, nil) {
        requestOptions = [.cameraIntrinsics:camData]
    }

    let imageRequestHandler = VNImageRequestHandler(cvPixelBuffer: pixelBuffer, orientation: 6, options: requestOptions)

    do {
        try imageRequestHandler.perform(self.requests)
    } catch {
        print(error)
    }
}
Hang in there! It’s our last part of the code. The extension adopts the AVCaptureVideoDataOutputSampleBufferDelegate protocol. Basically what this function does is that it checks if the CMSampleBuffer exists and is giving an AVCaptureOutput. Next, we create a variable requestOptions which is a dictionary for the type VNImageOption. VNImageOption is a type of structure that can hold the properties and data from the camera. Finally we create a VNImageRequestHandler object and perform the text request that we create earlier.
Build and run the app and see what you get!
Conclusion
Well, that was a big one! Try testing the app on different fonts, sizes, objects, lighting, etc. See if you can expand upon this app. Post how you’ve expanded this project in the comments below. You can also go beyond by combining Vision with Core ML. For more information on Core ML, check out my introductory tutorial on Core ML.
For reference, you can refer to the complete Xcode project on GitHub.
For more details about the Vision framework, you can refer to the official Vision framework documentation. You an also refer to Apple’s sessions on the Vision framework during WWDC 2017:


