

Networking in Swift has been a point of contention since the announcement of the language back in June of 2014. Even Swift’s creator, Chris Lattner, tweeted that decoding JSON is an “ongoing saga”. As a result, many have sought alternatives. Sure, there are built in classes to handle basic JSON parsing, but they are not the more developer-friendly. Fortunately, Alamofire exists. Written by the same creator as its Objective-C counterpart (AFNetworking), Alamofire is a powerful library that helps us decode JSON.
In this holiday-themed 3500+ word monstrosity of a tutorial, we’re going to explore a wide range of topics essential to networking and build a holiday todo list.
In this tutorial, you’ll discover how to use and decode JSON, write a custom server, use tools such as Heroku and MongoLab, how HTTP methods (including GET, POST, and DELETE) work, git, the terminal, and work with cocoa pods. If this sounds like a lot to you, grab a cup of coffee and let’s get started.

Oh, and happy holidays from all of us here at AppCoda. 🙂
NOTE: This is an advanced tutorial and covers a lot of ground – quickly. I assume you have a solid understanding of iOS and Swift. Certain topics such as tableviews, autolayout, delegates, etc will not be explained in depth. If these seem foreign to you, head on yonder to our excellent course and return later.
Getting Started
In order to make this work, I’ve written a backend in the popular server-side technology Node.js. For those unfamiliar with node, it based on javascript’s runtime environment in Google Chrome’s V8 engine. Long story short, it’s incredibly reliable, fast, and powerful.
For this backend, I also included Restify and used MongoDB. MongoDB is a no-SQL database popular among web developers. Using Mongo, we can store all our relevant content in the database.
When I was beginning my dive into Node, I was unsure how everything worked and many of the blogs I visited never explained what was ongoing. As such, although this is an iOS blog, I will introduce you to Javascript and how the Node server works.
I’ve scoured the web and there isn’t a detailed tutorial that walks you through the steps from creating an API to interacting with it in an iOS app. But that’s not true anymore. Enter the Networking tutorial…
Meet node.js
As I previously mentioned, Node js is a powerful server technology built upon Chrome’s running environment. As such, it is highly asynchronous and non blocking (if you’re unsure what this mean, it’s simple a reference to how the main thread, or main part of the app, does not get congested). Multithreading is a programming technology which prevents lag and increases program efficiency. Think of the app as a highway. If there is only one lane and 20 cars need to get through it, then there will likely be traffic or congestion. However, if there are three lanes, each with exists and entrances, then traffic will be much less. Multithreading is much the same way. In a multithreaded environment, code is executed on different threads which prevents congestion to the app and thus prevents it from stalling.
![]()
Node was developed by Joyent, a cloud computing company based in San Francisco and is maintained by the company.
If you’re still unsure how everything works, think of the backend as follows:
- It is a place that routes your API (we’re building an API for this app much like any other API on the web, including the popular forecast.io API we used in my previous tvOS tutorial).
- MongoDB gives us a place to store all this data. When we want to post a new message, we need to have a place where that message will be stored. In this scenario, it’s going to be stored to our Mongo database.
- We are creating a fully functional REST API which conforms to the REST protocol, which is how the web runs.
Our MongoDB is hosted on MongoLab and the node server is up on Heroku. Heroku, powered by Salesforce, is popular service for hosting Node, Rails, Python, etc. apps and MongoLab is an excellent service for hosting Mongo databases.
Introduction to HTTP Verbs
Before we begin coding, it is imperative that you understand HTTP verbs and how they will be used in our app.
GET – The GET verb queries our database and retrieves content. GET can be restricted to one, many, or all items. In fact, each and every time you go to google.com or view your Facebook/Twitter feed, you are performing a GET request (and likely not even knowing it)!
POST – The POST verb sends data to the server and then saves it. For example, when you compose a new Facebook or Twitter post and then press the Post/Tweet button, you are creating new content and thus using the POST verb.
UPDATE – The update verb allows you to modify content after the fact. When you edit a Facebook post, the UPDATE verb is being used.
DELETE – As the name implies, this verb calls for the deletion of content. When you press the delete button on a Facebook or Twitter post, this verb is called.
These four verbs are the basis on REST protocol and comprise how much of the internet works. You may also hear the acronym CRUD used interchangeably with these verbs. CRUD stands for Create Read Update and Delete. If it’s not already apparent, these words correspond with POST, GET, UPDATE, and DELETE.
Awesome! Now that we have a solid understanding of the HTTP protocol, we should be ready to jump into the meat of this tutorial and get rolling.
Setting up the Necessary Tools
Before we touch MongoLab or Heroku, let’s make sure you’re all set with Node.js.
Click on this link, follow the brief guide, and download node on your machine.
Then, refer to this page on npm’s website to download npm.
In order to set up our backend, we need to make accounts on both Heroku and MongoLab. Let’s start with MongoLab. Click this link to fire up MongoLab’s website and make an account.
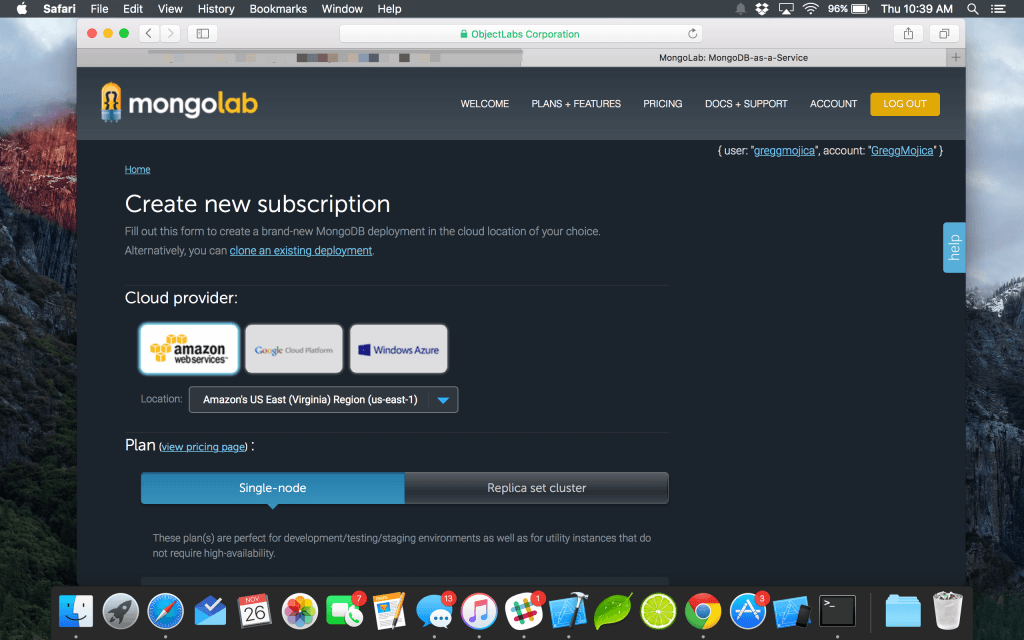
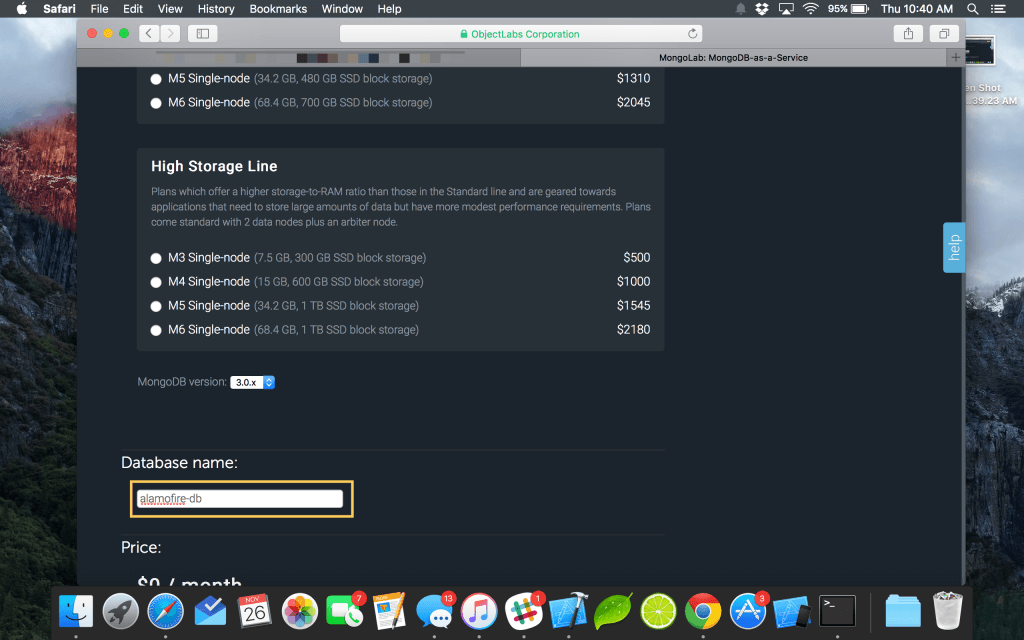
Be sure to select single-node (this is free) and when prompted, fill in a name for your database. I called mine alamofire-db (the db suffix at the end stands for database and this is a common naming convention).
Next login to your database and locate the mongo URI.
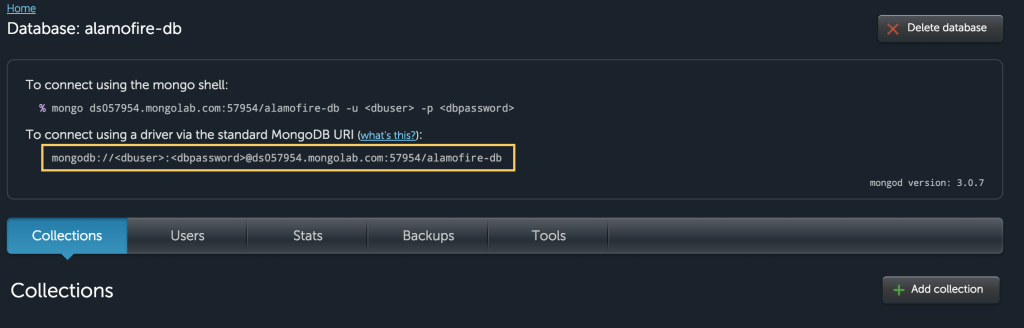
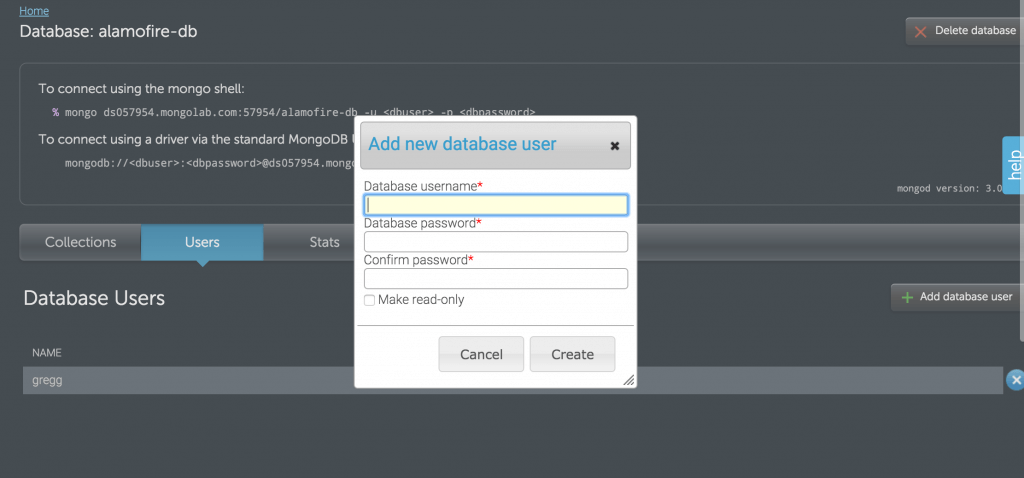
You will next need to make a new user by clicking the users tab and select a name and password. Remember the password.
Now return to the page where your mongo URI was and replace it with your new credentials. For example:
mongodb://<dbuser>:<dbpassword>@ds057954.mongolab.com:57954/alamofire-db
Became:
mongodb://gregg:[email protected]:57954/alamofire-db
Great progress!
Now go to Heroku.com, signup for free, and return here when ready.
Click this link to install the heroku toolbelt on your mac and follow the guide.
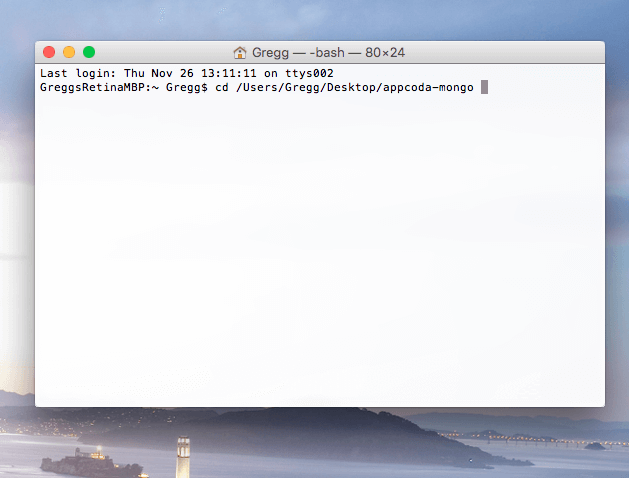
Once installed, power up terminal and select heroku login. If you’ve never used the terminal before, don’t worry. We’ll be using it a lot in this tutorial so you’ll have a solid grasp on how it works by the end.
As soon as you’re logged in to heroku on terminal, use the cd command (which stands for change directory) to move into the project folder you downloaded before from dropbox. cd is the terminal equivalent to moving through folders in finder.
Hit the enter key to execute this command. Great job. Now we’ll be using git to push to heroku.
Enter the following commands in terminal.
NOTE: If you are having difficulty with this step as some have relayed in the comments, please remove the git origin using this:
rm -r .git
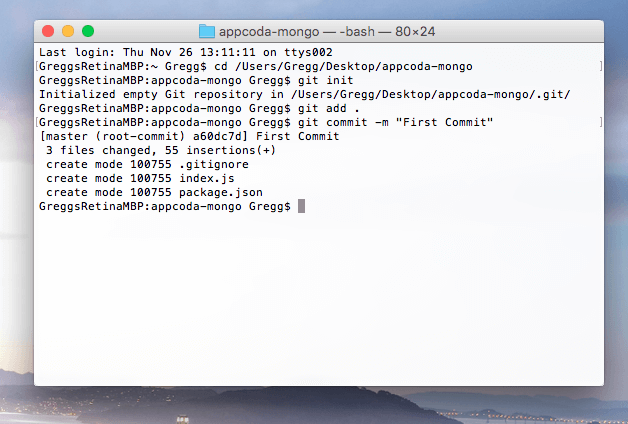
git init
git add .
git commit -m "First Commit"
These three commands inintalzie a repository (repo for short), then add the files to that repository, and finally commit, or saves them.
Git is a popular version control software common to many workfows.
You should now see something like the following:
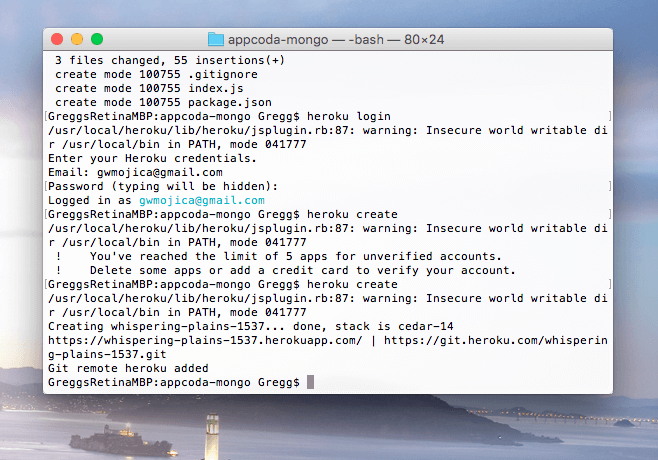
With the heroku toolbelt installed, type heroku login and enter your heoku login credentials (i.e. email and password). When you type in your password, it will be hidden. Hit enter to continue and if everything’s ok you’ll see your email highlighted in teal.
Now type heroku create to create a new heroku app. Heroku will create a new app for you with a domain. For example, mine is https://whispering-plains-1537.herokuapp.com/.
Now type git push heroku master to send you app to heroku!
If all goes well (which it should), you’ll see something like this (settings will vary).

Working with Node.JS, Express, MongoLab & Mongoose
Let’s begin by downloading the sample project linked here. Fire up your favorite text editor (Sublime Text 2 is mine; it’s available as an unlimited free trial on SublimeText.com, but if you like them support their app and make the purchase) and let’s dive in.
Javascript is very similar to Swift and you should (for the most part) be right at home with it. We’ll be using express and mongoose, two popular node packages. Make sure you have npm, the node package manager installed on your system.
Express, a “fast, unopinionated, minimalist web framework for Node.js” makes routing a breeze. What’s routing, you ask? Routing is the way we interact with the web. Every time you navigate to google.com you’re actually navigating to google.com/, which is the root index. If you were to go to google.com/hello that is another route. We an define routes we want our database to accept as we’ll do in a moment.
You can learn more about express and it’s capabilities from the official expressjs.org website.
Check out this example code:
var express = require('express'); // 1
var app = express(); // 2
// respond with "hello world" when a GET request is made to the homepage
app.get('/', function(req, res) { // 3
  res.send('hello world'); //4
});
The first line sets a variable called express. The second initializes a variable called app to express. In the third line we use the app, which represents the express environment. Here we use the get() function (much like in swift). When a user navigates to / (the default of all websites) then “Hello, World ” will appear. This is an example of express routing. For more information, check the express website http://expressjs.com/guide/routing.html
Now that we have our node environment setup with mongo, let’s try using some cURL request to test out its functionality. cURL is a command line program that allows you to send HTTP requests. We will first experiment with cURL and then migrate our cURL requests to AlamoFire.
Intro to JavaScript
Model Directory
Fire up your text editor (I’m using Sublime, by the way) and open the app. Navigate to the app.js file. As you can see, the app is broken down into a model and a routes file (and of course the app.js file you are currently viewing). The model file establishes the schema, or database structure. Let’s take a look at that file briefly.
var mongoose = require('mongoose'),
    Schema = mongoose.Schema;

var TodoSchema  = new Schema(
    {
  name: String
});

mongoose.model('employees', TodoSchema);
We can mongoose, the npm package that interfaces between the app and mongo. I was initially building an employe tracking app and actually called my model employees, but feel free to change this. I just kept it because the rest of the tutorial depends on it (and I caught it at the end)!

Mongoose will interface and connect our heroku node app with mongoLab. How convient.
Routes Directory
The routes file establishes what routes we will export to our app.js file. Don’t worry about exporting — it’s a more advanced feature of node and beyond the scope of this tutorial.
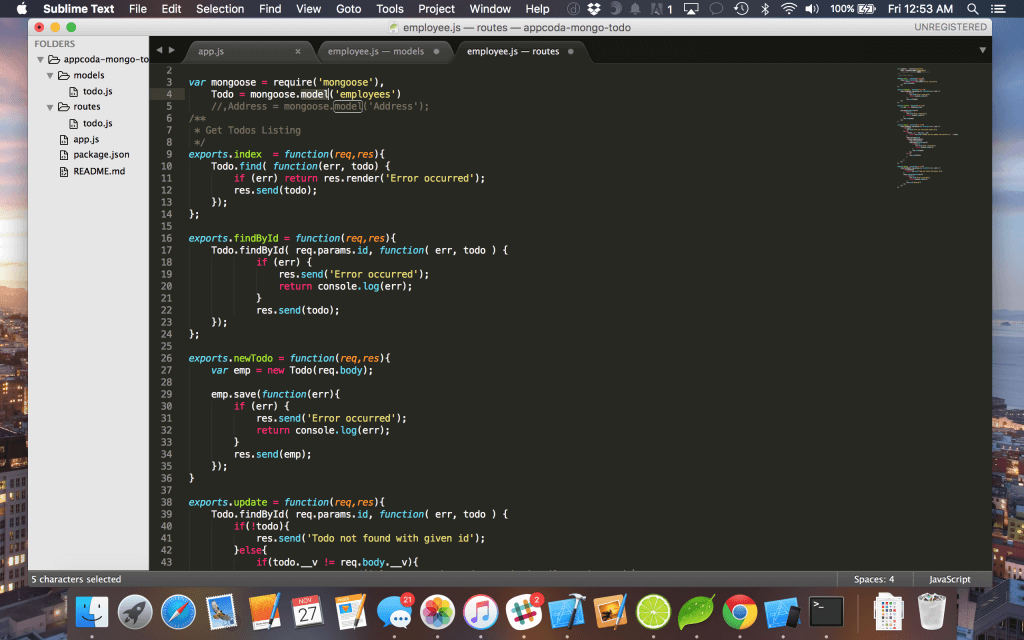
Notice newTodo in line 26. As you might have guessed, this creates a new todo.
 var emp = new Todo(req.body);

    emp.save(function(err){
        if (err) {
            res.send('Error occurred');
            return console.log(err);
        }
        res.send(emp);
});
We assign the Todo object (define in line 4 which is a connection from mongoose) to a variable called emp, set the req.body (req stands for request which is the data that was sent to us while res stands for response and is what we return).
Feel free to browse the rest of the methods.
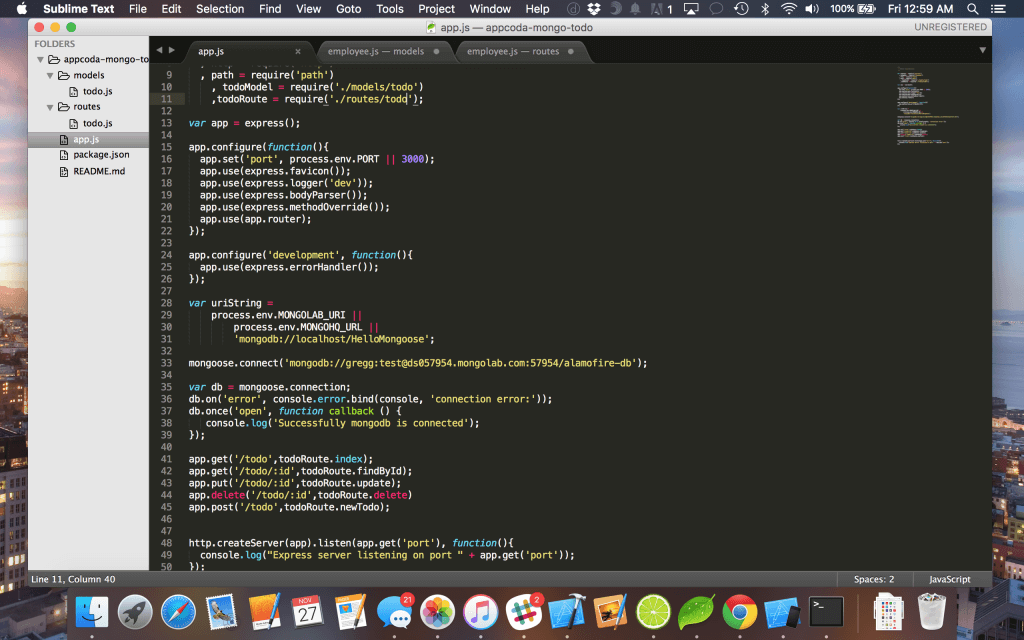
Sticky Glue — App.js
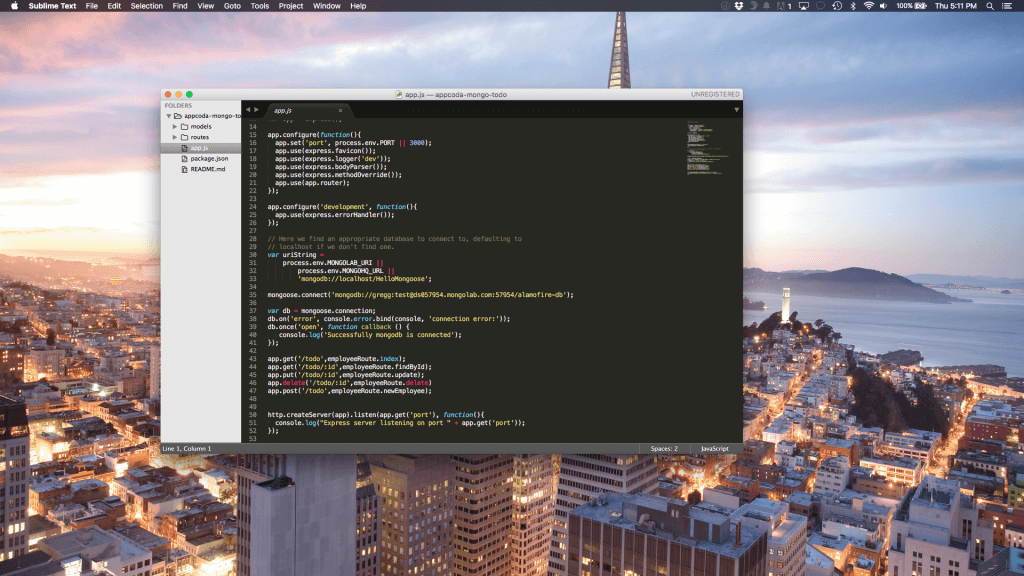
Return now to the app.js file. This is the main part of the entire app and holds it all together. Here’s some of the highlights of this file:
- Line 13 establishes the express app
- Lines 15 – 22 configure the app
- In line 33 we connect the app to mongoose and our mongoLab database.
- In line 35 we establish a connection.
- Lines 41 – 45 establish the app routes and connect them to the /routes/todo.js file
- Line 48 creates a server
With that you should have a basic working knowledge of how the javascript app works. As this is not a javascript blog, I will not go further in depth. However, I encourage you to research express and mongoose.
Working with cURL
With our node app up and running, let’s perform some cURL requests to test it out. As soon as we’re done, we can migrate over to Alamofire.
GET Request:
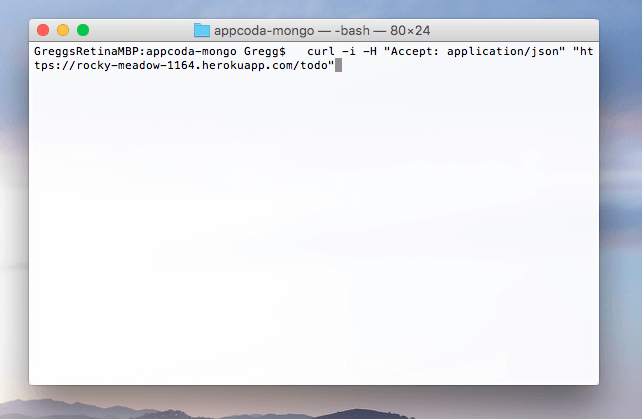
Run the following command in the terminal (feel free to modify the url with your own heroku url).
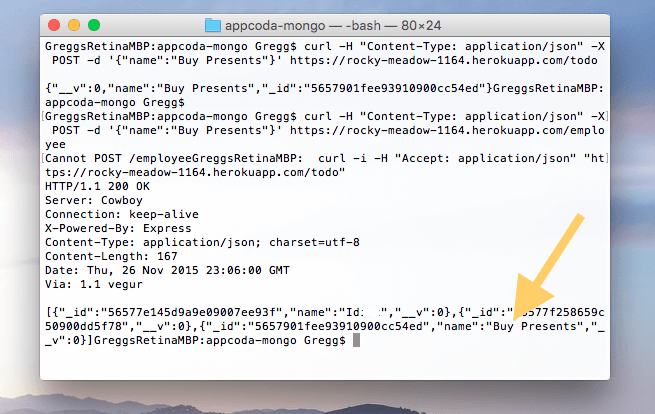
curl -i -H "Accept: application/json" "https://rocky-meadow-1164.herokuapp.com/todo"
The -i and -H are flags, which explain what will be accepted. We will accept json and append the JSON url at the end of the request.
You should see data returned. See the below screenshot.
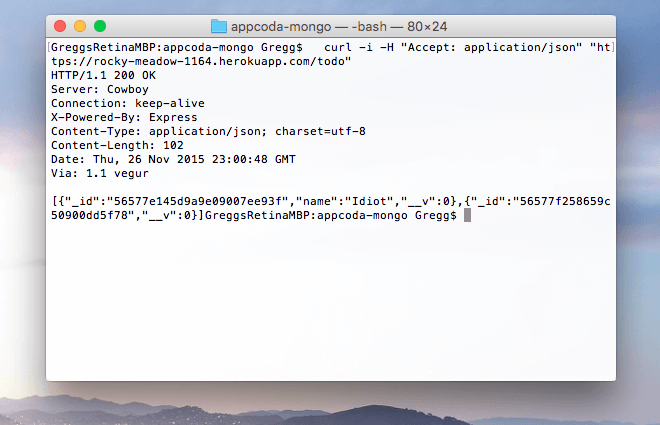
As you can see, we have some data returned, which is exactly what we want. If you replaced my url with your own, you might not see any data as you probably don’t have anything in your mongo db.
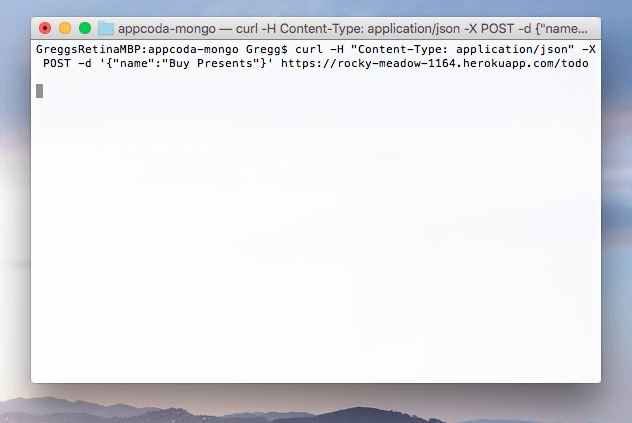
POST Request
If you want to add something to the database, we can run a simple POST command.
curl -H "Content-Type: application/json" -X POST -d '{"name":"Buy Presents"}' https://rocky-meadow-1164.herokuapp.com/todo
Now, rerun the GET command from earlier and you should see the “Buy Presents” we added before.
al
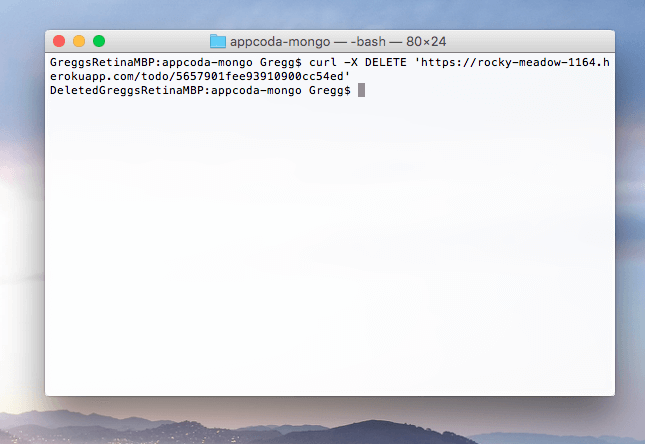
DELETE Request
curl -X DELETE 'https://rocky-meadow-1164.herokuapp.com/todo/5657901fee93910900cc54ed'
Awesome. We’re not going to discuss PUT since we won’t be using it in our app, but it’s very much the same as the others.
Setting up an iOS app with Alamofire

Let’s get started by creating a new Xcode project called TodoApp. Since the holidays are upon us, we should probably have a way to keep track of things. Luckily, we have our node app to help us out!
While you could install Alamofire manually (by dragging and dropping the files into your project), we’re going to use Cocoapods. Cocoapods is the de facto dependency manager for iOS projects. Using cocoapods, developers can easily add frameworks and third party libraries. It’s an amazing resource and if you haven’t used it yet you most definitely should be using it!
Make sure you have cocoapods installed by running the following command in terminal.
$ gem install cocoapods
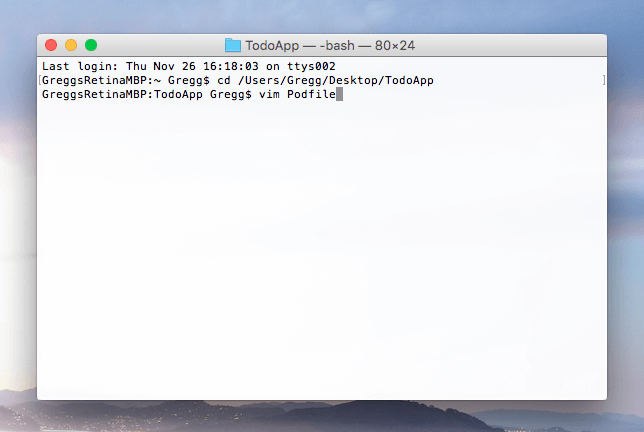
Now navigate to your project and cd to its location.
Now type the following command
vim Podfile
Vim is a command line editor, much like Sublime Text or TextMate although it is built into the command line. We’re going to make a Podfile, which is where cocoapods will look each time it updates the project’s pods (various dependencies).
Hit enter and type:
source 'https://github.com/CocoaPods/Specs.git'

platform :ios, '8.0'

use_frameworks!

pod 'Alamofire', '~> 3.0'
Then press the escape key followed by:
:wq
wq stands for write and quit. We have now created a new file and saved it. To install cocoapods, type
pod install
If all goes well, you should see something like the following.
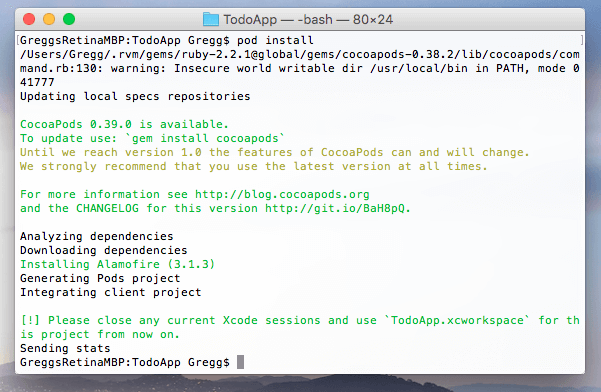
As the command line suggests, you must close your current xcode project, open up the finder window, and now select the .xcworkspace cocoapods generated.
The following handy command will open finder. We’re finally done with terminal…was that enough for one day?
open .
Fire up ViewController.swift and let’s get rolling.
Alamofire GET request
Now import Alamofire using
import Alamofire
Under viewDidLoad() type the following code
Alamofire.request(.GET, "https://rocky-meadow-1164.herokuapp.com/todo") .responseJSON { response in // 1
      print(response.request)  // original URL request
      print(response.response) // URL response
      print(response.data)     // server data
      print(response.result)   // result of response serialization

      if let JSON = response.result.value {
         print("JSON: \(JSON)")
        }
}
In line 1 we state this will be a GET request and pass in the URL we need. Run the app and see what it returns. If all goes well you’ll see returned JSON.
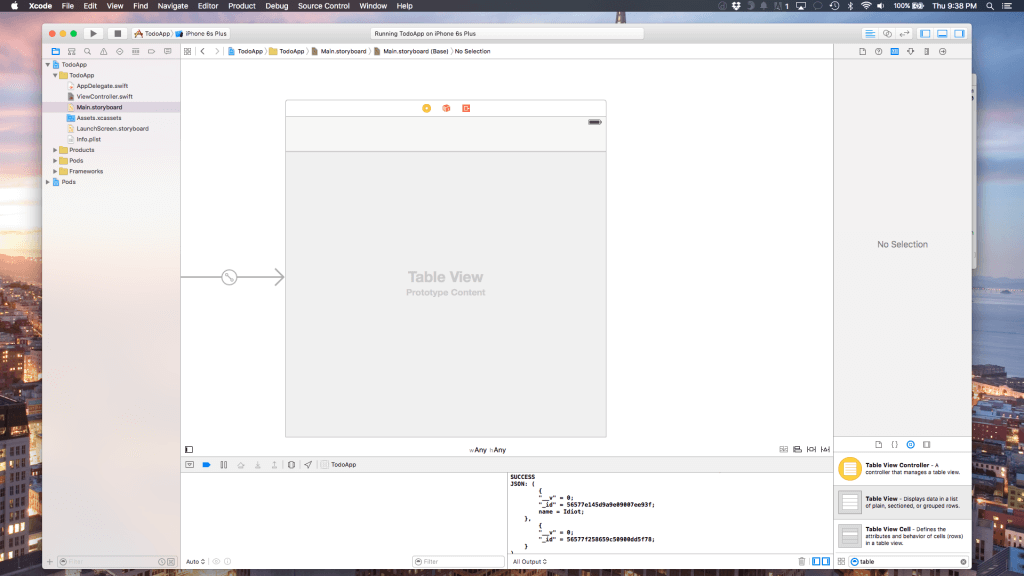
Now let’s move to our Main.storyboard and add a tableview to the view controller and embed it in a navigation controller. Your storyboard should look like mine below (notice the json returned from our node server in the console).
Copy and paste the following code in your viewcontroller.swift file.
import UIKit
import Alamofire
class ViewController: UIViewController {

    @IBOutlet weak var tableView: UITableView!
    var jsonArray:NSMutableArray?
    var newArray: Array<String> = []

    override func viewDidLoad() {
        super.viewDidLoad()

        Alamofire.request(.GET, "https://rocky-meadow-1164.herokuapp.com/todo") .responseJSON { response in
                print(response.request)  // original URL request
                print(response.response) // URL response
                print(response.data)     // server data
                print(response.result)   // result of response serialization

                if let JSON = response.result.value {
                    self.jsonArray = JSON as? NSMutableArray
                    for item in self.jsonArray! {
                        print(item["name"]!)
                        let string = item["name"]!
                        print("String is \(string!)")

                        self.newArray.append(string! as! String)
                    }

                    print("New array is \(self.newArray)")

                    self.tableView.reloadData()
                }
        }


        // Do any additional setup after loading the view, typically from a nib.
    }
}
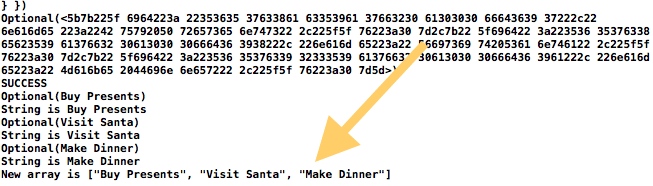
I have initialized two arrays and perform a simpe for loop to iterate through the array of items and then assign each returned item to the newArray object.
Using POST cURL requests, I added a few more items to the database. Feel free to do the same.
The GET request can be further simplified to the following code should you chose to do so.
Alamofire.request(.GET, "https://rocky-meadow-1164.herokuapp.com/todo").responseJSON { response in debugPrint(response) }
Next, add the UITableViewDelegate and UITableViewDataSource after the UIViewController declaration at the top of the file. Then assign the following code in viewDidLoad()
self.tableView.dataSource = self
self.tableView.delegate = self
Finally, add these UITableView delegate methods
   func tableView(tableView: UITableView, numberOfRowsInSection section: Int) -> Int {
        return self.newArray.count
   }

    func tableView(tableView: UITableView, cellForRowAtIndexPath indexPath: NSIndexPath) -> UITableViewCell {
        let cell = tableView.dequeueReusableCellWithIdentifier("Cell", forIndexPath: indexPath) as UITableViewCell

        cell.textLabel?.text = self.newArray[indexPath.row]
        return cell
    }

    override func didReceiveMemoryWarning() {
        super.didReceiveMemoryWarning()
        // Dispose of any resources that can be recreated.
    }
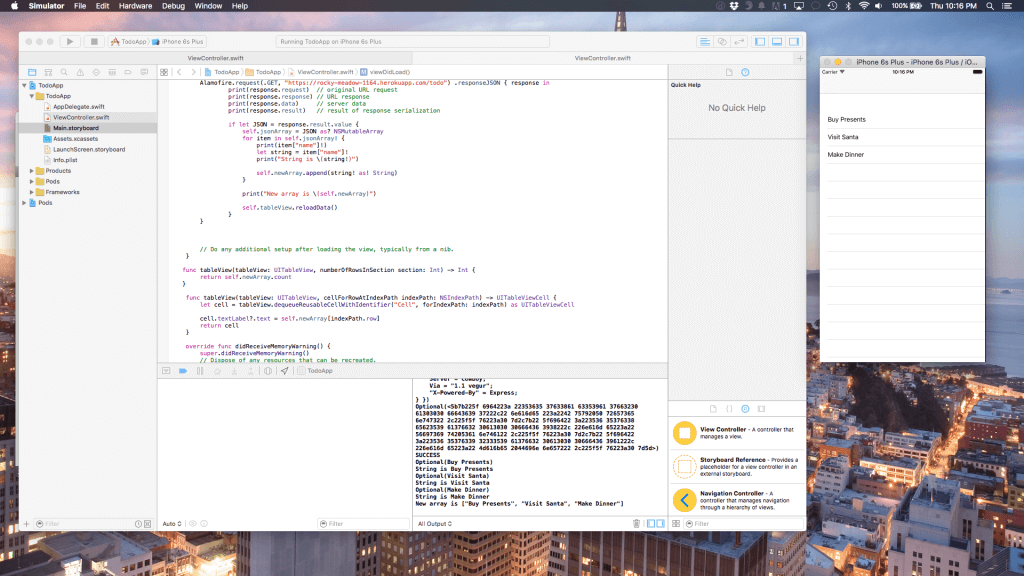
As you can see, our tableview is populated!
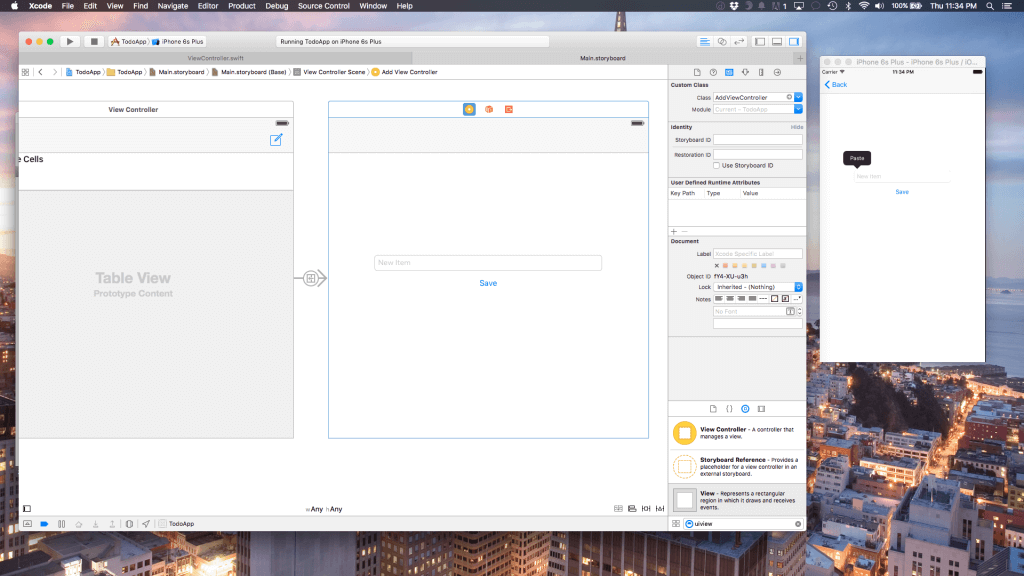
Let’s now add a compose button to add an item to the list. Add a new class called AddViewController to the storyboard and wire it up with a segue. Your storyboard should now look like the following.
Alamofire POST Request
In your AddViewController.swift file create an IBOutlet for the textfield (name it textView) and an IBAction for the Save button. Under the save button, input the following code.
Alamofire.request(.POST, "https://rocky-meadow-1164.herokuapp.com/todo", parameters: ["name": self.textView.text!])

self.navigationController!.popViewControllerAnimated(true)
As you can see, Alamofire dramatically simplifies the process of sending a POST request.
Next, let’s do some refactoring to our ViewController.swift code to ensure it updates after we save another item. Extract and remove your GET Alamofire code from viewDidLoad() and place it in a function called downloadAndUpdate
func downloadAndUpdate() {
        Alamofire.request(.GET, "https://rocky-meadow-1164.herokuapp.com/todo") .responseJSON { response in
            print(response.request)  // original URL request
            print(response.response) // URL response
            print(response.data)     // server data
            print(response.result)   // result of response serialization

            if let JSON = response.result.value {
                self.jsonArray = JSON as? NSMutableArray
                for item in self.jsonArray! {
                    print(item["name"]!)
                    let string = item["name"]!
                    print("String is \(string!)")

                    self.newArray.append(string! as! String)
                }
                print("New array is \(self.newArray)")
                self.tableView.reloadData()
            }
        }

    }
Now, call the method ViewWillAppear() and call your function inside it.
override func viewWillAppear(animated: Bool) {
   self.downloadAndUpdate()
}
If you build and run the app again and go through the creation process, the app will reload with the new todo each time. But why?
Well, this brings us to a (rather short) discussion on the view controller life cycle. ViewDidLoad() is the function called when the view is instantiated and everything is finished lading. The problem is that when we load another view (the AppViewController class) on top of the already loaded ViewController class, viewDidLoad is not called again (as it was instantiated before). ViewWillAppear, however is called every time a view is shown on screen. Since we are showing ViewController.swift again, this method will work.
Alamofire DELETE Request
Now add the following array under the newArray variable
var IDArray: Array<String> = []
Next, update your downloadAndUpdate function with the following changes.
self.newArray.removeAll() // NEW
self.IDArray.removeAll() // NEW

Alamofire.request(.GET, "https://rocky-meadow-1164.herokuapp.com/todo") .responseJSON { response in
            print(response.request)  // original URL request
            print(response.response) // URL response
            print(response.data)     // server data
            print(response.result)   // result of response serialization

            if let JSON = response.result.value {
                self.jsonArray = JSON as? NSMutableArray
                for item in self.jsonArray! {
                    print(item["name"]!)
                    let string = item["name"]!
                    let ID = item["_id"]! // NEW

                    self.newArray.append(string! as! String)
                    self.IDArray.append(ID! as! String) // NEW
                }
                print("New array is \(self.newArray)")
                self.tableView.reloadData()
            }
        }
The two new lines have comments saying NEW. Essentially, we are looping through the array to obtain the ID for each index and store it in the IDArray. We also removed all the old items from the array and reset it.
Now add the commitEditingStyle function to invoke the DELETE request.
func tableView(tableView: UITableView, commitEditingStyle editingStyle: UITableViewCellEditingStyle, forRowAtIndexPath indexPath: NSIndexPath) {
        if editingStyle == .Delete {
            print("ID is \(self.IDArray[indexPath.row])")

            Alamofire.request(.DELETE, "https://rocky-meadow-1164.herokuapp.com/todo/\(self.IDArray[indexPath.row])")
            self.downloadAndUpdate()

        } else if editingStyle == .Insert {
            // Create a new instance of the appropriate class, insert it into the array, and add a new row to the table view
        }
    }
As you can see, we just conform to our node app’s API which says that a delete request comes through /todo/ID.
Again, this rather simple Alamofire method invokes the DELETE request and then destroys the todo item.
And there you have it, a fully functioning todo app just in time the holidays. Thus concludes our 3500+ word tutorial.
Conclusion
We explored a lot in this tutorial. From Javascript’s Node to express and MongoDB to cURL and terminal to cocoapods and finally Alamofire, we dove into the details of what makes a REST API and how networking works. You should not have a solid grasp on how to:
- Build an API
- Deploy an API
- Write a Client App
- Interact with HTTP Verbs
- Use Cocoapods
- Use cURL
- Interact with Node and the MongoDB/Express environment
- Use Express routes
- Use Alamofire
This has been a monster tutorial and I thank you for sticking it out with me. For your reference, the entire source code can be downloaded here (including the Node app and iOS app).
As always, leave your thoughts in the comments and I’ll pop in to answer questions. Until next time!


