Update: As Apple released Xcode 6 and Swift, we’ve updated the Hello World tutorial here.
The Hello World tutorial was the first programming article written for our free programming course. We think it’s time to update the tutorial to make it fit for Xcode 5. Since the release of Xcode 5, we received quite a lot of queries (or complaints) about the Hello World tutorial. Here are some of them:
- I tried to follow the tutorial but the procedures no longer work for Xcode 5.
- Where is the Interface Builder?
- How can I create the XIB file?
The list goes on and on. Xcode 5 promotes the use of Storyboard instead of Interface Builder. When you create a new Xcode project using the Single View template, it defaults to Storyboard. There is no XIB file generated.

We’ve completely updated the Hello World tutorial for Xcode 5. However, we intend to use Interface Builder to build the project. It doesn’t mean we prefer Interface Builder over Storyboard, which is great. We just want you to learn both.
Enter the Hello World tutorial for Xcode 5.
You may have heard of “Hello World” program if you have read any programming book before. It has become the traditional program for first-time learner to create. It’s a very simple program that usually outputs “Hello, World” on the display of a device. In this tutorial, let’s follow the programming tradition and create a “Hello World” app using Xcode. Despite its simplicity, the “Hello World” program serves a few purposes:
- It gives you a better idea about the syntax and structure of Objective C, the programming language of iOS.
- It also gives you a basic introduction of the Xcode environment. You’ll learn how to create a Xcode project and create user interface with the built-in interface builder.
- You’ll learn how to compile a program, build the app and test it using the Simulator.
- Lastly, it makes you think programming is not difficult. I don’t want to scare you away. 🙂
Take a Look at Your First App
Before we go into the coding part, let’s first take a look at our version of the “Hello World” app. The final deliverable will look like this:
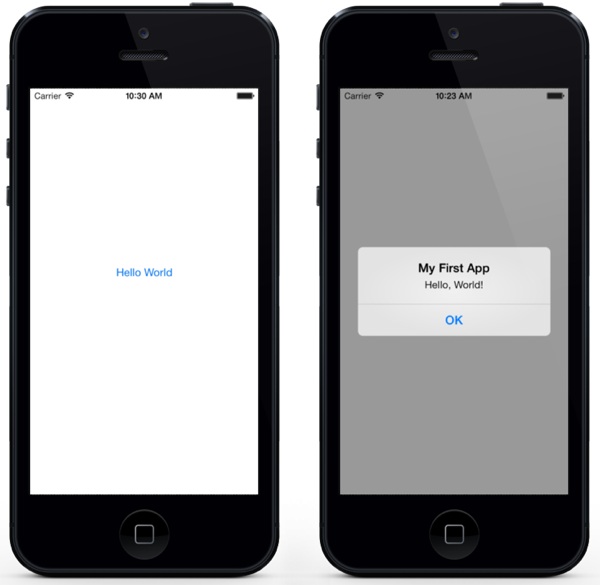
It’s very simple and shows only a “Hello World” button. When tapped, the app prompts you a message. That’s it. Nothing complex but it helps you kick off your iOS programming journey.
Start Coding!
First, launch Xcode. If you’ve installed Xcode via Mac App Store, you should be able to locate Xcode in the LaunchPad. Just click on the Xcode icon to start it up.
Once launched, Xcode displays a welcome dialog. From here, choose “Create a new Xcode project” to start a new project:

Xcode 5 – Welcome Dialog
Xcode shows you various project template for selection. For your first app, choose “Empty Application” and click “Next”.

Select Empty Application
This brings you to another screen to fill in all the necessary options for your project.

Hello World Project Options
You can simply fill in the options as follows:
- Product Name: HelloWorld – This is the name of your app.
- Company Identifier: com.appcoda – It’s actually the domain name written the other way round. If you have a domain, you can use your own domain name. Otherwise, you may use mine or just fill in “edu.self”.
- Class Prefix: HelloWorld – Xcode uses the class prefix to name the class automatically. In future, you may choose your own prefix or even leave it blank. But for this tutorial, let’s keep it simple and use “HelloWorld”.
- Device Family: iPhone – Just use “iPhone” for this project.
- Use Core Data: [unchecked] – Do not select this option. You do not need Core Data for this simple project.
Click “Next” to continue. Xcode then asks you where you saves the “Hello World” project. Pick any folder (e.g. Desktop) on your Mac. You may notice there is an option for version control. Just deselect it. We’ll discuss about this option in the later tutorials. Click “Create” to continue.

Pick a folder to save your project
As you confirm, Xcode automatically creates the “Hello World” project based on all the options you provided. The screen will look like this:
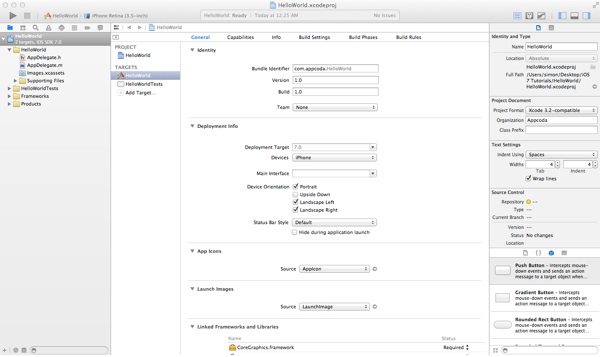
Empty HelloWorld Project
Familiarize with Xcode Workspace
Before we move on to code your app, let’s take a few minutes to have a quick look at the Xcode workspace environment. On the left pane, it’s the project navigator. You can find all your files under this area. The center part of the workspace is the editor area. You do all the editing stuffs (such as edit project setting, class file, user interface, etc) in this area depending on the type of file selected. Under the editor area, you’ll find the debug area. This area is shown when you run the app. The rightmost pane is the utility area. This area displays the properties of the file and allows you to access Quick Help. If Xcode doesn’t show this area, you can select the rightmost view button in the toolbar to enable it.
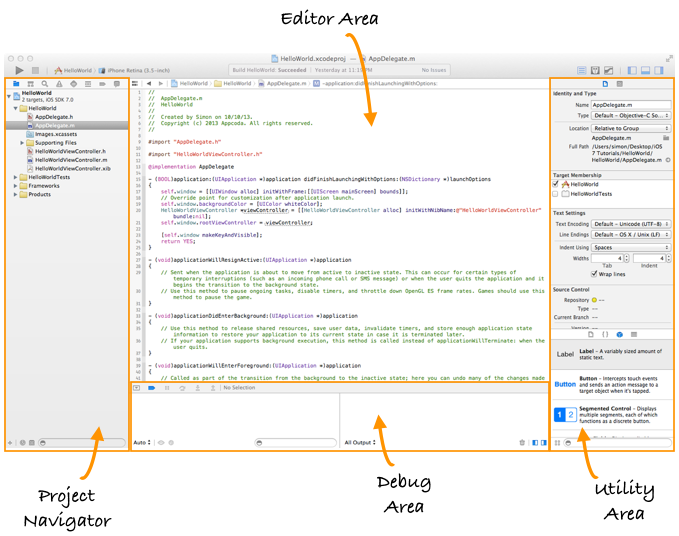
Lastly, it’s the toolbar. It provides various functions for you to run your app, switch editor and the view of the workspace.

Run Your App for the First Time
Even you haven’t written any code, you can run your app to try out the Simulator. This gives an idea how you build and test your app in Xcode. Simply hit the “Run” button in the toolbar.

Run button in Xcode 5
Xcode automatically builds the app and runs it in the Simulator. This is how the Simulator looks like:

iPhone Simulator in Xcode 5
A white screen with nothing inside?! That’s normal. As your app is incomplete, the Simulator just shows a blank screen. To terminate the app, simply hit the “Stop” button in the toolbar.
By default, Xcode sets to use iPhone Retina (3.5-inch) as the simulator. You are free to select other simulators to test the app. Try to select another simulator and run the app.

Back to Code
Okay, let’s move on and start to add the Hello World button to our app. Before we can put a button, we first need to create a view and its corresponding controller. You can think of a view as a container that holds other UI items such as button. Go back to the Project Navigator. Right-click on the HelloWorld folder and select “New File”.

Adding a new file in Project Navigator
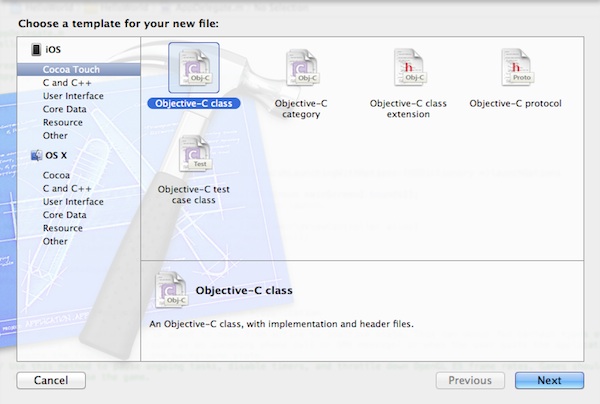
Under the Cocoa Touch category, select the Objective-C class template and click Next.
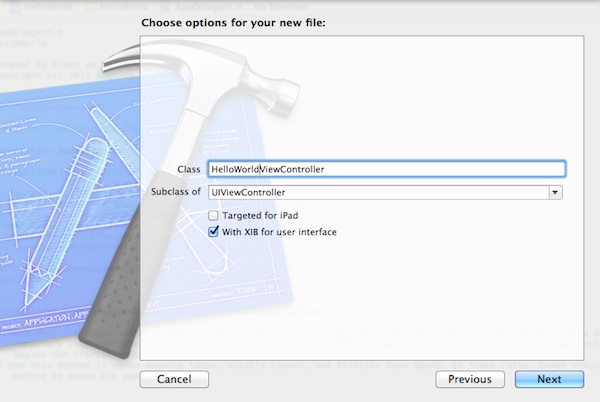
Name the new class as HelloWorldViewController and the subclass as UIViewController. Make sure you check the “With XIB for user interface” option. By selecting this option, Xcode automatically generates a Interface Builder file for the view controller.
You’ll be prompted with a file dialog. Simply click the Create button to create the class and XIB. Once done, Xcode generates three new files including HelloWorldViewController.h, HelloWorldViewController.m and HelloWorldViewController.xib. If you select the HelloWorldViewController.xib file, you’ll find a empty view similar to the below image:

HelloWorld Interface Builder (.xib)
Now we’ll add a Hello World button to the view. In the lower part of the utility area, it shows the Object library. From here, you can choose any of the UI Controls, drag-and-drop it into the view. For the Hello World app, let’s pick the button and drag it into the view. Try to place the button at the center of the view.

Drag button into the View
Next, let’s rename the button. To edit the label of the button, double-click it and name it “Hello World”.

If you now try to run the app, you’ll still end up with a blank screen. The reason is that we haven’t told the app to load the new view. We’ll need to add a few lines of code to load up the HelloWorldViewController.xib. Select the AppDelegate.m in Project Navigator. Add the following import statement at the very beginning of the file:
#import "HelloWorldViewController.h"
In the didFinishLaunchingWithOptions: method, add the following lines of code right after “self.window.backgroundColor = [UIColor whiteColor]”.
    HelloWorldViewController *viewController = [[HelloWorldViewController alloc] initWithNibName:@"HelloWorldViewController" bundle:nil];
    self.window.rootViewController = viewController;
Your code should look like this after editing:
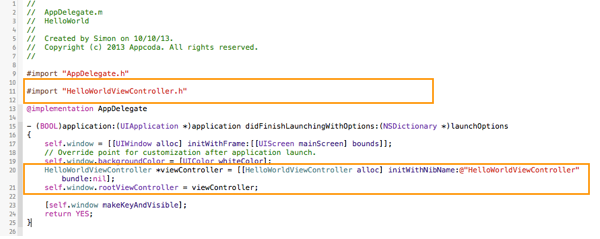
What you have just done is to load the HelloWorldViewController.xib and set it as the root view controller. Now try to run the app again and you should have an app like this:
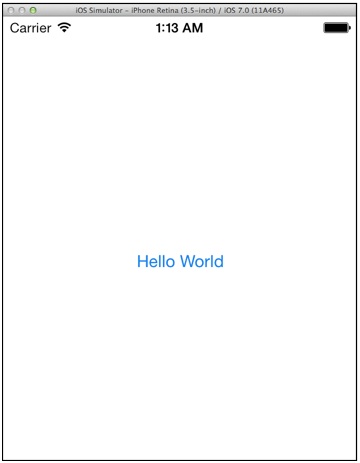
For now, if you tap the button, it does nothing. We’ll need to add the code for displaying the “Hello, World” message.
Coding the Hello World Button
In the Project Navigator, select the “HelloWorldViewController.h”. The editor area now displays the source code of the selected file. Add the following line of code before the “@end” line:
-(IBAction)showMessage;
Your complete code should look like this after editing:
#import

@interface HelloWorldViewController : UIViewController

-(IBAction)showMessage;

@end
Next, select the “HelloWorldViewController.m” and insert the following code before the “@end” line:
- (IBAction)showMessage
{
    UIAlertView *helloWorldAlert = [[UIAlertView alloc]
                                    initWithTitle:@"My First App" message:@"Hello, World!" delegate:nil cancelButtonTitle:@"OK" otherButtonTitles:nil];

    // Display the Hello World Message
    [helloWorldAlert show];
}
After editing, your code should look like below:

Source Code of HelloWorldViewController After Editing
Forget about the meaning of the above Objective-C code. I’ll explain to you in the next post. For now, just think of “showMessage” as an action and this action instructs iOS to display a “Hello World” message on screen.
Connecting Hello World Button with the Action
But here is the question:
How can the “Hello World” button know what action to invoke when someone taps it?
Next up, you’ll need to establish a connection between the “Hello World” button and the “showMessage” action you’ve just added. Select the “HelloWorldViewController.xib” file to go back to the Interface Builder. Press and hold the Control key on your keyboard, click the “Hello World” button and drag to the “File’s Owner”. Your screen should look like this:
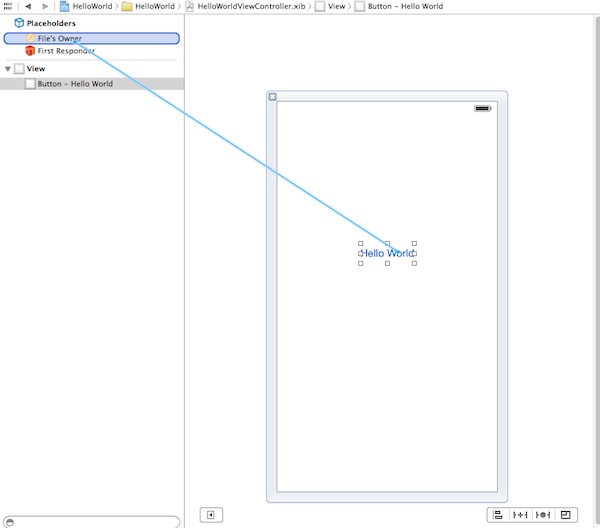
Release both buttons and a pop-up shows the “showMessage” action. Select it to make a connection between the button and “showMessage” action.

Send Events Selection
Test Your App
That’s it! You’re now ready to test your first app. Just hit the “Run” button. If everything is correct, your app should run properly in the Simulator.
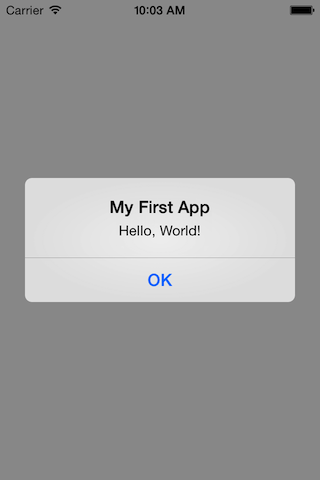
Congratulation! You’ve built your first iPhone app. It’s a simple app however, I believe you already have a better idea about Xcode and how an app is developed.
You can proceed to part 2 of the Hello World app and learn how the HelloWorld app actually works. For your own reference, you can download the complete Xcode project from here.
As always, if you come across any problem while creating your app, leave us comment below. Stay tuned. We’ll publish more tutorials about Xcode 5 and iOS 7.


