

After we published the iCloud programming tutorial, the first question from our readers is not about iCloud but related to the static table view. If you’ve followed our tutorials, you should have a basic understanding about table view. However, the table views that we’ve covered are of dynamic content. The “Add Note” controller that we built in the previous tutorial, on the other hand, makes use of the static table view. If you have problem with static table view, this tutorial is for you. We’ll show you how to create static table view using Storyboard.
To illustrate how easy you can use Storyboard to implement static table view, we’ll build a simple Setting screen. Static table views are ideal in situations where a pre-defined number of data items to be displayed. A setting screen is an obvious use of static table view.
Creating Xcode Project
To get started, launch Xcode and create a new project using the Single View Application template.

Create new Xcode project
Name your project as “StaticTableDemo” and don’t forget to select “Storyboard” in your project setting.

Xcode Project Settings
Designing Static Table View
In Storyboard, first delete the default view controller and drag a Table View Controller from the Object library.

Drag a Table View Controller to Storyboard
By default, Xcode sets the table view for dynamic content. You can easily change the table view from dynamic to static cells by altering the content property. Once changed, you’ll have a table view with three empty static cells.

Set the Content Property to Static Cells
To get the desired view of the Settings screen, change the table style from “Plain” to “Grouped” in the Attributes inspector of the table view. You have two ways to change the number of table row from 3 to 2. The easiest way is to select one of the table rows and press delete button to remove it. Alternatively, select the Table View Section in the document navigator and change the row number.

Customizing the Table View Section
You can use header and footer to display addition information for the table section. Set the header and footer as shown in the above screen.
Next we’ll design the table view cell with the following steps:
- Drag a label object into the table view cell and adjust its size to 17. Set the label to “Mobile Notification”.
- Drag another label object into the table view cell and place it under the previous label. Adjust its size to 10 and set the label to “Do you want to receive push notification?”.
- Drag a Switch object into the table view cell.
- Repeat the above procedures to implement the “Email Notification” cell.

Designing table view cells
We’ve created the first table section. To add the second section, select the Table View and change the “Sections” value in Attributes inspector to 2. As soon as you update the section number, Xcode adds a new section and the same content of the first section is automatically copied.

Changing the section number in Attributes inspector
Simply change the section and the table cells to make them look like the following:

Synchronization Section
To complete the layout of the Settings screen, embed the table view controller in a navigation controller. Select the table view controller and select Editor -> Embed in -> Navigation Controller from the Xcode menu.

Embed table view controller into navigation controller
Compile and Run the App
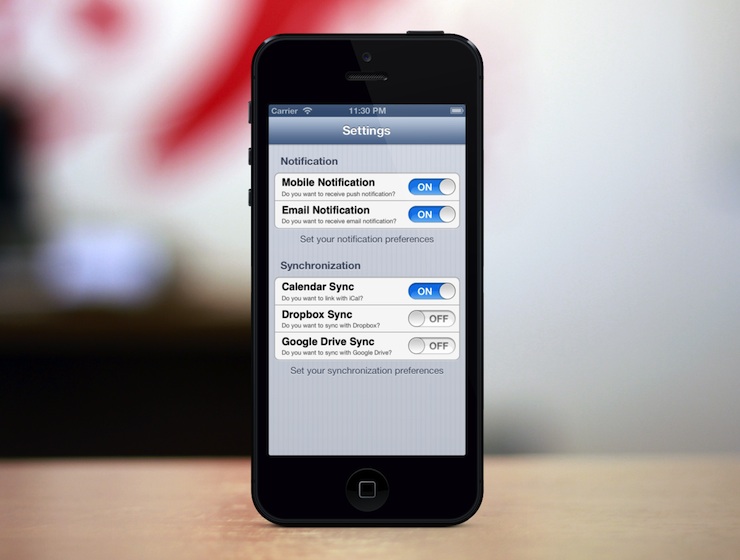
That’s it! Finally compile and run the app in Simulator. You should have a Settings screen look like this:

StaticTableDemo App
Summary
In this short tutorial, we demonstrate how you can create a static table view using Storyboard. While you can use dynamic table to display data from data source, static table view provides a great way to display a finite quantity of data that are already known beforehand. Settings screen is a common example that you can make use of the static table view.
For your complete reference, you can download the Xcode project here.
As always, leave us comment if you have any questions about the tutorial.


