

One of the basic, yet vital things a developer should know when creating macOS apps is how to present alerts, system panels or custom windows to their apps. Regardless of how small or big an app is, it will always be necessary to display an informational message to the user or ask for confirmation. Letting users to search for and open a file from their drive is the case for many kinds of apps, as well as saving back to disk.
Presenting any of the above can happen in two different ways: Either as a modal dialog, or as a sheet. When presenting as a modal dialog, the new window sits on top of the current window and interaction is allowed with that only. There is a title bar and window can be dragged around in the screen.
When presenting a window as a sheet, then there’s no separate window and no dragging can happen. Instead, the new window is sliding in from the top of the current window and looks like it’s a part of it. The common thing with the modal presentation is that the new window stays there until we dismiss it, and it doesn’t allow interaction with any other content underneath.
I would recommend to take a look at the Apple’s Human Interface Guidelines about dialogs, alerts and sheets.
To summarize, today we are going to see:
- How to present an Open Panel and let users open files of specific types (files with specific extensions).
- How to present a Save Panel to do the exact opposite and store a file anywhere on the disk.
- How to show Alerts with different kind of content in them.
- How to handle a custom window as a sheet.
Let’s get started, and let’s have a quick look of the demo app that we’ll be working on. Then we’ll jump straight into the new stuff we have to learn here today.
The Demo App
The demo app that we will focus on today is a light image editor. It is going to be capable of letting us open any image from the disk, apply four image filters, resize and save back to disk as a new file. There is a starter project to download, as most of the business logic has been implemented already.
Even though we’ll discuss about image filters (CIFilter objects) at a later part, I’d like just to mention from now that two out of the four provided filters require user input. We’ll make the app ask for that input through alerts, something that is not recommended to do when writing real world apps, however it’s a great way to see additional features an alert can provide. More about that later.
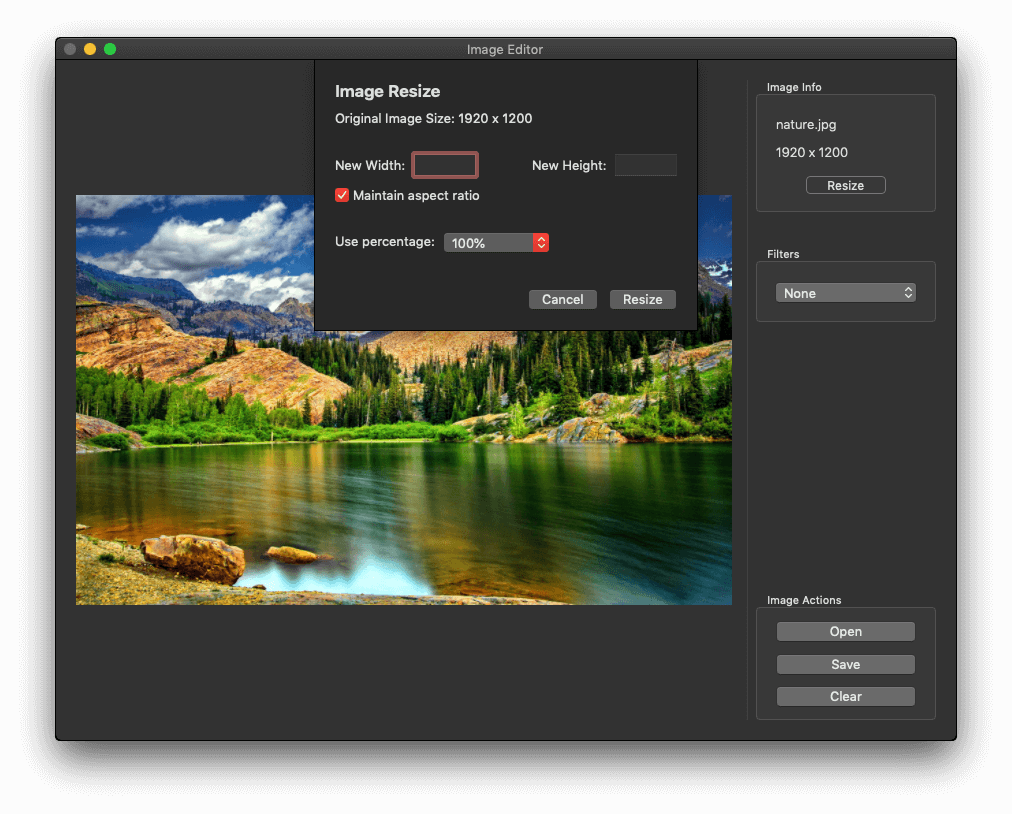
Image’s name and size are meant to be shown on the top right side of the window. A Resize button lies there too, which will trigger the presentation of a new window controller as a sheet. In that window, we’ll be able to provide either custom values for the width and height of the image, or scale it down using a preset percentage. More about that later as well.
Let’s go now through a quick presentation of the rest of the app. As said already, most of the logic of the app is already implemented so we can focus on the alerts and panels that the app will be presenting. Note that the implementation of the app is based on the MVVM (Model, View, ViewModel) pattern, so the actual business logic gets separated from any actions made in the view.
The project contains two view controllers: ImageEditorViewController and ResizeViewController. The respective ViewModel implementations are contained in the ImageEditorViewModel and ResizeViewModel classes, while the models are the ImageInfo and ImageSize (quite simple) structs. In addition, there are two auxiliary files that contain:
- The
ImageToolsclass. It implements a few class methods that help in loading an image from and saving back to disk, getting the image size and performing resizing. - The
ImageFilterenum. An enumeration that not only contains the available filters provided in the app, but it also has code related to the them, such as creating the actual CIFilter, getting the parameter names for those filters that need user input, the range of acceptable values of the parameters, and a few more.
Pre-existing code in the project contains enough documentation and therefore it won’t be hard to understand what each single piece of it is all about. I should mention also that the majority of our work here will be done in the ImageEditorViewController class; we will visit the ResizeViewController just for a while.
I would recommend you to take some time and have a tour in the starter project. Once you feel comfortable with it, let’s go straight into creating our first alert.
Presenting Your First Alert
An alert is a system window that displays informational messages with the option to contain up to four buttons that users can click on and trigger further actions. Also, as we will see in this and in another part later, alerts can contain additional, specific type of content. If you have prior experience with iOS, then an alert (NSAlert) is the equivalent of the alert presented using the UIAlertController class. Alerts are really handy as:
- They can display important messages to users, or ask for user’s input without the need from us to create custom windows to do that.
- They provide an interface (UI) that users are familiar with, as alerts are part of the macOS system.
So, when showing an alert to users, all we do is to provide our custom content; the look and feel is known to them and they know how to interact.
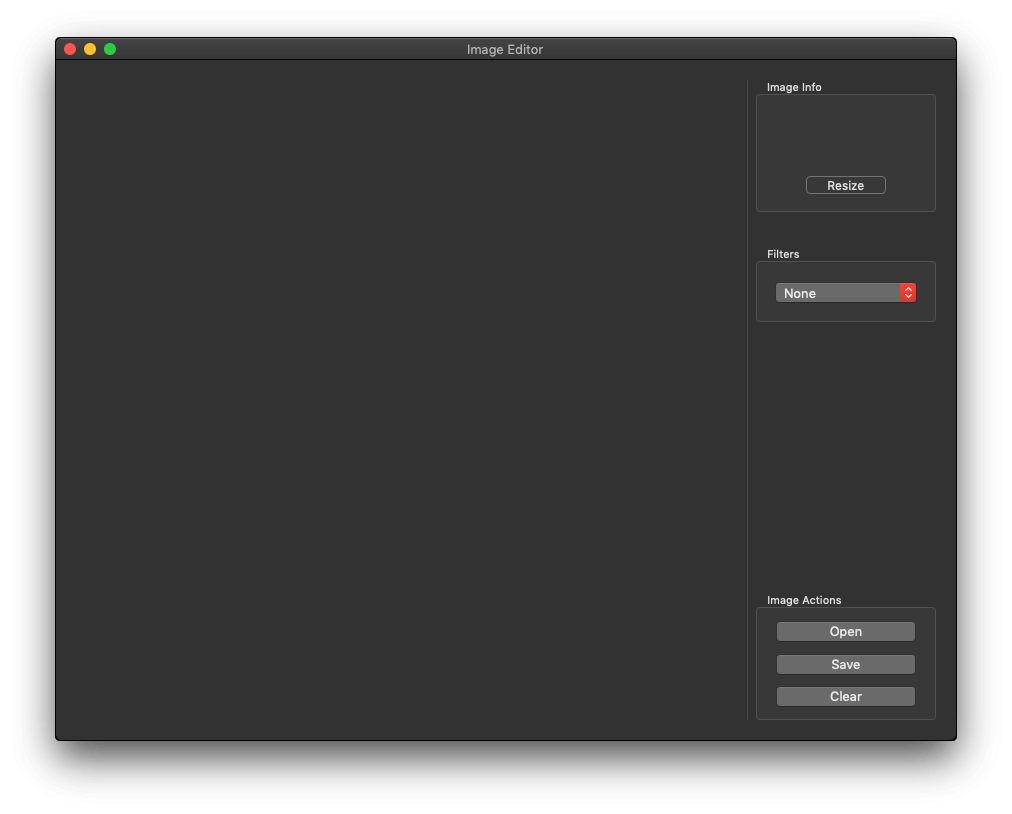
Let’s create our first alert now. If you run the app of the starter project presented in the previous part, you will see that initially we have no opened image in our window, it’s just the UI being shown:
It’s obvious that when no image is loaded it is impossible to apply any filters or do resizing. However, and regardless of how apparent that fact is, wouldn’t be nice to have an alert being presented when users try to apply a filter while no image exists? That way not only users will be reminded that they have to open an image first, but it’s a move that helps in the overall user experience (UX).
Going down in programming level, available filters are presented in the colorFilters popup button. As a side note, the datasource of the colorFilters popup (or in other words the items presented in it) is the availableFilters property of the imageEditorViewModel object which returns an array of all available filters as they exist in the ImageFilter enum (imageEditorViewModel is the ViewModel object that implements all the actual business logic).
The filters popup is connected to the selectImageFilter(_:) IBAction method which is called any time users select a filter option among the items listed. selectImageFilter(_:) exists in the ImageEditorViewController.swift file. As you will see by going there, there is no implementation currently, so let’s start doing so:
@IBAction func selectImageFilter(_ sender: Any) {
    guard let _ = imageEditorViewModel.displayedImageData else {
        showNoImageAlert()
        colorFilters.selectItem(at: 0)
        return
    }
}
Here’s what happens with the above code:
- Initially, the first line with the
guardstatement checks whether there’s an image loaded and displayed or not. ThedisplayedImageDataof theimageEditorViewModelholds the loaded image data, so when it’s nil it indicates that there is no loaded image in the app. - In that case (execution falls to the
elsecase of theguardstatement), we make a call to theshowNoImageAlert()method. It doesn’t exist yet, we’ll change that right next. - Regardless of the selection user made in the filters popup, we automatically switch back to the first option that displays “none” (no filter applied).
- We return from the function – necessary with the
guardstatement!
The above lines of code is the first implementation we do on that method. Later we’ll add some more code.
Let’s go to the showNoImageAlert() method. As this method does not exist yet, we’ll start defining it:
func showNoImageAlert() {
    if imageEditorViewModel.showNoImageAlert {

    }
}
The first thing we do is to check whether an alert is allowed to be presented through the value of the showNoImageAlert property of the imageEditorViewModel object. When it’s true, then we can display the alert, otherwise nothing should happen. Why do we need that condition here? You’ll understand pretty soon.
Let’s proceed now to initializing an alert object and passing the String messages we want to show:
func showNoImageAlert() {
    if imageEditorViewModel.showNoImageAlert {

        let alert = NSAlert()
        alert.messageText = "Missing image"
        alert.informativeText = "There is no image to apply the filter to."

    }
}
For a simple alert what we just did is sufficient. Note that when an alert is presented, it’s using the app’s icon on the left of the displayed content. As there is no custom icon in the app, the default one provided when Xcode generates the project will be used.
All we have left now is to present it. Let’s show it as a sheet dialog:
func showNoImageAlert() {
    if imageEditorViewModel.showNoImageAlert {
        ...

        alert.beginSheetModal(for: self.view.window!) { (response) in

        }
    }
}
The beginSheetModal(for:completionHandler:) of the NSAlert class will perform the actual presentation. The first parameter is the window that the alert will be presented to, and in that case it’s the main window of our app (we access it through the view property as you can see). When a button is tapped on the alert, the completion handler is called with a NSApplication.ModalResponse value describing the button that was tapped (find out more here), and the alert gets dismissed.
Notice in the above, first implementation of the showNoImageAlert() method that we haven’t specified any buttons or button titles. That’s perfectly okay, as NSAlert will create automatically an “OK” button. Also, we won’t use the response value in the completion handler here. We’ll see how to determine the clicked button later.
Run the app now and select any image filter. Here’s what you should get:

Congratulations! You just created your first alert!
Presenting a suppression button
Alerts mostly exist to notify users or allow to make quick decisions, but sometimes users would prefer not having the same alert being presented all the time as part of a certain process. In that case, displaying a check box that would allow users to select and dictate the alert not to appear again is the way to go.
Thankfully, NSAlert provides us with a way to add a suppression button to the alert, and let users choose whether they will allow the alert’s appearance. Actually, the suppression button is a… suppression check box, but it’s called a button because a check box is a special type of button (a NSButton object) too.
We’ll add more code in the showNoImageAlert() method that will display a suppression button with a customized message. When users click it, the alert won’t be shown again. We’ll see the process step by step starting by adding the following lines in the showNoImageAlert() function, after the alert initialization but before displaying it:
func showNoImageAlert() {
    if imageEditorViewModel.showNoImageAlert {
        ...

        alert.showsSuppressionButton = true
        alert.suppressionButton?.title = "I got it, don't show me this message again."
        alert.suppressionButton?.target = self
        alert.suppressionButton?.action = #selector(handleNoImageAlertSuppressionButtonClick(_:))


        alert.beginSheetModal(for: self.view.window!) { (response) in

        }
    }
}
The first thing we do is to enable the appearance of the suppression button by setting the showsSuppressionButton property of the alert object to true. Then, we set the text we want to display. That text should make clear to the user what the suppression button is there for.
With the next two lines we set the target and action that should be called when the suppression check box is clicked. We simply tell it to call the handleNoImageAlertSuppressionButtonClick(_:) method, which is another one to add to the ImageEditorViewController class:
@objc func handleNoImageAlertSuppressionButtonClick(_ suppressionButton: NSButton) {
    imageEditorViewModel.showNoImageAlert = false
}
In this method we set the value of the showNoImageAlert property of the imageEditorViewModel object to false. By doing that, the next time we’ll choose a filter without having loaded an image first, we won’t see the alert. Also, now you can understand why we started the implementation of the showNoImageAlert() method by checking the value of that property; we display the the alert if only users haven’t decided otherwise:
func showNoImageAlert() {
    if imageEditorViewModel.showNoImageAlert {
        ...
    }
}
Run the app again and select a filter. You will see that the suppression button is there now:

Click on it and dismiss the alert. Then select a filter again; no alert this time!
Note that the effects of clicking the suppression button do not get stored persistently by our app, so if you re-run it you will have the alert back. However, using the suppression button is actually a user preference, and therefore it should be stored persistently in real world apps.
Opening And Loading An Image
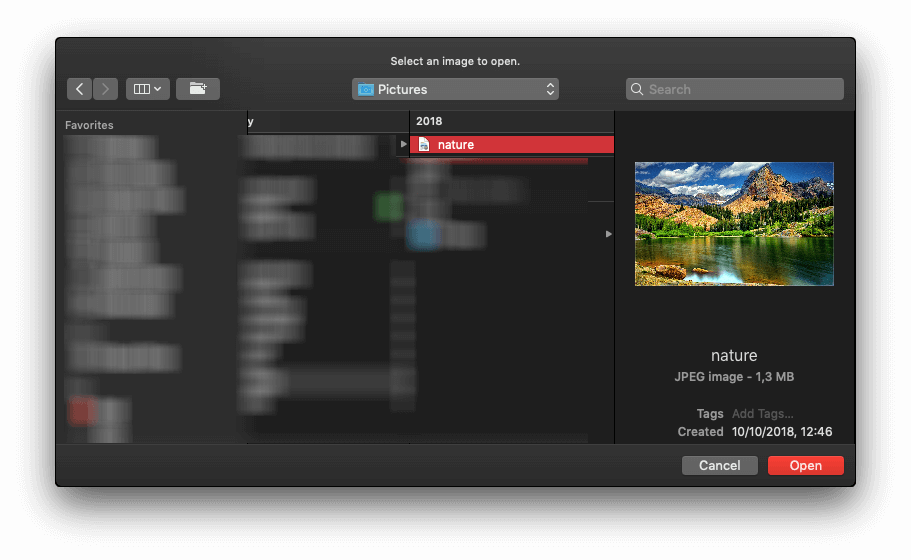
Now that we’ve added a bit to the user experience and we’ve learnt how to display an alert as a sheet, let’s make it possible for our app to open an image. In this part we are going to meet a new element in macOS programming, and that is the NSOpenPanel.
A NSOpenPanel, or an open panel, is a system window that allows to navigate in directories and select one or more files or directories to be opened by an app. You are already familiar with that window, as it’s provided by any app that supports an Open functionality. For example, go to Xcode and open the following menu: File > Open…. What you will see is what we will achieve here too.
We will be providing this kind of functionality through the Open button existing in our demo app (we won’t use menus, these are meant to be a future tutorial). This button is already connected to the openImage(_:) IBAction method, so whatever code we’ll add there is going to be executed when the Open button gets tapped.
The process of presenting an open panel is straightforward:
- We initialize a
NSOpenPanelobject. - We set a few properties depending on what we want to allow through that panel (select one or multiple files, select directories, and more).
- We present the panel either modally or as a sheet.
- We handle the URL or URLs pointing to the files or folders selected by the user.
Let’s see that in action:
@IBAction func openImage(_ sender: Any) {
    let panel = NSOpenPanel()
    panel.canChooseFiles = true
    panel.canChooseDirectories = false
    panel.allowsMultipleSelection = false

}
After the initialization of the NSOpenPanel object, the values that we assign in the properties shown above:
- Allow to choose files.
- Disallow to choose directories.
- Disallow to choose multiple files.
Now that we’ve made it clear that we want a single file to be selected through our open panel, we must say what kind of files the panel should allow to be opened. In our case we want image files, so “png”, “jpg” and “jpeg” extensions should be definitely included in the list of the allowed to open files. Actually, that list is specified in the supportedImageFormats property of the imageEditorViewModel object in our app, so let’s assign it to the panel as shown below:
@IBAction func openImage(_ sender: Any) {
    ...

    panel.allowedFileTypes = imageEditorViewModel.supportedImageFormats

}
Since we are going to display the panel modally (as a standalone window), we can display a message that wouldn’t appear in sheet mode:
@IBAction func openImage(_ sender: Any) {
    ...

    panel.message = "Select an image to open."
}
Finally, let’s present the panel:
@IBAction func openImage(_ sender: Any) {
    ...

    // Show the panel modally.
    let response = panel.runModal()
}
The result of the runModal() (a NSApplication.ModalResponse value) is stored to the response constant, and it indicates the button that the user clicked in the panel (Open or Cancel). Here is how we handle it:
@IBAction func openImage(_ sender: Any) {
    ...

    if response == NSApplication.ModalResponse.OK {
        guard let selectedURL = panel.url else { return }
        imageEditorViewModel.setSelectedImage(atURL: selectedURL)
    }
}
In case of choosing a single file or directory, the url property of the panel object will contain the URL to the selected item when the Open button is tapped. Even though we don’t support multiple opening of files here, the way to get multiple URLs from the panel is to use panel.urls. You will get an array with the URLs of the selected files and directories.
Once we make sure that there is a URL available, we call the setSelectedImage(atURL:) method of the imageEditorViewModel object to keep it and to trigger the image loading in the ImageEditorViewModel class (our ViewModel). On successful loading, the imageEditorViewModel will notify the view controller through the imageDidLoadHandler closure. It is implemented in the viewDidLoad() method already:
imageEditorViewModel.imageDidLoadHandler = { [unowned self] (imageData) in
    guard let image = NSImage(data: imageData) else { return }
    self.imageView?.image = image
    self.imageNameLabel.stringValue = self.imageEditorViewModel.imageName ?? ""
    self.imageSizeLabel.stringValue = self.imageEditorViewModel.displayedImageSizeString
    self.colorFilters.selectItem(at: 0)
}
That closure returns the image data (a Data object), so first we create a NSImage object using that data and we assign it to the image view. Then, we get the image name and size string values from the imageEditorViewModel object and we assign them to the respective labels.
Feel free to run the app now and use the Open button. Spot an image in your computer and open it.
Applying Filters
Previously we managed to present an alert with a message saying that an image should be loaded before applying any filter. Now that our app can actually load an image, let’s make it possible to apply filters to it. Programmatically speaking, a filter is a CIFilter (Core Image filter) object that will modify an image in a certain way. You can find all available filters by Apple here and read about the CIFilter class here.
As I wanted to keep things simple but enough for the learning purposes, I chose to include four (4) filters in the app:
- Sepia –
CISepiaTone - Mono –
CIPhotoEffectMono - Blur –
CIDiscBlur - Comic –
CIComicEffect
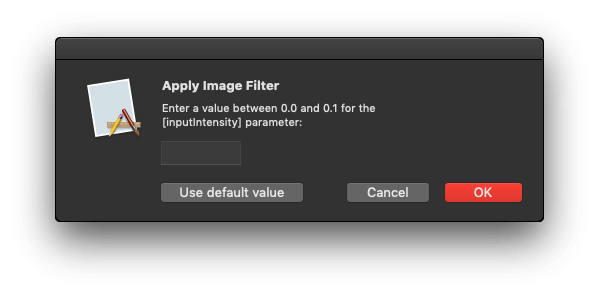
All filters mandatorily require the source image that they will be applied to. In addition, Sepia and Blur require an additional parameter value to be provided so they can produce the final result. Sepia expects for a parameter called “inputIntensity” with values ranging from 0.0 to 1.0 (default value is 1.0). Blur expects for a parameter called “inputRadius” with values ranging from 0 to 100 (default value is 8).
In a real world app, we should provide controls that users would expect to see for this kind of changes, like for a example a slider. However, here we won’t do that. As my goal is to show almost all alert capabilities, we’ll present a text field into an alert to get the user input for the parameters described above.
Note: Please see the code in the ImageFilter enum on how to create a CIFilter, how to get the parameter names, acceptable value ranges, and other related functionalities, or do an additional search on the Internet. I will avoid to discuss the filter details here as it’s out of the original scope, and the tutorial will end up really long.
So, let’s start creating the following method in the ImageEditorViewController class:
func showAlert(withFilterValues filterValues: AlertFilterValues) {

}
AlertFilterValues is a typealias (defined in ImageEditorViewModel.swift file) of the tuple: (minValue: String, maxValue: String, paramName: String) which includes the minimum acceptable value, the maximum acceptable value and the parameter name for the selected filter. The filterValues parameter value will be provided by the imageEditorViewModel object when we’ll call this method.
At first, let’s initialize an alert object and let’s set the displayed messages. As you will see next, min and max values, as well as the parameter name are part of the displayed message:
func showAlert(withFilterValues filterValues: AlertFilterValues) {
    let alert = NSAlert()
    alert.messageText = "Apply Image Filter"
    alert.informativeText = "Enter a value between \(filterValues.minValue) and \(filterValues.maxValue) for the [\(filterValues.paramName)] parameter:"

}
When we created our first alert previously in this tutorial, we didn’t specify any button, instead we relied to the fact that NSAlert would create a default button for us. This time we will specify the following buttons:
func showAlert(withFilterValues filterValues: AlertFilterValues) {
    ...

    alert.addButton(withTitle: "OK")
    alert.addButton(withTitle: "Cancel")
    alert.addButton(withTitle: "Use default value")
}
The addButton(withTitle:) allows us to add a button to the alert with a customized title. It is obvious what OK and Cancel buttons are meant for. The “Use default value” button we add as the last one will let the app use the parameter’s default value for the selected filter. Note two things:
- The first button you add will appear in the right side of the alert, while the last one will be the the left-most one.
- You can add up to four buttons to an alert, but don’t get used to that too much; the less buttons an alert has, the better for the user experience.
Now, the important stuff. NSAlert gives the ability to add custom views to an alert through a property called accessoryView. Of course, this is not meant for building an entire UI embedded in the alert, but it’s quite useful in cases where you need something more on top of what alerts can offer. We will make use of that property, and we will assign to it a text field (a NSTextField object), so we can type the parameter values in.
The custom view object that will be assigned to the accessoryView property of the alert can be created in any way that suits you the most (graphically or in code). Here, we’ll be creating the text field on the fly:
func showAlert(withFilterValues filterValues: AlertFilterValues) {
    ...

    let textfield = NSTextField(frame: NSRect(x: 0.0, y: 0.0, width: 80.0, height: 24.0))
    textfield.alignment = .center
    alert.accessoryView = textfield

}
Feel free to change the frame of the text field and reposition or resize it to see what happens.
It’s now time to present the alert. Since we presented the previous alert as a sheet, let’s present this one as a modal window:
func showAlert(withFilterValues filterValues: AlertFilterValues) {
    ...

    let response = alert.runModal()
}
Time to deal with the response value. As I’ve said already a couple of times, the returned value is a NSApplication.ModalResponse value that indicates the button tapped in an alert or a panel (like the open panel we saw before). For alerts the following values are provided so you can determine which button was clicked:
- alertFirstButtonReturn
- alertSecondButtonReturn
- alertThirdButtonReturn
alertFirstButtonReturn regards the right-most button so you understand the order. Use either an if-else or a switch statement to determine which button the user has clicked on. If you have a fourth button, then the else case in an if-else statement, or the default case in a switch statement will regard that button.
In our demo app we are interested in the first and third buttons, as the second one is the Cancel button and there is no need to take any action:
func showAlert(withFilterValues filterValues: AlertFilterValues) {
    ...

    if response == .alertFirstButtonReturn {

    } else if response == .alertThirdButtonReturn {

    }
}
In the ImageEditorViewController class you will find an implemented method named applyFilter(usingParameters:). It gets a dictionary as an argument which contains the filter’s parameter name and the value typed in by the user. Providing the dictionary is optional, so if the argument is nil the default value will be used for the filter’s parameter automatically. Our purpose here is to call that method either with the value typed by the user (if it’s valid), or with nil in case that value is wrong or the “Use default value” button was tapped (third button). Updating the code above to achieve that will give this:
func showAlert(withFilterValues filterValues: AlertFilterValues) {
    ...

    if response == .alertFirstButtonReturn {

        if let value = Double(textfield.stringValue) {
            if imageEditorViewModel.isValid(value: value) {

                let paramDict = [filterValues.paramName: value]
                applyFilter(usingParameters: paramDict)

            } else {
                applyFilter(usingParameters: nil)
            }
        } else {
            applyFilter(usingParameters: nil)
        }

    } else if response == .alertThirdButtonReturn {
        applyFilter(usingParameters: nil)
    }
}
The isValid(value:) of the imageEditorViewModel object will validate the input value. If it’s a valid one, the dictionary with the parameter name and that value is created and then passed as an argument to the applyFilter(usingParameters:) method. In any other case we call the method passing nil and indicating that way that the default value should be used for the filter. Notice that before we check for validity in the first button case, we convert the typed in value from String to Double. If user has entered something different than an acceptable number, then the else case will be executed.
Now that the showAlert(withFilterValues:) is ready, let’s go to the selectImageFilter(_:) IBAction method. So far there is our previous implementation in it where we covered the case of trying to apply a filter while no image exists. Complete the implementation with the following code so it’s possible to apply a selected filter:
@IBAction func selectImageFilter(_ sender: Any) {
    ...

    let selectedFilter = colorFilters.itemTitle(at: colorFilters.indexOfSelectedItem)
    imageEditorViewModel.appliedImageFilter = ImageFilter.filter(fromString: selectedFilter)

    if !imageEditorViewModel.shouldSetFilterValue() {
        applyFilter(usingParameters: nil)
    } else {
        if let alertFilterValues = imageEditorViewModel.getAlertFilterValues() {
            showAlert(withFilterValues: alertFilterValues)
        }
    }


}
With the first two lines we determine the filter that should be applied based on the user selection. The appliedImageFilter property of the imageEditorViewModel object holds the selected filter value. Then, we make a call to the shouldSetFilterValue() method to see if a parameter value is required for the selected filter. If not, then we call the applyFilter(usingParameters:) method we talked about previously passing a nil value. Otherwise, we get the values we want to show to the alert (min and max parameter values, parameter name), and eventually we call the showAlert(withFilterValues:) we implemented right before.
The app can now apply filters to the loaded image, so you can go and try that out. Make sure to provide both valid and invalid values to the alert when selecting Sepia or Blur filter and see how it behaves.
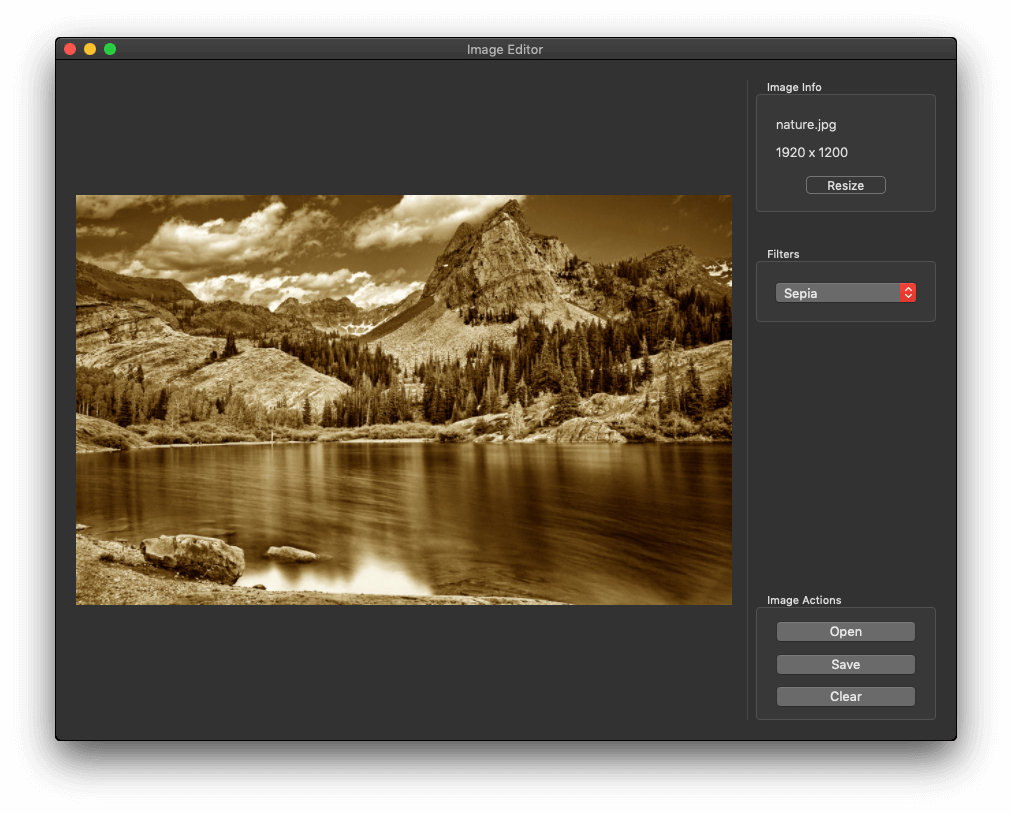
Here’s how an image would look after applying the sepia filter.
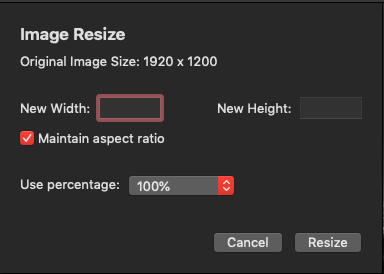
Resizing The Image
In the previous parts we managed to initialize, configure and present alerts and the open panel, and we saw that we can display them either as modal dialogs or as sheets. These presentation modes can be applied in custom windows created in the app too, and we are going to see that in this part.
In our main UI there is a Resize button which is supposed to present the ResizeViewController in a new window controller (both the new window and view controller exist in the Main.storyboard file). The most expected thing to do would be to create a segue in the storyboard and then present the resize view controller modally by performing that segue. But no, we won’t go that way. Instead, we’ll load the window controller in code so we can present its window along with the content view controller as a sheet.
The ResizeViewController gives two different options to perform resizing: Either by setting an explicit width and height (with the option to keep the original aspect ratio or not), or choose from some predefined percentage values to scale down the displayed image. All that functionality is already implemented so our work in that view controller will be short. We will focus only on how to dismiss it as a sheet sending back the proper NSApplication.ModalResponse value when the Resize and Cancel buttons are clicked.
Let’s go now to the resizeImage(_:) IBAction method in the ImageEditorViewController. The first thing we’ll do is to load the view controller from the storyboard:
@IBAction func resizeImage(_ sender: Any) {
    let storyboardName = NSStoryboard.Name(stringLiteral: "Main")
    let storyboard = NSStoryboard(name: storyboardName, bundle: nil)

    let sceneIdentifier = NSStoryboard.SceneIdentifier(stringLiteral: "ResizeWindowController")
    guard let windowController = storyboard.instantiateController(withIdentifier: sceneIdentifier) as? NSWindowController,
        let resizeWindow = windowController.window,
        let resizeViewController = windowController.contentViewController as? ResizeViewController,
        let displayedImageSize = imageEditorViewModel.displayedImageSize else { return }

}
In a fast forward mode, the above lines:
- Initialize a
NSStoryboardobject necessary to access the objects described in the next steps. - Access the window controller using the scene identifier “ResizeWindowController” which is also set in the Main storyboard (see the Identity Inspector after selecting the new window controller object).
- Get the window controller’s window (
resizeWindowabove). - Get the content view controller, which is
ResizeViewControllerinstance. - Make sure that there is a a current image size.
After we have initialized the resizeViewController instance, we must pass to it the current size of the displayed image:
@IBAction func resizeImage(_ sender: Any) {
    ...

    resizeViewController.resizeViewModel.set(originalSize: displayedImageSize)
}
Notice that the displayedImageSize value is given as an argument to the set(originalSize:) method of the resizeViewModel object (the ViewModel object) of the resizeViewController.
Now, let’s present it:
@IBAction func resizeImage(_ sender: Any) {
    ...

    self.view.window?.beginSheet(resizeWindow, completionHandler: { (response) in

    })

}
Obviously, our next step is to examine the response value, and get the new size set in the ResizeViewController when response is equal to “OK”. But wait a minute, this is a custom window and not a system panel, so is it possible to give us back such a value? Yes, it is, but we have to manually do so.
Open the ResizeViewController.swift file and spot the resize(_:) and cancelResizing(_:) IBAction methods. They are empty for now, but they are called when the Resize and the Cancel button are clicked.
Let’ start with the Cancel button. When it is clicked, we want to dismiss the window, but since it is presented as a sheet, we also want to indicate which button was clicked so no further actions to be taken back to the ImageEditorViewController class. We can do both pretty easily as shown next:
@IBAction func cancelResizing(_ sender: Any) {
    guard let window = self.view.window, let parent = window.sheetParent else { return }
    parent.endSheet(window, returnCode: .cancel)
}
Initially, we unwrap the window object, as well as its parent window that presents this one as a sheet. Then, we call the endSheet(_:returnCode) method using the parent object, and we pass two values as arguments: The current window that should be dismissed, and the appropriate NSApplication.ModalResponse.
Similarly, we can do the same for the Resize button in the resize(_:) IBAction method. This time we pass the “OK” value as the return code:
@IBAction func resize(_ sender: Any) {
    guard let window = self.view.window, let parent = window.sheetParent else { return }
    parent.endSheet(window, returnCode: .OK)
}
Back to the ImageEditorViewController class again, let’s continue from the point we were left in the resizeImage(_:) IBAction method. We will see what the response value is, and if it’s “OK” we’ll get the new size user set and we’ll trigger the actual resizing process:
@IBAction func resizeImage(_ sender: Any) {
    ...

    self.view.window?.beginSheet(resizeWindow, completionHandler: { (response) in

        if response == NSApplication.ModalResponse.OK {
            guard let newSize = resizeViewController.resizeViewModel.editedSize else { return }
            self.resize(toSize: newSize)
        }

    })
}
resize(toSize:) method is already implemented, so the above will work.
That’s it, now you know how to present custom windows as sheets and to dismiss them accordingly passing the proper return code back to the caller. It’s possible to create your own custom NSApplication.ModalResponse codes, however I leave that aside for now, it’s a bit out of our scope.
Run the app, load an image and then resize it. The resize window is presented as a sheet!
As a side note, keep in mind that if you resize and then you apply a filter, the image will revert to its original size. That’s because filters apply to the original image, so you’ll need to resize again. You are free to modify the given implementation and change that if you want.
Saving The Edited Image
Now that our small image editor works fine as it can apply filters and resize an image, let’s add the final touch, and let’s make it possible to save the edited image to disk. Opposed to the NSOpenPanel class we used earlier to open an image, now we will use the NSSavePanel class to save. However, and that’s important, there is another step that must be done prior to that; to make our app capable of writing anywhere.
In the Project Navigator select the project and go to the Capabilities tab. Do the following:
- Enable the App Sandbox capability.
- In the File Access section, change the permission to Read/Write for the User Selected File entry.
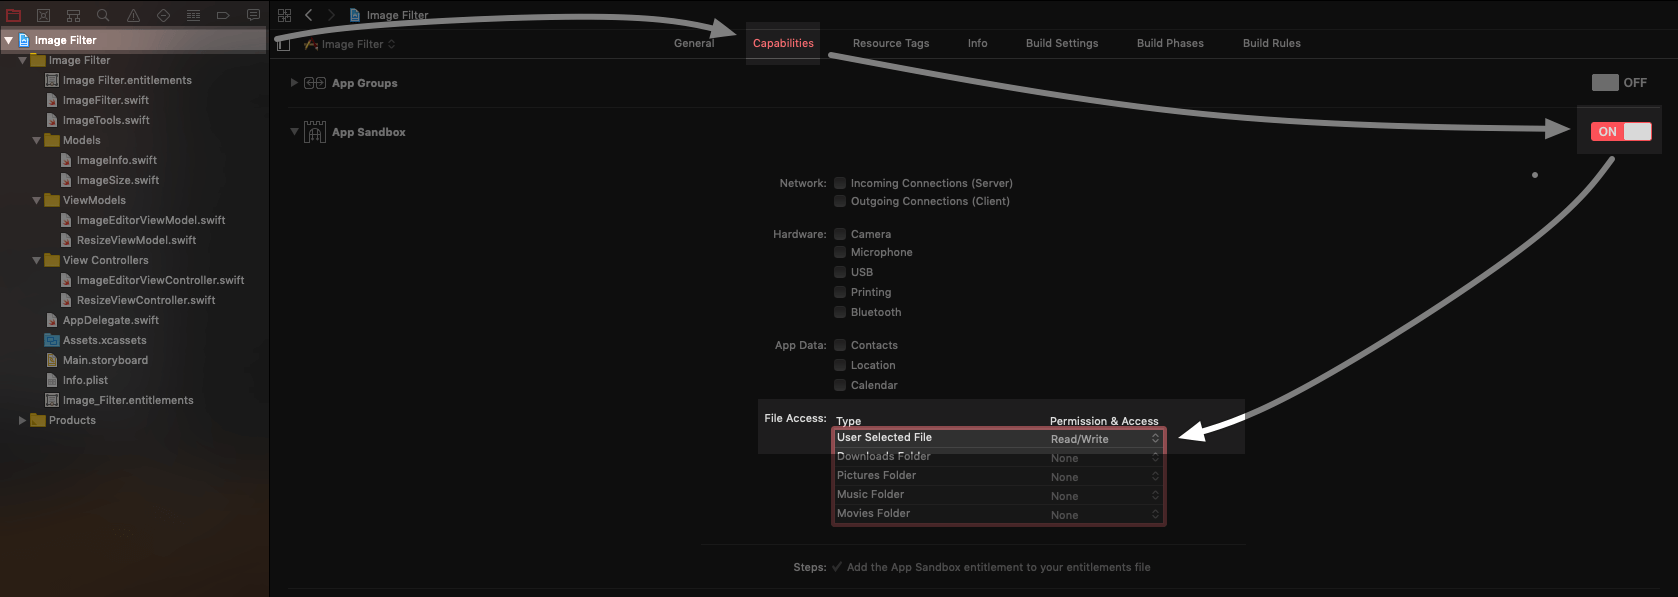
This will create a new entitlements file that will contain the new permissions you just granted to the app. If you skip or forget this step, you’ll be getting exceptions when you try to present a save panel in your apps.
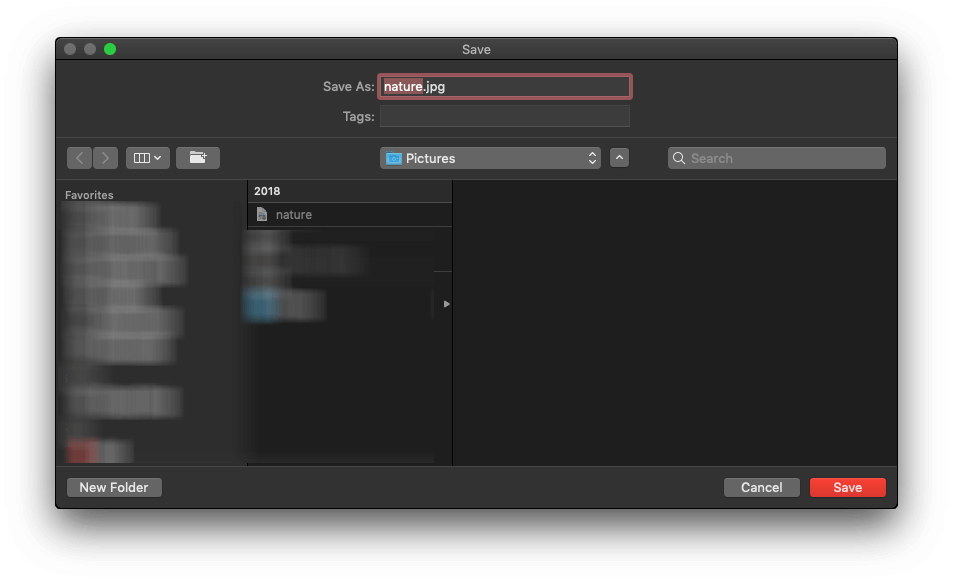
Back to the ImageEditorViewController.swift file and in the saveImage(_:) IBAction method, where we will add the code that will make the Save button work. The configuration of a NSSavePanel object looks quite similar to the configuration of a NSOpenPanel object, as after its initialization we have to set a few properties and then to present it. Let’s see it first and then we’ll discuss about it:
@IBAction func saveImage(_ sender: Any) {
    guard let _ = imageEditorViewModel.displayedImageData, let imageExtension = imageEditorViewModel.imageExtension else { return }

    let savePanel = NSSavePanel()
    savePanel.allowedFileTypes = [imageExtension]
    savePanel.nameFieldStringValue = imageEditorViewModel.imageName ?? "untitled"
    savePanel.canCreateDirectories = true
    savePanel.isExtensionHidden = false

}
Here is what the above properties are for, after the initialization of the savePanel object:
- The
allowedFileTypesproperty expects for an array of file extensions that should be allowed in the save panel. In our case, and given that users can open various kinds of image files, we use the extension of the loaded file (i.e., when “png” is opened, “png” to be saved as well). nameFieldStringValueproperty can be optionally set. When you do that, you set a preset file name to be shown in the save panel which users can change. If you omit using this property users will just have to type a file name before being able to save.canCreateDirectoriesis pretty much self-explanatory. When true, an additional button to create new folders is showing app in the save panel.isExtensionHiddenhides or shows the extension of the file name set using thenameFieldStringValueproperty.
After we finish this part, feel free to play with the above properties and see what happens if you change their values, or just omit setting a custom value.
Next, let’s present the save panel:
@IBAction func saveImage(_ sender: Any) {
    ...

    let response = savePanel.runModal()
}
If the response value is “OK”, meaning that the user clicked on the Save button, then we will get the URL to the selected file, and we will use the imageEditorViewModel object to perform the actual saving of the edited image to disk.
@IBAction func saveImage(_ sender: Any) {
    ...

    if response == NSApplication.ModalResponse.OK {
        guard let targetURL = savePanel.url else { return }
        _ = self.imageEditorViewModel.saveImage(toURL: targetURL)
    }
}
The saveImage(toURL:) method of the imageEditorViewModel initiates the actual saving job. It returns a Bool value depending on whether the saving was successful or not. We don’t make any use of that result here, but I leave it to you to decide if you want to do something with that (i.e., to show an alert if saving fails).
Summary
Presenting alerts and default panels is a basic knowledge that every macOS developer should have. Whether you will display them modally or as a sheet lies mostly on the overall app appearance and behavior, but it’s a personal decision too. By completing the implementation of the demo app step by step we managed to discuss all the important details of this post’s topic. Besides alerts and the open and save panels, we also made it clear how to present a custom window of our app as as sheet too. As a final word, using system alerts and panels is a good way to provide users with interfaces that are familiar with, so it is easier for them to get used to our apps and feel comfortable with them. This is all we want after all.
For reference, you can download the complete project on GitHub.


