

Welcome to a new tutorial where we are going to unfold another cool topic on macOS programming. Today we are going to meet an important control, really useful for displaying hiearchical data, the outline view.
Outline view inherits from table view, so there are significant similarities to the way we handle both. Table views have been the topic of this previous post, and I strongly recommend you to read it before you go to this one if you haven’t done so. What makes outline views a unique control is that displayed data can be expanded and collapsed, just like the directories and subdirectories in Finder on macOS, to the Groups and their contents in Project Navigator in Xcode, or the Document Outline in Interface Builder.
Configuring the user interface of an outline view is identical to the way the interface of a table view is configured. There are columns, cell views, identifiers, cell view subclassing, and so on; in general almost everything we met in the previous post discussing about table views. The delegate method to load cell views from the storyboard and set them up is also similar to the table view’s. What changes is the way we set the data source of the outline view. Additionally, we don’t have to deal with index paths here; instead there’s the concept of the item, where an item actually matches to an object of the data source. You will see how we treat items soon enough.
Through the following parts we will learn how to create an outline view, how to configure it, and how to deal with items and other important stuff. Being able to show expandable and hierarchical data is mandatory for a macOS developer, and today you’ll learn all you need so you can integrate outline views in your apps. Once again we’ll build a small application which you can then change or enrich and use it as you like.
About The Demo App
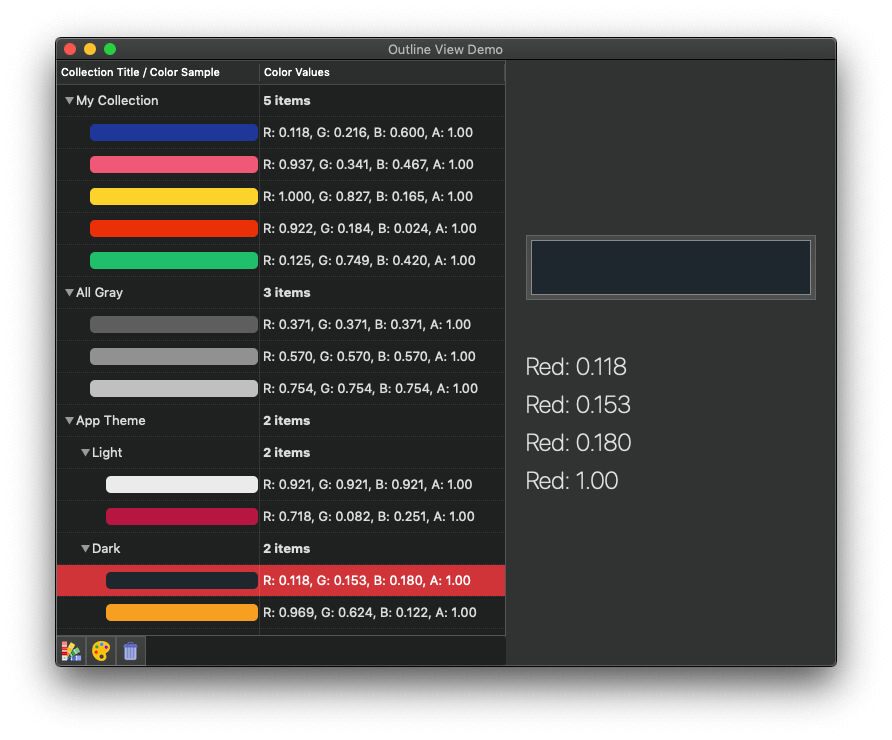
So, today we are going to create a small color manager, where we’ll be adding colors and collections of colors to an outline view. Collections are going to be expanded and collapsed, and they will contain both colors and other collections as child items. Colors won’t be expandable as they won’t contain any child items. Through a custom view we are going to be able to change a selected color, which by default is going to be black.
In order to keep things simple, colors in the outline view are going to be displayed as background colors of the text fields that outline’s cell views contain by default. We won’t create custom views to use as cell contents. It would be a pointless step in this tutorial, but if you want to learn how to do so please read the table views tutorial. Of course, in a real application custom views would be necessary as the width of text fields changes depending on the nesting level, however for a demo app like this one it’s just fine.
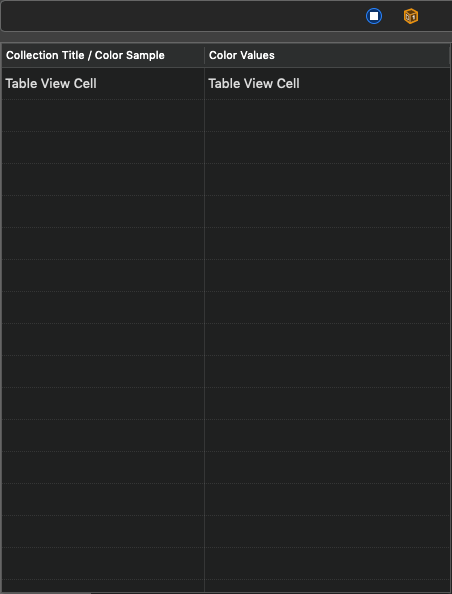
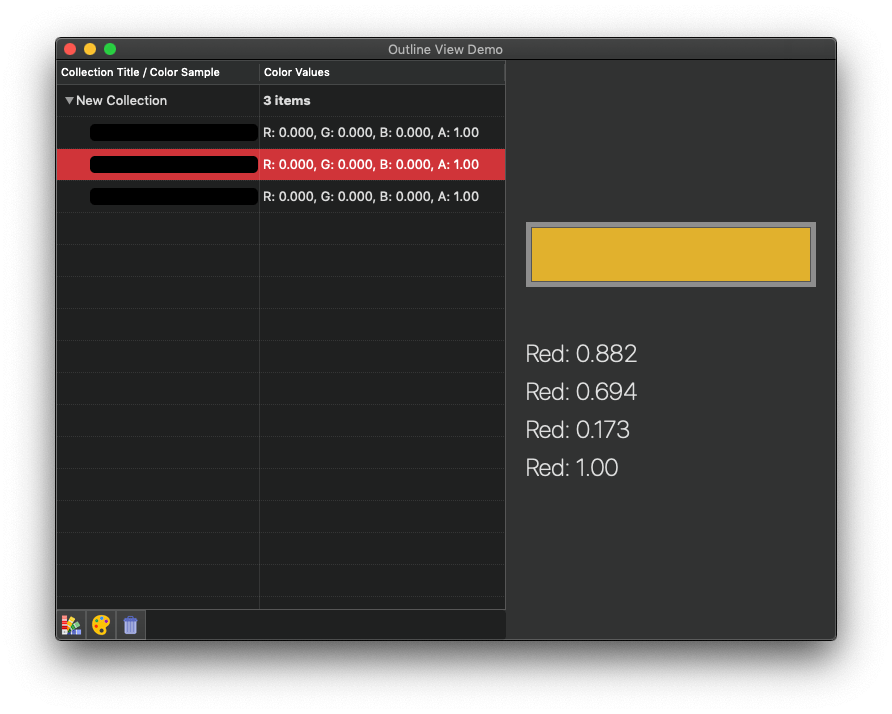
The outline view will have two columns, where in the first one we’ll have the collection titles and the colors (depending on the displayed item on each row), and in the second column we are going to have the number of items contained in a collection, or the RGBA values of the displayed color. The following shows a sample of what the final outcome is going to be:
We won’t start building the demo app from scratch, so please get the starter project where you’ll find certain parts already implemented. The project has been based on the MVVM architectural pattern, and that makes distinguishing concepts and functionalities easy. Model and View Model parts have already been implemented. Certain parts of the view have also been made. What it has been left out is everything regarding the outline view. It’s important to highlight that even though we won’t work on the model, it actually plays a crucial role to the implementation of the outline view. Why? Because instances of the custom types defined in the model consist of the datasource for the displayed items on the outline view. Those custom types are the Color and Collection classes; objects of them will “feed” our outline view.
Both of them have been implemented in the Model.swift file and they represent colors and collections programmatically. Please see the documented code in the starter project for more information.
With that said, let’s go ahead to create our outline view!
Adding and Configuring an NSOutlineView
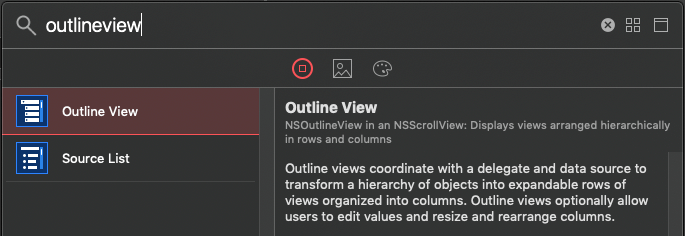
Let’s start by going to the Main.storyboard file where part of the interface is already created. What is missing is the topic of our discussion here, the outline view. To add one open the Library by clicking on the Plus button in Xcode’s toolbar, and type “outline view” to search for it. Once you find it, drag it to the left side of the view controller’s view.
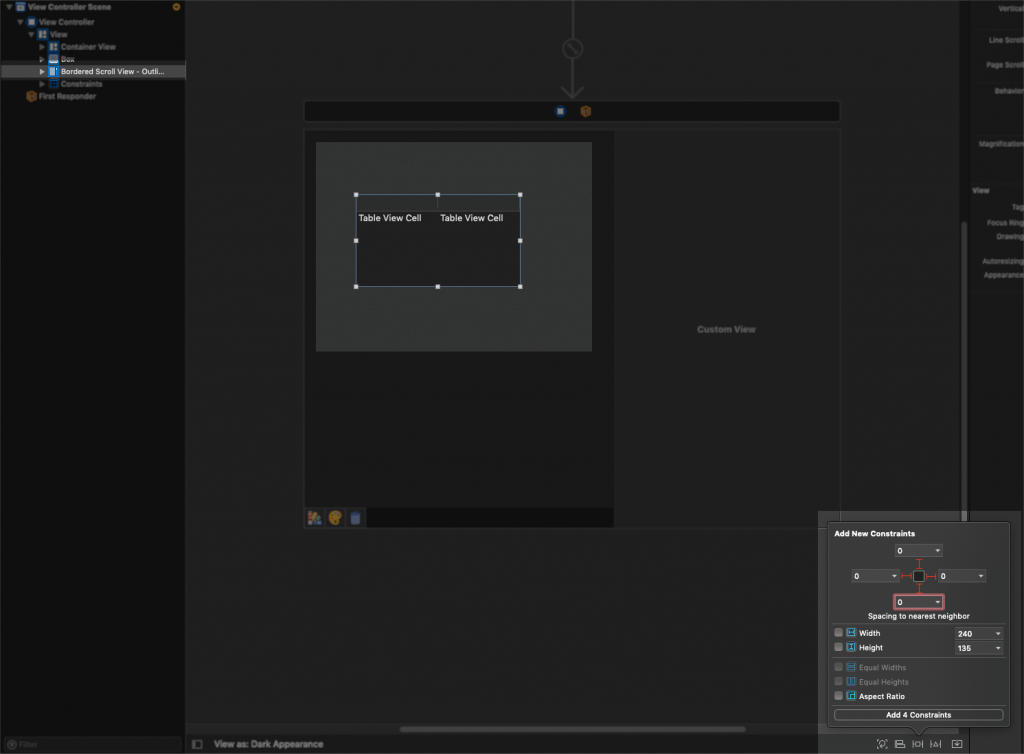
Initially, let’s configure its frame by setting its layout constraints. In the Document Outline, select the top-level object of the outline view, the scroll view. Then select the Top, Leading, Trailing and Bottom constraints and set their constants to 0. The outline view should “touch” the top-left side of the window, the box at the bottom and the custom view on the right.
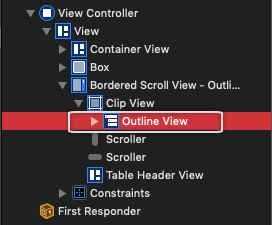
Similarly to table views, an outline view has two columns by default, and that’s suitable for our needs in this demo app. If, however, you need to change the number of columns in your apps, you have to do that through the Attributes inspector once you select the outline view object in the Document Outline. To reach to it you have to expand the scroll view and the clip view that contain it first:
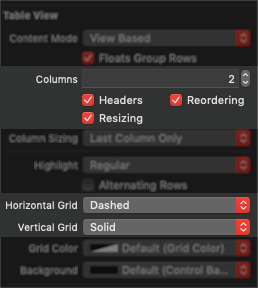
With the outline view selected go to Attributes inspector and in the Table View section go to the Columns field. There, you can change the columns from 2 to any number you desire. Outline view will instantly adapt to your changes, but keep in mind that you might have to resize the existing columns so you can see any additional columns defined. While being in the attributes inspector, let’s change a few settings. Right below the Columns field, there are three check boxes. Make sure to keep the Headers and Resizing checked, but uncheck the Reordering check box. A bit more down, open the Horizontal Grid popup button and select the Dashed option. By doing that, horizontal lines with dashes will separate rows in the outline view. In the Vertical Grid popup, select the Solid option so vertical lines separate the columns.
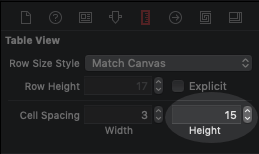
Switch now to the Size inspector where we’ll change the cell spacing so there is some more “room” for the displayed data. Update the Height and set its value to 15:
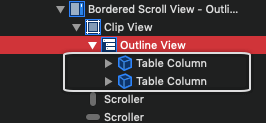
Time to give names to columns, as well as to specify some identifier values which we will need later. Expand the outline view object in the Document Outline pane, and select the first Table Column object.
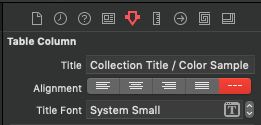
In the Attributes inspector set the title: “Collection Title / Color Sample” (without the quotes of course!).
Open the Identity inspector and in the Identifier text field set the value “col1”. It doesn’t really matter what the identifier’s name is, as long as it’s unique.
Next, open the Size inspector and set the width of the column to 200.
Repeat the above steps for the second Table Column now, and set the string “Color Values” as the column’s title and the “col2” as its identifier. It’s not necessary to set the column’s width; it will be calculated automatically by default (you can change that by selecting the outline view and going to the Attributes inspector, search for the Column Sizing setting).
At the end the outline view should look like this:
We have almost finished setting up the outline view, a couple of more things remaining to do. Select the first Table Column (the one that’s now called “Collection Title / Color Sample”) and expand it in the Document Outline pane. Then select the Table Cell View that was just revealed and open the Identity inspector. In the Identifier text field set the value “cell1”. This is necessary so we can “tell” to outline view which cell view to load when we’ll be configuring the cell contents in code.
Note: A cell in outline view is actually a view (a NSView object), exactly just like table views (once again, it would help a lot to read the previous tutorial about table views). It’s possible to have actual cells objects, but Apple recommends against that since using cell views allows for much more flexibility and customization of the displayed UI.

Do the same for the cell view of the second column, and set the “cell2” string as its identifier.
Lastly, select the view controller object and open the Connections inspector. Drag the outlineView outlet property to the outline view so we can access it from the code.

Setting Up The DataSource
With the outline view in place, we can start setting it up. Open the ViewController.swift file, and then go to the viewDidLoad() method. Let’s set the ViewController class as the datasource and delegate of the outline view:
override func viewDidLoad() {
    super.viewDidLoad()

    outlineView.dataSource = self
    outlineView.delegate = self
}
We will start by implementing the necessary datasource methods, and we’ll do that to an extension of the ViewController class. Go to the end of the file, and add this:
extension ViewController: NSOutlineViewDataSource {

}
The first datasource method we will implement has to do with the number of child items each item in the outline view contains:
func outlineView(_ outlineView: NSOutlineView, numberOfChildrenOfItem item: Any?) -> Int {

}
In our outline view we will show two different kind of items: Collection and Color objects. Collections can contain color objects and other collections as items, colors cannot contain other items. We could translate this to code like this:
if let item = item as? Collection {
    return item.totalItems
} else {
    return 1
}
Here’s something important: Notice that we check if the item object (the method’s item parameter) is a Collection object simply by casting to that type: item as? Collection. If that casting returns an actual value but not nil, then the item is of that type. If it returns nil, then the item is not of the type we are trying to cast to. This is a general technique used broadly with outline views, and you’ll see that we’ll repeat it many times in the parts coming next.
Back to the method we are implementing again. The above is what we need for returning the proper number of child items for each kind of item, however there is a small detail that has to be taken care of. If you look at the method’s definition, item is an optional, an Any? value, and that means that it can be nil. In that case we should return the top (root) level items. For this project, the root level items are the objects contained in the collections array of the Model struct (accessible through the model instance in the ViewModel class). Model struct also contains the totalCollections property which returns the number of Collection objects in the collections array.
Let’s update the method and let’s make use of all these said above:
func outlineView(_ outlineView: NSOutlineView, numberOfChildrenOfItem item: Any?) -> Int {
    if item == nil {
        return viewModel.model.totalCollections
    } else {
        if let item = item as? Collection {
            return item.totalItems
        } else {
            return 1
        }
    }
}
The above could be written in one line only:
func outlineView(_ outlineView: NSOutlineView, numberOfChildrenOfItem item: Any?) -> Int {
    return item == nil ? viewModel.model.totalCollections : (item as? Collection)?.totalItems ?? 1
}
Much better, don’t you think?
There are more datasource methods we have to implement. The next one returns the actual item:
func outlineView(_ outlineView: NSOutlineView, child index: Int, ofItem item: Any?) -> Any {

}
In our demo app we have to return either a Collection or a Color object. The logic we should follow here is the exact same to the one we applied to the previous method: If the item parameter value is nil, then we will return a top level object, meaning a Collection object from the collections array of the model. Which one? The one appointed by the index parameter value:
if item == nil {
    return viewModel.model.collections[index]
}
Otherwise, if the item is a Collection we’ll return the child item at the index position in its items array. If it’s a Color object, we’ll return the item itself but by unwrapping it (force unwrapping is acceptable since we know that item isn’t nil here):
if let collection = item as? Collection {
    return collection.items[index]
} else {
    return item!
}
Alternatively, we could have casted the last statement to a Color object like this: return item as! Color, but it makes no difference at the end.
So, let’s put everything together:
func outlineView(_ outlineView: NSOutlineView, child index: Int, ofItem item: Any?) -> Any {
    if item == nil {
        return viewModel.model.collections[index]
    } else {
        if let collection = item as? Collection {
            return collection.items[index]
        } else {
            return item!
        }
    }
}
In one line that would be:
func outlineView(_ outlineView: NSOutlineView, child index: Int, ofItem item: Any?) -> Any {
    return item == nil ? viewModel.model.collections[index] : (item as? Collection)?.items[index] ?? item!
}
Finally, one more datasource method:
func outlineView(_ outlineView: NSOutlineView, isItemExpandable item: Any) -> Bool {

}
In this one we must specify if a given item should be expandable or not. Focusing on the kind of items the outline view will present, we can tell that we want collections (Collection items) to be expandable, and Color items not to be. Translated that to code:
func outlineView(_ outlineView: NSOutlineView, isItemExpandable item: Any) -> Bool {
    guard let _ = item as? Collection else { return false }
    return true
}
The method returns true (meaning the item is expandable) if only the item parameter value is a Collection object. In any other case it returns false.
Preparing Cell View Contents
Let’s focus now on one and quite important delegate method of the outline view, a method that will allow us to configure the displayed cells and populate them with the datasource values. But before we start implementing it, let’s create a new extension for the ViewController class at the end of the file:
extension ViewController: NSOutlineViewDelegate {

}
By adding the above Xcode doesn’t show error messages any more. In this extension we’ll implement the following method:
func outlineView(_ outlineView: NSOutlineView, viewFor tableColumn: NSTableColumn?, item: Any) -> NSView? {

}
Think of this method as the equivalent of the table view delegate method in iOS which dequeues and returns cells, but this one doesn’t dequeue anything; it loads and returns cell views.
At this point it’s time to recall the identifier values we had set for both the columns and the cells of the outline view back in the storyboard file. We are going to use them now. The first thing we have to do is to distinguish the columns based on their identifiers:
guard let colIdentifier = tableColumn?.identifier else { return nil }
if colIdentifier == NSUserInterfaceItemIdentifier(rawValue: "col1") {

} else {

}
tableColumn parameter value provides the identifier property, which however is a NSUserInterfaceItemIdentifier value, not a string as one might would expect. We have to create a new NSUserInterfaceItemIdentifier with the first column’s identifier value (“col1”) so we can make the comparison shown here and determine what the column is. If the above condition is true, then we are referring to the first column and we will try to access its cell view. The identifier of that cell is “cell1”, and here’s how we “ask” from the outline view to create a new cell view using its identifier:
let cellIdentifier = NSUserInterfaceItemIdentifier(rawValue: "cell1")
guard let cell = outlineView.makeView(withIdentifier: cellIdentifier, owner: nil) as? NSTableCellView else { return nil }
Once again, the cell’s identifier is also a NSUserInterfaceItemIdentifier value. The method we call above (makeView(withIdentifier:owner:)) is probably the most important one in the entire delegate method we are implementing, as this is the one that creates the actual cell view object. Once it’s created it’s assigned to cell.
Now we are able to start populating values and formatting the cell view based on the given item parameter value. For collections we will display the title, and we will make the text field of the cell view editable so we can edit it.
if let collection = item as? Collection {
        cell.textField?.stringValue = collection.title ?? ""
        cell.textField?.isEditable = true
        cell.textField?.delegate = self
        cell.textField?.layer?.backgroundColor = NSColor.clear.cgColor
    } else if let color = item as? Color {

}
With the last line we make sure that there is no background color to the cell’s text field in case the cell view had been previously (re)used to present a Color item. Speaking of that, if the item is a Color object then we won’t display any text to the text field of the cell, instead we’ll set its background to the color specified by the Color object.
if let collection = item as? Collection {
    ...
} else if let color = item as? Color {
    cell.textField?.stringValue = ""
    cell.textField?.isEditable = false
    cell.textField?.wantsLayer = true
    cell.textField?.layer?.backgroundColor = color.toNSColor().cgColor
    cell.textField?.layer?.cornerRadius = 5.0
}
NSView objects do not have a CALayer layer by default, like UIView objects in iOS have. We are asking from text field to use one by setting the wantsLayer property to true. In that layer then we are setting the background color and the corner radius (the last one isn’t important, it’s just for a small pleasure for the eye).
With the above we are finishing the configuration of the cell view for the first column, but we should not forget to return it:
return cellNow, let’s take care of the cell view for the second column in the else clause of the initial if statement. Exactly as we did before, let’s create the cell view using the cell identifier (“cell2”):
let cellIdentifier = NSUserInterfaceItemIdentifier(rawValue: "cell2")
guard let cell = outlineView.makeView(withIdentifier: cellIdentifier, owner: nil) as? NSTableCellView else { return nil }
In case of a Collection item we’ll show the number of contained items to the text field:
if let collection = item as? Collection {
    cell.textField?.stringValue = collection.totalItems != 1 ? "\(collection.totalItems) items" : "1 item"
    cell.textField?.font = NSFont.boldSystemFont(ofSize: cell.textField?.font?.pointSize ?? 13.0)
} else if let color = item as? Color {

}
Making the font bold isn’t necessary, it’s just to emphasize the text field content.
If the item is a Color object, then we display the color as RGBA values:
if let collection = item as? Collection {
    ...
} else if let color = item as? Color {
    cell.textField?.stringValue = color.description
    cell.textField?.font = NSFont.systemFont(ofSize: cell.textField?.font?.pointSize ?? 13.0)
}
Here we revert back to normal font in case the cell view has been used to present a Collection item.
We need to return cell here as well:
return cellWe just finished setting up the cell views of the outline view, including their formatting and content. Before we move to the next part, let’s see the entire method we implemented here:
func outlineView(_ outlineView: NSOutlineView, viewFor tableColumn: NSTableColumn?, item: Any) -> NSView? {
    guard let colIdentifier = tableColumn?.identifier else { return nil }
    if colIdentifier == NSUserInterfaceItemIdentifier(rawValue: "col1") {
        let cellIdentifier = NSUserInterfaceItemIdentifier(rawValue: "cell1")
        guard let cell = outlineView.makeView(withIdentifier: cellIdentifier, owner: nil) as? NSTableCellView else { return nil }

        if let collection = item as? Collection {
            cell.textField?.stringValue = collection.title ?? ""
            cell.textField?.isEditable = true
            cell.textField?.delegate = self
            cell.textField?.layer?.backgroundColor = NSColor.clear.cgColor
        } else if let color = item as? Color {
            cell.textField?.stringValue = ""
            cell.textField?.isEditable = false
            cell.textField?.wantsLayer = true
            cell.textField?.layer?.backgroundColor = color.toNSColor().cgColor
            cell.textField?.layer?.cornerRadius = 5.0
        }

        return cell
    } else {
        let cellIdentifier = NSUserInterfaceItemIdentifier(rawValue: "cell2")
        guard let cell = outlineView.makeView(withIdentifier: cellIdentifier, owner: nil) as? NSTableCellView else { return nil }

        if let collection = item as? Collection {
            cell.textField?.stringValue = collection.totalItems != 1 ? "\(collection.totalItems) items" : "1 item"
            cell.textField?.font = NSFont.boldSystemFont(ofSize: cell.textField?.font?.pointSize ?? 13.0)
        } else if let color = item as? Color {
            cell.textField?.stringValue = color.description
            cell.textField?.font = NSFont.systemFont(ofSize: cell.textField?.font?.pointSize ?? 13.0)
        }

        return cell
    }
}
Getting An Item’s Collection
Now that the data source and the delegate of the outline view have been implemented and set up, it’s time to proceed to adding colors and collections. But before we do that, let’s create a handy method which will be proved useful in our next steps. Let’s implement a method which will find and return the collection of a selected item in the outline view.
More specifically, if the selected item is a Collection object, then this is what will be returned by that method. If it’s a color, then the method will return the parent Collection object. By doing so, we will also have the chance to meet a couple of new things about the outline view: How to get the selected item (and row), and how to to get the parent item of an item.
In the body of the ViewController class define the following method:
func getCollectionForSelectedItem() -> Collection? {

}
The first thing we’ll do is to get the selected item:
let selectedItem = outlineView.item(atRow: outlineView.selectedRow)The above line contains two important new elements:
- The
selectedRowproperty which indicates the currently selected row. Notice that if no row is selected, this property has the value -1, while if multiple items are selected then it points to the last selected row. - The
item(atRow:)method returns the item of the specified row.
Next, we will check if the selected item is a Collection object, and if it is we will return it. If it’s not, then it’s a Color object, so we will get its parent item and we will return it as a Collection object too. Let’s use a guard statement to do everything mentioned here:
guard let selectedCollection = selectedItem as? Collection
    else { return outlineView.parent(forItem: selectedItem) as? Collection }
return selectedCollection
If for some reason the selectedItem is nil, parent item does not exist or an item cannot be casted to a Collection type, then we are still okay as the method returns an optional Collection value.
Here’s the entire method:
func getCollectionForSelectedItem() -> Collection? {
    let selectedItem = outlineView.item(atRow: outlineView.selectedRow)

    guard let selectedCollection = selectedItem as? Collection
        else { return outlineView.parent(forItem: selectedItem) as? Collection }
    return selectedCollection
}
Creating A Collection
In the ViewController class you will find the following IBAction method already defined:
@IBAction func createCollection(_ sender: Any) {

}
It is connected to the left-most button in the user interface, and it’s the place where we will implement the necessary code which will allow us to create a new collection. A new Collection object is being created in the createCollection(withTitle:inCollection:) method of the ViewModel class. You can find it already implemented in the starter project, so all we have to do is to just call it. Since it requires a title as its first argument, we’ll use a standard value to satisfy that; each new collection will be titled: “New Collection”. The title text field is editable, so it will be changed by users as needed. The second argument is optional. It expects for the parent Collection object, but if we are talking about creating a top level collection then there’s no parent and we’ll pass nil.
Starting the implementation in the createCollection(_:) action method, the first thing we’ll do is to declare the following variable:
var collectionToExpand: Collection?If the new collection that will be created is going to be another collection’s child item, then it will be nice to have the parent to be expanded automatically. The local variable we just declared will hold the parent collection, if any exists of course.
Let’s get going by using the getCollectionForSelectedItem() method we implemented in the previous step. If there is any item selected when the button to create a new collection is clicked, then we’ll get its collection as described previously from the getCollectionForSelectedItem() and we’ll provide it as the second argument to the createCollection(withTitle:inCollection:) method. If there’s no item selected, then we will get a nil value and we will add the new collection as a top level item in that case.
if let collection = getCollectionForSelectedItem() {
    // Create the new collection as a child item of the current collection.
    viewModel.createCollection(withTitle: "New Collection", inCollection: collection)
    collectionToExpand = collection
} else {
    // No parent collection was returned so pass nil as the second
    // argument and create a top level collection.
    viewModel.createCollection(withTitle: "New Collection", inCollection: nil)
}
This code does what exactly was described above. Note that in the first case where a parent collection exists, we keep it to the collectionToExpand variable so we can expand it.
Regardless of the one or the other case above, right after a new Collection object is created we have to refresh the outline view:
outlineView.reloadData()Lastly, let’s expand automatically the parent collection (if there’s any):
outlineView.expandItem(collectionToExpand)The line above is another new thing we meet on outline views. We don’t care if collectionToExpand is nil, because the expected argument is an optional value.
The above few lines are all we need to make the creation of new collections happen. The actual heavy lifting regarding the initializaton of a Collection object and its addition to the model object is something that’s already implemented in the starter project; here we are interested in the outline view, so we are focusing on that only.
@IBAction func createCollection(_ sender: Any) {
var collectionToExpand: Collection?
// Get the collection of the currently selected item, if there is any.
if let collection = getCollectionForSelectedItem() {
// Create the new collection as a sub-item of the current collection.
viewModel.createCollection(withTitle: "New Collection", inCollection: collection)
collectionToExpand = collection
} else {
// No parent collection was returned so pass nil as the second
// argument and create a top level collection.
viewModel.createCollection(withTitle: "New Collection", inCollection: nil)
}
// Reload the outline view.
outlineView.reloadData()
// Expand the collection if possible.
outlineView.expandItem(collectionToExpand)
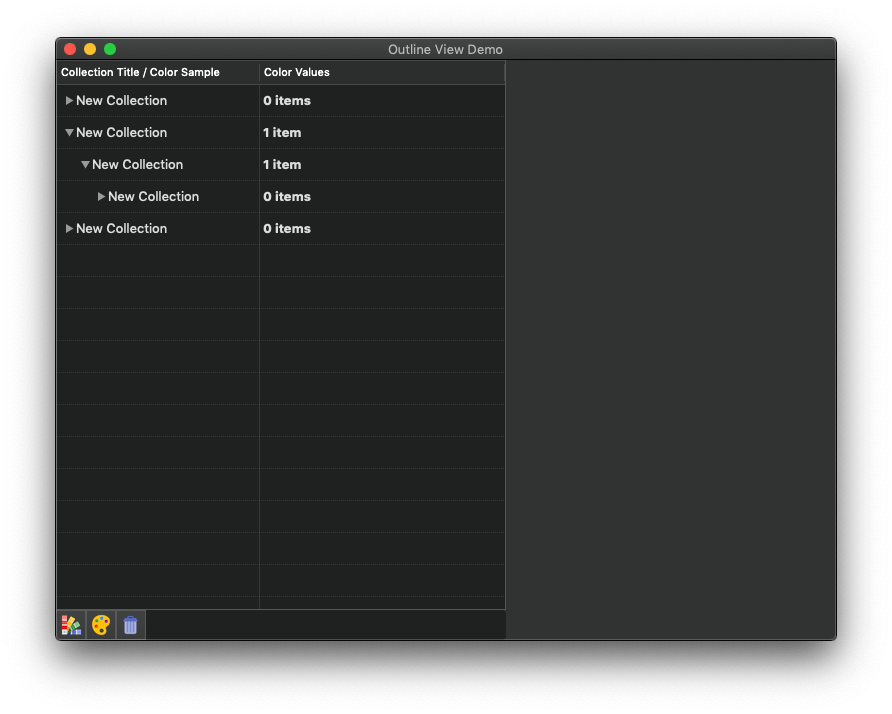
}You can run the app now and see results for first time. Create collections in both the root level and as child items to other collections.
Adding Colors
With the capability to create collections implemented, let’s move to the next one: Adding colors. A new Color object is created in the addColor(to:) method of the ViewModel class (already implemented). The expected argument is the collection where the new Color object will be added to as a child. Practically that means that an item should be already selected in the outline view when a new color is about to be added, so the getCollectionForSelectedItem() method returns a Collection object and not a nil value.
The implementation of the new feature we are discussing about here will take place in the addColor(_:) IBAction method. You will find it already defined in the ViewController class:
@IBAction func addColor(_ sender: Any) {

}
Let’s start by getting the collection of the selected item, if there is any:
guard let collection = getCollectionForSelectedItem() else { return }We proceed by creating the new Color object using the collection returned above:
let newColor = viewModel.addColor(to: collection)You see here that the addColor(to:) method of the ViewModel class returns the Color object that was just created. You’ll find out why really shortly.
Now, let’s reload the outline view so we refresh its contents with the new color, and let’s expand the color’s parent collection automatically in case it’s collapsed:
outlineView.reloadData()
outlineView.expandItem(collection)
Apart from expanding the collection, wouldn’t be great to have the newly added color selected automatically too?
As you can guess, that’s the reason we kept the new color object to the newColor constant above. We will use it to auto-select the new color item. First we’ll get the row of the newColor object, and then we will select it:
let colorRow = outlineView.row(forItem: newColor)
outlineView.selectRowIndexes(IndexSet(arrayLiteral: colorRow), byExtendingSelection: false)
Previously we learnt how to get an item based on its row (remember the item(atRow:) method of the outline view.). Now, we see the exact opposite; how to get the item’s row based on the item itself using the row(forItem:) method.
Besides that, the last line shows how to select one or more rows using the selectRowIndexes(_:byExtendingSelection:) method of the outline view. The first argument is an IndexSet which we initialize using the rows that should be selected.
Here’s the entire method:
@IBAction func addColor(_ sender: Any) {
// Make sure that there is a target collection to add a new color to.
guard let collection = getCollectionForSelectedItem() else { return }
// Create and get the instance of the new color.
let newColor = viewModel.addColor(to: collection)
// Reload the outline view and expand the collection.
outlineView.reloadData()
outlineView.expandItem(collection)
// Get the row of the new color item and select it automatically.
let colorRow = outlineView.row(forItem: newColor)
outlineView.selectRowIndexes(IndexSet(arrayLiteral: colorRow), byExtendingSelection: false)
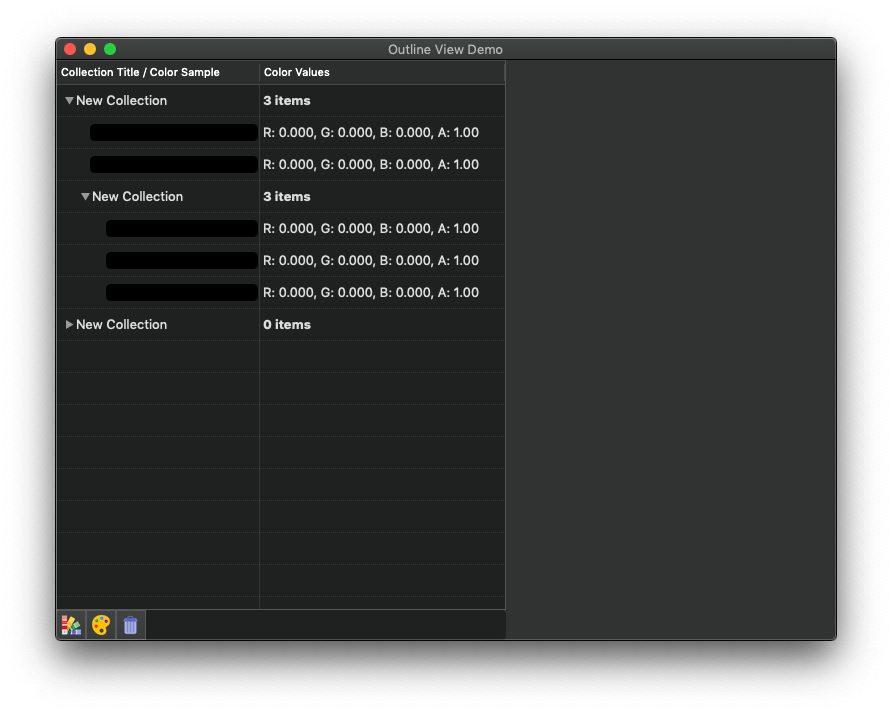
}A new color is black by default, and this is what you’ll see if you test the app now. Color change becomes possible right next.
Handling Item Selections
On the contrary of what someone would expect, there is not a delegate method like outlineView(_:do:something:) available to let us handle selections made on outline view items. The respective provided method by the NSOutlineViewDelegate class contains a notification object as its argument, a “selection did change” message that is being sent by the system when the outline’s selection is changed.
“Jump” to the NSOutlineViewDelegate extension we implemented earlier:
extension ViewController: NSOutlineViewDelegate {
    ...
}
Add the following to it:
func outlineViewSelectionDidChange(_ notification: Notification) {

}
Let’s discuss what we are going to do here. In the starter project there is a custom view implemented called ColorDetailsView, and its purpose is to display a color (actual color) along with its RGBA values:
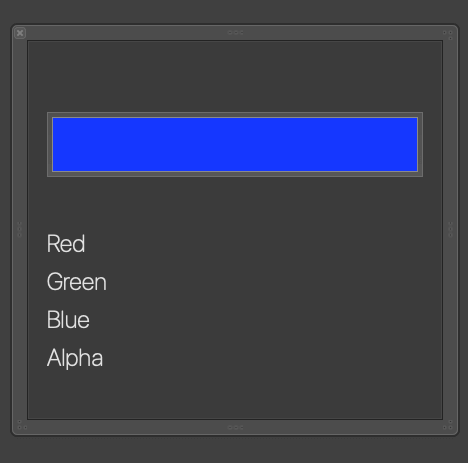
Such a view has been added to the view controller’s main view as a subview, but it remains hidden. Our goal here is to make it visible every time a color item is being selected, passing the respective Color object so its details to be displayed. Keeping the color details view visible when a collection is being selected or when there’s no selection at all is meaningless, so in these cases we’ll just hide it again.
The implementation is really simple, but let’s go step by step. At first, let’s check if the selected item is a color or not:
if let color = outlineView.item(atRow: outlineView.selectedRow) as? Color {

}
Once again we use the item(forRow:) method to get the item matching to the selected row. If casting it to a Color object is successful, then there are two things to do: To pass the color object to the color details view (colorDetailsView property in the ViewController class), and to make it visible. Here we go:
colorDetailsView.set(color: color)
colorDetailsView.show()
Take a look at the ColorDetailsView.swift file to see the implementation details of the color details view. It’s a custom view going in pair with a .xib file that contains the UI design.
As I’ve said already, if the selected item is not a Color object then we need to hide the color details. This will happen to an else clause:
else {
    colorDetailsView.hide()
}
Here’s the implementation in one piece. As you can see, there’s no much to do; the actual work of displaying the color details and showing or hiding the view is already implemented in the starter project.
func outlineViewSelectionDidChange(_ notification: Notification) {
if let color = outlineView.item(atRow: outlineView.selectedRow) as? Color {
// If the selected item is a Color object then pass it to the color details
// view and show it.
colorDetailsView.set(color: color)
colorDetailsView.show()
} else {
// In any other case hide the color details view.
colorDetailsView.hide()
}
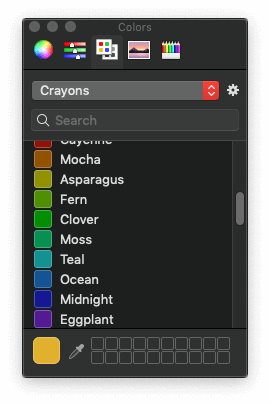
}To change the color simply click on the color well (see this tutorial regarding various macOS controls), and the Colors panel will appear.
Notice that when you select a new color, the actual color sample and the RGBA values are being updated in the color details view.
That’s great, but there’s a problem. The selected item in the outline view is not being updated with the new color!
Updating The Selected Color Item
Even though the color details view updates itself when a new color from the Colors panel is being selected, the original selected color item in the outline view remains intact. The reason for that is because the ViewController class doesn’t know about the changes that take place in the ColorDetailsView class. ColorDetailsView has the responsibility to let the ViewController know, and it’s actually doing that by using the delegation pattern and implementing the ColorDetailsViewDelegate protocol. This protocol contains one method only: shouldUpdateColor(withRed:green:blue:alpha:).
ViewController class sets itself as the delegate of the ColorDetailsView upon the view’s lazy loading implementation (find it at the beginning of the ViewController class):
lazy var colorDetailsView: ColorDetailsView = {
    let view = ColorDetailsView()
    view.delegate = self
    ...
}()
It implements the delegate method as shown to the following extension, which also exists in the starter project:
extension ViewController: ColorDetailsViewDelegate {
    func shouldUpdateColor(withRed red: CGFloat, green: CGFloat, blue: CGFloat, alpha: CGFloat) {

    }
}
So, what remains for us here is to add the missing logic to the above method and have our Color item get updated according to the parameter values shown above.
We will start by getting the Color object matching to the selected row:
if let color = outlineView.item(atRow: outlineView.selectedRow) as? Color {

}
Color class in the Model.swift file contains a method called update(withRed:green:blue:alpha:). Its purpose is to update itself with the given color values. We’ll use it as shown here:
color.update(withRed: red, green: green, blue: blue, alpha: alpha)The Color object is now updated, but changes must be reflected to the outline view as well. We don’t have to reload the entire outline view, we can reload just a single item as you can see:
outlineView.reloadItem(color)That’s it, now any changes made to the actual color will be reflected to the selected item in the outline view.
For reference, here’s the above lines together:
extension ViewController: ColorDetailsViewDelegate {
    func shouldUpdateColor(withRed red: CGFloat, green: CGFloat, blue: CGFloat, alpha: CGFloat) {
        if let color = outlineView.item(atRow: outlineView.selectedRow) as? Color {
            color.update(withRed: red, green: green, blue: blue, alpha: alpha)
            outlineView.reloadItem(color)
        }
    }
}
Updating Collection Items Titles
Another similar problem to what we just solved exists when editing the title of a collection item. Regardless of what you’ll type in as a title, when the outline view is being reloaded the original default title is appearing again. This happens because we don’t keep the typed title when text editing is finished. But don’t worry, it’s easy to fix it.
To start, let me refresh our memory by saying that when we were setting up the cell views we had set the ViewController class (self) as the delegate of the text field:
func outlineView(_ outlineView: NSOutlineView, viewFor tableColumn: NSTableColumn?, item: Any) -> NSView? {
    ...

    if let collection = item as? Collection {
        ...
        cell.textField?.delegate = self
        ...
    }
    ...
}
In the ViewController.swift file you can find the following extension that makes ViewController class conform to the NSTextFieldDelegate protocol:
extension ViewController: NSTextFieldDelegate {

}
In it, we will implement the following method:
func control(_ control: NSControl, textShouldEndEditing fieldEditor: NSText) -> Bool {

}
This delegate method is called every time the text control (text field) specified by the control parameter is about to end from being edited. Our goal here is to get the collection item that was just edited and to assign the text field’s text to the matching Collection object. Here it is:
extension ViewController: NSTextFieldDelegate {
    func control(_ control: NSControl, textShouldEndEditing fieldEditor: NSText) -> Bool {
        guard let collection = outlineView.item(atRow: outlineView.selectedRow) as? Collection else { return true }
        collection.title = (control as! NSTextField).stringValue
        return true
    }
}
As you see, we are using a guard statement when casting the item to a Collection object. Once we have it, we update its title property. Notice how we cast from NSControl to NSTextField and that we get the actual text using the stringValue property.
If you try to change a collection’s title now and you refresh the outline view by adding another item after that, you’ll see that the title you set remains there!
Removing Items
So far we’ve learnt how to add new items to the outline view, how to access them and deal with selections, rows, and underlying types, but there’s still something missing; how to remove items.
So, now we will focus on that and we’ll make it possible to delete items by using the respective button in the UI. This button is connected to this IBAction method (in the ViewController class):
@IBAction func removeItem(_ sender: Any) {

}
Removal will obviously be working when there’s an item selected, and that’s where we start from; we’ll get the selected row:
let selectedRow = outlineView.selectedRowAlso, we’ll declare a local boolean variable which will show whether removing an item was successful or not, so we can take some additional actions later.
var result = falseRemoving an item means that we have to delete the corresponding object from the outline view’s data source. ViewModel class provides a method to do that, remove(item:from:). It’s a generic method that accepts both Color and Collection items. If the selected item that should be deleted has a parent collection, then we provide it as the second argument. Otherwise, if the second argument is nil and the given item is a Collection object, it tries to delete from the top level collections.
Let’s deal with the Color case first. We will use the item(atRow:) method to get the Color item based on the selected row value, but along with it we’ll also get its parent collection. Without it we can’t remove the color:
if let selectedItem = outlineView.item(atRow: selectedRow) as? Color, let parentCollection = getCollectionForSelectedItem() {

}
If both the selectedItem and parentCollection above get a value we can safely proceed to deleting the color from the collection:
viewModel.remove(item: selectedItem, from: parentCollection)
result = true
Notice that we set true to the result flag since we managed to perform the deletion.
Let’s focus on the case where the selected item is a collection now:
else if let selectedItem = outlineView.item(atRow: selectedRow) as? Collection {

}
There are two different sub-cases to take care of here: When the collection has a parent collection and when not. Checking for that is easy:
if let parentCollection = outlineView.parent(forItem: selectedItem) as? Collection {

} else {

}
In the first case we will remove the selected collection (selectedItem) from the parentCollection object. In the second case we will just pass nil as the second argument. Updating the above with these:
if let parentCollection = outlineView.parent(forItem: selectedItem) as? Collection {
    viewModel.remove(item: selectedItem, from: parentCollection)
} else {
    viewModel.remove(item: selectedItem, from: nil)
}

result = true
Again, we set true to the result flag to indicate a successful deletion.
By having handled both Color and Collection cases above, we can proceed and check the value of the result flag. If it’s true, then we can refresh the outline view:
if result {
    outlineView.reloadData()
}
We can stop here as the above concludes the effort to make the app capable of removing rows. However we’ll continue a little bit more to make the user experience more pleasant! If you run the app now, add a few items and start deleting rows, you’ll see that you have to manually select another item after you’ve removed one. That’s not so convenient when you want to delete subsequent items one after another, or you want to keep acting on the remaining items after a deletion.
So, here’s what we’ll do: We will check if the selected row is not the last one, and if there are more items after it, we will automatically select the one coming after the deleted item. In the opposite case, we’ll check if there are rows before the selected row. If so, we’ll automatically select the previous item, otherwise nothing will happen.
Still in the if result statement, we translate all the above in code as shown next:
if selectedRow < outlineView.numberOfRows {
    outlineView.selectRowIndexes(IndexSet(arrayLiteral: selectedRow), byExtendingSelection: false)
} else {
    if selectedRow - 1 >= 0 {
        outlineView.selectRowIndexes(IndexSet(arrayLiteral: selectedRow - 1), byExtendingSelection: false)
    }
}
Now whenever you delete an item the next one will be automatically selected, and if there is not any, the previous one will be auto-selected instead (if exists).
Here is the method we just implemented:
@IBAction func removeItem(_ sender: Any) {
    let selectedRow = outlineView.selectedRow
    var result = false

    if let selectedItem = outlineView.item(atRow: outlineView.selectedRow) as? Color, let parentCollection = getCollectionForSelectedItem() {
        viewModel.remove(item: selectedItem, from: parentCollection)
        result = true
    } else if let selectedItem = outlineView.item(atRow: outlineView.selectedRow) as? Collection {
        if let parentCollection = outlineView.parent(forItem: selectedItem) as? Collection {
            viewModel.remove(item: selectedItem, from: parentCollection)
        } else {
            viewModel.remove(item: selectedItem, from: nil)
        }

        result = true
    }

    if result {
        outlineView.reloadData()

        if selectedRow < outlineView.numberOfRows {
            outlineView.selectRowIndexes(IndexSet(arrayLiteral: selectedRow), byExtendingSelection: false)
        } else {
            if selectedRow - 1 > -1 {
                outlineView.selectRowIndexes(IndexSet(arrayLiteral: selectedRow - 1), byExtendingSelection: false)
            }
        }
    }
}
Summary
If there is one thing to take with you leaving from here today is how you get to the underlying data source object based on a selected item of the outline view. Take for example what we did in the previous parts, where we were casting items either to Collection or Color objects. It’s also important to know how to deal with outline views regarding basic stuff, such as getting the actual item from the selected row, the row from the item, selecting rows programmatically, and so on. Another crucial part is the data source methods that specify the kind and number of items that should appear in the outline view. No concrete rules to follow here as all depend on the data you want to display on the outline view, as well as how you want it to be displayed. Keep in mind which items you want to exist in the root level, and which items should exist as child items. At the end, working with outline views is not hard as long as you break down the implementation process in steps. Thanks for reading!
For the complete demo, please download it on GitHub.
Credits: Button icons by icons8


