

Are you wondering which feature of your app is indulging most of your user? Do you know which is the most hit tab of your wonderful app? If you want your app to be loved by your users, you have to better understand how your users use your app. In order to so, it is inevitable that you have to integrate some kinds of mobile analytics in your app. And, Mixpanel is one of the most popular mobile analytics platforms.
Mixpanel is a platform which can be used to track user action in your app. It collects data and analyse it in such a way that it’s easier for you to find out the problems in your app. You can retain and engage your customers by analysing their app usage. Every user can be associated with unique identifier which helps you find out their app usage pattern. Mixpanel is one of the mobile analytics platform which focuses on tracking user action rather than just their page views. It has a web dashboard which will help you analyse the data in different forms. With the help of mobile analytics you can retain your valuable users and know them with the way they use your app.
I’m going to walk you through Mixpanel, and here is what you will learn in this tutorial:
- Setting up Mixpanel account
- Integrate Mixpanel analytics in your app using Swift 3 which will include Mixpanel initialization, user action tracking, super properties registration, and how you can add people’s property.
Most importantly, this tutorial is going to be extremely easy, and fits most readers. Let’s get started.
Creating a Project in Mixpanel
Before integrating Mixpanel with your app, you will need to register on mixpanel.com in order to create a Mixpanel account. Mixpanel comes with free and paid version. You can use free version to maintain your app which will provide you up to 20M data points. To learn more about the pricing details, you can check it out here: https://mixpanel.com/pricing.
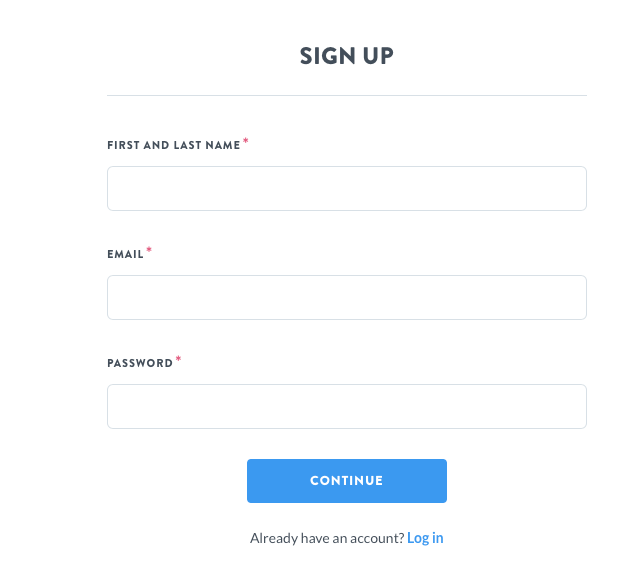
Creating account with mix panel is extremely simple process. You just have to fill the below details to signup.
Once signup, you will be brought to a welcome screen that shows you the integration procedures. Skip this part, I will walk you through later. In case you’ve registered Mixpane before, you will see the dashboard where you are going to see graphs and events ones you track them through your app.
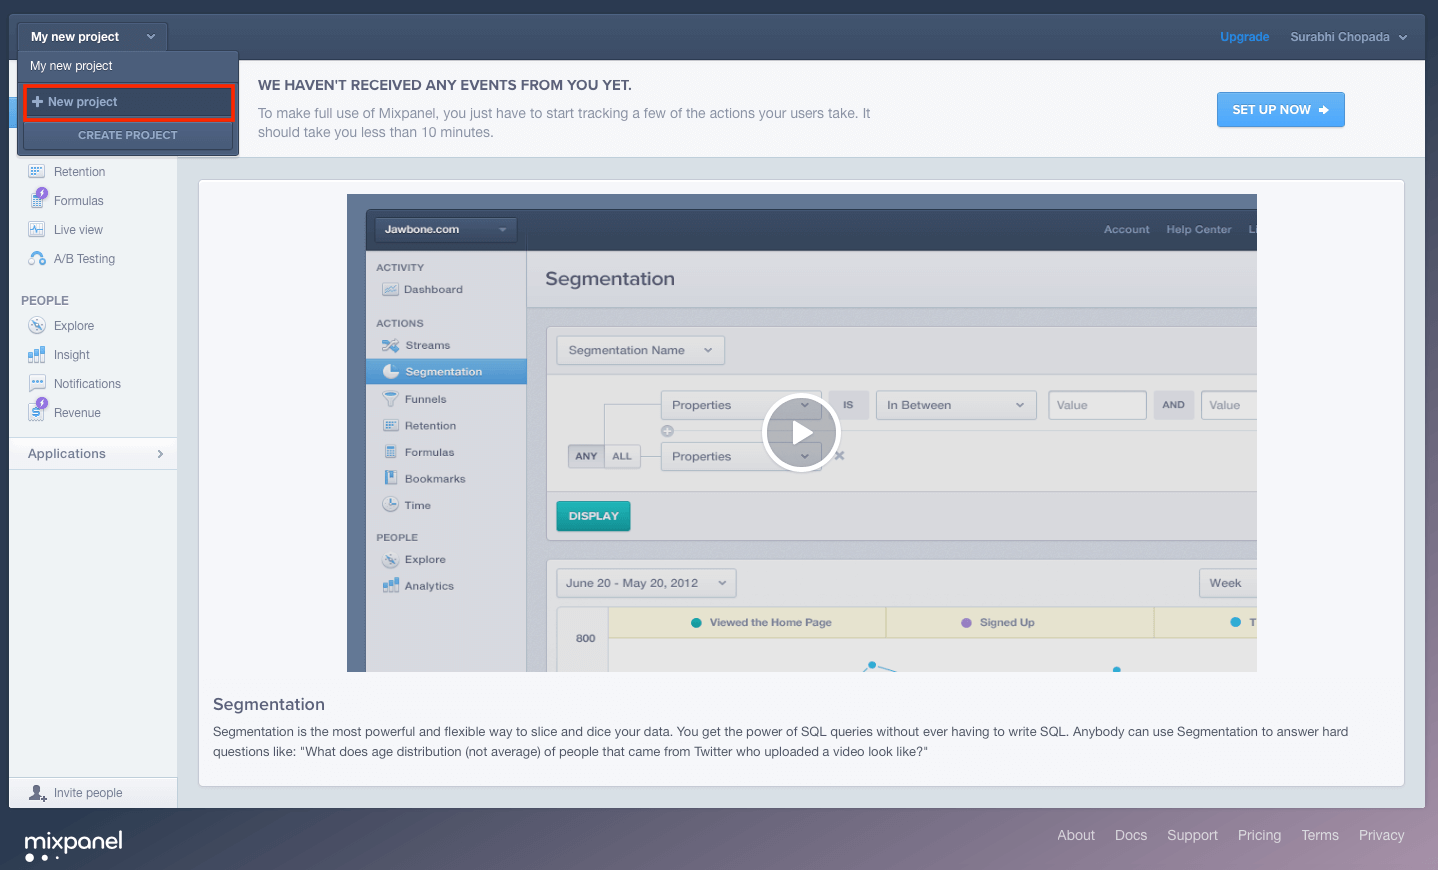
Now click the My New Project button and click New project. You can then name the project of your choice. Simply name it “MixpanelDemo” (or whatever name you like), and click the Create Project button to proceed.
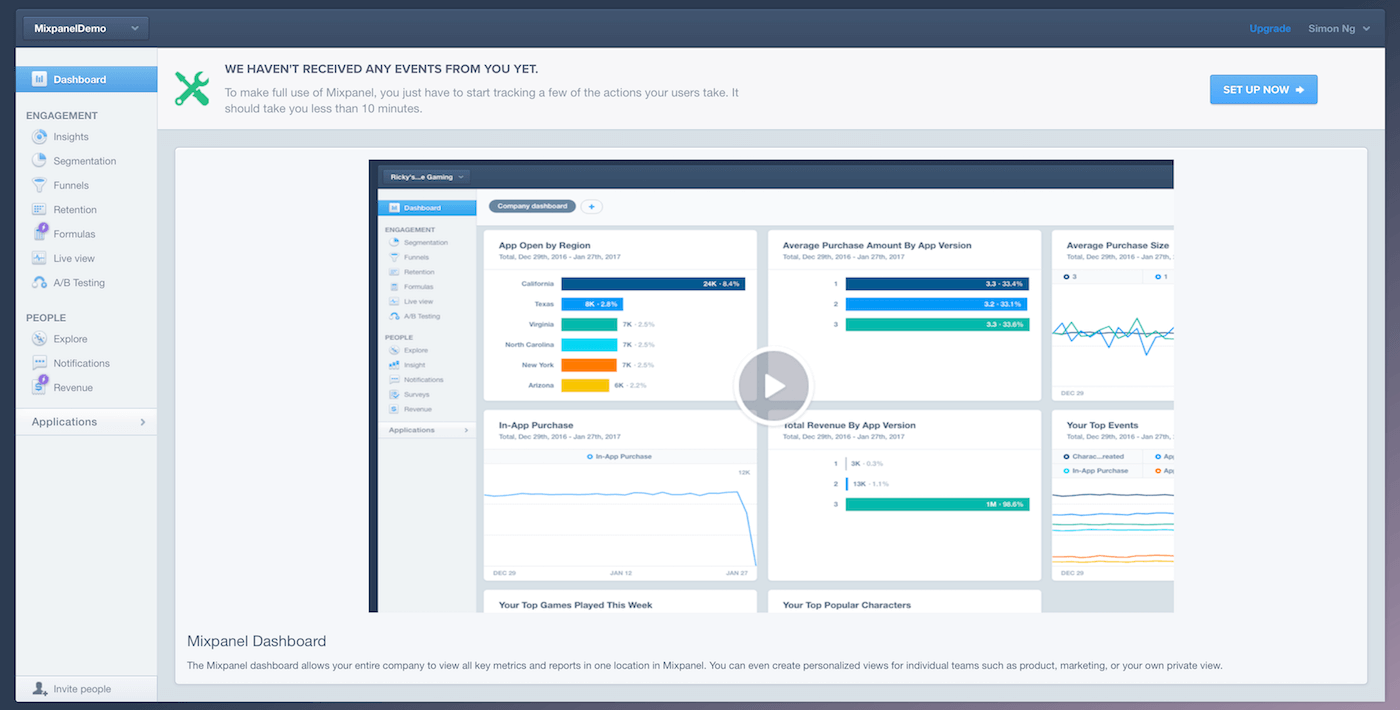
You should now see the dashboard. All the actions that we are going to track through will be seen under this project. But of course, you won’t see any charts or data as we haven’t sent any event to Mixpanel, which we will implement it in a while.
Okay, now you may wonder how your app will be associated with the project you have just created? It’s here.
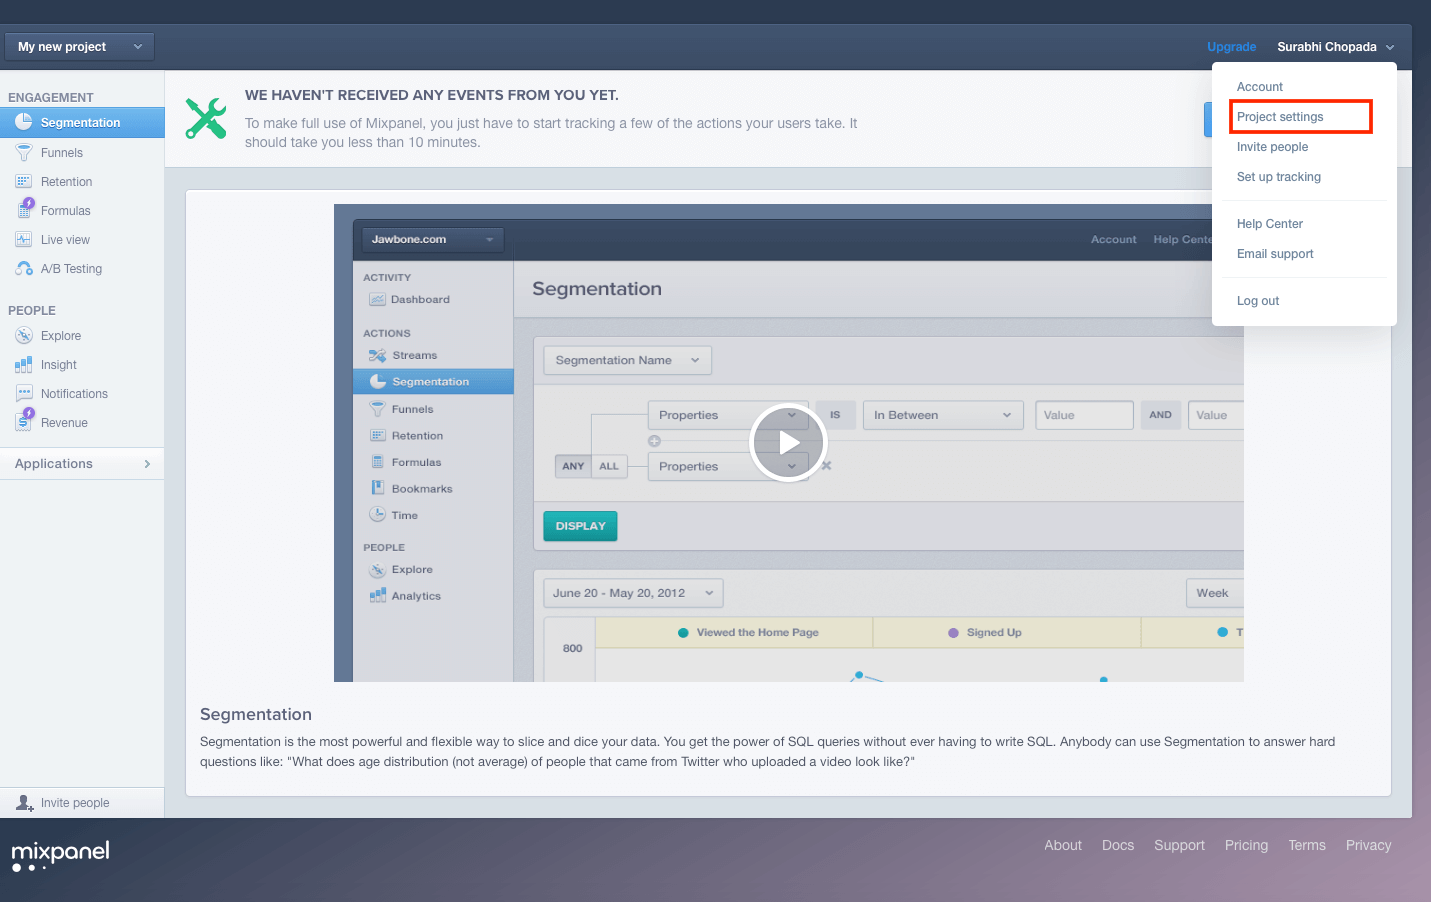
Click your name on right hand side, you will see projects settings menu. Project settings menu contains the token that you are required to use in your app while integrating mixpanel.
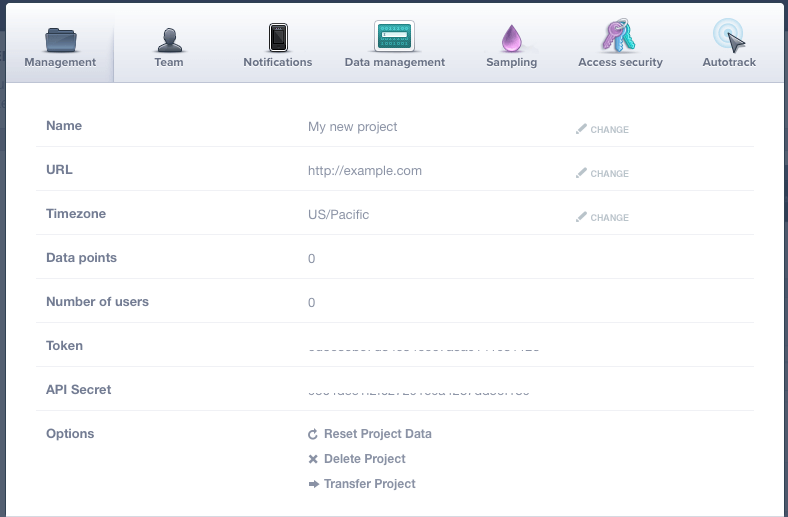
Later, we will refer to the token and API secret when building the app demo. You should know where to find it. In our app, we are going to use this token to associate it with this Mixpanel project.
That’s it! We are done with setting up our mixpanel project. Now let’s see how to integrate it in our app.
Creating the Demo App
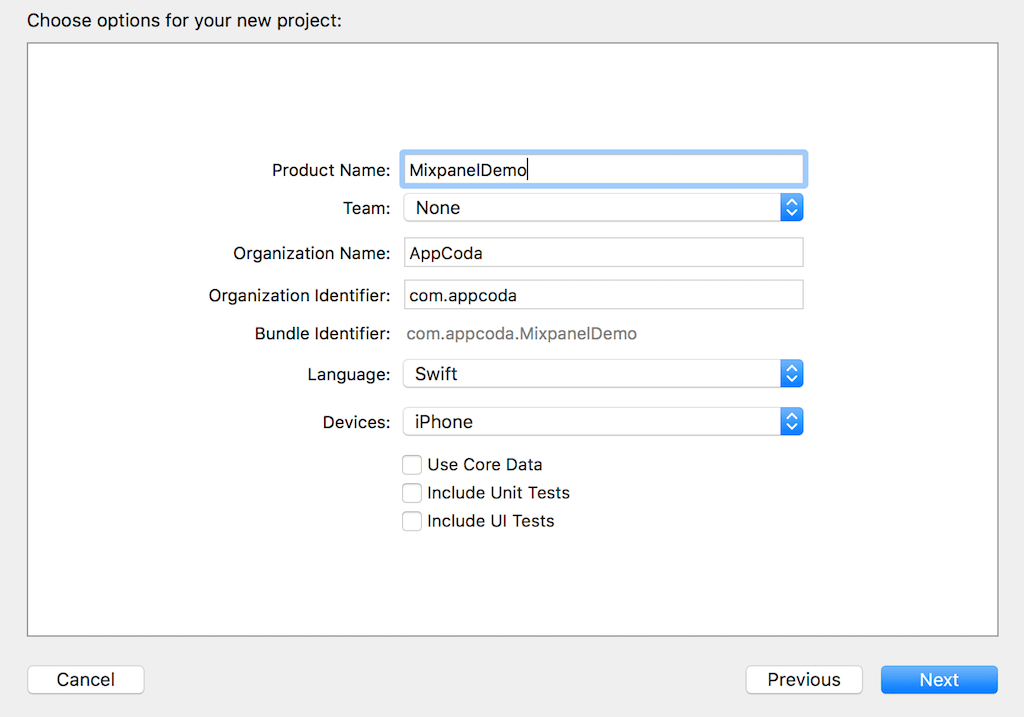
For demo purpose, we will create a simple one screen counter app. So fire up Xcode and create a new project by using the Single View Application template. Name your application MixpanelDemo, enter a organisation identifier, set iPhone for the device family. Tell Xcode where you want to save the project and click on create button.
Now let’s add some UI to the app. Add two buttons (Start and Stop) to the view controller, and put a label to display the counter.
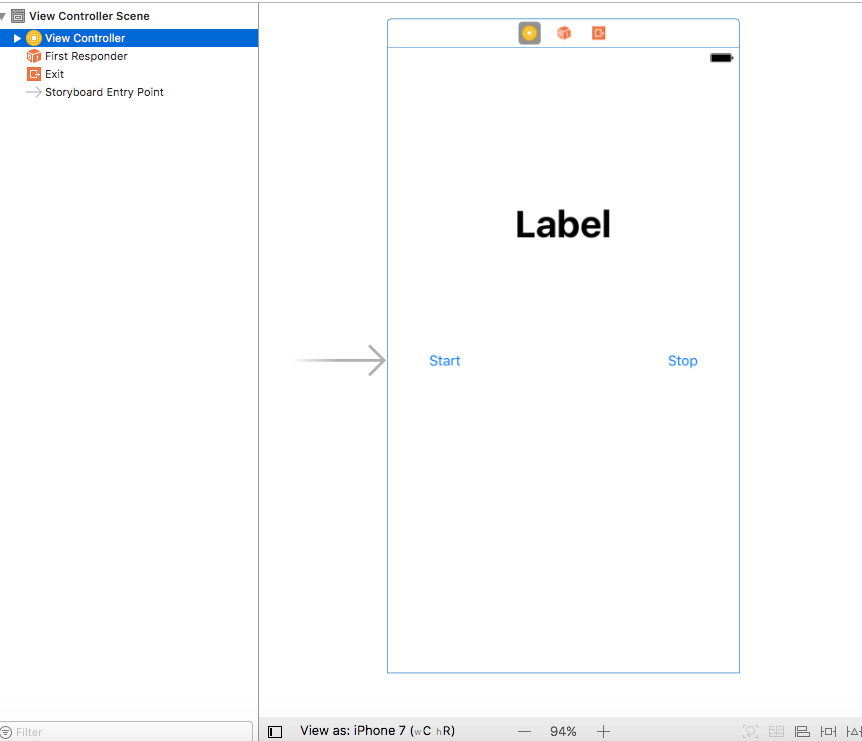
After that, create an outlet (counterLabel) for the label. And then create action methods for both Start and Stop buttons. Make sure you establish the connections between the buttons and action methods.
class ViewController: UIViewController {

    @IBOutlet var counterLabel: UILabel!

    override func viewDidLoad() {
        super.viewDidLoad()
        // Do any additional setup after loading the view, typically from a nib.
    }

    override func didReceiveMemoryWarning() {
        super.didReceiveMemoryWarning()
        // Dispose of any resources that can be recreated.
    }

    @IBAction func startClick(_ sender: Any) {

    }

    @IBAction func stopClick(_ sender: Any) {

    }
}
Let’s code to set the counter. We will create a variable counter by initialising it to 60.
var counter = 60
And we will also create a timer variable for implementing the counter:
var timer = Timer()
In the viewDidLoad method, we will set the content of the counter label, which is the value of the counter variable.
override func viewDidLoad() {
    super.viewDidLoad()

    counterLabel.text = String(counter)
}
Now we will add some code to start the counter as follows:
@IBAction func startClick(_ sender: Any) {
    if timer.isValid {
        timer.invalidate()
    }

    counter = 60
    counterLabel.text = String(counter)
    timer = Timer.scheduledTimer(timeInterval: 1.0, target: self, selector: #selector(self.countdown), userInfo: nil, repeats: true)
}
In the method shown above, we first initialize the counter to 60 and assigning it to label. This is because every time we click on Start button we need our counter and text label to be reset to the value 60. The timer is scheduled to have the time interval equal 1 sec, so the countdown method will be called every 1 sec.
Now add the countdown method to the class like this:
func countdown() {
    if(counter > 0){
        counter -= 1
        counterLabel.text = String(counter)
    }
    else {
        timer.invalidate()
    }
}
In this method we are decrementing the counter by 1 if counter is greater that 0 and setting the updated value to the label. Otherwise, we stop the timer as the value reaches 0. This is how we decrease the counter from 60 to 0.
For the stop button action, we will just stop the timer like this:
@IBAction func stopClick(_ sender: Any) {
    timer.invalidate()
}
Now hit the run button and you will see a simple app which will give you counter which starts from 60 and ends to 0. Now it comes the interesting part – Integrating Mixpanel in to this app.
You have developed an amazing app but it’s time to make it more amazing!! Let’s integrate with Mixpanel for usage analysis.
Installing the Mixpanel library with CocoaPods
The easiest way to get Mixpanel into your iOS project is to use CocoaPods. If you are not familiar with CocoaPods, please refer to this beginner’s guide. Assuming you have CocoaPods installed, you can follow the steps below to install the Mixpanel library in your Xcode project:
- Open terminal and run the command below to create a file in your Xcode project called Podfile.
- Once the Podfile is created, edit the pod file and add the line “pod ‘Mixpanel-swift'” to the file:
- Finally run `pod install` in terminal. It should download and install the Mixpanel library, and create a new Xcode workspace called `MixpanelDemo.xcworkspace`. Open up this workspace in Xcode.
cd [your-projectPath]
pod init
target 'MixpanelDemo' do
  # Comment the next line if you're not using Swift and don't want to use dynamic frameworks
  use_frameworks!

  # Pods for MixpanelDemo
  pod 'Mixpanel-swift'
end
Initializing MixPanel
Now that we have Mixpanel added to the project, the next step is to initialize it before starting to track any action. First, add the following import statement in AppDelegate.swift:
import Mixpanel
Do you remember the token revealed in the Mixpanel portal? Yes, it’s time to use it. We need to initialize the library with that token. Add a new function called initializeMixpanel():
func IntialiseMixpanel() {
    Mixpanel.initialize(token: "Your_Mixpanel_Token")
}
Here we just need add a single line of code. Remember to “Your_Mixpanel_Token” with your own token, which will be used to integrate with your Mixpanel project.
Next, invoke this function in application(_:didFinishLaunchingWithOptions:):
func application(_ application: UIApplication, didFinishLaunchingWithOptions launchOptions: [UIApplicationLaunchOptionsKey: Any]?) -> Bool {

    initializeMixpanel()

    return true
}
You are now done with the initialization and you are all set to track your first event.
Tracking Events
You can track any action that a user performs in your app. It can be anything like page view, successful logins, purchases made, etc. It all depends on your project what you want to track. But for our simple demo, we will track a few events including:
- Timer started
- Timer stopped
- App Launched
It is very simple but you’ll get an idea about how Mixpanel works. Now open ViewController.swift and add an import statement:
import Mixpanel
Let’s go back to methods that we have created earlier for the start and stop buttons. In the app, we will track event when user starts the timer and when he/she stops it. To do that, all you need to do is call Mixpanel.mainInstance().track(event:) with the specified event name. Modify the startClick method like this:
@IBAction func startClick(_ sender: Any) {
    counter = 60
    counterLabel.text = String(counter)
    timer = Timer.scheduledTimer(timeInterval: 1.0, target: self, selector: #selector(self.countdown), userInfo: nil, repeats: true)

    //Track Event
    Mixpanel.mainInstance().time(event: "Timer Started")
}
Now when someone taps the Start button, we will send an event to our Mixpanel project with the event name set to “Timer Started”. Later, after you test the app, you will see the event appeared in your Mixpanel dashboard.
You can also add extra parameters to distinguish the events. For the stopClick method, we add properties for each event we send in dictionary form.
@IBAction func stopClick(_ sender: Any) {
    timer.invalidate()

    //Track event with property
    Mixpanel.mainInstance().track(event: "Timer Stopped", properties: ["Counter":counterLabel.text!])
}
In addition to naming the event as “Timer Stopped”, we also specify the property and record the counter value at the time when a user hits Stop.
Lastly, we also want to send an event when a user launches the app. In the initializeMixpanel method of AppDelegate, please insert a line of code for this purpose:
func initializeMixpanel() {
    Mixpanel.initialize(token: "Your_Mixpanel_Token")
    Mixpanel.mainInstance().track(event: "App Launched")
}
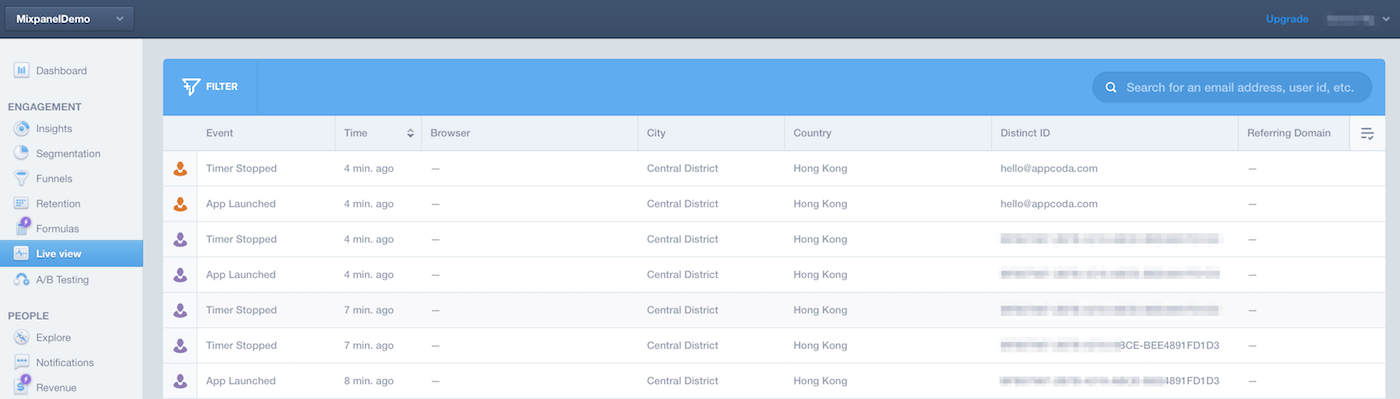
Now let’s run the app to have a quick test. Play around with the timer and then go up to your Mixpanel. Login to the dashboard and check out the Live View Tab.
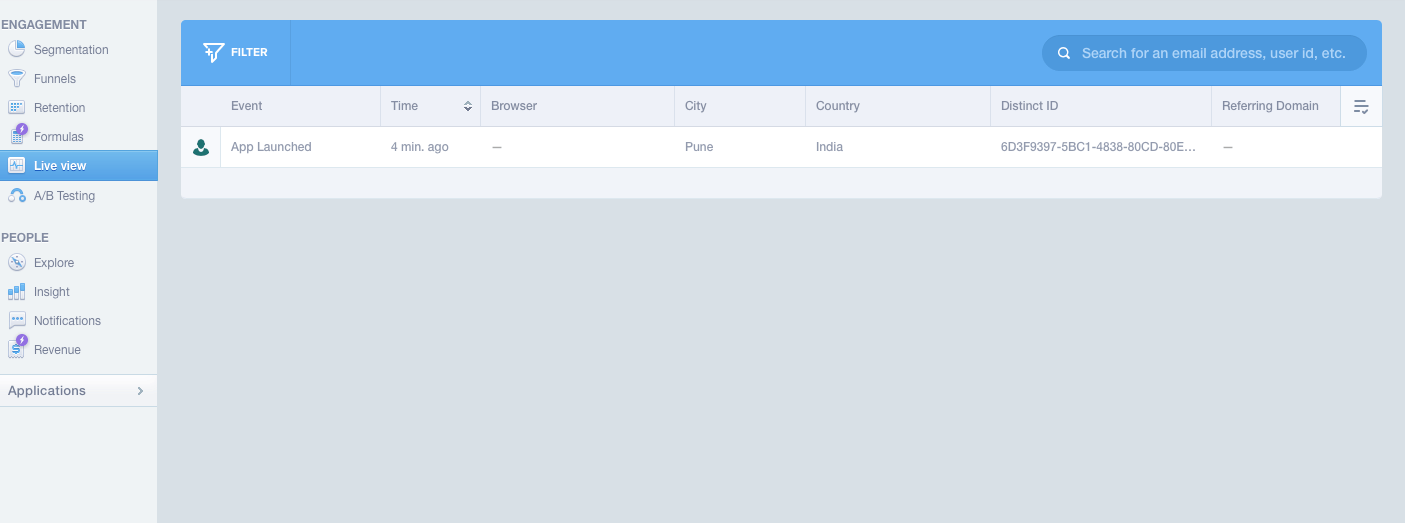
You will see your events being logged here. It might take some time (around 10 minutes) to get your first event appeared in the dashboard. But this is a real time tracking and you can check all the events in real time in the live view.
Mixpanel also allows us to set the flush interval for event tracking. When you call track to send an event, it can be queued, and the queue will be flushed based on the time defined in the flush interval. We will set this to 10 second in our app. So every 10s, it will check if any event is present in queue and flush it accordingly. Update the initializeMixpanel() method like this:
func initializeMixpanel() {
    Mixpanel.initialize(token: "Your_Mixpanel_Token")
        Mixpanel.mainInstance().flushInterval = 10
    Mixpanel.mainInstance().track(event: "App Launched")
}
Managing User Identities
Mixpanel keeps track of users with a unique identity. By default, Mixpanel considers the device id as the distinct ID of a user. Optionally, you can also set the ID for a user manually.
It’s always great idea to associate a user with a unique id like email, user ID, etc that your app uses to recognize a particular user. One drawback of using a device’s ID as identifier is a user can use your app on multiple devices. In this case, the user will be treated as a different user on another device, which is we don’t want. For users own multiple device, we want to treat him/her as the same person.
This is why we prefer to use an ID (e.g. email address) that associates with a particular user. With Mixpanel tracking, you will find him/her the same user on your Mixpanel Dashboard even if he/she uses the app on multiple devices. It’s necessary to set the unique ID of a user before tracking starts. This is because Mixpanel will record all the events with your specified user.
Okay, let’s see how it can done. For demo purpose, we will hardcode an email address as an identifier in the app. We will set the identity in initializeMixpanel(), and the method is updated as below:
func initializeMixpanel() {
    Mixpanel.initialize(token: "Your_Mixpanel_Token")
    Mixpanel.mainInstance().flushInterval = 10
    var mixpanelID = UserDefaults.standard.object(forKey: "MixpanelID")
    if (mixpanelID == nil) {
        mixpanelID = "[email protected]"
        UserDefaults.standard.set(mixpanelID, forKey: "MixpanelID")
    }
    Mixpanel.mainInstance().identify(distinctId: mixpanelID as! String)
    Mixpanel.mainInstance().track(event: "App Launched")
}
Now the app will save the Mixpanel Identity in UserDefaults so that every time we don’t need to get the identifier. To set the user’s identity for Mixpanel, you can just call the identify() method with the specified distinct ID.
If you test the app now and play around with the timer, you can find that the new events are associated with “[email protected]”.
Storing User Profiles
In addition to user identities, Mixpanel also allows you to set individual properties for a particular user such as email address, registration date and full name. In Mixpanel dashboard, you can see the list of users under the People section in the side menu. If you want to know the details of a particular person, you can reveal the user’s profile and explore all the events trigged by that person. This is truly awesome. It will give you, the app developer, a better understanding about how each user uses your app.
To set properties on a user profile, you can call Mixpanel.mainInstance().people.set(property:) to set the user’s properties. For the demo app, update the stopClick method like this:
@IBAction func stopClick(_ sender: Any) {
    timer.invalidate()

    // Track event with property
    Mixpanel.mainInstance().track(event: "Timer Stopped", properties: ["Counter":counterLabel.text!])
    Mixpanel.mainInstance().people.set(property:"Latest Time Record", to: counterLabel.text!)
    Mixpanel.mainInstance().people.increment(property: "Stop hits",by: 1)
}
In the above code, we set the Latest Time Record as the user’s property. Every time the user stops the timer, this property will be updated with his latest record. On top of that, we can also set incremental numeric property. This is particularly useful when you want to store or keep track of an accumulated value. For instance, we want to keep track of the total number of times the user hits the Stop button. We can call the Mixpanel.mainInstance().people.increment(property:,by:) method. In the code above, we set the “Stop hits” property and increase the value by 1.
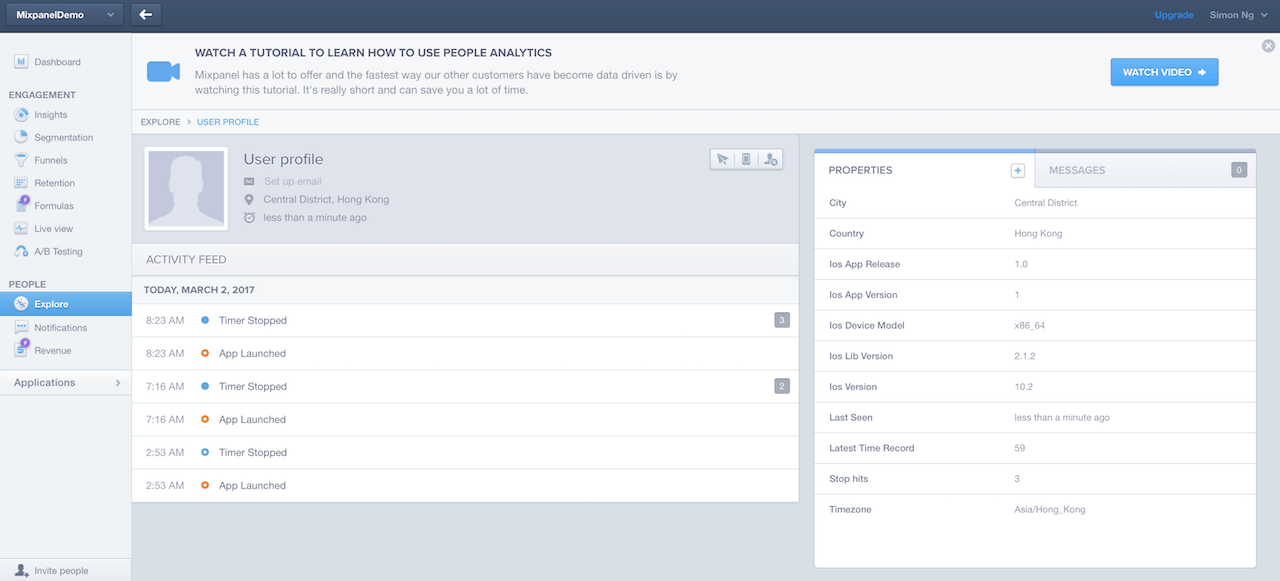
Try to run the app again, and hit the Start/Stop button. When you go back to the Mixpanel dashboard, choose Explore under the People section. You will get the list of users using the app. If you select a particular user, you will find the detailed list of the event. And you will find an entry of “Stop hits” in the Properties tab.
Super Properties
Mixpanel sends a number of parameters by default, such as the device model, operating system version and time zone. But sometimes you may want to have some properties that you want to include in each event you send. Mixpanel has Super Properties for this purpose. You can register the properties as Super Properties and then Mixpanel will include it in all events you send.
To register a property as super property, you just need to call Mixpanel.mainInstance().registerSuperProperties(). You can update the initializeMixpanel() method like this:
func initializeMixpanel() {
    Mixpanel.initialize(token: "Your_Mixpanel_Token")
    Mixpanel.mainInstance().flushInterval = 10
    var mixpanelID = UserDefaults.standard.object(forKey: "MixpanelID")
    if (mixpanelID == nil) {
        mixpanelID = "[email protected]"
        UserDefaults.standard.set(mixpanelID, forKey: "MixpanelID")
    }
    Mixpanel.mainInstance().identify(distinctId: mixpanelID as! String)
    Mixpanel.mainInstance().registerSuperProperties(["App Language" : "English"])
    Mixpanel.mainInstance().track(event: "App Launched")
}
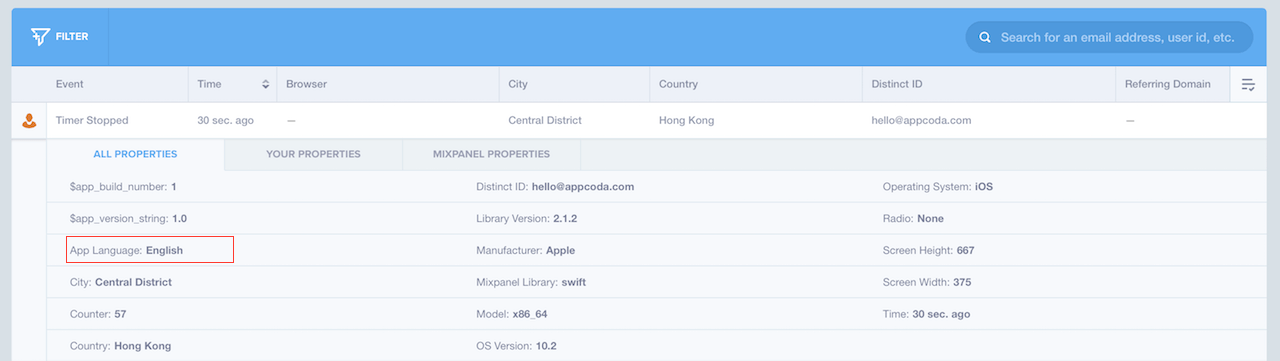
As an example, we register the App Language as a Super Property. You are free to use whatever property you like such as organisation name and app release date. You can now run your app again and tap the Start/Stop buttons. Now all events should include the “App Language” property.
Summary
I have covered some of the Mixpanel features in this tutorial. That said, there are some features I do not have time to cover. Mixpanel can offer much more to engage users like push notification. You can even send push notification to users through Mixpanel that will enhance your interaction with users. I hope this tutorial will help you understand Mixpanel, and how to integrate it with your app! I highly recommend you to use Mixpanel to better understand your app usage, and your users.
For reference, you can download the demo project on GitHub.


