

Earlier, Apple officially released iOS 13 to the public. Apart from dark mode and other new features, the latest version of iOS also introduces us a new way known as Context Menu to interact with the device.
A context menu is similar to peek and pop in 3D Touch. One noticeable difference is that this feature works on all devices running iOS 13 and later, even the device doesn’t support 3D Touch. To bring up a context menu, people uses the touch and hold gesture or force touch if the device is powered with 3D Touch.
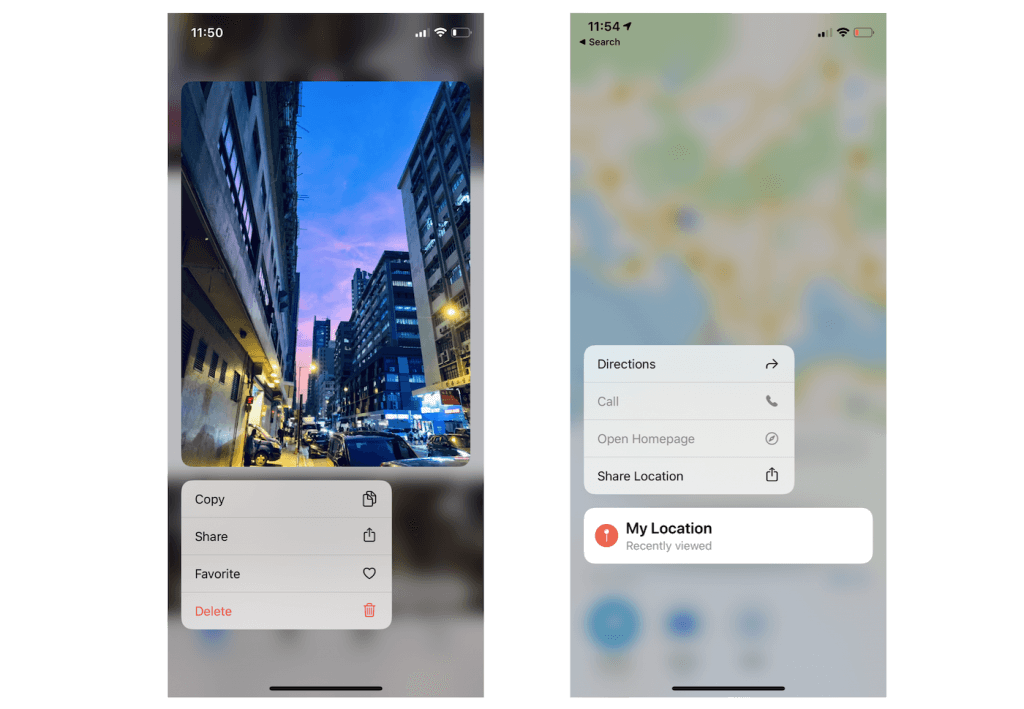
If you’ve upgraded to iOS 13, you can find this new control in most stock apps such as Maps and Photos.
In this tutorial, let’s see how to implement the context menu in SwiftUI.
Building a Context Menu in SwiftUI
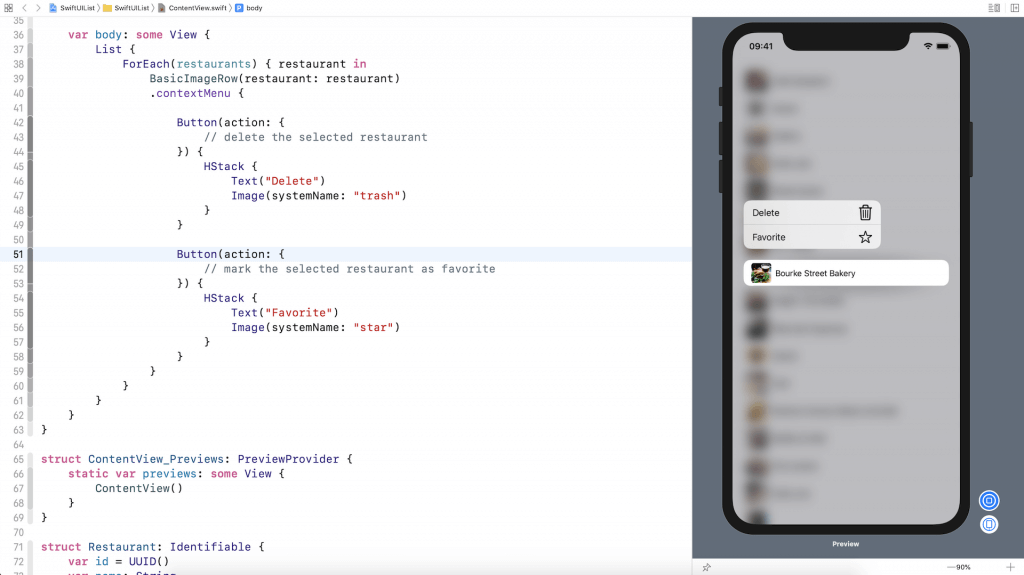
To begin, please download this starter project and unzip it on your Mac. After opening the SwiftUIList.xcodeproj file, run the project or preview it in the canvas. The app should show you a list of restaurants.

What we are going to do is create a context for this demo app. We want to trigger the context menu when people touch and hold any of the rows. In the menu, it provides two action buttons for users to choose: Delete and Favorite. When selected, the Delete button will remove the row from the list. The Favorite button will mark the selected row with a star indicator.
Working with the ContextMenu Modifier
SwiftUI has made it very simple to implement a context menu. You just need to attach the contextMenu container to a view and configure its menu items.
To present these two items in the context menu, we can attach the contextMenu to each of the rows in the list like this:
List {
    ForEach(restaurants) { restaurant in
        BasicImageRow(restaurant: restaurant)
            .contextMenu {

                Button(action: {
                    // delete the selected restaurant
                }) {
                    HStack {
                        Text("Delete")
                        Image(systemName: "trash")
                    }
                }

                Button(action: {
                    // mark the selected restaurant as favorite
                }) {
                    HStack {
                        Text("Favorite")
                        Image(systemName: "star")
                    }
                }
            }
    }
}
Implementing the Button Actions
Right now, we haven’t implemented any of the button actions. However, if you execute the app, the app will bring up the context menu when you touch and hold one of the rows.
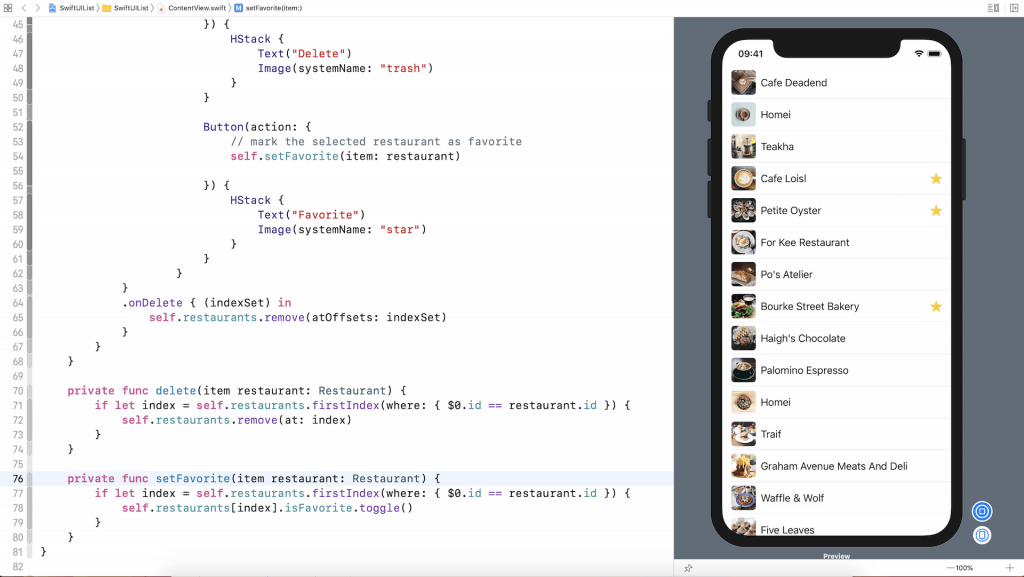
Now let’s continue to implement the delete action. Unlike the onDelete handler, the contextMenu doesn’t give us the index of the selected restaurant. To figure it out, it would require a little bit of work. Create a new function in ContentView:
private func delete(item restaurant: Restaurant) {
    if let index = self.restaurants.firstIndex(where: { $0.id == restaurant.id }) {
        self.restaurants.remove(at: index)
    }
}
This delete function takes in a restaurant object and searches for its index in the restaurants array. To find the index, we call the firstIndex function and specify the search criteria. What the function does is loop through the array and compare the id of the given restaurant with those in the array. If there is a match, the firstIndex function returns the index of the given restaurant. Once we have the index, we can remove the restaurant from the restaurants array by calling remove(at:).
Next, insert the following line of code under // delete the selected restaurant:
self.delete(item: restaurant)We simply call the delete function when users select the Delete button.
To make the delete work, we also need to mark the restaurants array with the @State keyword:
@State var restaurants = [ ... ]Now you’re ready to test the app. Click the Play button in the canvas to run the app. Press and hold one of the rows to bring up the context menu. Choose Delete and you should see your selected restaurant removed from the list.
Let’s move onto the implementation of the Favorite button. When this button is selected, the app will place a star in the selected restaurant. The Restaurant struct already has a property named isFavorite that indicates if the restaurant is marked as favorite. By default, its value is set to false.
struct Restaurant: Identifiable {
    var id = UUID()
    var name: String
    var image: String
    var isFavorite: Bool = false
}
Similar to the Delete feature, we’ll create a separate function in ContentView for setting a favorite restaurant. Insert the following code to create the new function:
private func setFavorite(item restaurant: Restaurant) {
    if let index = self.restaurants.firstIndex(where: { $0.id == restaurant.id }) {
        self.restaurants[index].isFavorite.toggle()
    }
}
The code is very similar to that of the delete function. We first find out the index of the given restaurant. Once we have the index, we change the value of its isFavorite property. Here we invoke the toggle function to toggle the value. Say, for example, if the original value of isFavorite is set to false, the value will change to true after calling toggle().
Next, we have to handle the UI of the row. Whenever the restaurant’s isFavorite property is set to true, the row should present a star indicator. Update the BasicImageRow struct like this:
struct BasicImageRow: View {
    var restaurant: Restaurant

    var body: some View {
        HStack {
            Image(restaurant.image)
                .resizable()
                .frame(width: 40, height: 40)
                .cornerRadius(5)
            Text(restaurant.name)

            if restaurant.isFavorite {
                Spacer()

                Image(systemName: "star.fill")
                    .foregroundColor(.yellow)
            }
        }
    }
}
In the code above, we just add a code snippet in the HStack. If the isFavorite property of the given restaurant is set to true, we add a spacer and a system image to the row.
That’s how we implement the Favorite feature. Lastly, insert the following line of code under // mark the selected restaurant as favorite to invoke the setFavorite function:
self.setFavorite(item: restaurant)Now it’s time to test. Execute the app in the canvas. Press and hold one of the rows (e.g. Petite Oyster), and then choose Favorite. You should see a star app appeared at the end of the row.
This is how you implement context menus in SwiftUI. I hope you enjoy reading this tutorial. We’re going to release our new book on SwiftUI next book. Please stay tuned for our updates.
For reference, you can download the full project on GitHub.
Editor’s note: To learn more about SwiftUI, you can check out our new book “Mastering SwiftUI“.


