

WWDC 2019 was one of the more exciting keynotes in terms of advancements in developer tools. One of the biggest and the best announcements was the release of SwiftUI. SwiftUI is a brand new framework that allows you to design and developer user interfaces with way less code and in a declarative way.
Unlike UIKit which was commonly used conjoined with storyboards, SwiftUI is completely based on code. However, the syntax is very easy to understand and can quickly be previewed with Automatic Preview.
Since SwiftUI is built with Swift, it allows you to create the same complexity of apps with much less code. What’s even more is that the use of SwiftUI automatically enables your app to take advantage of features like Dynamic Type, Dark Mode, Localization, and Accessibility. Furthermore, SwiftUI is available on all platforms including macOS, iOS, iPadOS, watchOS, and tvOS. So now, your UI code can be synchronized across all platforms giving you more time to focus on the minor platform-specific code.
Editor’s note: This tutorial has been updated for Xcode 11.4 and Swift 5.2. If you want to dive deeper into SwiftUI, you can check out our Mastering SwiftUI book.
About this tutorial
It’s important that developers learn early how to use SwiftUI because Apple will eventually migrate much of their focus to this framework. In this tutorial, we’ll look at the basics of SwiftUI and explore how to create navigation views, images, texts, and lists by building a simple contact list that shows all our tutorial team members. When a member is clicked, the app proceeds to the detail view displaying their picture along with a short bio about them. Let’s get started!
This tutorial requires you to be running Xcode 11 (or up) and we will be using Swift 5 in this tutorial. While an advanced knowledge of Swift is not necessary to follow the tutorial, it’s recommended that you understand the basics.
Setting Up Your Project with SwiftUI
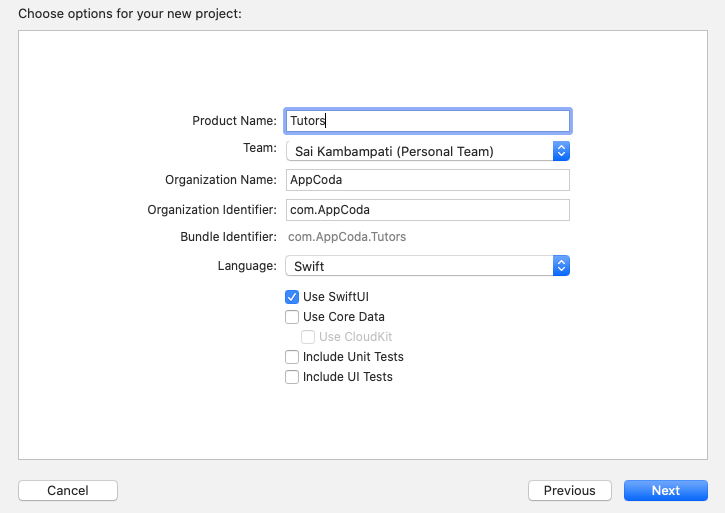
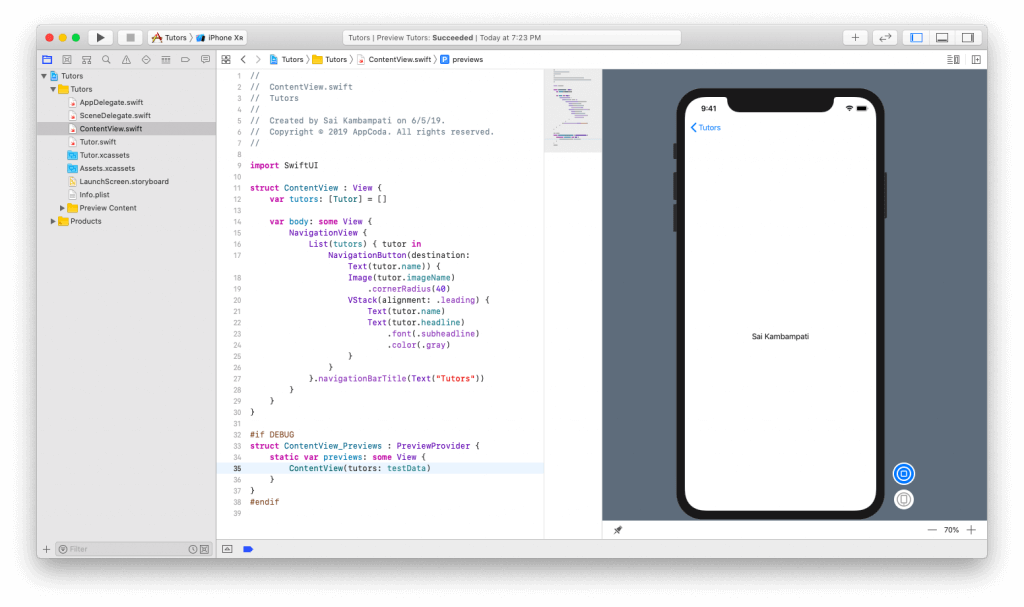
Let’s start from scratch so you can see how to start to run a SwiftUI app immediately. First, open Xcode and click on Create new Xcode project. Under iOS, choose Single View App. Name your app and fill out the text fields. However, at the bottom, make sure that the Use SwiftUI option is checked. If you do not check the option, Xcode will generate the storyboard file
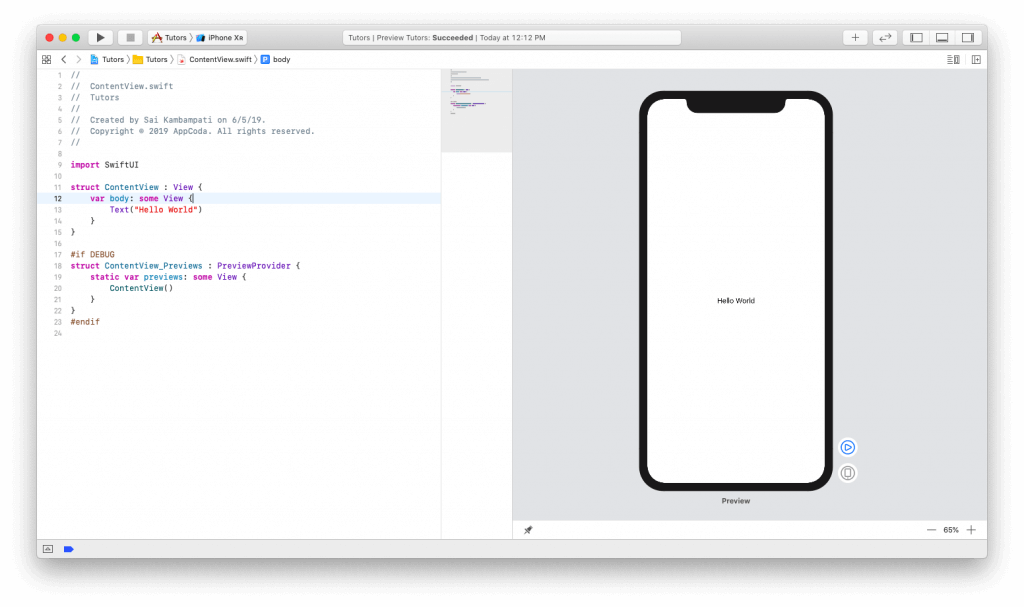
Now Xcode will automatically create a file for you called ContentView.swift and the amazing part is that it will show you a live preview of your code to the right hand side as shown below.
If you don’t see the preview, you will need to hit the Resume button in the preview canvas. It’ll take some time to build the project. Just be patient.
Now let’s start seeing how we can modify these files to create our app.
Building the List View
To build the list view, there are three parts to this. The first part is the creation of the rows in the list. You may recognize the design to be similar to a UITableView. To do this, we have to create a ContactRow. The second part is connecting the data we need to our list. I have the data already coded and it takes just a few modifications to connect our list to the data. The final part is simply adding a Navigation Bar and embedding our list in a Navigation View. This is pretty simple. Let’s see how we implemented all these in SwiftUI.
Creating the Tutor List
First, let’s create the list view for displaying a list of all the tutorial team members including their profile photos and description. Let’s see how this can be done.
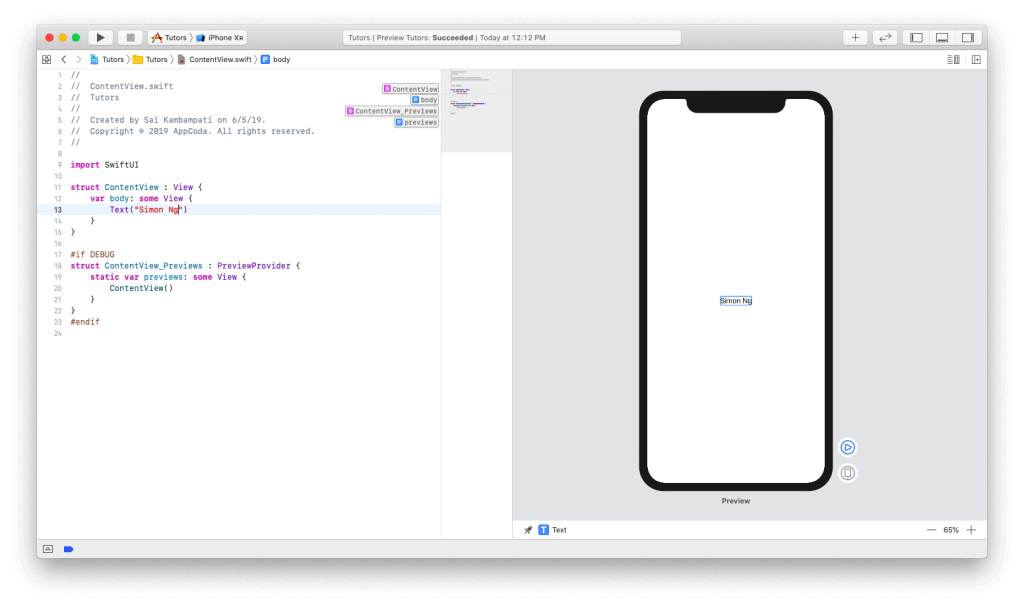
As you can see in the generated code, we already have a Text component with the value set to “Hello World”. In the code editor, change the value of the code to “Simon Ng”.
struct ContentView: View {
    var body: some View {
        Text("Simon Ng")
    }
}
If all works, you should see your canvas on the right update automatically. That’s the power of instant preview that we’ve all anticipated for so long.
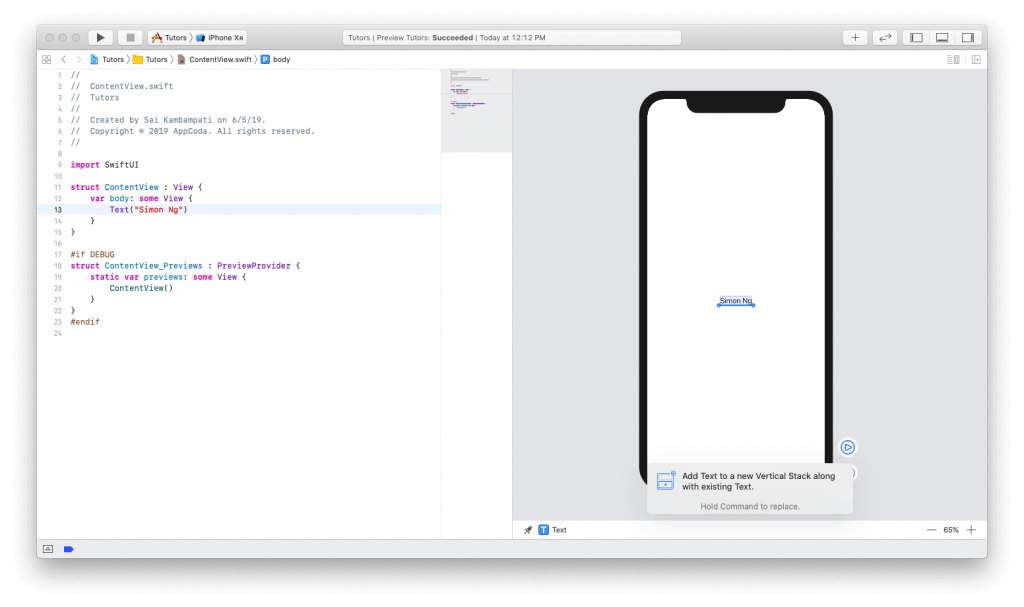
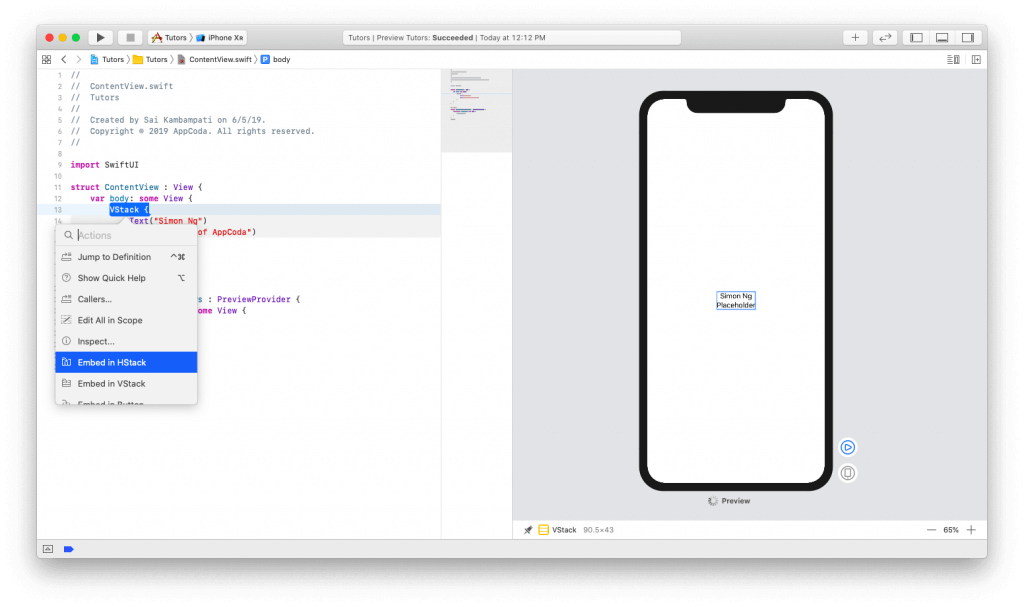
Let’s add another Text view to our app. This will be the short description of the member. To add a new UI element to our app, press the + button in the top right corner. A new window will appear with a list of different views. Drag the view titled Text and drop it underneath our initial Text view as shown below.
Notice the code on the left:
struct ContentView: View {
    var body: some View {
        VStack {
            Text("Simon Ng")
            Text("Placeholder")
        }
    }
}
You can see that a new Text view was added underneath our Simon Ng text view. What’s different is that it seems to have wrapped it in something called a VStack. A VStack is short for vertical stack and it is the replacement of Auto Layout in SwiftUI. If you’ve developed for watchOS before, you know that there are no constraints, rather everything is placed into groups. With a vertical stack, all of our views will be arranged vertically.
Now, change the text of “Placeholder” to “Founder of AppCoda”.
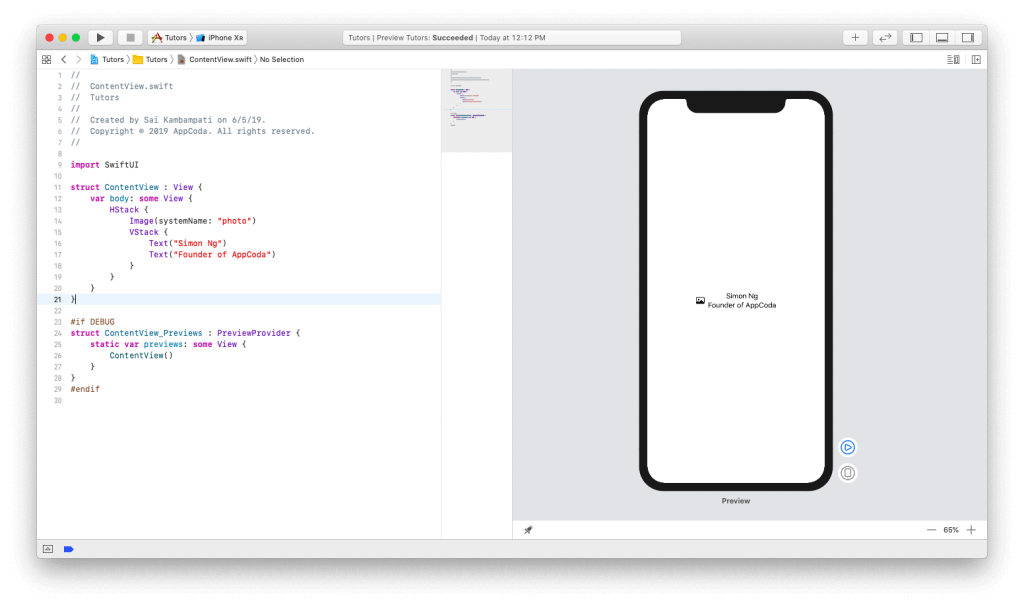
Next, let’s add an image to the left of this text. Since we want to arrange a view horizontally to the existing views, we need to wrap the VStack in an HStack. To do this, CMD+Click on the VStack in your code, and then choose Embed in HStack. Take a look at it below:
Your code should now look like this:
struct ContentView: View {
    var body: some View {
        HStack {
            VStack {
                Text("Simon Ng")
                Text("Founder of AppCoda")
            }
        }
    }
}
There are no distinctive changes in our automatic preview but let’s add an image now. Change your code to look like this:
struct ContentView: View {
    var body: some View {
        HStack {
            Image(systemName: "photo")
            VStack {
                Text("Simon Ng")
                Text("Founder of AppCoda")
            }
        }
    }
}
Starting from iOS 13, Apple introduces a new feature called SFSymbols. Designed by Apple, SF Symbols is a set of over 1,500 symbols you can use in your app. Since they are able to integrate seamlessly with the San Francisco system font, the symbols automatically ensure optical vertical alignment with text for all weights and sizes. Since we don’t have the images of our tutors yet, we use a placeholder image here.
Now, let’s focus on some minor design issues. Since we want to emulate the look and feel of a UITableRow, let’s align the text to the left (i.e. leading). To do that, CMD+Click on the VStack and click on Inspect. Select the left alignment icon as shown below:
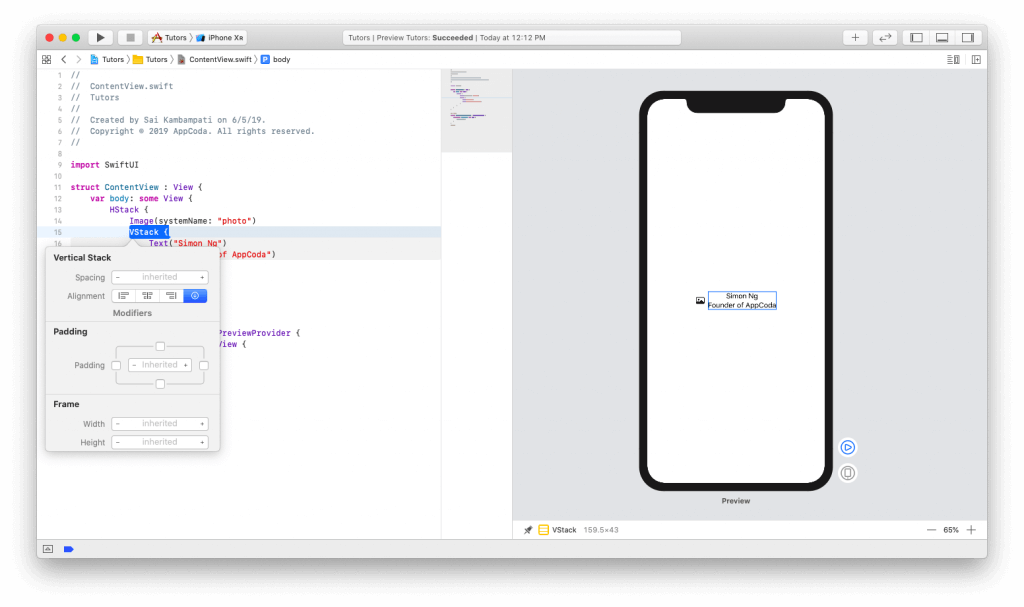
You’ll see the code change to the following. And, you’ll also see your live preview change to reflect the new changes.
VStack(alignment: .leading) {
    ...
}
Now since our second text view is a headline, let’s change the font to reflect this. Just like before, CMD+Click on the “Founder of AppCoda” text view in the live preview and select Inspect. Change the font to “Subheadline” and watch both the live preview and your code change.
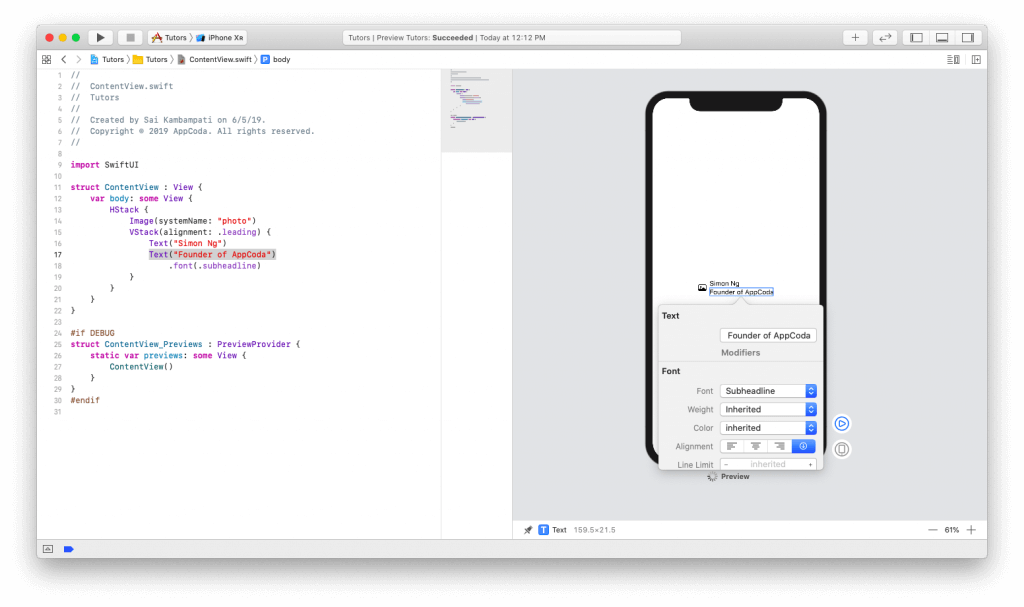
Let’s change the color too and set it to “Gray”. Your code should now look like this:
struct ContentView: View {
var body: some View {
HStack {
Image(systemName: "photo")
VStack(alignment: .leading) {
Text("Simon Ng")
Text("Founder of AppCoda")
.font(.subheadline)
.color(.gray)
}
}
}
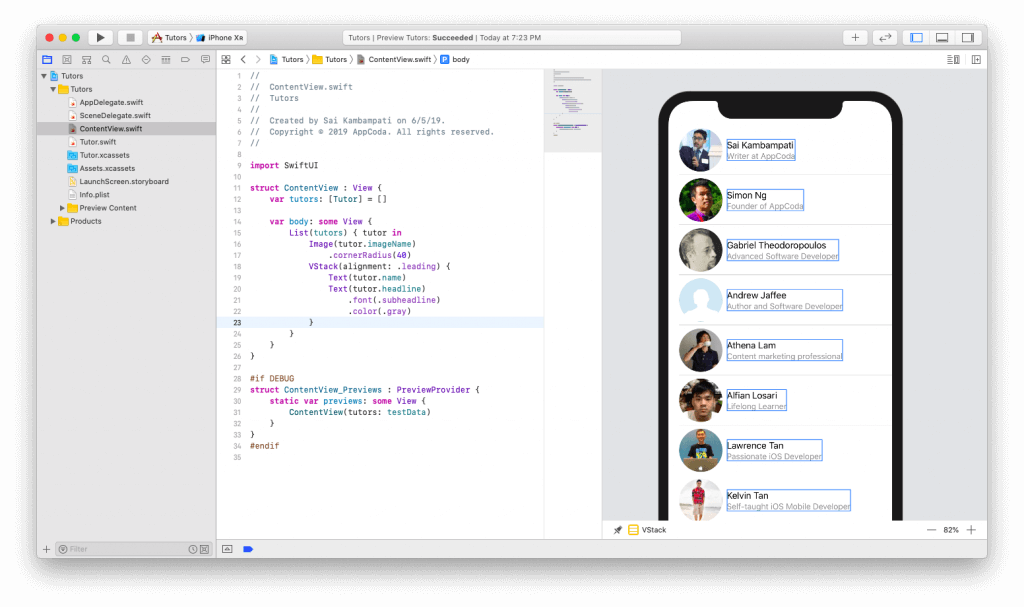
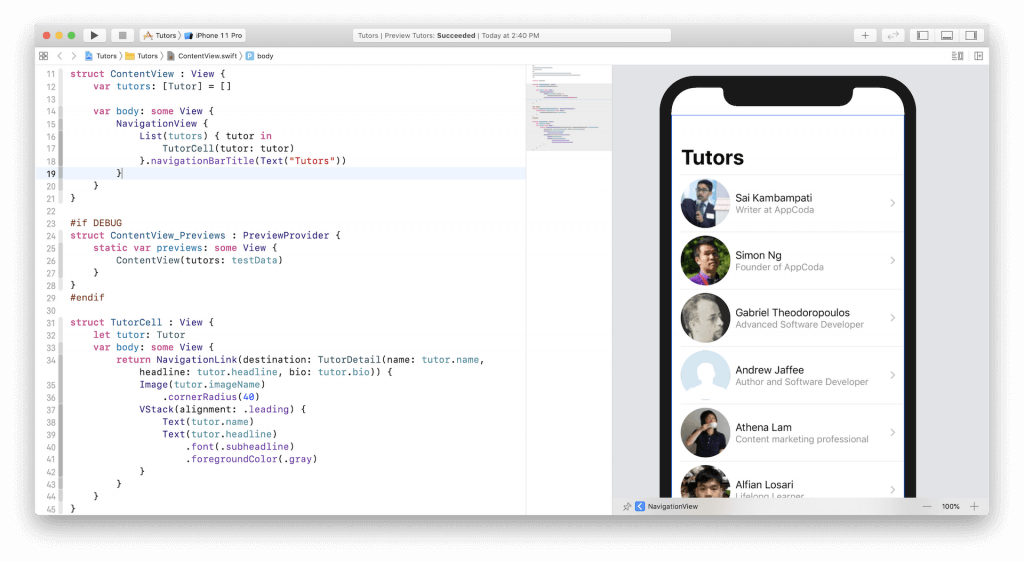
}Now that we’re done designing the sample row, here comes to the magic part. Watch how easy it is to create a list. CMD+Click on our HStack and click on Embed in List. Voila! Watch how your code will automatically change and our canvas will reflect 5 beautiful new rows each showing Simon Ng as the team member.
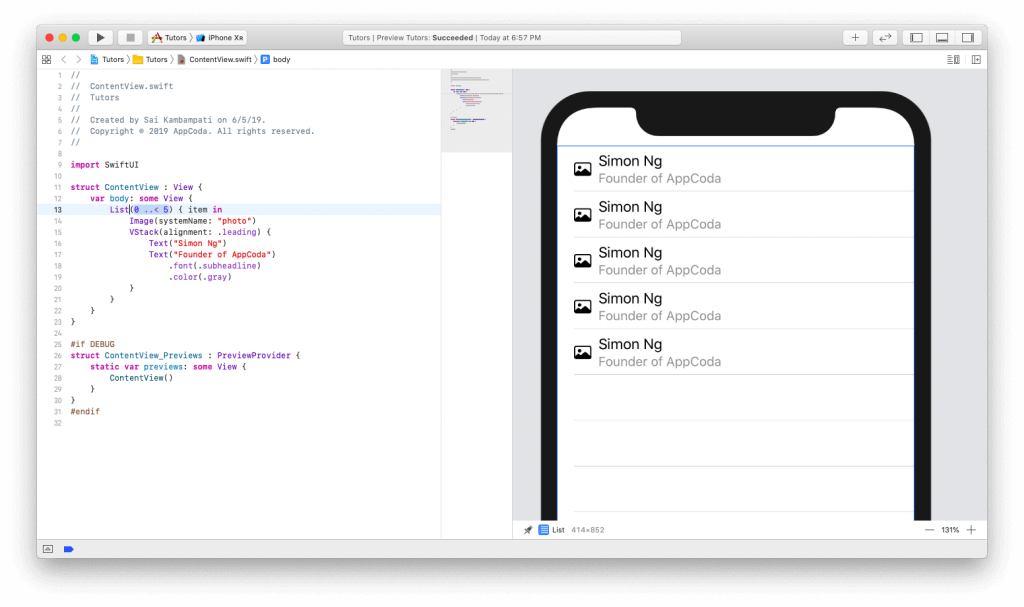
Also, be sure to note how the List was created in the code. By removing the HStack and replacing it with a reiterating List, we were able to create a table view. Now think about all the time and lines of code you saved avoiding all the UITableViewDataSource, UITableViewDelegate, Auto Layout, Implementation for Dark Mode, etc. This alone shows the extent and power of SwiftUI. However, we’re far from done. Let’s add some real data to our new list.
Connecting our data to the list
The data we need is a list of the tutorial team members and their bios along with a folder of all their images. You can download the files you need here. You should find 2 files named Tutor.swift and Tutor.xcassets.
Once downloaded, import both the Swift file and the asset folder into your Xcode project. To import them, simply drag them to the project navigator.
In Tutor.swift, we declare a struct called Tutor and have it conform to the Identifiable protocol. You’ll see why this is important later. We also define its variables as id, name, headline, bio, and imageName. Finally, we include some test data that will be used in our app. In Tutor.xcassets, we have images of all our team members.
Go back to ContentView.swift and modify your code to look like this:
struct ContentView: View {
    //1
    var tutors: [Tutor] = []

    var body: some View {
        List(0..<5) { item in
            Image(systemName: "photo")
            VStack(alignment: .leading) {
                Text("Simon Ng")
                Text("Founder of AppCoda")
                    .font(.subheadline)
                    .color(.gray)
            }
        }
    }
}

#if DEBUG
struct ContentView_Previews : PreviewProvider {
    static var previews: some View {
        //2
        ContentView(tutors: testData)
    }
}
#endif
What we’re doing here is quite simple:
- We’re defining a new variable named
tutorswhich is an empty array of the structureTutor. - Since we’re defining a new variable to our structure
ContentView, we need to change theContentView_Previewsas well to reflect this change. We set the parametertutorsto ourtestData.
There won’t be any change in our live preview because we haven’t used our test data. To display the test data, modify your code like this:
struct ContentView: View {
var tutors: [Tutor] = []
var body: some View {
List(tutors) { tutor in
Image(tutor.imageName)
VStack(alignment: .leading) {
Text(tutor.name)
Text(tutor.headline)
.font(.subheadline)
.color(.gray)
}
}
}
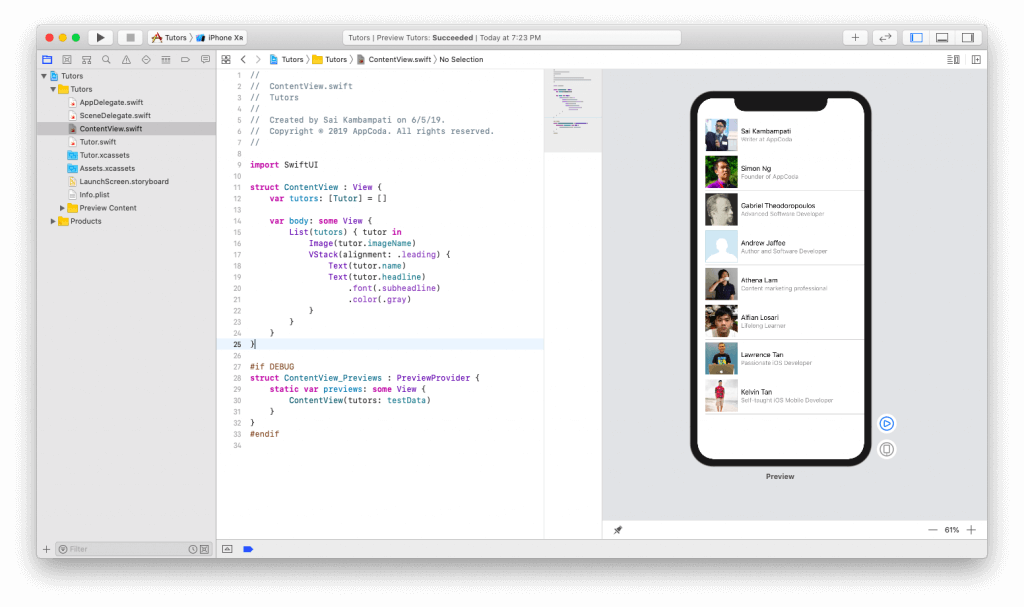
}Here, we make sure the ContentView to use the tutors list for displaying the data on screen.
Ta-da! Look at how your live preview changes in the canvas.
The images are in square shape. We’d like them to have more of a rounded and circular look. Let’s see how we can make a rounded-corner image. In the top right corner, press the + button and click the second tab. This should show a list of layout modifiers that you can add to the views.
Search for “Corner Radius”, drag it over to our live preview and drop it on the image. You should see the code and the live preview change to something like this.
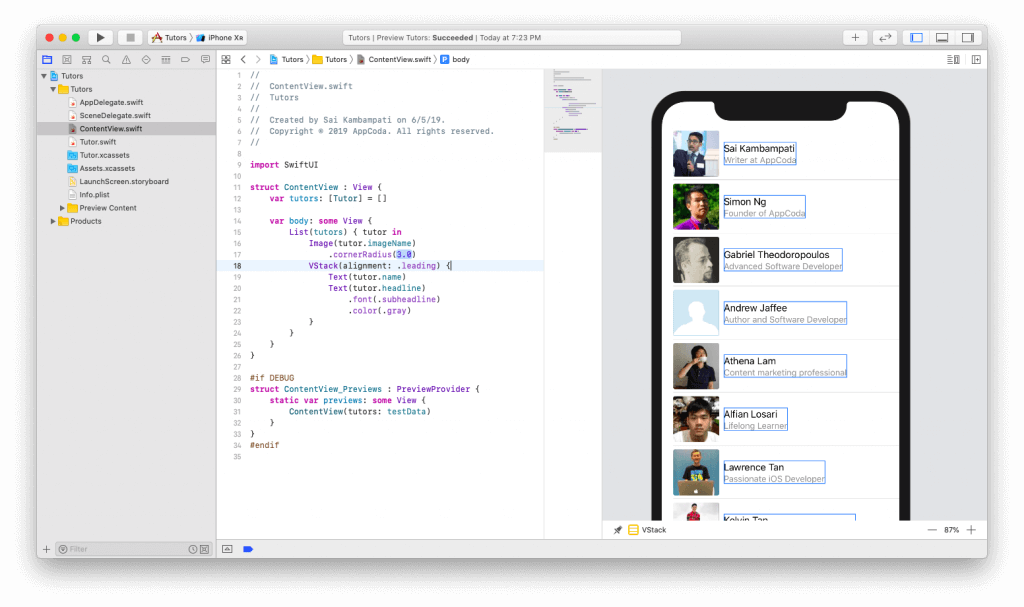
However, a corner radius of 3 is a little too small to notice. So, change it to 40. This way, you’ll achieve a nice and circular profile picture.
The cell and the list are all done now! Give yourself a pat on the back for accomplishing this. What we need to do next is present a detail view when a user taps on a cell. Let’s start building the navigation.
Building the Navigation
A navigation view wraps the view we already have in a navigation bar and navigation controller. Assuming you’ve used Storyboard before, you should know that it’s pretty easy to embed a view in a navigation interface. All you need to do is just a few clicks.
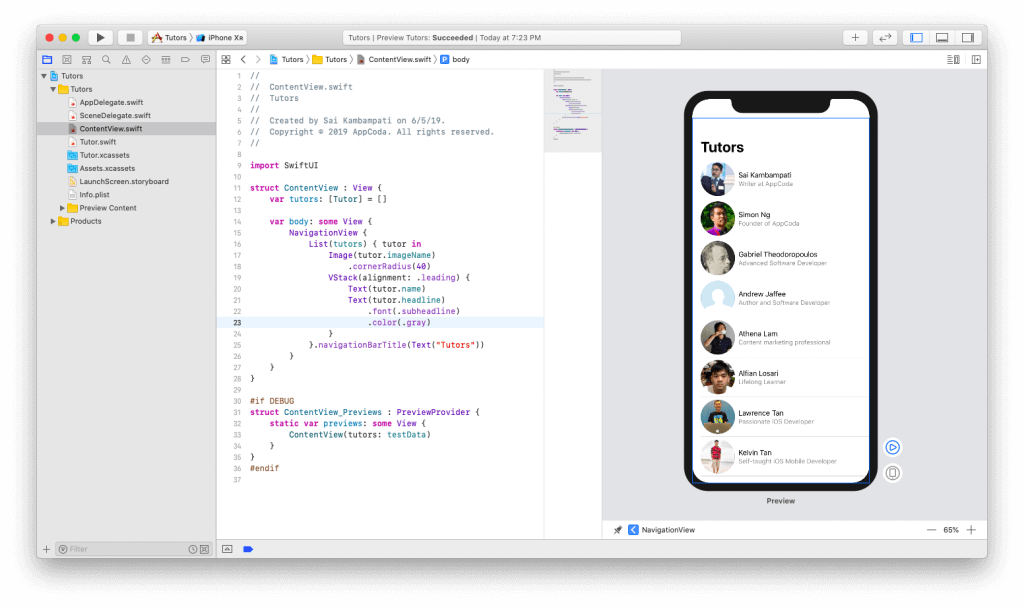
For SwiftUI, wrapping the List view in a NavigationView is also very easy. All you need to do is to change your code like this:
...
var body : some View {
    NavigationView {
        List(tutors) { tutor in
            ...
        }
    }
}
...
You just need to wrap the List code in a NavigationView wrapper. By default, the navigation bar doesn’t have a title. Your preview should move the list down leaving a very large gap in the middle. This is because we haven’t set the navigation bar’s title. To fix that, we can set the title by adding the following line of code (i.e. .navigationBarTitle):
...
var body : some View {
    NavigationView {
        List(tutors) { tutor in
            ...
        }
        .navigationBarTitle(Text("Tutors"))
    }
}
...
Your screen should now look similar to this:
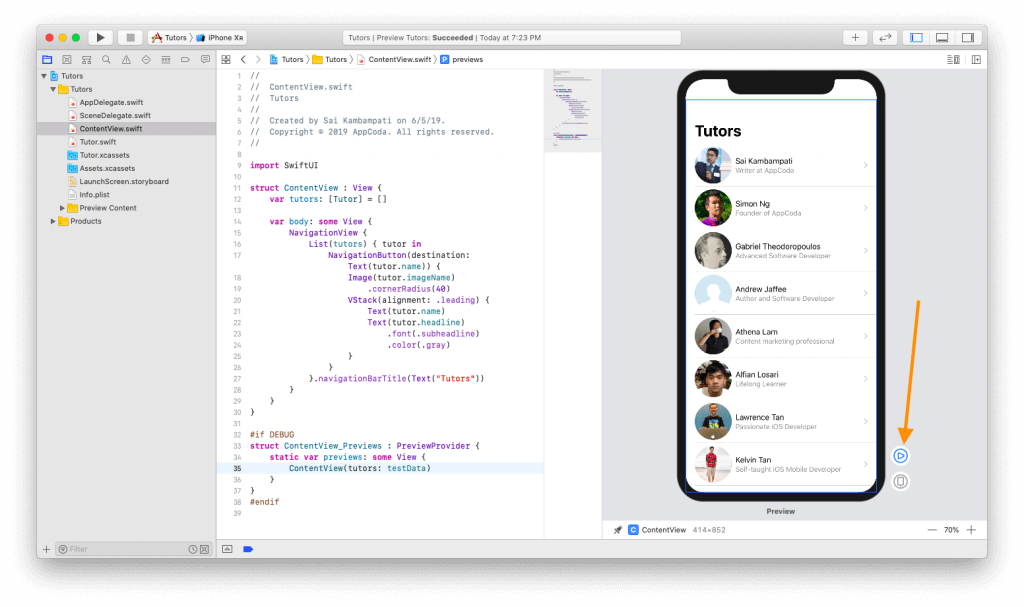
Next, let’s set up the navigation link. A NavigationLink presents a destination which is a view that presents on the navigation stack. Just like how we wrapped the List in a NavigationView, we need to wrap the content of the List with a NavigationLink as shown below:
...
var body : some View {
    NavigationView {
        List(tutors) { tutor in
            NavigationLink(destination: Text(tutor.name)) {
                Image(tutor.imageName)
                VStack(alignment: .leading) {
                    Text(tutor.name)
                    Text(tutor.headline)
                        .font(.subheadline)
                        .foregroundColor(.gray)
                }
            }
        }
        .navigationBarTitle(Text("Tutors"))
    }
}
...
We simply shows the name of the team member in the detail view. Now’s the time to test it out.
In the current preview mode, you can’t interact with the view. Normally when you click on the automatic preview, it just highlights the code. In order to test and interact with the UI, you need to press the play button at the bottom right corner.
The view will go dark and you may need to wait for a couple of seconds for the whole simulator to load before you can actually interact with the views.
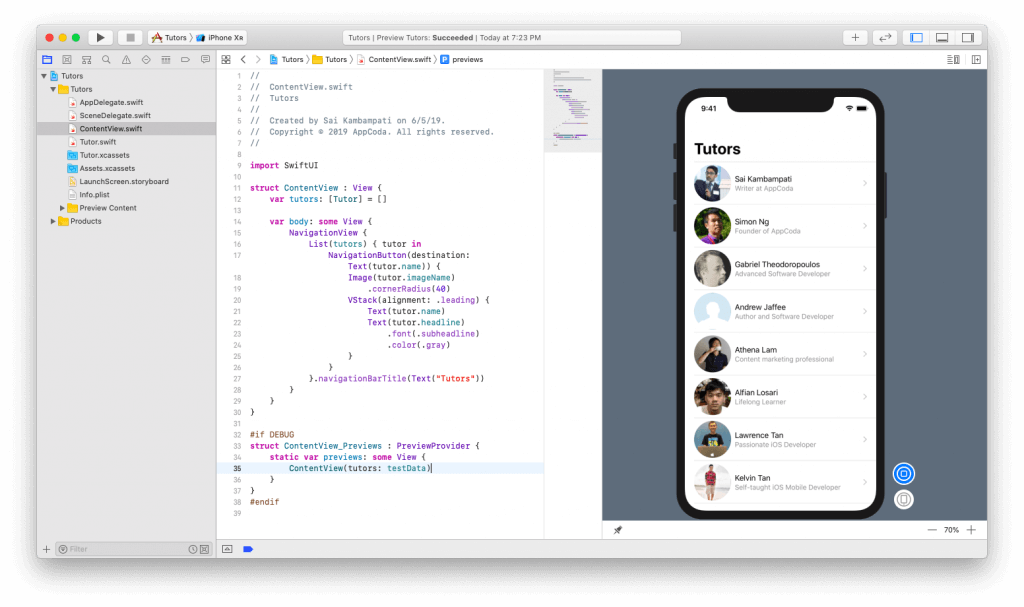
Once it finishes loading, you should be able to click on a cell and it will navigate to a new view in the stack that displays the name of the selected cell.
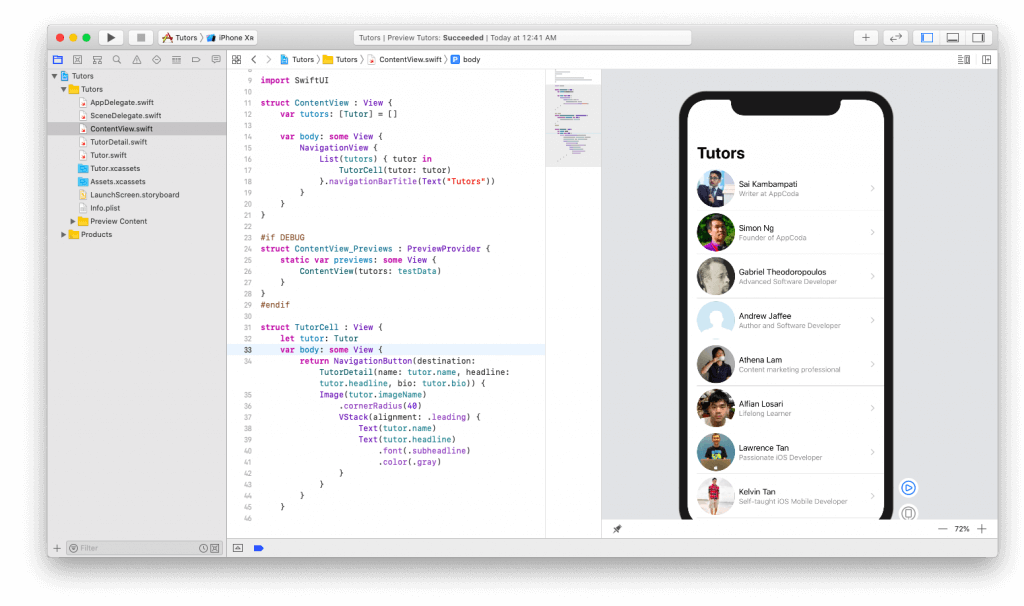
Before moving onto the implementation of the detailed view, let me show you a nifty trick that will help making your code more legible. CMD+Click the NavigationLink and choose “Extract Subview”.
Boom! You can see that the entire code in NavigationLink has been created into a brand new struct that makes it very legible. Rename ExtractedView to TutorCell.
You may now get an error in TutorCell. This is because we don’t have a tutor parameter to pass in this new structure. It’s very simple to fix the error. Add a new constant in your TutorCell struct as such:
struct TutorCell: View {
    let tutor: Tutor
    var body: some View {
        ...
    }
}
And, in the ContentView, add the missing parameter by changing the line to:
...
List(tutors) { tutor in
    TutorCell(tutor: tutor)
}.navigationBarTitle(Text("Tutors"))
...
That’s it! We have our list and cells all well designed and laid out! Next, we’re going to build a detail view that will show all the information of the tutor.
Building the Detail View
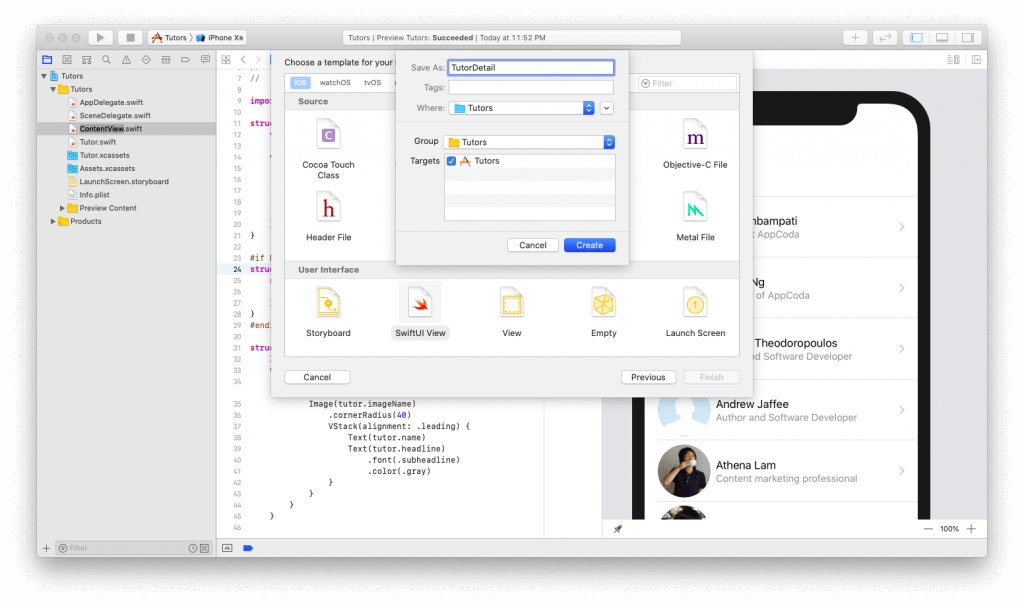
Let’s create a new file by going to File > New > File. Under iOS, select SwiftUI View and name this file TutorDetail.
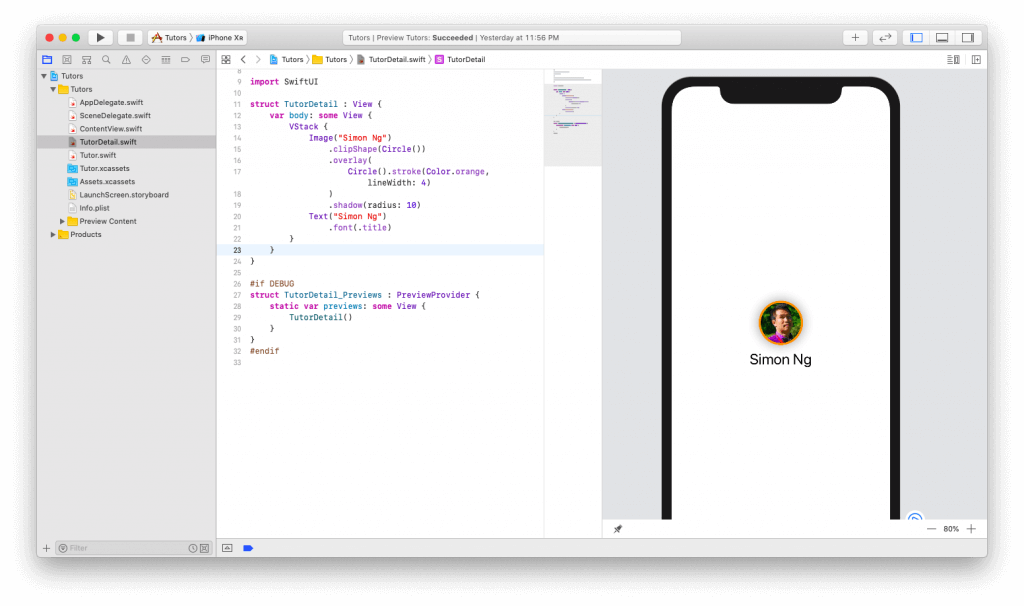
You can see in the automatic preview that our basic view has been created. Let’s change this. First, click on the + button and drop an image above the Text view already built in. Set the name of the image to “Simon Ng”. Simon’s picture should show up. Now modify your code to look like below:
struct TutorDetail: View {
    var body: some View {
        //1
        VStack {
            //2
            Image("Simon Ng")
                 .clipShape(Circle())
                .overlay(
                    Circle().stroke(Color.orange, lineWidth: 4)
                )
                .shadow(radius: 10)
            //3
            Text("Simon Ng")
                .font(.title)
        }
    }
}
You should be able to follow the code but in case you can’t, don’t worry. Here’s what it’s basically saying:
- First, we wrap all our views in a vertical stack. This is crucial to the layout of the design we’ll be taking.
- Next, we take that image of Simon and spice it up. First, we set the clips of the image to be in the shape of a circle. Rather than setting its
cornerRadius, this is much more effective because it can adapt to different image sizes. We add an overlay of a circle with a white border which provides a beautiful orange border. Finally, we add a light shadow to provide some depth. - Our last line of code sets the font of the name of the tutor to the the
titlefont.
We also need to add two more text views: headline and bio. Drag in two text views below the tutor name text view and let’s edit them:
struct TutorDetail: View {
    var body: some View {
        VStack {
            Image("Simon Ng")
                 .clipShape(Circle())
                .overlay(
                    Circle().stroke(Color.orange, lineWidth: 4)
                )
                .shadow(radius: 10)
            Text("Simon Ng")
                .font(.title)
            Text("Founder of AppCoda")
            Text("Founder of AppCoda. Author of multiple iOS programming books including Beginning iOS 12 Programming with Swift and Intermediate iOS 12 Programming with Swift. iOS Developer and Blogger.")
        }
    }
}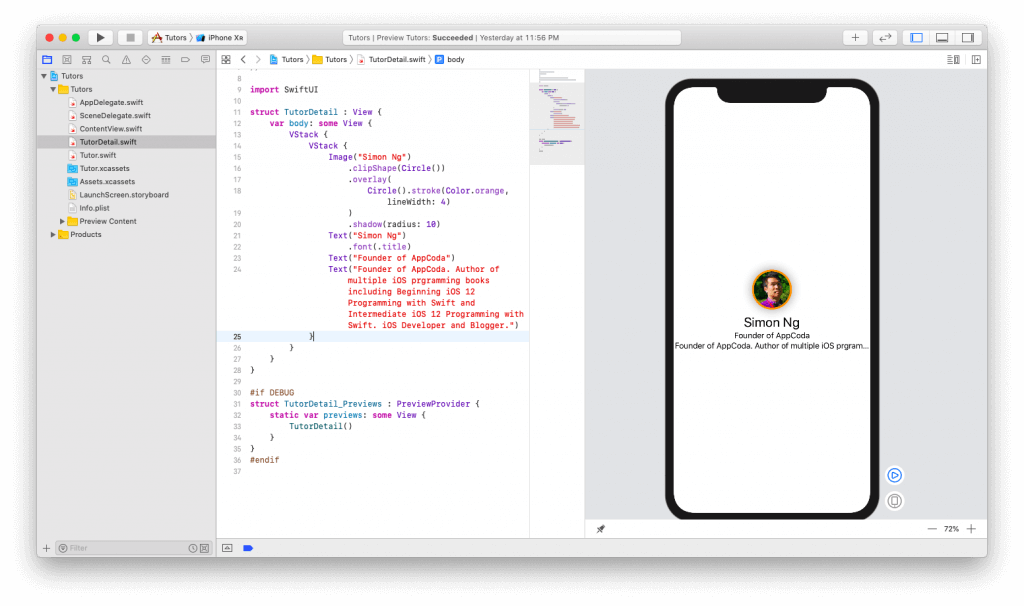
The good news is that we have our text views present. The bad news is it looks bad and doesn’t really show the difference between a headline and a biographical description. Furthermore, the bio text view doesn’t display the whole text. Let’s fix these issues one by one.
Update the code like this:
struct TutorDetail: View {
    var body: some View {
        VStack {
            Image("Simon Ng")
                 .clipShape(Circle())
                .overlay(
                    Circle().stroke(Color.orange, lineWidth: 4)
                )
                .shadow(radius: 10)
            Text("Simon Ng")
                .font(.title)
            //1
            Text("Founder of AppCoda")
                .font(.subheadline)
            //2
            Text("Founder of AppCoda. Author of multiple iOS programming books including Beginning iOS 12 Programming with Swift and Intermediate iOS 12 Programming with Swift. iOS Developer and Blogger.")
                .font(.headline)
                .multilineTextAlignment(.center)

        }
    }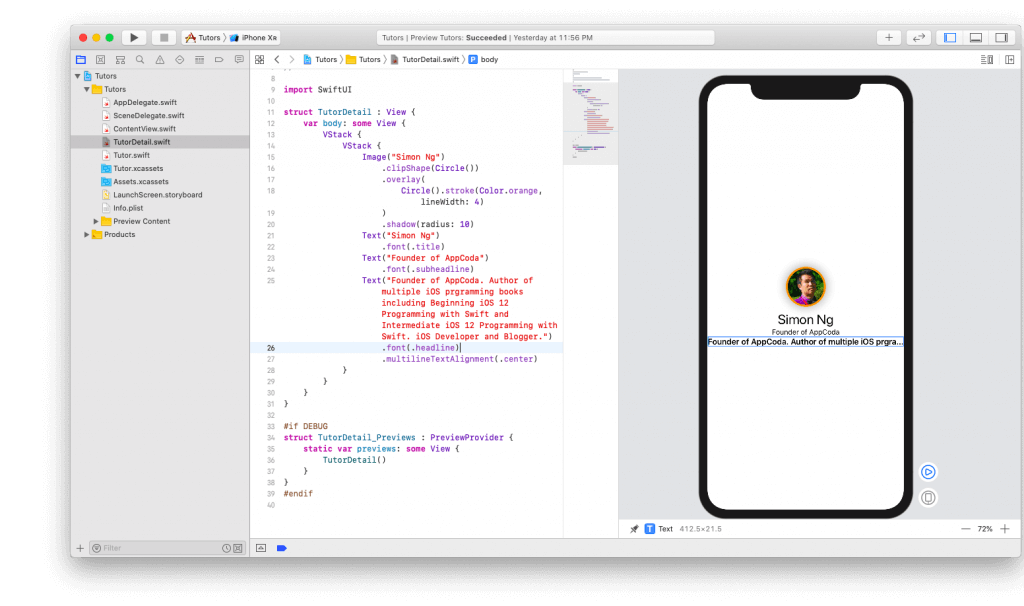
}- First we set the “Founder of AppCoda” to be a font weight of
subheadline - Similarly, we set the bio text view to the font weight of
headline. We also center the text with the line.multilineTextAlignment(.center).
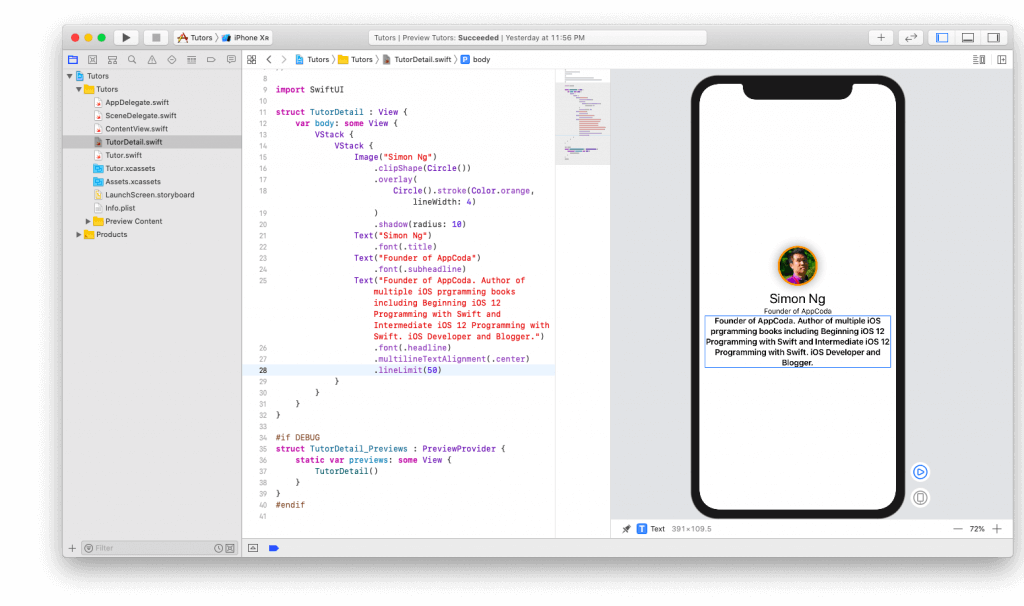
Let’s fix the next problem. We need to display the entire text of the bio text view. This can be easily done by adding a new line of code:
...
Text("Founder of AppCoda. Author of multiple iOS programming books including Beginning iOS 12 Programming with Swift and Intermediate iOS 12 Programming with Swift. iOS Developer and Blogger.")
        .font(.headline)
        .multilineTextAlignment(.center)
        .lineLimit(50)
...
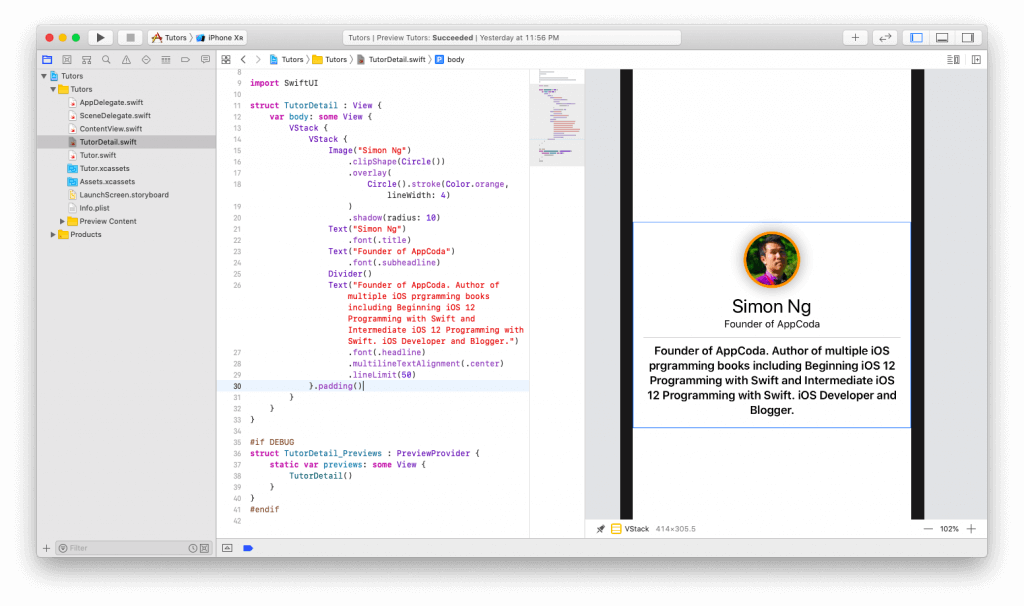
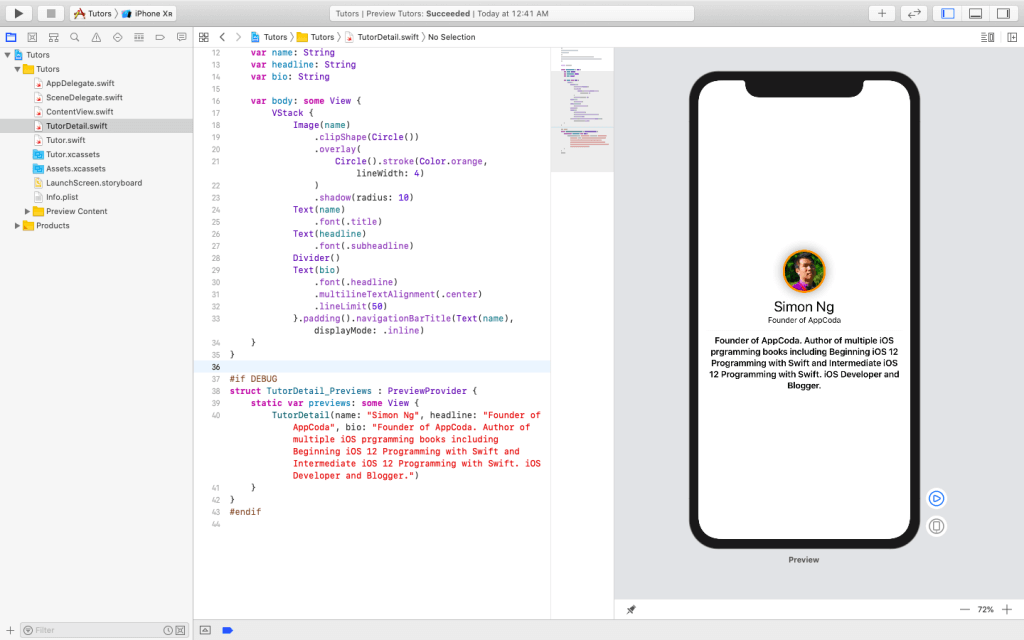
Everything looks good. There’s one last design change I want to make. The headline and the bio text views are rather too close to each other. I’d like to have some space in between these two Text views. Also, I’d like to add some paddings to all the views such that they are not hugging the edges of the device. Make sure you change the code like this:
struct TutorDetail: View {
    var body: some View {
        VStack {
            Image("Simon Ng")
                 .clipShape(Circle())
                .overlay(
                    Circle().stroke(Color.orange, lineWidth: 4)
                )
                .shadow(radius: 10)
            Text("Simon Ng")
                .font(.title)
            Text("Founder of AppCoda")
                .font(.subheadline)
            //1
            Divider()

            Text("Founder of AppCoda. Author of multiple iOS programming books including Beginning iOS 12 Programming with Swift and Intermediate iOS 12 Programming with Swift. iOS Developer and Blogger.")
                .font(.headline)
                .multilineTextAlignment(.center)
                .lineLimit(50)
        //2
        }.padding()
    }
}
We’ve made a couple of changes here:
- Adding a divider is just as simple as calling
Divider(). - To add padding to the entire vertical stack, we just have to call
.padding()at the end of theVStackdeclaration.
That’s all! Congrats! You finally completed the detail view. What’s left is connecting our list to the detail view. This can be quite simple.
Passing Data
To pass data, we need to declare some parameters in our TutorDetail struct. Before declaring the variable body, add the following variables:
var name: String
var headline: String
var bio: String
var body: some View {
    ...
}
These are the parameters we’ll pass from our ContentView. Replace the text occurrences with these parameters:
...
var body: some View {
    VStack {
        // 1
        Image(name)
            .clipShape(Circle())
               .overlay(
                   Circle().stroke(Color.orange, lineWidth: 4)
            )
               .shadow(radius: 10)
        //2
        Text(name)
            .font(.title)
        //3
        Text(headline)
            .font(.subheadline)
        Divider()
        //4
        Text(bio)
            .font(.headline)
            .multilineTextAlignment(.center)
            .lineLimit(50)
        //5
    }.padding().navigationBarTitle(Text(name), displayMode: .inline)
}
...- We replace the name of the image with our variable
name - We also replace the name of the tutor with our variable
name - We replace our headline text with our variable
headline - Finally, we also replace our long paragraph of text with out variable
bio - We also add a new line of code that will set the title of the navigation bar to the name of our tutor.
Last but not least, we need to add the missing parameters to our struct TutorDetail_Previews.
#if DEBUG
struct TutorDetail_Previews : PreviewProvider {
    static var previews: some View {
        TutorDetail(name: "Simon Ng", headline: "Founder of AppCoda", bio: "Founder of AppCoda. Author of multiple iOS programming books including Beginning iOS 12 Programming with Swift and Intermediate iOS 12 Programming with Swift. iOS Developer and Blogger.")
    }
}
#endif
In the above code, we add the missing parameters and fill in the information with what we had earlier.
You may be wondering what’s up with the #if DEBUG/#endif statements. These lines of code mean that whatever code is wrapped within these commands, will only be shown in the preview for debugging purposes. In your final app, it won’t be there.
Resume your automatic preview. Nothing should change since we still have the same information. But make sure that you are able to preview TutorDetail before moving on to the next step.
Our final step is to link this view to our list. Switch over to the ContentView.swift file. All you need to do is change one line of code in the TutorCell struct. Change the NavigationButton code to the following:
...
var body: some View {
    return NavigationButton(destination: TutorDetail(name: tutor.name, headline: tutor.headline, bio: tutor.bio)) {
        ...
    }
}
...
Instead of presenting a Text view with the tutor name, we need to change the destination to that of TutorDetail while filling in the appropriate details. Your code should now look like this:
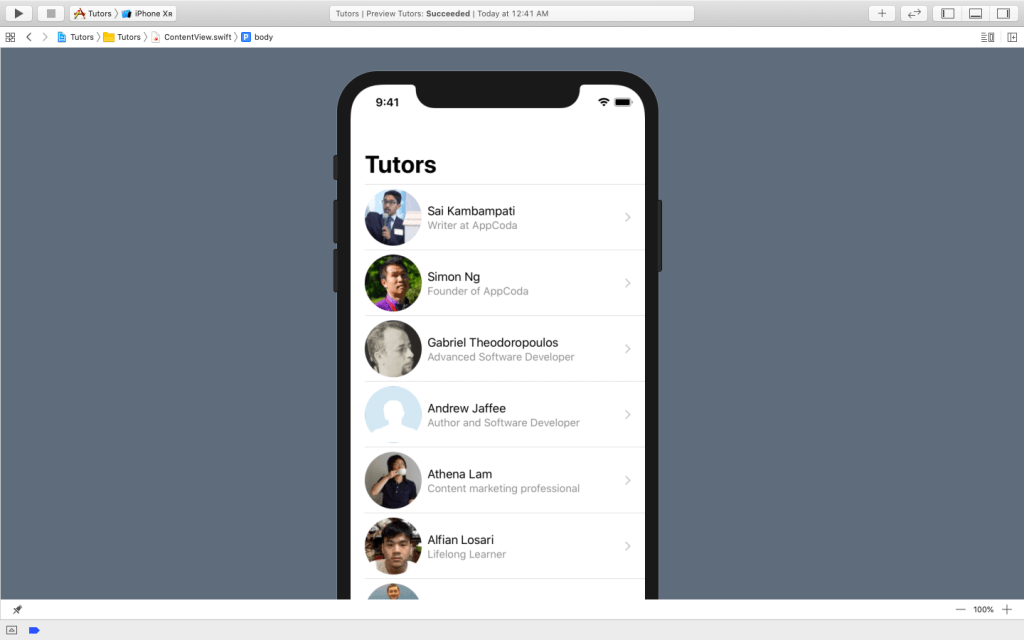
Click the play button on the live canvas and interact with the view. If all works well, it should work exactly as expected.
Simply choose one of the member records:
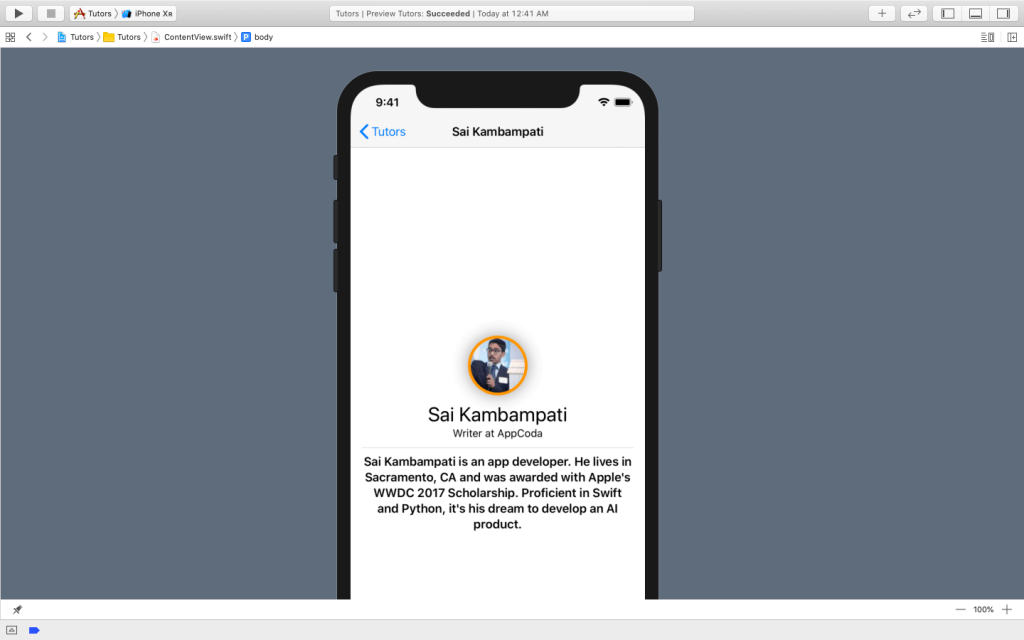
And then you should see the member details in the detail view.
Conclusion
This was a pretty huge tutorial but it presents the basics of SwiftUI. You should be comfortable to build simple apps now like a to-do list. I suggest you take a look at some of the resources below such as the Apple’s documentation and the WWDC 2019 sessions given about this framework.
- SwiftUI Documentation
- SwiftUI Tutorials
- Introducing SwiftUI: Building Your First App
- SwiftUI Essentials
This framework is the future of Apple development so it’s great to get that head start early on. Remember, if you’re confused about the code, try to interact with the automatic preview and see if you can make UI changes directly to see how the code is built. If you have any questions, feel free to ask in the comments below.
For reference, you can download the completed project here. If you want to dive deeper into SwiftUI, check out our next tutorial on SwiftUI button.


