Use Storyboards to Build Navigation Controller and Table View
By now, if you’ve followed our tutorials, you should have a basic understanding about UITableView and how to build a simple app. This week, we’ll talk about something new – Storyboards. This is one of the most exciting features introduced in Xcode 4.2 and iOS 5 SDK. It makes your life, as an iOS developer, simpler and lets you easily design the user interface of your iOS app.
In this tutorial, we’ll show you how to use Storyboards to build a Navigation interface and integrate it with UITableView. We try to keep thing simple and focus on explaining the concept. So no fancy interface or pretty graphic. We’ll leave the artwork to future tutorials.
Okay, let’s get started.
What’s Navigation Controller?
Before we move onto the coding part, as usual, let’s have a brief introduction about Navigation Controller and Storyboards.
Like table view, navigation controller is another UI element you commonly find in iOS app. It provides a drill-down interface for hierarchical content. Take a look at the built-in Photos app, YouTube, and Contacts. They’re all built using Navigation Controller to display hierarchical content. Usually table view and navigation controller work hand in hand for most of the apps. This doesn’t mean you have to use both together, however.
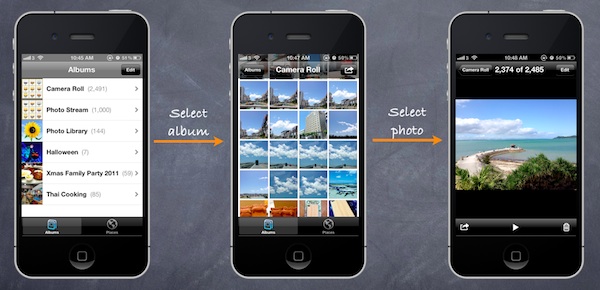
An example of Navigation Controller – Photos App
Storyboards Overview
Storyboard, as mentioned earlier, is a new feature available since the release of Xcode 4.2. It offers a complete new way for iOS developer to create and design user interface. Before the introduction of Storyboard, it’s especially hard for beginner to create navigation (and tab) interface. Every interface is stored in a separate nib file. On top of it, you have to write code to link all interfaces together and describe how the navigation works.
With Storyboards, all screens are stored in a single file. This gives you a conceptual overview of the visual representation for the app and shows you how the screens are connected. Xcode provides a built-in editor to layout the Storyboards. You can define the transition (known as segues) between various screens simply using point and click. This doesn’t mean you do not need to write code for the user interface. But Storyboards significantly reduce the amount of code you need to write. Here is a sample screenshot to show you how Storyboards look like in Xcode.
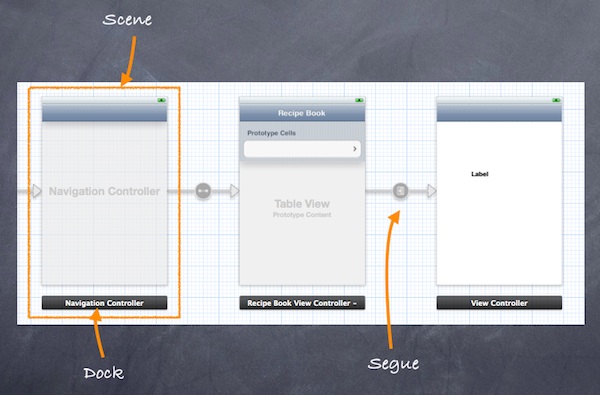
Storyboards – Scene and Segue
Scene and Segues
When working with Storyboards, Scene and Segues are two terms you always come across. Within a Storyboard, a scene refers to a single view controller and its view. Each scene has a dock, which is used primarily to make action and outlet connections between the view controller and its views.
Segue sits between two scenes and manages the transition between two scenes. Push and Modal are two common types of transition.
Creating Navigation Controller in Storyboards
Now let’s get our hands dirty and create our own Storyboards. In this tutorial, we’ll build a simple app that makes use of both UITableView and UINavigationController. We use the table view to display a list of recipes. When users select any of the recipe, the app navigates to the next screen showing the details. It’ll be easy.
First, fire up Xcode (make sure you’re using 4.2 or up) and create a new project using “Single View application” template.

Xcode Project Template Selection
Click “Next” to continue. In reference to the below figure, fill in all the required values for the Xcode project. Make sure you enables the “Use Storyboards” option.
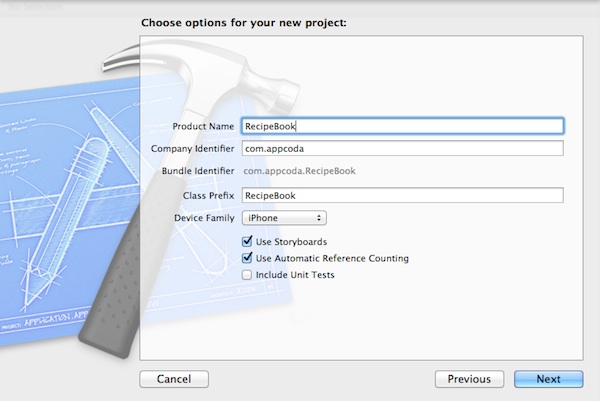
RecipeBook Xcode Project
Click “Next” to continue. Xcode then asks you where you saves the “SimpleTable” project. Pick any folder (e.g. Desktop) to save your project.
You may notice there is a minor difference in the Xcode project, as compared with those you came across in previous tutorials. The .xib file (interface builder) is replaced with the MainStoryboard.storyboard file.
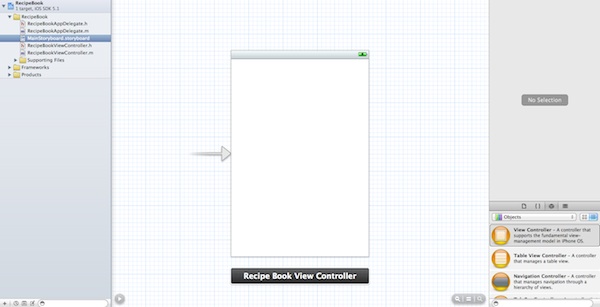
Default Storyboard in Xcode
By default, Xcode creates a standard view controller. As we’ll use navigation controller to control the screen navigation, we first change the view controller to navigation controller. Select the Simply select “Editor” in the menu and select “Embed in”, followed by “Navigation Controller”.
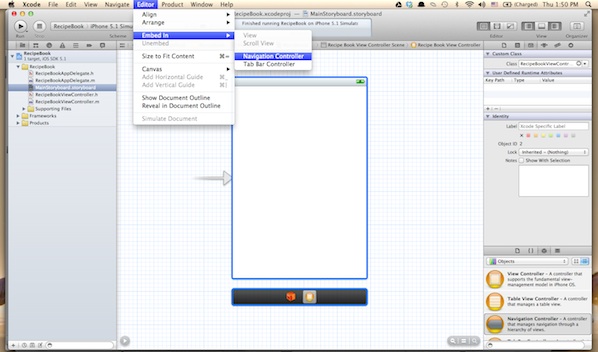
Embed View Controller in Navigation Controller
Xcode automatically embeds the RecipeBook View Controller with Navigation Controller. Your screen should look like this:
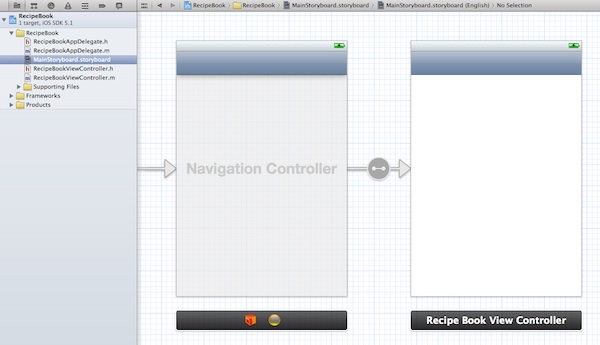
Embedded View Controller with Navigation Controller
Before moving on, let’s run the app and see how it looks. Hit the “Run” button and you should get an app with a blank view but added with a navigation bar. This shows you’ve successfully embed your RecipeBook View Controller in a Navigation Controller.
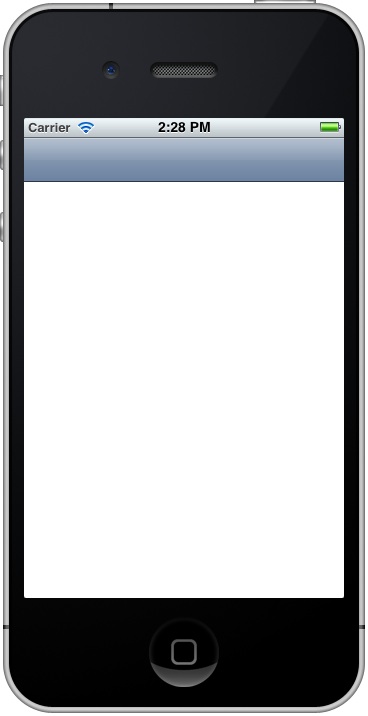
Recipe Book App with Empty View Controller
Adding Table View for Your Data
Next, we’ll add a table view for displaying our recipes. Select “Table View” in Object Library and drag it into “Recipe Book View Controller”.
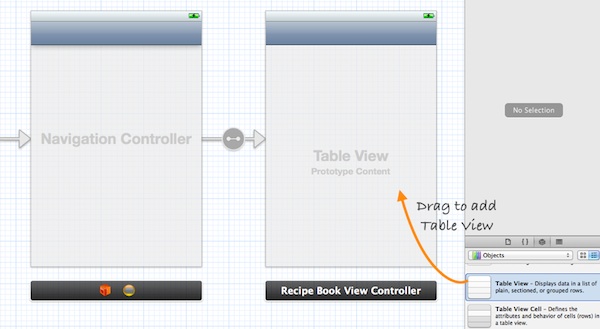
Add Table View to Recipe Book View Controller
The next thing we have to do is to write code to populate the table data (i.e. recipes). In Project Navigator, select “RecipeBookViewController.h”. Append “
|
1 2 3 4 5 |
#import <UIKit/UIKit.h> @interface RecipeBookViewController : UIViewController <UITableViewDelegate, UITableViewDataSource> @end |
Next, select “RecipeBookViewController.m” and define an instance variable (i.e. recipes array) for holding the table data.
|
1 2 3 |
@implementation RecipeBookViewController { NSArray *recipes; } |
In the “viewDidLoad” method, add the following code to initialize the “recipes” array:
|
1 2 3 4 5 6 |
- (void)viewDidLoad { [super viewDidLoad]; // Initialize table data recipes = [NSArray arrayWithObjects:@"Egg Benedict", @"Mushroom Risotto", @"Full Breakfast", @"Hamburger", @"Ham and Egg Sandwich", @"Creme Brelee", @"White Chocolate Donut", @"Starbucks Coffee", @"Vegetable Curry", @"Instant Noodle with Egg", @"Noodle with BBQ Pork", @"Japanese Noodle with Pork", @"Green Tea", @"Thai Shrimp Cake", @"Angry Birds Cake", @"Ham and Cheese Panini", nil]; } |
Lastly, we have to implement two datasource methods to populate the table data: “tableView:numberOfRowsInSection” and “tableView:cellForRowAtIndexPath”. Recalled that these two methods are part of the UITableViewDataSource protocol, it’s mandatory to implement the methods when configuring a UITableView. The first method is used to inform the table view how many rows are in the section, while the second method is used to fill the cell data. So let’s add the below code.
|
1 2 3 4 5 6 7 8 9 10 11 12 13 14 15 16 17 18 |
- (NSInteger)tableView:(UITableView *)tableView numberOfRowsInSection:(NSInteger)section { return [recipes count]; } - (UITableViewCell *)tableView:(UITableView *)tableView cellForRowAtIndexPath:(NSIndexPath *)indexPath { static NSString *simpleTableIdentifier = @"RecipeCell"; UITableViewCell *cell = [tableView dequeueReusableCellWithIdentifier:simpleTableIdentifier]; if (cell == nil) { cell = [[UITableViewCell alloc] initWithStyle:UITableViewCellStyleDefault reuseIdentifier:simpleTableIdentifier]; } cell.textLabel.text = [recipes objectAtIndex:indexPath.row]; return cell; } |
For your reference, this is the complete source code of “RecipeBookViewController.m”.
|
1 2 3 4 5 6 7 8 9 10 11 12 13 14 15 16 17 18 19 20 21 22 23 24 25 26 27 28 29 30 31 32 33 34 35 36 37 38 39 40 41 42 43 44 45 46 47 48 49 50 51 52 53 54 55 56 57 |
// // RecipeBookViewController.m // RecipeBook // // Created by Simon Ng on 14/6/12. // Copyright (c) 2012 Appcoda. All rights reserved. // #import "RecipeBookViewController.h" @interface RecipeBookViewController () @end @implementation RecipeBookViewController { NSArray *recipes; } - (void)viewDidLoad { [super viewDidLoad]; // Initialize table data recipes = [NSArray arrayWithObjects:@"Egg Benedict", @"Mushroom Risotto", @"Full Breakfast", @"Hamburger", @"Ham and Egg Sandwich", @"Creme Brelee", @"White Chocolate Donut", @"Starbucks Coffee", @"Vegetable Curry", @"Instant Noodle with Egg", @"Noodle with BBQ Pork", @"Japanese Noodle with Pork", @"Green Tea", @"Thai Shrimp Cake", @"Angry Birds Cake", @"Ham and Cheese Panini", nil]; } - (void)viewDidUnload { [super viewDidUnload]; // Release any retained subviews of the main view. } - (BOOL)shouldAutorotateToInterfaceOrientation:(UIInterfaceOrientation)interfaceOrientation { return (interfaceOrientation != UIInterfaceOrientationPortraitUpsideDown); } - (NSInteger)tableView:(UITableView *)tableView numberOfRowsInSection:(NSInteger)section { return [recipes count]; } - (UITableViewCell *)tableView:(UITableView *)tableView cellForRowAtIndexPath:(NSIndexPath *)indexPath { static NSString *simpleTableIdentifier = @"RecipeCell"; UITableViewCell *cell = [tableView dequeueReusableCellWithIdentifier:simpleTableIdentifier]; if (cell == nil) { cell = [[UITableViewCell alloc] initWithStyle:UITableViewCellStyleDefault reuseIdentifier:simpleTableIdentifier]; } cell.textLabel.text = [recipes objectAtIndex:indexPath.row]; return cell; } @end |
Lastly, we have to establish the connection between the Table View and the two methods we just created. Go back to the Storyboard. Press and hold the Control key on your keyboard, select the “Table View” and drag to the View Controller icon. Your screen should look like this:
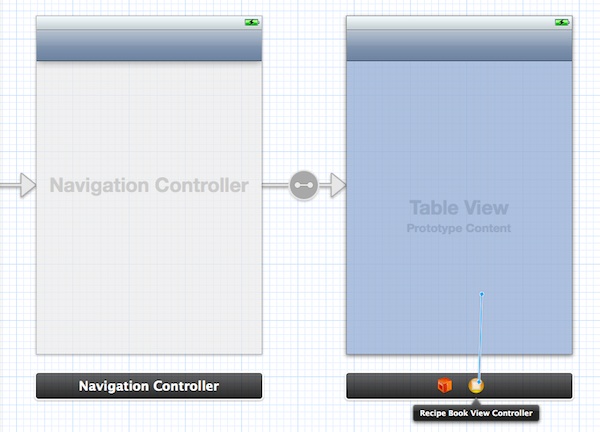
Connect Table View with Datasource and Delegate
Release both buttons and a pop-up shows both “dataSource” & “delegate”. Select “dataSource” to make a connection between the Table View and its data source. Repeat the above steps and make a connection with the delegate.
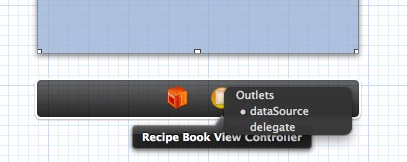
Datasource and Delegate Outlets
Before we test out the app, one last thing to do is add a title for the navigation bar. Simply select the navigation bar of “Recipe Book View Controller” and fill in the “Title” under “Attributes Inspector”. Remember to hit ENTER after keying in the title to effectuate the change.
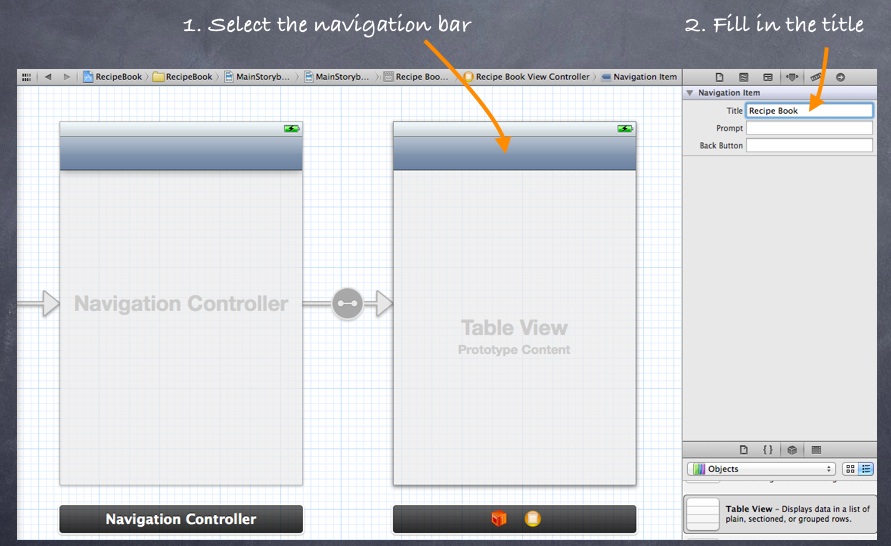
Assign a Title for the Navigation Bar
Now, it’s time to execute your code. Hit the Run button and test out your app. If your code is correct, you should end up with an app displaying a list of recipes. The app should be very similar to the Simple Table app you’ve built before. Here, the major difference is it’s embedded in a Navigation Controller.
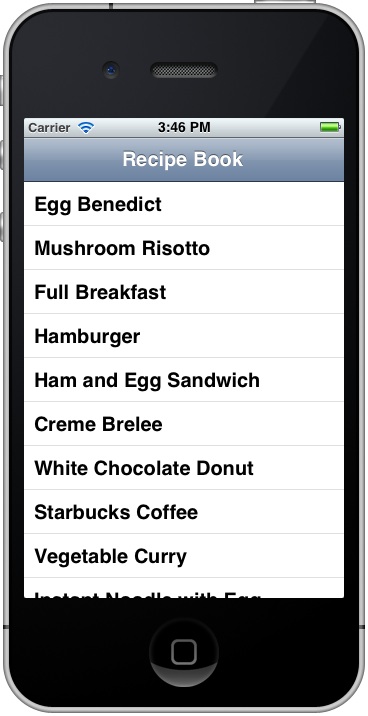
Simple Table App with Navigation Bar
Introducing Prototype Cell
Do you remember how we customize the table cell? Several weeks ago, we showed you how to design your own custom table cell using Interface Builder. In brief, you need to create a separate nib for the cell and programmatically load it in the table. With the introduction of Prototype Cell in Storyboard, it’s much simpler to create a custom cell. Prototype cell allows you to easily design the layout of a table cell right in the Storyboard editor.
We will not go into the details of the customization in this tutorial but just simply add “Disclosure Indicator” in the cell.
To add a prototype cell, select the Table View. Under “Attributes Inspector”, change the “Prototype Cells” value from “0” to “1”. As soon as you change the value, Xcode automatically shows you a prototype cell. In order to show you another table style, let’s also change the “Style” option from “Plain” to “Group”.
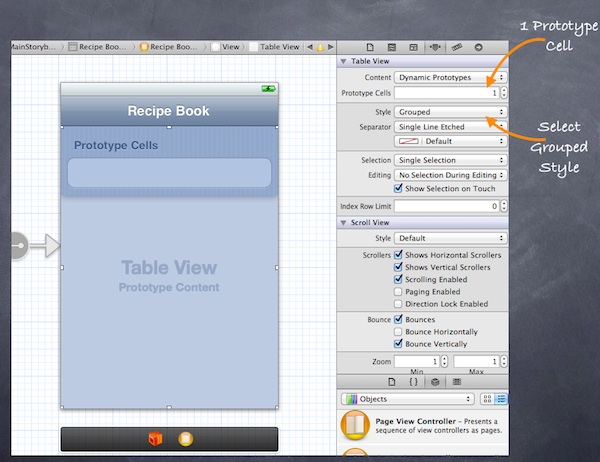
Adding Prototype Cell for Table View
Next, select the “Prototype Cell”. You should be able to customize the options of the cell. To display a disclosure indication for each cell, change the “Accessory” to “Disclosure Indicator”. It’s important to define the Reuse identifier. You can think of this identifier as the cell’s ID. We can use it to refer to a particular prototype cell. Here, we define the identifier as “RecipeCell” that matches with our code.
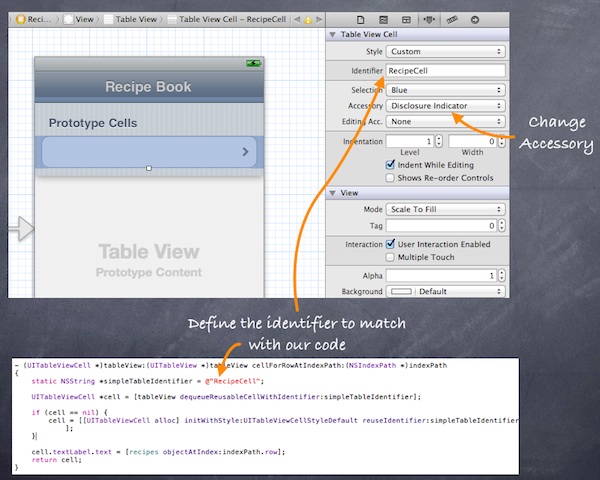
Define Identifier and Accessory for Prototype Cell
Now, run the app again. It looks a bit difference and we’re making progress. We’ve changed the table style to “Grouped” style and added the disclosure indicator.
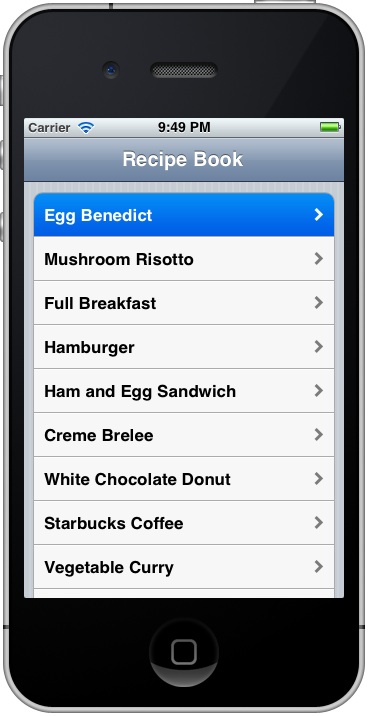
Recipe App with Disclosure Indicator
Adding Detail View Controller
Finally it comes to the last part of the tutorial. What’s missing is the detail view controller that shows the details of recipe. The detail view controller should be displayed when user taps on any of the recipes.
Okay, let’s add a new View Controller as the detail view controller.
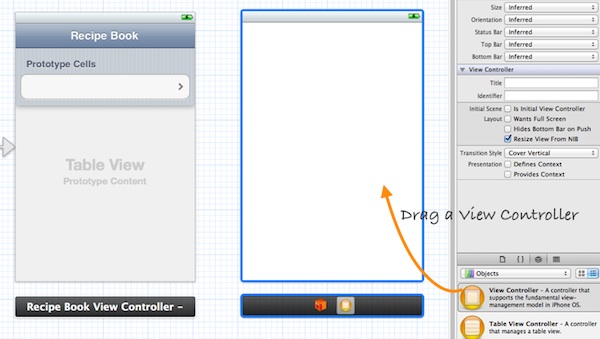
Add a New View Controller
The primary purpose of this tutorial is to show you how to implement navigation controller. We’ll keep the detail view as simple as possible. Let’s just a label displaying the recipe name. Drag the label from Object library and place it at the center of the view. You may change the font size or type to make the label look better.
Next, we’ll add a segue to connect the prototype cell and the new View Controller. It’s very straightforward to add a segue object. Press and hold the control key, click on the prototype cell and drag to the View Controller.
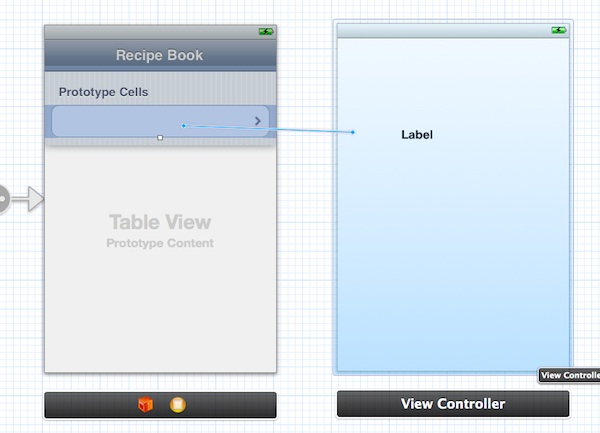
Connect Both Scenes with Segue
Release both buttons and a pop-up shows three types of Segues (push, modal and custom).

Storyboard Segues (Push, Modal and Custom)
As explained before, segue defines the type of transition between scenes. For standard navigation, we use “Push”. Once chosen, Xcode automatically connects both scenes with Push segue. Your screen should look like this:
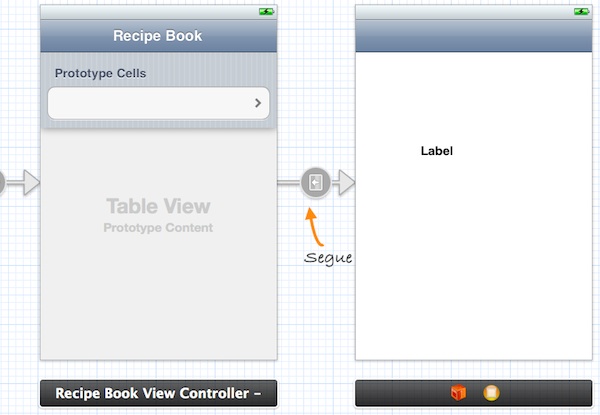
Storyboard Segue
Now, let’s run the app again. As you select any of the recipes, the app shows the detail view controller. Though the detail view controller just shows a label, you already make the navigation work.

Receipe App With Detail Controller
What’s Coming Next?
This is a lengthy tutorial and finally it comes to an end. I hope you have a better understanding about Storyboards and know how to design your own navigation controller. However, there is still one thing left: how can you pass the recipe name from the “Recipe Book View Controller” to the “Detail View Controller”? I’ll leave this to the next tutorial which should be published by the end of this week.
Storyboards, UITableView and Navigation Controller are the fundamental UI elements and commonly used when building iOS apps. So take some time to go through the tutorial and make sure you have a thorough understanding of the material. As always, if you have any questions, leave me comment or ask it at our forum.
Update #1: The next tutorial about data passing is now available!
Update #2: You can now download the full source code for your reference.

Comments
 kash56789
AuthorHi simonng,.. firstly, i would like to thank you very much, because after reading through all your tutorials, i have understood a lot of things in designing a UI for iOS. I am new to Cocoa programming, but you have made it easy for beginners like me to understand iOS App programming. Thank you.
I read the latest tutorial you have posted about using “Storyboards and Navigation controller”, and it was very helpful. I tried it, and i could successfully make an app using storyboard and the navigation controller. I’m eagerly waiting for the next tutorial from you, which will tell us how to pass data between the table view and the detail view.
regarding this, i have a doubt. I want to build the table view with sections, and in each section i will have a few rows(cells). Now, what i want to do is, when a user taps on any row(cell) in a section, i want to display a customized detail view depending on which row is selected.
Fo example,
if a user taps row-1 in section-1 of the table view, i want to push a detail view which contains a UISwitch contol in it.
if a user taps row-2 in section-1 of the table view, i want to push a detail view which contains a UITextfield control in it.
and after the user selects something in the new detail view displayed for the row he selected, i want to use that text/value to be displayed in the row when the user navigates back to the table view.
i would be very much thankful to you if you could help me out in this.
 Aakash
AuthorHi kash56789,
If you got the way how to do it ,,,,thn plz let me know…
I also want to do the same thing..
 Ryan
Ryan
AuthorClick “Next” to continue. Xcode then asks you where you saves the “SimpleTable” project. Pick any folder (e.g. Desktop) to save your project.
Should that be “RecipeBook” project?
 Simon Ng
Author@Ryan, you can create a new folder (say, RecipeBook) for this Xcode project.
 Tekle Derso
AuthorDear Simon,
Thank you very much for your great tutorials.
I am feeling more and more confident with each tutorial and am thinking the many things I could use it for. Once we cover the next tutorial and if you could also show us how to read data from a database table, it will be time to start putting up an app of my own I hope.
Thank you a lot.
 Simon Ng
AuthorGlad to hear that! Later I’ll cover database programming. Will keep you updated.
 Mellowip1983
AuthorThis is a brilliant tutorial! Following the others I have data stored in a .plist for an app displaying college courses, I am looking to group these into 3 groups. I can set the code statically to add 3 sections but how do you then specify rows for each section as section 1 will have 4 rows, section 2 will have 2 rows and section 3 will have 19 rows.
 kaviarasu
Authorhow to create new view controller in this tutorial and link with navigation controller
 kaviarasu
Authorplease explain as soon as possible…..
 Anuj
Anuj
Authorreally nice tutorial…..thanks
 Tekle Derso
AuthorThank you very much for this.
Unfortunately, I have ran into some problem, my first time to do so.
The code complied without any issues. But, on execution, I am not seeing any thing on the details view. I have done every thing as per the tutorial. But, I have encountered two cases which did not act they way they should have.
The first case occurred while extending the UIViewController and creating the RecipeDetailViewController. Xcode did not show me the two options, namely “Target for iPad” and “With XIB for user interface”. So, I was not able to uncheck the “With XIB for user interface” as per the instruction to do so in the tutorial.
For your information, I am using Xcode 4.2, Build 4C199 on Mac Mini.
The second problem was while linking up the variable element with the UI element in the “Recipe Book View Controller”. Your instruction says to hold the command key and click the view controller icon, drag it to the table view. Doing this does not have any effect at all. Holding the Control key and clicking the view controller icon seems to work. But, on releasing the keys, the popup does not show me “tableView”. It only shows me “View” and I selected that and all errors were removed. The code compiled without any issues. Selecting a recipe, however, is still showing a blank view.
I would like to retry. But, how do I revert to the state I started from? Will deleting the codes we added during this tutorial return me to the state my code was at the previous tutorial. I have Git which I installed while learning Ruby on Rails. May be I should be using it.
 Simon Ng
Author@Tekle, base on the Xcode project you sent me, you’ve misplaced the “prepareForSegue” method and tableView instance variable. Both should be placed inside “RecipeBookViewController.m” or “RecipeBookViewController.h”. The “prepareForSegue” will be automatically invoked when the screen transition begins. Through this method, we create the detail view controller and assign the recipe name. Please check your code again.
 Simon Ng
AuthorRemember to refer to this tutorial for details: http://104.131.120.244/storyboards-ios-tutorial-pass-data-between-view-controller-with-segue/
 Tekle
Tekle
AuthorDear Simon,
Thank you very much for your kind help.
This has helped me to understand Xcode itself. The reason why I had put
some of the code at the wrong place was because I got errors when I
typed them and was scared. Now, I should wait until I enter all the
relevant code before deciding I have an error.
Now, the only issue I have is a warning message that says “Local
declaration of ‘tableView’ hides instance variable.” But, it did not
prevent the project from performing as expected.
Thank you once again.
 Mahesh
AuthorThanks
But Now we need a sqlite tutorials
Interaction with database.
Insert, find, update and delete contact into Table.
 Josh Aran
AuthorCan you please explain how you can make the photo thumbnails with the table view as in the photo app.
It would be awsome if you know how to do that, thank you very much for your tutorials.
 anonymous
AuthorReally good thanks. As a note, some of the sentences dont make 100% sense, e.g. “It looks a bit difference and we’re making progress” – difference is meant to be different. Great tutorial thought and very descriptive, keep up the good work 🙂
 Simon Ng
AuthorThanks. Just correct it.
 Natarajan
AuthorHI
I am using Xcode4.5. Under Embed > Navigation controller is not enabled. How can i fix this.. Can anybody help
 Natarajan
Authorgot it..
 noob1
noob1
Authorhi,
my project and question related to it is set up similar to yours, except after table view controller i have tab bar controller, and my question is how would i pass data with segue from table cell to views that follow tab bar controller, i’ve tried storing cell data in variable and then calling it in views but data shows with some delay, and every tutorial is suggesting that i should do it with segue, so.. please help 🙂
 Alex
Alex
AuthorNice tutorial.. the only thing I cant get done in xcode 4.5 is dragging the table view into the view controller.. it always wants to create a new window.. I played around with the zooming, but that doesnt seem to help… any ideas? OR did something change in 4.5?
 Bob
Bob
AuthorDid anyone find a solution to this? I’m using 4.5.2 (4G2008a) on Mountain Lion 10.8.2 and have the exact same problem. I’ve fooled with it for an hour now. Any help is appreciated.
Thanks
 J
J
AuthorMaybe its a little late, but anyone with the same problem:
Just make sure you are dragging the Table View and not the Table View Controller, that appears first when you are picking an object. When you select a controller, it will create a new window.
 Jun
Jun
AuthorHi Simon, thanks so much for the tutorial. Got everything working : )
One question, could you tell us how we should go about including the thumbnail and custom labels as we did in Tutorial 4, and be able to segue onto the next screen? I tried coding it myself and I keep getting errors.
Thanks!
 Kika
Kika
AuthorHi, I did everithing as you said. App builds without issues, but when I try to scrool table view, app stops working with EXC_BAD_ACCESS pointing on this line of thext: cell.textLabel.text = [recipes objectAtIndex:indexPath.row];
What am I doing wrong?
 Taras
Taras
AuthorI’m getting the same thing. Must be the iOS6 / iPhone 6.0 sim issue. Classic.
 Darkfire
AuthorI am having the same issue.
 Darkfire
AuthorNevermind, I redid the tutorial from scratch and it’s all working now. Not sure why.
 Marky Boy
AuthorHi there i am struggling with this problem and have no clue on how to solve it. has anyone found out how to fix it or what the cause of it is ? i would rather learn how to fix it than just restart the tutorial. Btw these are Ace tutorials 🙂
 eddy
eddy
Authormake sure to use automatic reference counting
 Smadge
AuthorHi Simon,
Once again you have made it sooo easy to follow your tutorials.
I have included this into an existing storyboard that has a navigation controller already. This controller controls a view controller with 7 round rect buttons.
Once on of these round rect button is pressed the app navigates to a another view controller with dismiss keyboard settings and 5 more round rect buttons. It is here where i am attempting to connect this tutorial to one of the round rect buttons through this tutorials new navigation controller.
I hope this makes sense.
Now when i build the app it runs up to the point where i select one of the 5 rect buttons of which one is connected to this tutorial, the app crashes and takes me to main.m.
the code is as follows:
#import
#import “AppDelegate.h”
int main(int argc, char *argv[])
{
@autoreleasepool {
return UIApplicationMain(argc, argv, nil, NSStringFromClass([AppDelegate class]));
}
}
What does this mean and how do i fix please. It is a Thread 1: signal SIGABRT error and i cannot find a solution. Your help would be appreciated.
Many Thanks
 Jeff
Jeff
AuthorGreat tutorial! I was confused by the storyboard as I was reading an old book. Now I really love the storyboard!
 James Gunaca
AuthorGreat tutorial. I got to the very end but how do I create different detail view controllers to correspond with each of the recipes in this tutorial? I can’t seem to find that in this tutorial. Thank you!
 Marcos Vilela
AuthorBy far the best tutorial of this topic I’ve ever seen!
 Cmr
Cmr
AuthorThanks for very nice tutorial ! For me it was not possible to get this working without using the
performSegueWithIdentifier method at didSelectRowAtIndexPath, though . Am I doing something wrong ?
 Yss
Yss
AuthorSame here, I looked for fail 2 hours because it didn’t worked just with the segue in storyboard.
Thanks for your comment 😉
 Samuel Quiring
AuthorThere’s a typo in this text. Look for “select the Simply select”:
By default, Xcode creates a standard view controller. As we’ll use navigation controller to control the screen navigation, we first change the view controller to navigation controller. Select the Simply select “Editor” in the menu and select “Embed in”, followed by “Navigation Controller”.
 Lmccrea
AuthorWorks beautifully! Thanks
 Samuel Quiring
AuthorI followed the tutorial and it worked great for me. What I cannot figure out is how to enable scrolling (vertical) of the UITableView. I tried putting in a scrollView, which enabled bounce, but not scrolling.
I’ve glanced at other tutorials on a similiar topic, ones that do not use storeyboards. They are more complicated, but it is much clearer (I think) how stuff is working, or not working in the case of vertical scrolling.
 J
J
Authorthis is the tutorial I’ve been looking for for ages! I am surprised that Apple doesn’t have one for such commonly used design
 Matt
Matt
AuthorThis is a really good tutorial. It took me awhile, but I finally got it working on its own. Now when i try to get it working within an app I’ve already started, I have nothing but problems. I think it stems from the RecipeBookViewController .h and .m files not being present in my existing app. I’ve added them and assigned the class to the navigation controller and embedded view controller, but it only crashes in the simulator. Could you suggest what steps need to be taken in order to add the Navigation Controller within an existing project?
 Matt
Matt
AuthorOkay, upon further testing, I found that when I create the navigation controller according to the tutorial, it crashes as soon as I touch a button that loads the controller. However, if I create the navigation controller by dragging a Navigation Controller object into the storyboard, it doesn’t crash. Unfortunately, the cells do not populate with the data. Xcode 4.6
 Matt
Matt
AuthorI figured it out.
 Anthony DeFreitas
AuthorHi Simon,
great tutorial, thanks a bunch for sharing.
I’m using xcode 4.6 and when I run the app with a blank storyboard it displays a view controller with the app’s name. Where is this being controlled from? When I do add the view controller and hook it up to a navigation controller none of the elements that I’m placing on the view controller are showing up.
Thanks for any help
 Roy Jay
AuthorHum….I’ve done the other tutorials successfully up to this point but when I set this one up, I don’t get the Recipe list. I’ve stopped right after connecting the Table View Controller to the dataSource and the delegate. When I run the app, I still get a blank Recipe Book app. Any ideas? One strange thing was that when I went to connect to TVC to the two Outlets, they appeared to already be connected (almost by default). I’ve disconnected them and reconnected them a few times and its still not working. Thanks!
 Nadia z
AuthorGreat tutorial! Done it right during the first time. Thank you 🙂
 Alex
Alex
AuthorHi guys, everything works fine until I press on a recipe, then nothing happens, It doesnt redirect me to the DetailedViewController… and yes Ive connected the cell to the ViewController and chose Push… :'(
 Frank
Frank
AuthorHey not sure if you’ve found the solution, but I had the same issue so hopefully this helps anyone else with this problem. Make sure that whatever you name your identifier in the storyboard for the prototype cells matches the variable you add into the RecipeBookViewController.m. For example:
static NSString *simpleTableIdentifier = @”RecipeCell”; //<– this is case sensitive! I originally had it as @"recipeCell" which is different from the storyboard if you're following the exact naming as the tutorial.
I made the R capital and problem solved for me 🙂
-Frank
 weida
weida
AuthorThanks! That helped me.
 Brock
Brock
AuthorThank you so much…Best tutorial i have seen so far…..so easy and simple…..I like the way you give detail by making errors and screenshots, its so helpful…..Big Thanks
 Brock
Brock
AuthorThank you so much…Best tutorial i have seen so far…..so easy and simple…..I like the way you give detail by making arrows and screenshots, its so helpful…..Big Thanks
 John
John
AuthorAgain, my I.Q went up by a point!!! Thank you for tutorial us.
 Khalid Mehmood Awan
AuthorNice tutorial, even though i selected “Disclosure Indicator” but when i run the app, it does not show any Disclosure Indicators
 Erin Parker
AuthorExcellent. Thank you!
 Bhaskar Ghosh
AuthorI have added another view controller before proceeding to the Recipe view controller. It is named appViewController. In there I’ve a button that connects to Recipe ViewController. I’m getting the folllowing exception: Terminating app due to uncaught exception ‘NSInvalidArgumentException’, reason: ‘-[UIViewController tableView:numberOfRowsInSection:]: unrecognized selector sent to instance 0x686d160’ What could be the reason
 Keta Patel
AuthorI am getting the same error. Can anyone please help us?
 shailesh
AuthorSuperb tutorial 🙂
 Nilesh Kumar
AuthorA nice tutorial.I got what I was looking for.Thanks a lot
 Nilesh Kumar
AuthorYours tutorial are best.Good work.Looking ahead for more adventures from you.
 Darkfire
AuthorHello.
These are great, but I am having an issue on this tutorial.
First, my table always shows black, unless I close it and reopen it in the simulator then it shows fine. Not sure why initial run doesn’t load the table?
Second I am getting a sigbart error when navigating from the row selection? If I remove the detail I can click no issue, but as soon as I add the view controller and segue it fails?
I am running ios 6.
Thanks!!!
 Umair Ali
AuthorI can’t drop table view on the recipe book view controller, i try to drop by using zoom out and zoom in to recipe book view controller but i can’t do this…whats a problem whith it..???
 Josh Sturgess-Meyers
AuthorWhy is it that whenever I follow any of the tutorials it never works like you say it should, and when I download the source file, theres more code in there then what the tutorial tells us to put in?
 Ilya Mihailov
AuthorHi, I have a little question) How can I use it (I’m meaning segue) for customised cells? Please help me
 Waqas Qadeer Soomro
AuthorGreat Tutorial !! Thanks 🙂
 Jack
Jack
AuthorThanks for the tutorial. To continue from the previous tutorials with out using prototype cells you can create a segue from the detail view to the list view with an identifier and add the below code in didSelectRowAtIndexPath: [self performSegueWithIdentifier:@”ListToDetailSegue” sender:self];
 Kevin
Kevin
AuthorHow do I get the tab layout of previous tutorial using this?
 tweisbach
AuthorThere is some text not showing up because it includes the less-than character and is being treated like html. There is the sentence ‘Append “” after “UIViewController”’ where in the first quotes it should include ‘%3CUITableViewDelegate%2C%20UITableViewDataSource%3E’.
 Paul N
AuthorHi, Great tutorial but I can’t get the list to have the same look as int he tutorial. I have redone the tutorial several times and even downloaded the tutorial which also displays differently. I have attached a screen shot of how the downloaded code is appearing in my fresh install of Xcode 5.1.1 Any advice will be greatly appreciated
 Robert L
AuthorHope you figured out, but this is just a design change by Apple with iOS7. Everything is now nice and square.
 Suragch
AuthorPush and modal are now deprecated. (iOS 8 and xcode 6) What should we be using now?
 Sangeeta K
AuthorNice tutorial. Easy to understand and implement. Thanks.
 Oslo Young
AuthorNice tutorial. I’ve followed your tutorial how to create your own custom UITableViewCell and Navigation Controller Fundamental. But how to combined those two? In this tutorial, you used a simple prototype cell then connect (push) it to another view controller. My question is, how to used a custom cell from your tutorial, then connect it to another view controller. Thank you.