

Welcome to another macOS tutorial! In this post we are about to learn how to create a macOS application that belongs to a unique category of apps; a category that is quite common but also quite important, and contains a large number of existing and new macOS apps. We are going to learn how to create a document based application.
It would be pointless to try to give a definition about what a document based app is, as you can immediately get it; just think of the browser that you’re reading this post now, or Xcode, or even TextEdit app. What is common to all of them is that they allow to create new windows in order to start a new task, and they support a bunch of common features and functionalities, such as create new, save, open, maybe printing, and more. All of them are document based applications!
Behind each window on a document based app there is a document, an instance of the NSDocument class. Such an object is responsible for representing the data users deal with in a window, as well as for providing some default functionalities that we’ll talk about and put in motion later in this post (like writing files to disk, or reading back from it).
A document contains at least one window controller, which in turn contains a window, and that window contains a content view controller that implements all the UI users interact with. Also, the represented data by a document (the data that is displayed in a window and users work with) is known as the document content. All documents in an app are handled by another controller, called NSDocumentController. Default operations, such as creating new windows, showing the UI for saving files, or tracking whether a document has been edited, are provided and controlled by the document controller in a document based app. In general, a great deal of functionalities is coming for “free” in a document based app through the document controller and the document objects. That fact has two advantages: First, it makes it ideal for focusing on the development of more meaningful and vital parts of the app. Second, users don’t have to learn how to use a new UI; they’re familiar with the default built-in functionalities that all document based apps provide.
In the following chapters of this post we’re going to create a document based app from scratch, and through that process to meet the most important aspects about it. You will see that the required amount of work is not that much, and we’ll end up having a fully working app quite fast.
Before We Get Started
Usually, in most of my tutorials I provide you with a starter project to begin with, and we continue together building on it. Today things are a bit different, as it’s crucial to start a document based app from scratch! So, there is not a starter project to download. There are, however, some files you can download from here that will help speed up things while making the demo app.
In particular, you’ll get an archive that contains:
- The Main.storyboard file that contains the UI of the app configured; you’ll use to replace the one in the project that you’ll create.
- An Assets Catalog to replace yours; it contains a couple of images and some custom colors.
So, just grab the files you’ll need next, and jump straight into the making of a document based app!
About The Demo App
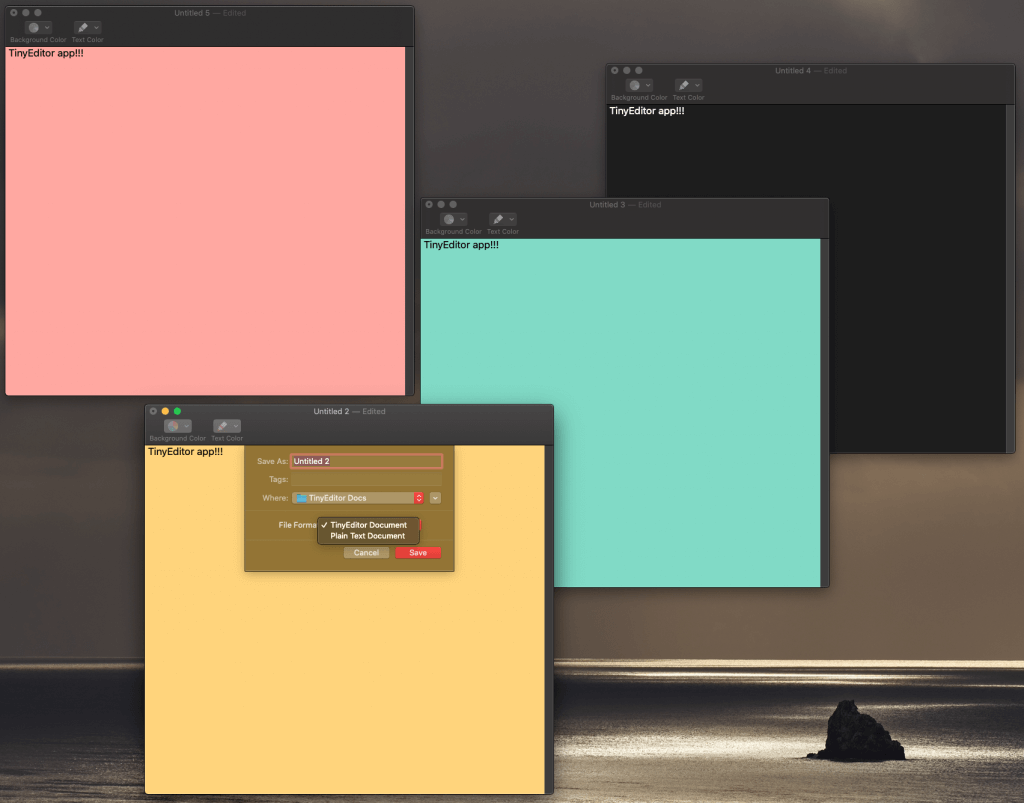
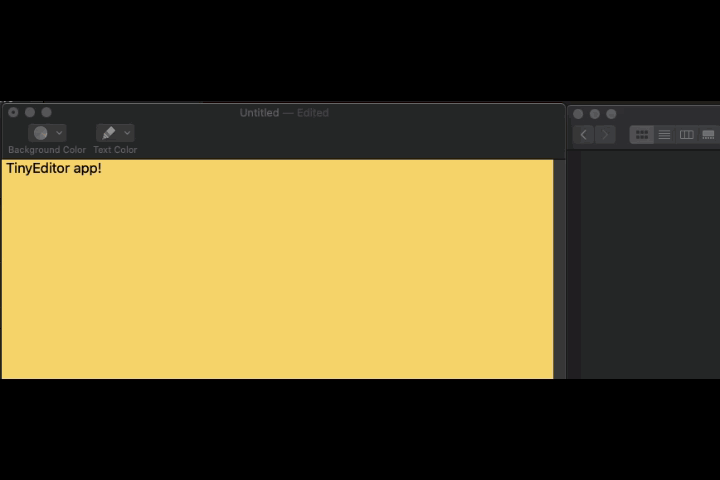
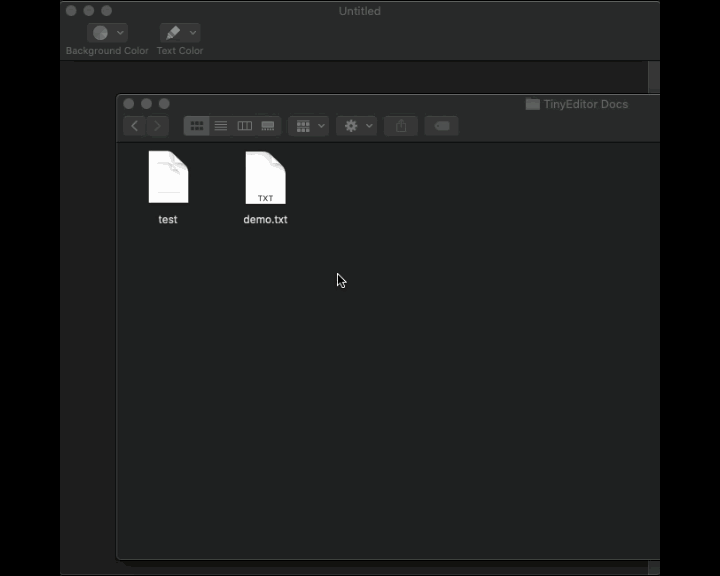
Today we are going to create a small note editor that we’ll name TinyEditor. Each document in our document based app will show an editor, and it will be possible to save notes to files using a custom file type, to open previously saved files, and to perform a bunch of other default actions that we find in many other applications. To spicy things up, we’ll make it possible to change both the background and text color of the editor, allowing to choose from a predefined number of colors in each case. Additionally, we’ll enable our editor to open and save plain text files, and through that we’ll discuss about some more really interesting stuff.
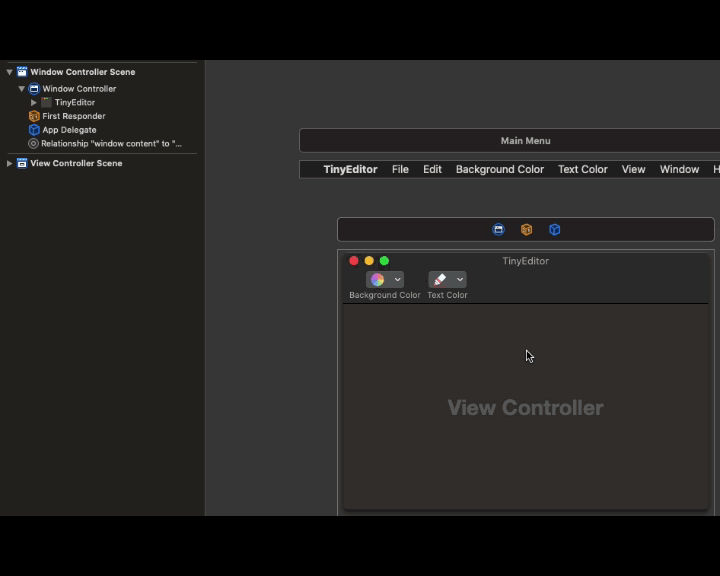
Right next you can see a preview of the demo app we’ll build here:
Creating A Document Based App
When developing a document based app, attention must be given even to the first step while creating the Xcode project. By not doing the correct choices you might end up without a default document controller that provides a lot of the desired built-in functionality, and that’s definitely something you don’t want to happen. So make sure that you’re properly following the steps described next.
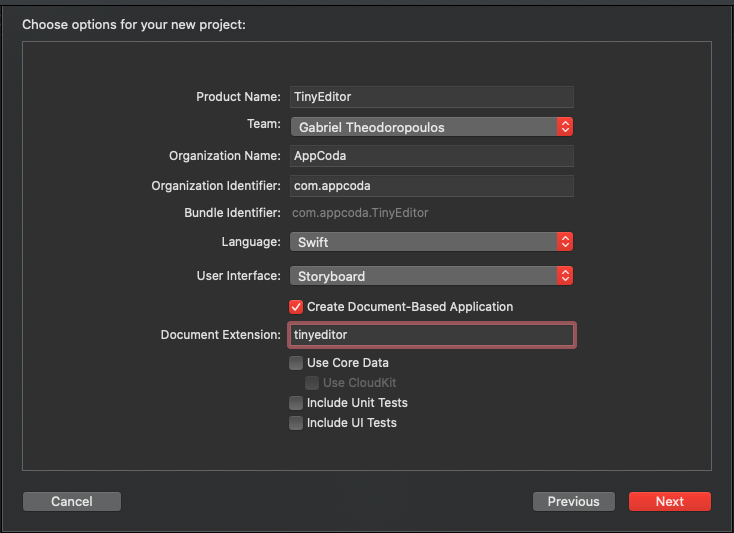
Start by launching Xcode and select to create a new project. Select the macOS platform and right below the App template. Click Next to proceed and you’re coming to the most important part.
At first, provide a name for the project; as I said already, let’s call it TinyEditor, so fill that in Product Name field. Also make sure that the Team, Organization Name and Organization Identifier fields have the proper values.
Then:
- Make sure to check the Create Document-Based Application check box.
- Provide a Document Extension. This is the extension of the files that will be saved by our app. Let’s specify the tinyeditor extension.
Note: We’re going to use “tinyeditor” as a file extension although it’s a bit long so any other shorter extension won’t conflict with file extensions associated to other applications on your Mac. Feel free to use a shorter extension if you wish though, such as “ted” or whatever else you prefer. “tinyeditor” will by the extension that will be used throughout this tutorial.
When you’re done, click Next again to continue. Select a target directory to save the project into, and you’re all set!
Exploring the Project
Once the project is ready, take a couple of minutes to see what Xcode has created for us. The first thing you’ll notice is that there is a file in the Project Navigator called Document.swift. This is a NSDocument subclass with some code defined in it. The purpose of the existing code is to:
- Create the window controller of the document.
- Define a method which we’ll use to provide the data that will be written to a file when saving.
- Define a method that reads data from a file and it’ll be our task to properly handle and use it.
- Allowing auto-saving of the document’s data by overriding the
autosavesInPlaceproperty.
That default implementation of the Document class is usually good enough for most applications. Of course, more content can be added depending on the app one’s making; just take a look at the NSDocument class documentation for additional methods and properties that can be overriden.
Once you finish with the Document.swift file, select the project name at the top of the Project Navigator, then select the TinyEditor target from the targets list, and open the Info tab. You’ll find out that a custom document type has been automatically created by Xcode. A document type describes the file type that the app can handle, and there can be more than one document types defined in one application. We have the tinyeditor file type here for now, but we’ll add one more for plain text file types later.

Another configuration made for us can be found in the Signing & Capabilities tab. In the App Sandbox > File Access section you’ll see that the User Selected File type is set to Read/Write, something that’s None by default to other types of macOS apps. Allowing read and write permissions is required in order to be able to save and read files from the disk. Feel free to change the permissions regarding the special folders you see in the list too if you need so.
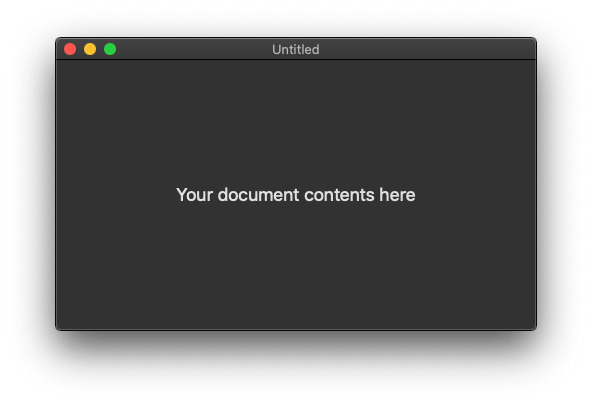
If you want, you can run the app for first time. Even though there’s just an empty window that shows up, you can get your first taste of your own document based app by going to menu File > New. A new window will appear instantly. You can also try the Save and Open menu commands that will initiate the respective processes; however if you try to perform such an operation you’ll get an error message. Don’t worry, that’s normal because there’s some missing code that we’ll add soon.
Adding An Exported UTI
Our application declares a custom file type; a file type that macOS doesn’t know anything about, and that will make impossible to open files created with our app from Finder. In order to change that, it’s necessary to specify an Exported UTI. Note that doing so wouldn’t be necessary if we had used a known file type (for example, “txt”).
Note: Read more about UTIs here and here.
So, while still being in the Info tab expand the Exported UTIs section and click on the Plus (+) button at the bottom side. Fill in only the following fields with the values I’m giving you:
- Description: TinyEditor Document UTI
- Identifier: YOUR_ORGANIZATION.tinyeditor – for example: com.appcoda.tinyeditor
- Extensions: tinyeditor
You can also set an icon, but for it can be left blank here. You’re free to find a nice image and set it both here and in the document type if you wish so.
If you want other applications to be capable of opening documents created by your app, and if the document type matches to any known UTI (for example you save text, JSON, image, etc), then you can provide the proper UTI to the Conforms To field. I can tell you from now that the content of the files that our demo app will create will be a JSON object. Based on that, we can set the public.json UTI to the Conforms To field, so other apps can open our documents too. But let’s don’t do that here; let’s keep the tinyeditor files for our app only.
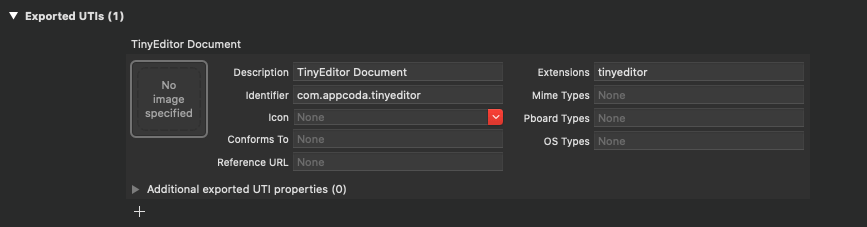
Before we continue, there’s one small modification we should do in the document type right above the exported UTI. Go to the Name field, and replace the current value with this: TinyEditor Document. This is what is going to appear in Finder when a tinyeditor file is selected. We wouldn’t like it to say DocumentType there; it wouldn’t make sense. “TinyEditor Document” is much better and describes the app that the file type belongs to.
The Tiny Editor App UI
In order to save us valuable time that we should spend configuring the app’s UI, I included the Main.storyboard file already configured in the starter files that I asked you to download earlier. First, in your own project right click on the Main.storyboard file to delete it (make sure to move to trash, not remove the reference only). Then, just drag and drop the downloaded storyboard file to Xcode. Keep the following settings:
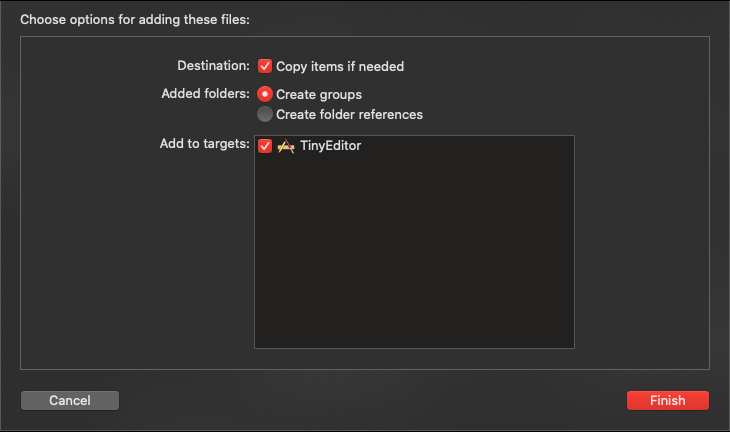
When you add it to your project and open it, you’ll see that it already includes a toolbar but the icons of the toolbar buttons are missing. To fix that you will need to add the images from the Assets Catalog included in the zipped file you downloaded. But wait a minute!
The downloaded Assets Catalog also contains a few custom colors that we’ll need in our app, so instead of doing everything manually, simply delete the current Assets Catalog from your project, and add the downloaded one. Just like as you did with the storyboard file. You’ll get both images and colors at once.
Connecting IBOutlet Properties For Color Menus
When you finish doing the above, there are a few IBOutlet properties that have to be connected. Before doing so, open the AppDelegate.swift file and add the following:
@IBOutlet weak var bgColorMenu: NSMenu?
@IBOutlet weak var textColorMenu: NSMenu?
These two properties consist of the menu that will appear when it’s about to choose a background or text color.
In Main.storyboard file now, select the Background Color menu so it expands in the Document Outline. Then, click on the App Delegate object, and by having the Ctrl key pressed, drag to the Menu included under the Background Color menu item. In the window that pops up, select the bgColorMenu IBoutlet.
Repeat the above process for the Menu under the Text Color item. Click and drag from App Delegate to the Menu object, keep the Ctrl key pressed, and then upon release select the textColorMenu IBOutlet property.
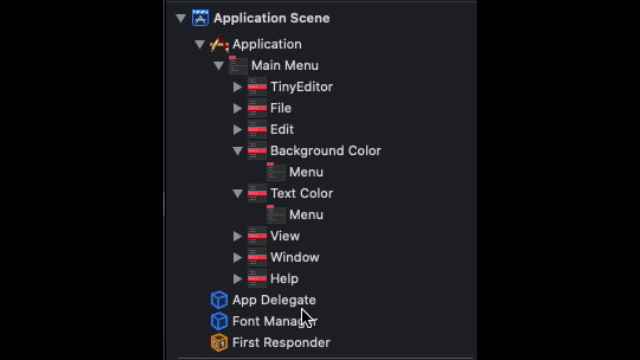
The above process must be done for the two drop down items in the toolbar. Start by double clicking on the Background Color item in the toolbar. In the toolbar items that will be revealed, double click on the Background Color drop down under the Allowed Toolbar Items. Look at the Document Outline now; the Menu object is selected. Like before, hold the Ctrl key down, click on the App Delegate object and drag towards the selected Menu item. Leave the mouse button and select the bgColorMenu IBOutlet property.
Repeat the above steps once again for the Text Color item in the toolbar and connect the textColorMenu to its Menu object.
The above actions of connecting the IBOutlet properties to the menu objects of the Main Menu and toolbar items aim to two things:
- To avoid manually setting the menu items for both menus, and do a repeating work.
- To make it easy to add more options to our menus in the future; we might want to provide additional colors at some point, and you’ll see that this can happen automatically with the approach we’ll follow next.
Note: Menus and the toolbar have already been presented in a previous post.
Connecting The Text View
Even though there is a text view object in the storyboard file, it is not connected to any IBOutlet property so we can access it programmatically and update its properties. Let’s take a minute to fix that and perform a super-light configuration to text view at the same time.
Open the ViewController.swift file and declare the following IBOutlet property at the beginning of the ViewController class:
@IBOutlet var textView: NSTextView!Next, override the viewWillAppear(_:) method where we’ll do two things only: The first is to increase the text view’s font size. the second is to set the ViewController class as the delegate of the text view; this will make it possible to keep the edited text in the note model later.
override func viewWillAppear() {
    super.viewWillAppear()

    textView.font = NSFont.systemFont(ofSize: 17.0)
    textView.delegate = self
}
Finally, go right after the closing curly bracket of the ViewController class at the end of the file, and add the following extension where ViewController conforms to NSTextViewDelegate. In it, we implement just one delegate method and for the time being we leave it empty. We’ll add code later.
extension ViewController: NSTextViewDelegate {
func textViewDidChangeSelection(_ notification: Notification) {
}
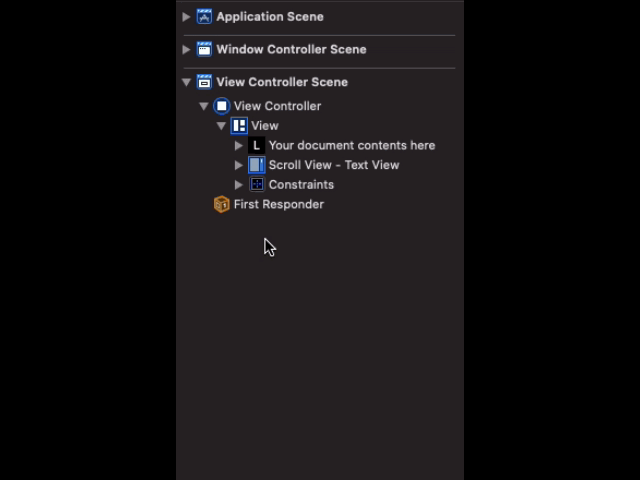
}Back to Main.storyboard file, where we will connect the text view to the IBOutlet property created above. Go to Document Outline and expand the Scroll View – Text View object until text view becomes visible. Then, keep Ctrl key down, click on the View Controller object, and drag towards the Text View object. Release both mouse and the Ctrl key, and select the textView property in order to make the connection.
That’s it! You can go ahead and give it a try to the app using the imported UI for first time!
The Editor’s Colors
Before we manage to create the actual menu options that will allow to change the background or text color of the editor, we need to specify the available colors first. Regarding the text color, we’ll use only dark and light colors (black and white). For the background though we’ll have five colors, where the four of them exist in the Assets Catalog you added to the project; the missing one will be the default background color of the system (textBackgroundColor).
We will keep things organized and easily accessible by defining a new custom type, a structure. Before that, let’s add a new file in the project. Press Cmd+N and select to add a new Swift File. Name it AppColors and open it in Xcode.
First, replace this line:
import Foundationwith this:
import CocoaNext, add the following struct definition:
struct AppColors {

}
Both background and text colors will be collections, and actually collections that will be declared as static properties in the structure. That will make it easy to access them without needing to create objects of the structure. But what the item of each collection will be?
The first thought that’s coming to everybody’s mind is to have collections of colors (NSColor objects), and that’s correct. However, remember that we want to match these colors to menu items in a while, and menu items must have… titles; titles that refer to colors. So, what if we would match a name to each color, and therefore each item of the collections would be the color name along with the color value formed as a tuple?
Based on that idea, here’s the array that will keep the background colors. See the collection’s type:
static let bgColors: [(name: String, color: NSColor)] = []With the above, we’ll be using the name value for each menu’s title, and the color value as the color to apply. Two birds with one stone!
Let’s add the background colors now:
static let bgColors: [(name: String, color: NSColor)] = [
    ("Default", NSColor.textBackgroundColor),
    ("Blue", NSColor(named: "blue") ?? NSColor.black),
    ("Yellow", NSColor(named: "yellow") ?? NSColor.black),
    ("Pink", NSColor(named: "pink") ?? NSColor.black),
    ("Teal", NSColor(named: "teal") ?? NSColor.black)]
Note that NSColor(named:) initializer returns an optional value, so by using the nil coalescing operator (??) we make sure that a default color will be used if NSColor(named:) returns nil for some reason.
Next, let’s specify the text color data:
static let textColors: [(name: String, color: NSColor)] = [
    ("Dark", NSColor.black),
    ("Light", NSColor.white)]
Fewer lines here as we have two colors only.
With the colors provider implemented we are now in the position to use them.
Creating The Color Menus
Go to AppDelegate.swift file now where we had declared two IBOutlet properties previously. These properties are the actual menus that will be displayed when the Background Color or Text Color menu items are clicked on the Main Menu of the app, or when the respective dropdown items in the toolbar are clicked.
Up until now, though, none of these menu properties contains items, so even if you run the app and click on the menus connected to them nothing will happen.
In order to change that, start by defining the following custom method in the AppDelegate class:
fileprivate func configureBGColorsMenu() {

}
Note: It’s marked as file-private so it’s accessible only in the scope of this class. Read more about access levels here.
Here’s what has to be done in the above method: A new menu item must be created for each background color data item specified in the bgColors array in the AppColors struct. This can be easily achieved using the forEach higher order function and by applying it in the bgColors array:
fileprivate func configureBGColorsMenu() {
    AppColors.bgColors.forEach { (colorData) in
        let menuItem = NSMenuItem(title: colorData.title, action: #selector(handleBGColorSelection(_:)), keyEquivalent: "")
        bgColorMenu?.addItem(menuItem)
    }
}
We create a new menu item here (a NSMenuItem object) for each color data found in the bgColors array. We provide the color’s name as title, and in addition we specify an action method to call when the menu item is clicked. We’ll implement that method in a few moments.
Adding the newly created item to the menu is done by calling addItem(_:) method as shown above. However, that method comes in another “flavor” too that allows to provide the menu item arguments straight into it. Let’s update the above into a single line:
fileprivate func configureBGColorsMenu() {
    AppColors.bgColors.forEach { (colorData) in
        bgColorMenu?.addItem(withTitle: colorData.name, action: #selector(handleBGColorSelection(_:)), keyEquivalent: "")
    }
}
We can go even further and make it a one-line operation only:
fileprivate func configureBGColorsMenu() {
    AppColors.bgColors.forEach { bgColorMenu?.addItem(withTitle: $0.name, action: #selector(handleBGColorSelection(_:)), keyEquivalent: "")}
}
Note: Read more about higher order functions.
Time to implement the handleBGColorSelection(_:) action method:
@objc fileprivate func handleBGColorSelection(_ menuItem: NSMenuItem) {
    let docController = NSDocumentController()
    guard let vc = docController.currentDocument?.windowControllers.first?.contentViewController as? ViewController else { return }
    vc.setBGColor(with: menuItem.title)
}
When a background color will be selected using the menu items we just specified above, the background color of the editor should change to that color. However, imagine the case where you have 4-5 open TinyEditor documents at the same time. Which one is it going to accept the color change if we use the Main Menu of the app?
It’s obviously necessary to spot the currently edited document, and that’s possible through the currentDocument property of the NSDocumentController class. So, at first we initialize a new NSDocumentController object in the snippet above. Then we use it to access the current document, through the document object we access the first window controller, then the content view controller and eventually the method of the ViewController class that updates the color. All that of course if the above guard statement won’t fall into the else case for some reason.
Note: Here we accessed the first window controller knowing that there will be only one window controller per document. If you have more window controllers in your own apps, then the above logic does not guarantee that the correct window controller will be used for the action you want to apply. Therefore, make sure to determine somehow which window controller is going to be used – note that windowControllers is an array.
Time to deal with the text colors menu. Whatever we just did above remains the same in this case too, so there’s nothing new to add. Here are the two new methods you need to add to the AppDelegate class right below those we just implemented:
fileprivate func configureTextColorsMenu() {
    AppColors.textColors.forEach { textColorMenu?.addItem(withTitle: $0.name, action: #selector(handleTextColorSelection(_:)), keyEquivalent: "")}
}

@objc fileprivate func handleTextColorSelection(_ menuItem: NSMenuItem) {
    let docController = NSDocumentController()
    guard let vc = docController.currentDocument?.windowControllers.first?.contentViewController as? ViewController else { return }
    vc.setTextColor(with: menuItem.title)
}
The above configuration methods (configureBGColorsMenu() and configureTextColorsMenu()) won’t be called unless we take care of that. So, override the awakeFromNib() method that gets called when the storyboard has been loaded, and call the two methods that will configure the menus:
override func awakeFromNib() {
    super.awakeFromNib()
    configureBGColorsMenu()
    configureTextColorsMenu()
}
The menus that display the background and text color options are now ready, but we can’t test the app yet; we have a couple of methods missing in the ViewController class.
Adding The Missing Pieces
In the methods we just implemented in the AppDelegate we call two other methods of the ViewController class. However, none of the last two exists yet, and obviously we won’t be able to run the app without adding them.
Open the ViewController.swift file and add the following method definition:
func setBGColor(with name: String) {

}
Its name says what is all about; it’ll change the background color of the text view based on the given color name. Once again we’ll use the bgColor collection with the background color data of the AppColors struct, and this time we’ll apply the filter higher order function in order to get the color value that matches to the provided name. The returned color will be set as the background color of the text view:
func setBGColor(with name: String) {
    textView.backgroundColor = AppColors.bgColors.filter { $0.name == name }.first?.color
}
The above though returns an optional color object that makes Xcode trigger an error; textview’s background color can’t be optional. So let’s fix that by making sure that if no actual color is returned then a default one will be used instead:
func setBGColor(with name: String) {
    textView.backgroundColor = AppColors.bgColors.filter { $0.name == name }.first?.color ?? NSColor.textBackgroundColor
}
We’ll act similarly in order to implement the second missing function from ViewController. But there’s an additional step here; We must also update the color of the blinking cursor. It wouldn’t feel nice to have different text and cursor colors.
Here’s the new implementation:
func setTextColor(with name: String) {
    // Update the text color.
    textView.textColor = AppColors.textColors.filter { $0.name == name }.first?.color ?? NSColor.textColor

    // Update the cursor color!
    textView.insertionPointColor = textView.textColor ?? NSColor.textColor
}
Both methods are ready for now! But we’ll come back soon enough to make some necessary and important additions.
Now, you can run the app and try out the color changing. If you didn’t miss any step, then it’ll be working just fine!

The Note Model
In order to be able to represent a note programmatically and keep its text along with the used colors, we need to define a custom type that will work as the model for the note editor. So, go to File > New > File… menu or press Cmd+N in Xcode, and add a new Swift File to the project. Name it TinyNote.
Open the newly created file and add the next class with the shown properties in it:
class TinyNote: Codable {

    var note = ""

    var bgColorIndex: Int = 0

    var textColorIndex: Int = 1


    // MARK: - Init()

    init() {

    }

}
note property will keep the text of a note, bgColorIndex will point to the color data in the collection of background colors, and textColorIndex will point to the color data in the collection of text colors, as those were specified in the AppColors.swift file.
See that we don’t have properties that keep the actual color values used in the editor; instead we have properties that store each color index. We achieve two goals by doing so:
- First, it’s possible to replace a color in the color arrays in the AppColors.swift file without having to update each note afterwards that uses an old color.
- Second, it won’t be hard to encode and decode an object of this class. It would have been hard though if we had used actual color values. A color object (NSColor) is not a basic Swift data type, so it cannot be encoded or decoded out of the box. An indirect approach would be required, like representing each color using their RGBA values as double numbers, and that would lead to additional properties that we just avoid that way (less is better!).
Speaking of encoding and decoding, notice that the TinyNote class adopts the the Codable protocol. We need it for the following simple reason:
The contents of every tinyeditor file that our app will create will be nothing else than a JSON representation of the data contained in a TinyNote instance. We’ll stick to JSON so we can keep things simple here. However, we could follow other approaches too; for example we could archive (with NSKeyedArchiver) TinyNote objects and save the archived data. Or save a property list that will contain the above properties. It’s all up to you to choose, but as I said we’ll use JSON encoding and decoding just for simplicity.
Based on that, let’s add two methods in the above class. The first one encodes an instance of the class as a JSON object and returns the encoded data:
func getNoteAsJSON() -> Data? {
    let encoder = JSONEncoder()
    return try? encoder.encode(self)
}
The next one decodes a given JSON object and populates decoded data to the properties of the self instance:
func use(data: Data) -> Bool {
    let decoder = JSONDecoder()
    guard let decoded = try? decoder.decode(TinyNote.self, from: data) else { return false }
    note = decoded.note
    bgColorIndex = decoded.bgColorIndex
    textColorIndex = decoded.textColorIndex
    return true
}
We are going to use both of these methods in the Document.swift file when we’ll implement the missing logic to write and read data.
Using The Note Model
When making changes in TinyEditor app, then edited text or selected colors should be kept in instances of the TinyNote class somehow so we are able to save notes to disk.
The easiest approach in order to manage to use TinyNote in our demo app is to declare a TinyNote stored property in ViewController class:
var tinyNote = TinyNote()Then, whenever changes happen, we can use tinyNote property and access its own properties in order to store the updated data.
However, we won’t follow that path here. Even though it’s perfectly fine to do it that way, in this case we’ll follow a different approach I’d like to show.
For starters, there’s one thing that does not change: We need to initialize a TinyNote instance somewhere. But instead of doing it in the ViewController class, we’ll do it in the Document class (in the Document.swift file). So, go there and add the following declaration at the beginning of the class:
var content = TinyNote()We’re naming it content conventionally, as it represents the document’s content; the data shown and managed in the app. Of course, you can give it any name you want.
Declaring content in the Document class has an additional benefit; it’ll be easier for us to have access to the data that will be saved to file later. This does not mean though that would be impossible to get it if we had declared it in ViewController, it’s just more straightforward now.
The step that follows is interesting: How do we access the content property of a document so we update it through the ViewController class?
Well, there are two solutions. The first one is to access the document object through the ViewController and use the content property somehow like that:
guard let document = self.view.window?.windowController?.document as? Document else { return }
document.content.note = ...
document.content.bgColorIndex = ...
What’s interesting to see here is how we can have access to the document object. If you remember, in the introduction of this post I had said that the hierarchy of objects in document based apps is:
document > window controller > view controller
In the snippet above we follow the opposite path; we start from the view controller (self), through the view’s window we get access to the window controller, and finally to the document. This is an important technique in order to access document’s properties or methods, and we’ll use it later. But now we’ll do something else!
Each view controller has a property called representedObject (read more here). It’s a property that belongs to NSViewController class so it’s always available to any view controller subclass (like the ViewController in our project).
Based on that, inside the Document class we will assign the content property to representedObject, so ViewController will instantly have access to content values! Given also the fact that TinyNote is a class so such objects pass around as references, then any changes that will take place in representedObject from ViewController will be reflected to the content property as well.
Go to makeWindowControllers() method in Documents.swift file, and after the default code you’ll find there add the next line:
override func makeWindowControllers() {
    ...

    windowController.contentViewController?.representedObject = content
}
Time to use the representedObject property!
Updating Note Model With Edited Values
Open the ViewController.swift file now where we’ll add the code that updates the representedObject with any changes made to the editor; changes in the text view’s text, or in the colors.
Let’s start with something easy, so go straight to the end of the file where we had added the textViewDidChangeSelection(_:) of the NSTextViewDelegate protocol. This method is called whenever a change is taking place in the text view. The goal here is to update the note property of the TinyNote instance with the text view’s text:
func textViewDidChangeSelection(_ notification: Notification) {
    (representedObject as? TinyNote)?.note = textView.string
}
Notice that representedObject is an Any object, so casting to TinyNote is mandatory in order to be able to access its properties.
We have to do the same now when the background and text color of the text view are changed. Let’s start with the background color, so go to the setBGColor(with:) method.
We have to be a bit cautious here, because what we want to keep is the index of the selected color data, not the color name or value; however, it is not instantly available as you can see. What we have at our disposal is the color name from the parameter value, and the actual color that we’ve assigned already to text view’s background.
Using a different higher order function this time, we’ll use the color name in order to get back the index of the color data in the bgColors collection (in AppColors struct):
func setBGColor(with name: String) {
    ...

    if let colorIndex = AppColors.bgColors.firstIndex(where: { $0.name == name }) {
        (representedObject as? TinyNote)?.bgColorIndex = colorIndex
    }
}
firstIndex method returns the index of the first item in the collection where the given condition becomes true. As a result, we keep the selected background color’s index to bgColorIndex property as soon as it gets unwrapped to colorIndex constant.
We can do the exact same thing in order to store the text color. Go to the setTextColor(with:) method and make the addition shown next:
func setTextColor(with name: String) {
    ...

    if let colorIndex = AppColors.textColors.firstIndex(where: { $0.name == name }) {
        (representedObject as? TinyNote)?.textColorIndex = colorIndex
    }
}
Right now we have a fully working model, so let’s take advantage of it; let’s make saving to file possible!
Saving To Files
When working on document based applications, then the burden of showing a save panel in order to ask for a file name and a target directory, as well the actual writing to file is handled by the system. All we have to do on our part is to provide the data (as a Data object) that will be written to the file.
The saved file will be using the extension specified during the project creation time, which we also found in the Document Type section under Info tab. In our case this is the tinyeditor extension. As an additional information, it’s possible to override the writing functions and implement your own logic, but in 9 cases out of 10 it won’t be necessary to do that.
So, let’s switch to the Document.swift file now, and this time we’ll focus on the data(ofType:) method that exists there by default.
At the time being, this method just throws an error that you can see if you run the app and try to save a note. That’s normal, as we still have not written any code that returns actual data to be stored to a file. Based on the work we’ve done so far, providing that data is going to be a piece of cake!
The data that we want to save to file is the contents of the content property. content is a TinyNote object, and if you remember when we implemented TinyNote class we had also created a method called getNoteAsJSON(). This is the one that will give us the data we want to return in the data(ofType:) method. Don’t forget however it returns an optional data object (Data?), so unwrapping it is necessary in order to do things properly. If unwrapping succeeds, then we just return the unwrapped value. Here it is:
override func data(ofType typeName: String) throws -> Data {
    if let noteData = content.getNoteAsJSON() {
        return noteData
    }

    throw NSError(domain: NSOSStatusErrorDomain, code: unimpErr, userInfo: nil)
}
The three new lines added above are all we need here so saving to file can work! Notice that we still keep the last line that throws the error; if for some reason no data is returned by getNoteAsJSON(), then we need to inform users that the note could not be saved.
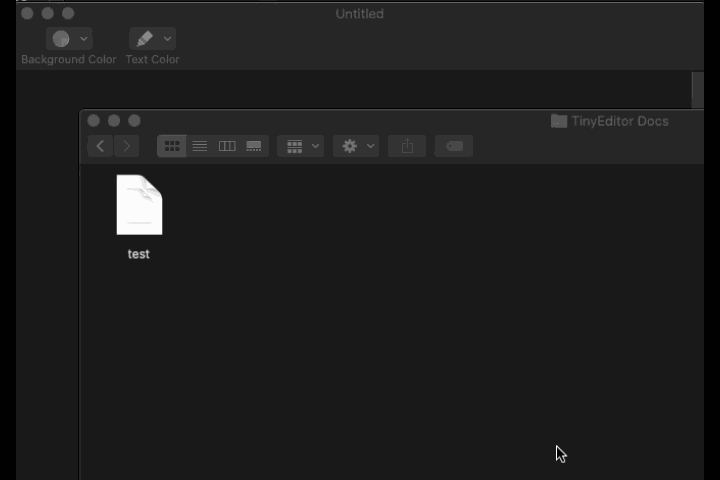
Go ahead now and give it a try! Type something, change colors if you want and then save. Then, go to Finder and you’ll see a tinyeditor file created in the target directory you chose!
Opening Files
We just managed to enable saving to files and for first time we actually saved notes. However, it’s still impossible to open a previously saved tinyeditor file, and that’s what we’re about to do now.
Opening files is a bit trickier than saving for a reason that you’ll understand pretty soon. But, similarly to saving, the appearance of a load panel and the actual data reading from a selected file is handled by the system. So, our starting point is data that has been already read for us.
Still inside the Document.swift file, go to read(from:ofType:) method. The first parameter, data, is the data read by a file that we choose to open either by using the Open functionality inside the app, or by double clicking on a tinyeditor file in Finder.
Since we’re opening tinyeditor files, we know in advance that the data is actually JSON data. So all we have to do is to use the second method we created in the TinyNote class called use(data:), which in turn will decode the given JSON and will populate the read values to the proper properties.
So, let’s start with that:
override func read(from data: Data, ofType typeName: String) throws {
    if content.use(data: data) {

        return
    }

    throw NSError(domain: NSOSStatusErrorDomain, code: unimpErr, userInfo: nil)
}
See that we have a throw statement in this method too; it’s necessary if opening and reading a file fails. Also, see that inside the if statement we have return command. If we manage to read data successfully and have the content property contain the loaded values, then we don’t want the execution to continue to error throw.
Now, time for the tricky part I mentioned above. Right above we populated the data from a file to the content property, but did not use it after that. The next reasonable step is to use content in the ViewController and update the UI based on its contained values. In order to do that, we need to access the view controller through the window controller of the document like that:
windowController.contentViewController?.populateContent()populateContent() is supposed to be a method that updates the UI with the content values.
The above sounds pretty reasonable to do, right? But here’s the trap! At the time of reading data from a file, the user interface for the document has not been created yet!
As a result, even though we would not get an error message, the document that would appear after opening a file would be empty! No content would be shown in it.
As you understand, the above is never going to work. So we’ll do something else. Instead of trying to reach the view controller when data is read, we’ll check if there’s any data loaded when the view controller is initialized.
In order to do that, we need first a flag that indicates whether data has been loaded from a file or not. Go to the beginning of the Document class and add the following:
class Document: NSDocument {

    var didReadData = false

    ...
}
In the read(from:ofType:) method again, inside the if statement we’ll set it to true:
override func read(from data: Data, ofType typeName: String) throws {
    if content.use(data: data) {

        // Make didReadData flag true to indicate that data has been read from a file!
        didReadData = true

        return
    }

    throw NSError(domain: NSOSStatusErrorDomain, code: unimpErr, userInfo: nil)
}
Now, we’ll continue working on the ViewController.swift file. In the ViewController class we’ll create a new method that will check the value of the didReadData flag of the document. In case it’s true, then it’ll update the UI according to the loaded data. Let’s see it:
func handleOpenDocumentOperation() {
    if let document = self.view.window?.windowController?.document as? Document {
        if document.didReadData {
            populateDocumentContent()
            document.didReadData = false
        }
    }
}
I had described earlier how the document object can be reached from the view controller, but we hadn’t used it. Now, we’re using that approach and starting from self (the view controller) we end up to the document object. Through the unwrapped document object we can access the didReadData flag, and if it’s true, then we’ll use the content property from document in order to show loaded data to the UI.
Note that it’s necessary to set this flag back to false as we do above, because we’ll call handleOpenDocumentOperation() method from the viewWillAppear(_:) method in a while, and that method can be called multiple times during the lifetime of a view controller.
Updating the UI with the loaded data takes place in a new method called populateDocumentContent():
func populateDocumentContent() {
    guard let content = representedObject as? TinyNote else { return }
    textView.string = content.note
    setBGColor(with: AppColors.bgColors[content.bgColorIndex].name)
    setTextColor(with: AppColors.textColors[content.textColorIndex].name)
}
Once again we’re using here the representedObject of the view controller, which refers to the content property of the document. Things are quite easy here; we set the text view’s text using the note property of content, and we specify both background and text colors using the names we’re getting by simply accessing the given index in the proper collection.
Before you press Cmd+R to run the app, remember that we stil haven’t called the handleOpenDocumentOperation(). Jump to the viewWillAppear(_:) method and add the next line:
override func viewWillAppear() {
    ...

    handleOpenDocumentOperation()
}
We’re all set now! Run the app and use the Open command to load a previously saved file. Then go to Finder, find a tinyeditor file and double click on it; it will open with the TinyEditor app!
Opening Text Files
Our demo app is a note editor, and it would be a pity not to make it capable of handling text files, and by doing so to learn something new along the way.
We’ll begin by enabling the opening of plain text files with the TinyEditor app. We’ll talk about saving to text files in the next part, as certain actions are required to be done in order to achieve the desired results when saving. What you should keep for now is that by finishing this part, our demo application will open both tinyeditor and txt files, either using the Open menu or when files are double clicked in Finder.
So let’s get started. Select the TinyEditor project at the top of the Project Navigator, then the TinyEditor target in the targets list and click to open the Info tab. Expand the Document Types section.
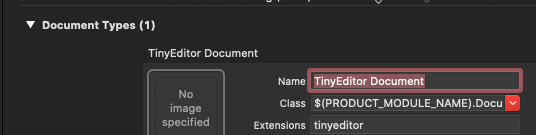
Right below the existing document type there’s a plus button. Click on it and a new empty document type will be created. Fill in the following fields with the values I’m providing you with:
- Name: Plain Text Document
- Class: $(PRODUCT_MODULE_NAME).Document
- Extensions: txt
- Identifier: public.plain-text
- Role: Editor (it should be the default value)
- Mime Types: text/plain
When you finish setting the above values, expand the Additional document type properties option right below and click inside the empty area. A new entry will be created. As a key type LSHandlerRank, and as a value Alternate.

You are recommended now to go to menu Product > Clean Build Folder and either build the project again, or just run it. Then either use the Open menu, or go to Finder and find a .txt file. If you don’t find any, just create one with TextEdit app; just make sure to convert it first to Plain text and then save it.
If you right click on the text file in Finder and select Open With, you’ll see that TinyEditor is included in the list of apps that can open the text file. If you use the Open menu command, the text file won’t be disabled and you are allowed to click on it. Success!
However, trying opening leads to the following alert message:
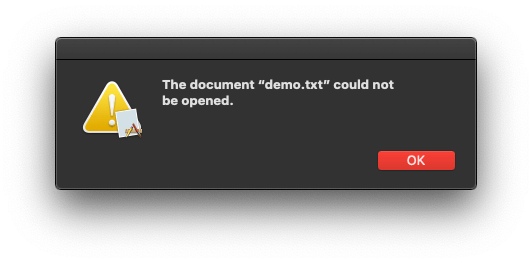
Why is that happening?
The answer lies behind the kind of data TinyEditor can open. Remember that a tinyeditor file contains actually JSON data, so when opening such a document we are decoding it in the use(data:) method of the TinyNote class.
However, what we are trying to open now is a text file; to use different words, the file we are trying to open does not contain JSON data, but plain text; a string value.
For that reason, decoding fails and use(data:) method returns false to its caller, the read(from:ofType:) method in the Document class. Eventually, that method throws the default error.
Fixing that problem is easy; we’ll modify a bit the use(data:) method in the TinyNote class. Open the TinyNote.swift file and go straight to that method. There you’ll find the following statement responsible for returning the false value:
guard let decoded = try? decoder.decode(TinyNote.self, from: data) else { return false }Instead of returning false in case decoding fails, we’ll do something different; we’ll try to convert the provided data into a String value, and if that fails too, then we’ll return false. But if it does not fail, then we’ll keep the string data to the note property and we’ll return true. Here’s that change:
guard let decoded = try? decoder.decode(TinyNote.self, from: data) else {
    guard let text = String(data: data, encoding: .utf8) else { return false }
    note = text
    return true
}
And here’s the entire use(data:) method after doing the above modification:
func use(data: Data) -> Bool {
    let decoder = JSONDecoder()

    guard let decoded = try? decoder.decode(TinyNote.self, from: data) else {
        // Data was not a JSON.
        // Try to create a String object using it.
        guard let text = String(data: data, encoding: .utf8) else { return false }

        // Data was converted to a string successfully!
        note = text
        return true
    }

    // Data was a JSON and has been decoded successfully!
    note = decoded.note
    bgColorIndex = decoded.bgColorIndex
    textColorIndex = decoded.textColorIndex

    return true
}
Run the app now. Regardless of whether you open a tinyeditor or a txt file, either from the Open menu or from Finder, the selected file will open in TinyEditor!
See that by adding a new document type and by doing a slight modification to our existing code, we managed to support opening of plain text files too!
Saving As Text
Currently, if you create a new TinyEditor document and you save it for first time, you’ll notice a new popup button appearing in the save panel titled File Format. If you click to open it, then you’ll see that you have two options: Either to save as a TinyEditor Document, or as a Plain Text Document:
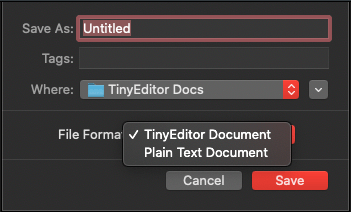
Select the second option, and give a name to the file. If you find the saved file in Finder, you’ll see that indeed is a text file!
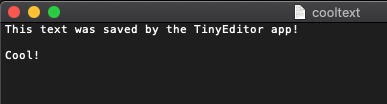
However, if you open it with TextEdit then most probably you’ll get frustrated; the text file does not contain the note as a text, but the JSON representation with all data of the note:

That’s definitely not what we had in mind obviously. We want to have the note text only, and above all, we don’t want a JSON string in the exported text file. So, how can we work around this?
The solution exists in the Document.swift file, and inside the data(ofType:) method. This method has a parameter called typeName. Its value is the name of the document type. When saving a file as a tinyeditor document it has the TinyEditor Document value. When saving a file as a text document, it has the Plain Text Document value.
Using an if statement we can determine the file type that is going to be used. In case of a TinyEditor document, we stick to the solution we already have implemented to that method. But in case of a text document, then we’ll convert the note’s text into a Data object, and this is what we’ll return from the method.
So, make sure that you’re in the Document.swift file and inside the data(ofType:) method, and update it as you see next:
override func data(ofType typeName: String) throws -> Data {
    if typeName == "TinyEditor Document" {
        if let noteData = content.getNoteAsJSON() {
            return noteData
        }
    } else {
        if let noteData = content.getNoteText() {
            return noteData
        }
    }

    throw NSError(domain: NSOSStatusErrorDomain, code: unimpErr, userInfo: nil)
}
The logic is simple as you can see. What we’re missing now is the new method you see above and Xcode shows an error because of it; the getNoteText().
Open the TinyNote.swift file in order to implement it. All we’ll do is to convert the note property to a Data object and return it:
func getNoteText() -> Data? {
    return note.data(using: .utf8)
}
Run again and choose to save the document as a text file. When done, open it with TextEdit; there will be the actual text only!
A Few Notes About Document Types, Exported & Imported UTIs
In the previous parts we visited a few times the Info tab of the project target where we met the default Document Type, we defined a new Exported UTI, and lastly we added a new Document Type.
But besides the few things we’ve done, what exactly the Document Type, Exported UTIs and Imported UTIs are? That’s usually a part of Xcode that tends to be quite confusing, so let me outline shortly each one what is for:
- In the Document Type section we let macOS know that this app can handle the specified document type. You saw that in action with the custom (tinyeditor) and text document types.
- If the document type does not conform to any public UTI AND the app is the one that defines that type, then it’s necessary to create a new entry in the Exported UTIs section. By doing so we make known to the system the new document type that our app introduces. Take as an example the TinyEditor Document type that our demo app defines.
- If the document type does not conform to any public UTI and the app is not the one defining the type, then we must create a new entry to the Imported UTIs section. We did not use it here, but think of the scenario where you create a TinyEditor documents reader; it will be mandatory besides the document type that you’ll define to also create a new imported UTI entry so macOS knows that this app can open tinyeditor files.
Right above I mentioned the phrase “public UTIs”. These are UTIs recognizable by macOS and used publicly by many apps. Take a look at those lists.
Summary
As I said to the beginning of this post, document based applications consist of a separate category on their own, and today we learnt how to create one. Even though lots of features and default behaviour come for free, it’s still up to us as developers to add the missing links in the chain that will end up to a fully working application. In the previous parts we highlighted important aspects, we met new concepts, and we saw how various objects are connected to each other.
We also went a step further beyond the basics; we added support for an additional file type and we witnessed how things easily worked by doing just a few modifications at the proper spots of the app. Finally, we talked about a few, yet important things about document types and UTIs. I hope all these become valuable in your macOS programming learning journey. Feel free to extend or modify the demo application in any way you like, and don’t stop experimenting. There is more about document based apps besides the few we met here, but that’s up to you to explore. Now you’ve been shown the way!
For reference, you can download the complete project on GitHub.


