

Earlier, we explored the use of UIViewRepresentable and show you how to integrate UITextView into a SwiftUI project. While you can use the UIViewRepresentable protocol to wrap a UIKit view, but how about a view controller? You probably need to use camera or access the user’s photo library in your app. So, how can use integrate the UIImagePickerController class into your SwiftUI view?
In this tutorial, we will walk you through the integration by using the UIViewControllerRepresentable protocol. It’s very similar to the UIViewRepresentable protocol, but UIViewControllerRepresentable is designed for wrapping a UIKit view controller. If you have already read the tutorial on UIViewRepresentable, all the procedures that we are going to discuss should be very familiar to you.
Working with UIViewControllerRepresentable
Basically, to integrate UIImagePickerController in the SwiftUI project, you can wrap the controller using the UIViewControllerRepresentable protocol and implement the required methods:
struct ImagePicker: UIViewControllerRepresentable {
    func makeUIViewController(context: UIViewControllerRepresentableContext<ImagePicker>) -> UIImagePickerController {

        // Return an instance of UIImagePickerController
    }

    func updateUIViewController(_ uiViewController: UIImagePickerController, context: UIViewControllerRepresentableContext<ImagePicker>) {

    }
}
The protocol has two methods that you need to conform to. The makeUIViewController method is called when the ImagePicker is initialized. In the method, you are required to instantiate the UIImagePickerController and configure its initial state. For the updateUIViewController method, it is called when the state of the app changes, which affect the image picker. You can implement the method to update the configuration of the image picker controller. This is completely optional. If there is nothing to update, you can leave the method blank.
Creating an ImagePicker in SwiftUI
As always, I love to illustrate an API by building a demo. Let’s create a new project named SwiftUIImagePicker using the Single View Application template. Just make sure you select SwiftUI for the User Interface option.
Next, we will create a new file for ImagePicker. Right click SwiftUIImagePacker folder in the project navigator and choose New File…. Select the Swift File template. First, we need to import both UIKit and SwiftUI frameworks:
import UIKit
import SwiftUI
Next, create the ImagePicker struct and adopt the UIViewControllerRepresentable protocol:
struct ImagePicker: UIViewControllerRepresentable {

    var sourceType: UIImagePickerController.SourceType = .photoLibrary

    func makeUIViewController(context: UIViewControllerRepresentableContext<ImagePicker>) -> UIImagePickerController {

        let imagePicker = UIImagePickerController()
        imagePicker.allowsEditing = false
        imagePicker.sourceType = sourceType

        return imagePicker
    }

    func updateUIViewController(_ uiViewController: UIImagePickerController, context: UIViewControllerRepresentableContext<ImagePicker>) {

    }
}
The UIImagePickerController class allows you to access the photo library and use the built-in camera. In the code above, we declare a sourceType variable for this purpose. By default, it’s set to open the user’s photo library. In the makeUIViewController method, we instantiate the instance of UIImagePickerController and configure its source type.
Loading the Photo Library in SwiftUI Views with ImagePicker
Now that we have created the ImagePicker, let’s see how to use it in a SwiftUI view. Switch over to ContentView.swift and update the ContentView struct like this:
struct ContentView: View {
@State private var isShowPhotoLibrary = false
@State private var image = UIImage()
var body: some View {
VStack {
Image(uiImage: self.image)
.resizable()
.scaledToFill()
.frame(minWidth: 0, maxWidth: .infinity)
.edgesIgnoringSafeArea(.all)
Button(action: {
self.isShowPhotoLibrary = true
}) {
HStack {
Image(systemName: "photo")
.font(.system(size: 20))
Text("Photo library")
.font(.headline)
}
.frame(minWidth: 0, maxWidth: .infinity, minHeight: 0, maxHeight: 50)
.background(Color.blue)
.foregroundColor(.white)
.cornerRadius(20)
.padding(.horizontal)
}
}
}
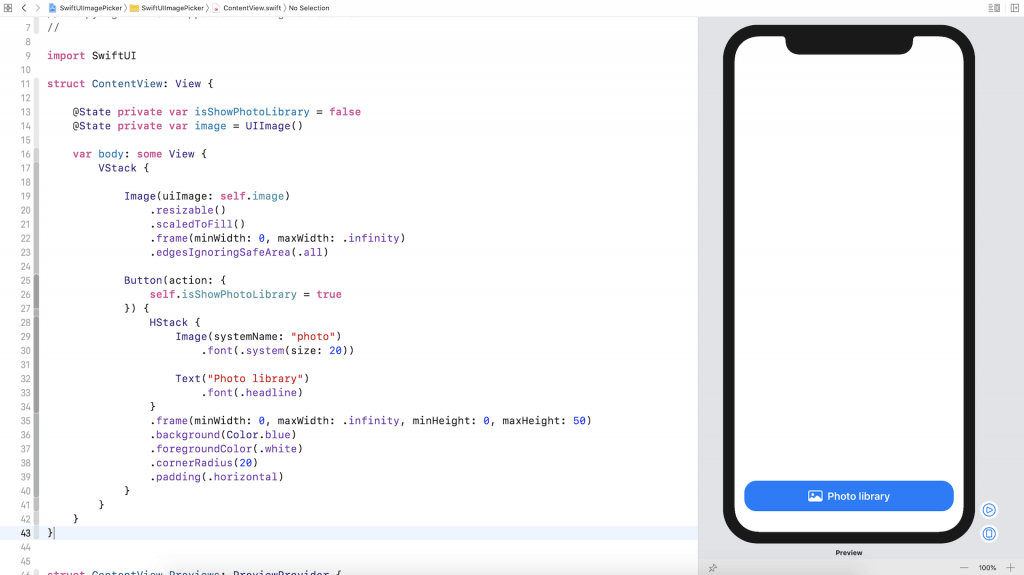
}We have one state variable to control the appearance of the photo library and the other one for the selected image. By default, the selected image is set to a blank image. In the view, we have a button to change the state of isShowPhotoLibrary. If you have written the code correctly, you should see something like this in the preview:
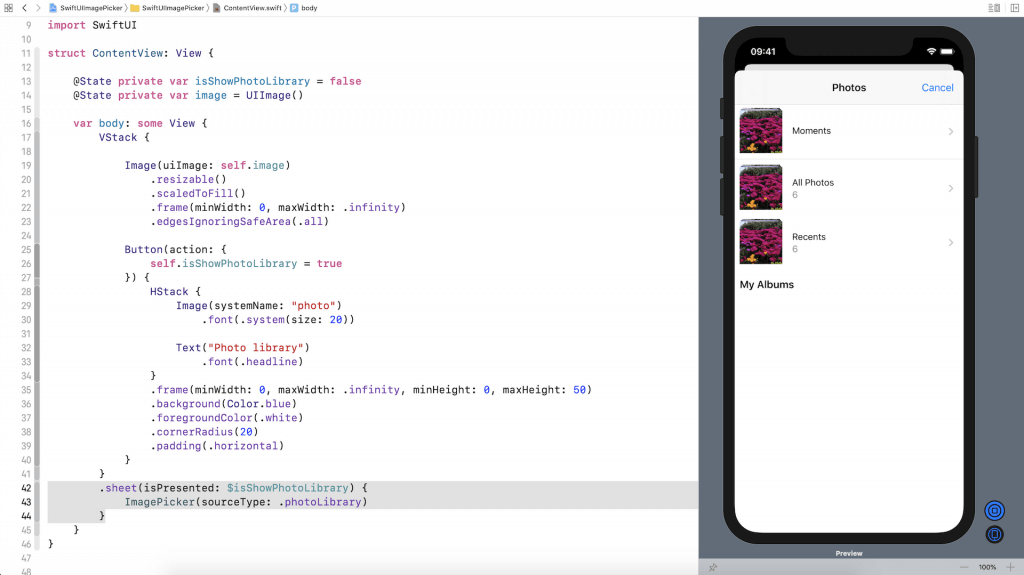
To use the ImagePicker for loading the photo library, attach the .sheet modifier to the VStack like this:
.sheet(isPresented: $isShowPhotoLibrary) {
    ImagePicker(sourceType: .photoLibrary)
}
In the closure, we create the ImagePicker and present the photo library when a user tap the Photo Library button. Run the app in the preview canvas. You should be able to open the photo library.
Using Coordinator to Adopt the UIImagePickerControllerDelegate Protocol
Right now, the content view doesn’t have any idea about the selected image. When you select a photo in the library, the app just dismisses the photo library view and return to the main screen.
If you’ve use UIImagePickerController before, you know you have to adopt two delegates: UIImagePickerControllerDelegateand UINavigationControllerDelegate in order to interact with the image picker controller. When a user chooses a photo from the photo library, the imagePickerController(_:didFinishPickingMediaWithInfo:) method of the delegate is called.
func imagePickerController(_ picker: UIImagePickerController, didFinishPickingMediaWithInfo info: [UIImagePickerController.InfoKey : Any]) {

}
By implementing the method, we can get the selected photo from the method’s parameter. To adopt the protocol in ImagePicker, we have to implement the makeCoordinator method and provide a Coordinator instance. This Coordinator acts as a bridge between the controller’s delegate and SwiftUI.
Now go back to ImagePicker.swift and declare two variables like this:
@Binding var selectedImage: UIImage
@Environment(\.presentationMode) private var presentationMode
As the name suggests, the selectedImage variable is used to store the selected image. After a user selects a photo, we need to dismiss the photo library. To do that, the presentationMode variable is for this purpose. Later, we can call presentationMode.wrappedValue.dismiss() to dismiss the view.
Next, create the Coordinator class inside ImagePicker like this:
final class Coordinator: NSObject, UIImagePickerControllerDelegate, UINavigationControllerDelegate {

    var parent: ImagePicker

    init(_ parent: ImagePicker) {
        self.parent = parent
    }

    func imagePickerController(_ picker: UIImagePickerController, didFinishPickingMediaWithInfo info: [UIImagePickerController.InfoKey : Any]) {

        if let image = info[UIImagePickerController.InfoKey.originalImage] as? UIImage {
            parent.selectedImage = image
        }

        parent.presentationMode.wrappedValue.dismiss()
    }
}
The Coordinator class adopts the UIImagePickerControllerDelegate protocol and implements the imagePickerController(_:didFinishPickingMediaWithInfo:) method of the delegate. The method will be called when an image is selected. In the method, we retrieve the selected image and then dismiss the photo library.
The init method takes in an instance of ImagePicker, so that we can pass it the selected image and use its presentationMode to dismiss the view.
Now that we’ve prepared the Coordinator class, the next step is to create the makeCoordinator method and return an instance of Coordinator:
func makeCoordinator() -> Coordinator {
    Coordinator(self)
}
Lastly, we need to assign the coordinator as the delegate of UIImagePickerController. In the makeUIViewController method, insert the following line of code:
imagePicker.delegate = context.coordinatorBefore you can test the change, switch over to ContentView.swift and update the code in the .sheet modifier:
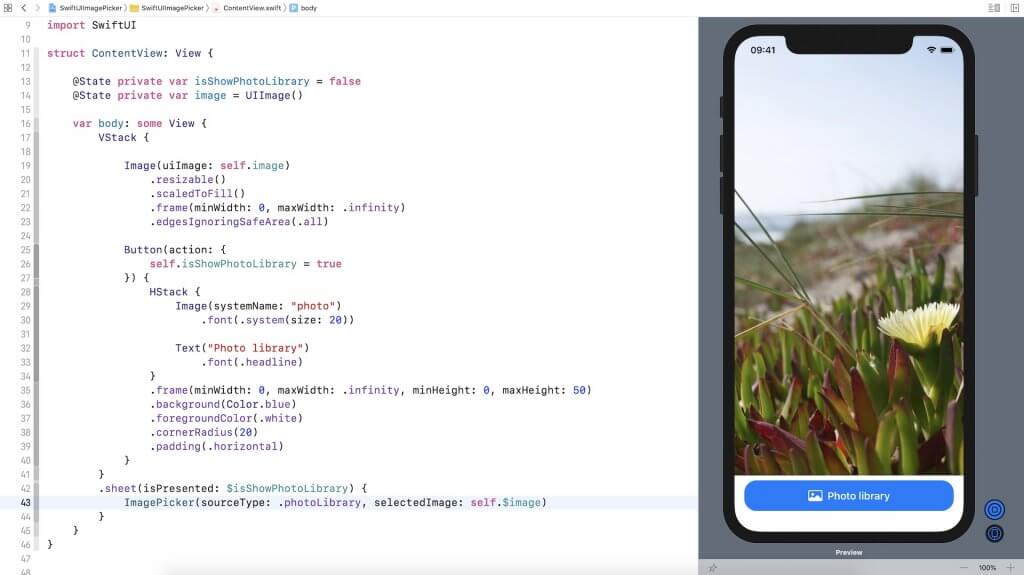
.sheet(isPresented: $isShowPhotoLibrary) {
    ImagePicker(sourceType: .photoLibrary, selectedImage: self.$image)
}
We have to pass the binding of image so that the ImagePicker can pass the user’s selected image for display. Now run the app in a simulator or in the preview canvas. The app is now capable to display the selected image.
Using Camera in SwiftUI
The ImagePicker is flexible enough to support the built-in camera. If you want to open the camera for taking photo in your SwiftUI app, you can change the sourceType from .photoLibray to .camera like this:
ImagePicker(sourceType: .camera, selectedImage: self.$image)In iOS, the user must explicitly grant permission for each app to access cameras. On top of the change above, you also need to edit the Info.plist file and specify the reason why your app needs to use the built-in camera.

You can’t test this option using the simulator. But if you have an iPhone, you can deploy the app to the device and try it out.
Summary
In this tutorial, I’ve walked you through the UIViewControllerRepresentable protocol, which acts as a bridge between view controllers in UIKit and SwiftUI views. By using the protocol, we integrated UIImagePickerController into a SwiftUI project, allowing the application to access the photo library and the device’s camera.
SwiftUI is still a very new framework, so not all UIKit components are available in the framework. In case you can’t find a native UI component in SwiftUI, you can apply this technique to bring the UIKit component to your SwiftUI project.
For reference, you can download the full project on GitHub.


