

Update: The post has been updated to support Xcode 5 and iOS 7.
In the previous post we covered how to create a simple camera app. In this post, we’re going to create a similar application but for video recording and playback.
The iOS API for recording and playing videos can be a little bit confusing for newcomers, as there are several options available. If you just want to play a video, you can use the MediaPlayer framework, which allows us to play a video stored locally in our device, or from a remote location. However, if you need advanced features such as media asset management, media editing, track management, and others, you have to use the AVFoundation framework. We’ll keep thing simple and start off by covering the MediaPlayer framework.
On top of that, the MediaPlayer framework brings us two main classes to display videos or movies. If you want to display a video immediately and inline (e.g. a subview smaller than the full screen), you should use the MPMoviePlayerController. By using MPMoviePlayerController, playback occurs in a view owned by the movie player. You can incorporate a movie player’s view into a view owned by your app. On the contrary, if you want to play a full screen video, for example by presenting the video modally, you should use the MPMoviePlayerViewController class. The MPMoviePlayerViewController class is designed to present a simple view controller for displaying full-screen movies.
In this tutorial, we will focus on the MPMoviePlayerController. If you grasp the basics, however, you should have no problem utilizing the MPMoviePlayerViewController class.
Demo App Overview
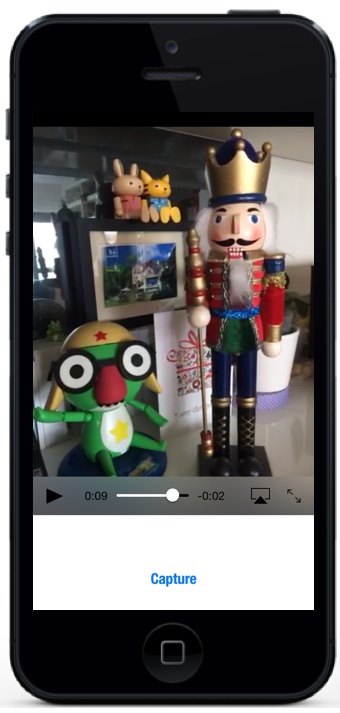
Like any other tutorials, we’ll build a simple demo app to walk you through the concept. The demo app is very simple without fancy user interface. Once opened, the app displays a screen with a single “Capture” button. When you tap the button, it’ll bring up the video camera for video recording. Once finished the recording, the video is automatically shown in the main screen. Users are allowed to play back the video inline. Pretty simple, right?
Creating Xcode Project
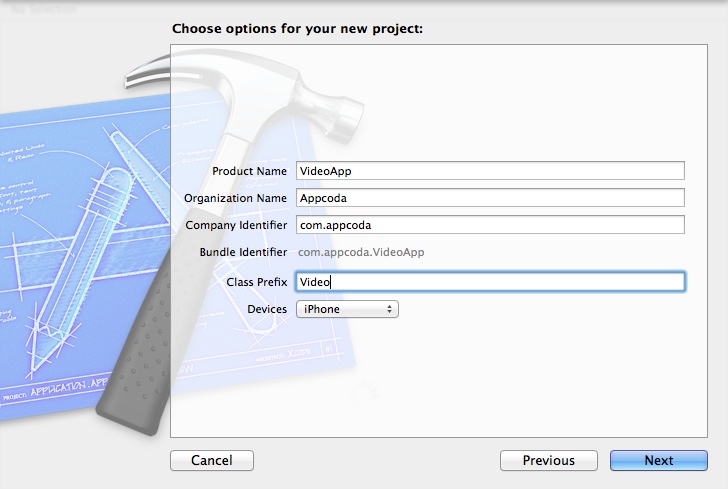
Open Xcode and create a new Project, choose the Single View Application template. Name the project as VideoApp and set the class prefix as Video. Click next to create and save the project.
Designing User Interface
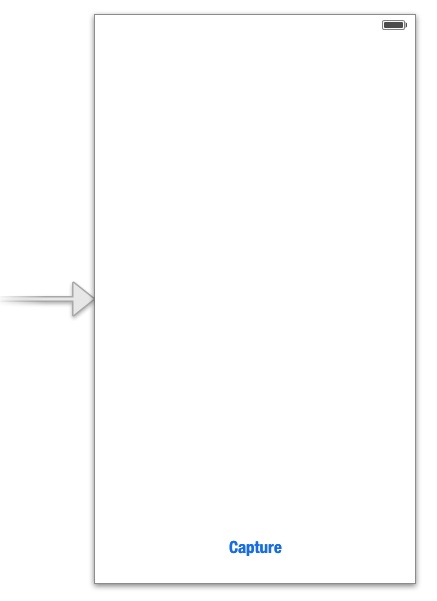
Next, let’s design the user interface of the app. Go to the Main.storyboard. Add a button and place it at the bottom of the screen centered. Change its title to “Capture”. Your design should look like below.
Again, the next thing to do is to establish a connection between the Capture button and code. In order to do that, switch to the Assistant Editor mode. Create an action method in the VideoViewController.h for the Capture button. Name the method as “captureVideo”.

Implementing the VideoViewController
Open the VideoViewController.h file and add the following code to include the necessary header files:
#import
#import
In the previous tutorial, we use the UIImagePickerController class to take static photo. The same class is also capable to capture video. If you’re not forgetful, you should still remember how to use UIImagePickerController. Here, the VideoViewController has to implement both the UIImagePickerControllerDelegate and UINavigationControllerDelegate protocols.
On top of that, we’ll add two properties (videoURL and videoController) in the VideoViewController.h. The videoURL property stores the URL of the current video, while the videoController property is dedicated for video play back.
If you did everything correctly, your VideoViewController.h file should be something like below:
#import
#import
#import

@interface VideoViewController : UIViewController

@property (strong, nonatomic) NSURL *videoURL;
@property (strong, nonatomic) MPMoviePlayerController *videoController;

- (IBAction)captureVideo:(id)sender;

@end
Implementing Picker Controller for Video Recording
When the user taps the “Capture” button, the captureVideo: method is called. This method is responsible to create, configure and display the image picker for video recording. We’ll implement the method using the below code:
- (IBAction)captureVideo:(id)sender {
    if ([UIImagePickerController isSourceTypeAvailable:UIImagePickerControllerSourceTypeCamera]) {

        UIImagePickerController *picker = [[UIImagePickerController alloc] init];
        picker.delegate = self;
        picker.allowsEditing = YES;
        picker.sourceType = UIImagePickerControllerSourceTypeCamera;
        picker.mediaTypes = [[NSArray alloc] initWithObjects: (NSString *) kUTTypeMovie, nil];

        [self presentViewController:picker animated:YES completion:NULL];
    }
}
If you’ve read the previous tutorial, you should have a basic idea of UIImagePickerController. The above code shouldn’t be new to you. It’s almost the same as the one we use for taking photo, except that we set the picker’s media types to kUTTypeMovie. Depending on the media types, the picker displays different interface for photos or videos. By default the media type is set to kUTTypeImage, which designates the photo camera interface. As we need the picker to launch the video capture interface, we set the media type to kUTTypeMovie.
Implementing Video Playback
Once user finishes recording and confirm to save the video, the app will automatically play back the video in the main screen. In order to implement the video playback, there are a few things to be done:
- Get the system URL of the video just captured
- Remove the UImagePickerController
- Play the video by using the MPMoviePlayerController class, which is a built-in class for the playback of a video from a file (or a network stream)
As you know, the didFinishPickingMediaWithInfo: method will be called when user confirms to use the video. The file URL of the video is bundled in the info parameter. So in this method, we first get the URL of the video (please note that this video is not saved in the photo library unless we do it explicitly). Secondly, we dismiss the picker. Lastly, we instantiate the MPMoviePlayerController class and pass it with the video URL for playback. We also change the size of the view to leave some free space for the “Capture” button. And finally, we present the view and play the video.
- (void)imagePickerController:(UIImagePickerController *)picker didFinishPickingMediaWithInfo:(NSDictionary *)info {

    self.videoURL = info[UIImagePickerControllerMediaURL];
    [picker dismissViewControllerAnimated:YES completion:NULL];

    self.videoController = [[MPMoviePlayerController alloc] init];

    [self.videoController setContentURL:self.videoURL];
    [self.videoController.view setFrame:CGRectMake (0, 0, 320, 460)];
    [self.view addSubview:self.videoController.view];

    [self.videoController play];

}
There is still one thing left. We should implement the imagePickerControllerDidCancel: method. We mentioned this method in the previous chapter. The method is invoked when user cancels the video recording. In this case, we simply dismiss the picker.
- (void)imagePickerControllerDidCancel:(UIImagePickerController *)picker {

    [picker dismissViewControllerAnimated:YES completion:NULL];

}
Compile and Test the App
OK, it is time to compile and test our application. Like the Camera app we developed in the previous chapter, you can’t test it using the built-in iPhone Simulator. You have to use a real device for the testing as the iPhone simulator doesn’t have a camera.
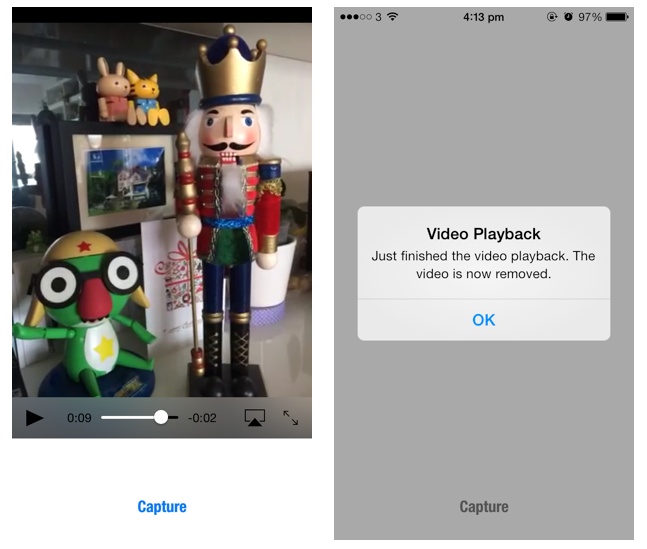
If you compile and run the app on your iPhone, you should be able to bring up the video camera interface after tapping the “Capture” button. Once capturing the video, it’s automatically played back in the main screen.
Using the Movie Player Notifications
A nice feature of the MPMoviePlayerController is that it has a collection of notifications that we can use to control the video playback. For example, when the video has finished playing, the MPMoviePlayerPlaybackDidFinishNotification will be sent. Add the following code to the didFinishPickingMediaWithInfo: method, just before the [self.videoController play] statement:
[[NSNotificationCenter defaultCenter] addObserver:self
                                             selector:@selector(videoPlayBackDidFinish:)
                                                 name:MPMoviePlayerPlaybackDidFinishNotification
                                               object:self.videoController];
You may be new to NSNotificationCenter. Simply think of it as a centralized hub of notifications within an app. Through it, any part of your app can notify or be notified by other parts of the app. In the above code, it tells the NSNotificationCenter to listen for the MPMoviePlayerPlaybackDidFinishNotification and calls up the videoPlayBackDidFinish: method accordingly.
In this case, the videoPlayBackDidFinish: method will stop the video, remove its view and display an alert message. Of course, we’ll remove the notification. Otherwise, it will be called twice! Add the following code in the VideoAppController.m:
- (void)videoPlayBackDidFinish:(NSNotification *)notification {

    [[NSNotificationCenter defaultCenter]removeObserver:self name:MPMoviePlayerPlaybackDidFinishNotification object:nil];

    // Stop the video player and remove it from view
    [self.videoController stop];
    [self.videoController.view removeFromSuperview];
    self.videoController = nil;

    // Display a message
    UIAlertView *alert = [[UIAlertView alloc]
                                    initWithTitle:@"Video Playback" message:@"Just finished the video playback. The video is now removed." delegate:nil cancelButtonTitle:@"OK" otherButtonTitles:nil];
    [alert show];

}
Now compile and test the app again. Try to record a video. The app will automatically play back the video but it’s removed the player from the view once the play back completes.
Summary
By now, you should have a better idea about implementing video recording and playback in iOS. The UIImagePickerController makes it simple to bundle video capturing feature in your app. With a few lines of code, you can bring up the built-in video camera and capture video. On the other hand, the MediaPlayer framework provides handy facilities for video or movie playback. The use of framework is not limited to video playback. It allows developers to access the iPod library, play music, podcast and audio book files. So don’t stop here, check out Apple’s official reference to learn more about the framework.
For your complete reference, you can download the source code for the sample Xcode project here.
As always, leave us comment and share your thought about the tutorial.


