Chapter 2
Your First Taste of Swift with Playgrounds

Now that you have configured everything you need to start iOS app development, let me answer another common question from beginners before moving on. A lot of people have asked me about what skills you need in order to develop an iOS app. In brief, it comes down to three areas:
- Learn Swift - Swift is now the recommended programming language for writing iOS apps.
- Learn Xcode - Xcode is the development tool for you to design the app UI, write Swift code, and build your apps.
- Understand the iOS software development kit - Apple provides the software development kit for developers to make our lives simpler. This kit comes with a set of software tools and APIs that empowers you to develop iOS apps. For example, the SwiftUI framework which will discuss in the next chapter is one of the essential frameworks you need to learn for building user interface and animations. If you want to display a web page in your app, the SDK also provides a built-in browser that lets you embed right in your application.
You will have to equip yourself with knowledge on the above three areas. That's a lot of stuff. But no worries. You'll learn the skills as you read through the book.
The Swift History
Let me start off by telling you a bit about the history of Swift.
In the Worldwide Developer Conference 2014, Apple surprised all iOS developers by launching a new programming language called Swift. Swift is advertised as a "fast, modern, safe, interactive" programming language. The language is easier to learn and comes with features to make programming more productive.
Prior to the announcement of Swift, iOS apps were primarily written in Objective-C. The language has been around for more than 30 years and was chosen by Apple as the primary programming language for Mac and iOS development. I've talked to many aspiring iOS developers. A majority of them said Objective-C was hard to learn and its syntax looked weird. Simply put, the code scares some beginners off from learning iOS programming.
The release of Swift programming language is probably Apple's answer to some of these comments. The syntax is much cleaner and easier to read. I have been programming in Swift since its beta release. It's more than 8 years for now. I can say you're almost guaranteed to be more productive using Swift. It definitely speeds up the development process. Once you get used to Swift programming, it would be really hard for you to switch back to Objective-C.
It seems to me that Swift will lure more web developers or even novice to build apps. If you're a web developer with some programming experience on any scripting languages, you can leverage your existing expertise to gain knowledge on developing iOS apps. It would be fairly easy for you to pick up Swift. Being that said, even if you're a total beginner with no prior programming experience, you'll also find the language friendlier and feel more comfortable to develop apps in Swift.
In June 2015, Apple announced Swift 2, and that the programming language goes open source. This is a huge deal. Since then, developers created some interesting and amazing open source projects using the language. Not only can you use Swift to develop iOS apps, companies like IBM developed web frameworks for you to create web apps in Swift. Now you can run Swift on Linux too.
Following the release of Swift 2, Apple introduced Swift 3 in June 2016. This version of the programming language, integrated into Xcode 8, was released in Sep, 2016. This was considered as one of the biggest releases since the birth of the language. There were tons of changes in Swift 3. APIs are renamed and more features were introduced. All these changes helped to make the language even better and enabled developers to write more beautiful code. That said, it took all developers extra efforts to migrate their projects for these breaking changes.
In June 2017, Apple brought you Swift 4, along with the release of Xcode 9, with even more enhancements and improvements. This version of Swift had a focus on backward compatibility. That meant ideally projects developed in Swift 3 could be run on Xcode 9 without any changes. Even if you had to make changes, the migration from Swift 3 to 4 would be much less cumbersome than that from 2.2 to 3.
In the following year, Apple only released a minor update for Swift, pushing Swift's version number to 4.2. Even though it's not a major release, the new version also came with a lot of language features to improve productivity and efficiency.
In late March 2019, Apple officially released Swift 5, which is a major milestone of the programming language. While it includes many new features, the most important change is that the Swift runtime is now included in Apple’s platform operating systems including iOS, macOS, watchOS, and tvOS. Actually, it's a good news for aspiring developers. This means the Swift language is more stable and mature. Everything you learn in this book will apply to the future release of Swift.
This year, the Swift language is further updated to Swift 5.9 with even more features such as macros.
If you're a total beginner, you may have a couple of questions in mind. Why does Swift keep changing? If it keeps updating, is Swift ready for use?
Nearly all programming languages change over time. The same is for Swift. New language features are added to Swift every year to make it more powerful and developer friendly. It is somewhat similar to our spoken languages. Let's say, for English, it still changes over time. New vocabulary and phrases such as freemium are added to the dictionary every year.
All languages change over time, and there can be many different reasons for this. The English language is no different.
Source: https://www.english.com/blog/english-language-has-changed
While Swift keeps evolving, it doesn't mean it is not ready for production use. Instead, if you are going to build an iOS app, you should build it in Swift. It has become a de facto standard for iOS app development. Companies such as LinkedIn, Duolingo and Mozilla had already written apps entirely in Swift since its early versions. Since the release of Swift 4, the programming language is more stable and definitely ready for enterprises and production uses.
Let's Get Started
Enough for the background and history. Let's begin to look into Swift.
To get a taste of Swift programming language, let's take a look at the following code snippets.
Objective-C
const int count = 10;
double price = 23.55;

NSString *firstMessage = @"Swift is awesome. ";
NSString *secondMessage = @"What do you think?";
NSString *message = [NSString stringWithFormat:@"%@%@", firstMessage, secondMessage];

NSLog(@"%@", message);
Swift
let count = 10
var price = 23.55

let firstMessage = "Swift is awesome. "
let secondMessage = "What do you think?"
var message = firstMessage + secondMessage

print(message)
The first block of code was written in Objective-C, while the second one was written in Swift. Which language do you prefer? I guess you would prefer to program in Swift, especially if you're frustrated with the Objective-C syntax. It's clearer and readable. There is no @ sign and semi-colon at the end of each statement. Both statements below concatenate the first and second messages together. I believe you can probably guess the meaning of the following Swift code:
var message = firstMessage + secondMessage
but find it a bit confusing for the Objective-C code below:
NSString *message = [NSString stringWithFormat:@"%@%@", firstMessage, secondMessage];
Trying out Swift in Playgrounds
I don't want to bore you by just showing you the code. There is no better way to explore coding than actually writing code. Xcode has a built-in feature called Playgrounds. It's an interactive development environment for developers to experiment Swift programming and allows you to see the result of your code in real-time. You will understand what I mean and how Swift Playgrounds works in a while.
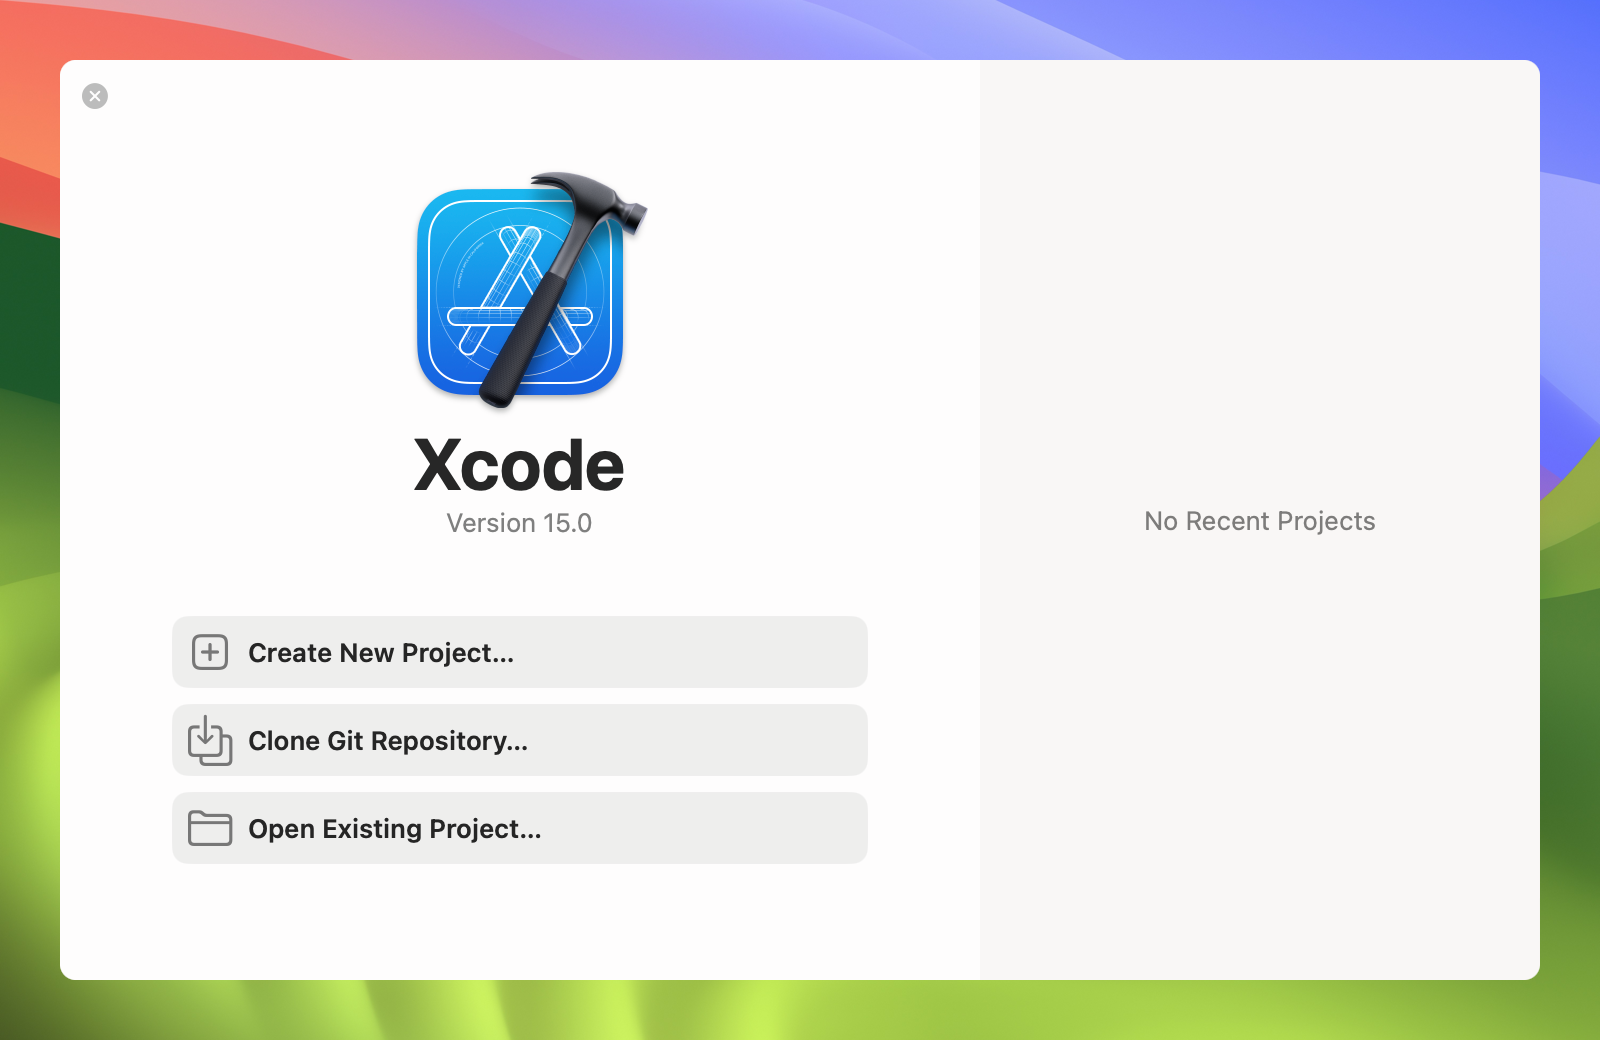
Assuming you've installed Xcode 15 (or up), launch the application (by clicking the Xcode icon in Launchpad). You should see a startup dialog.
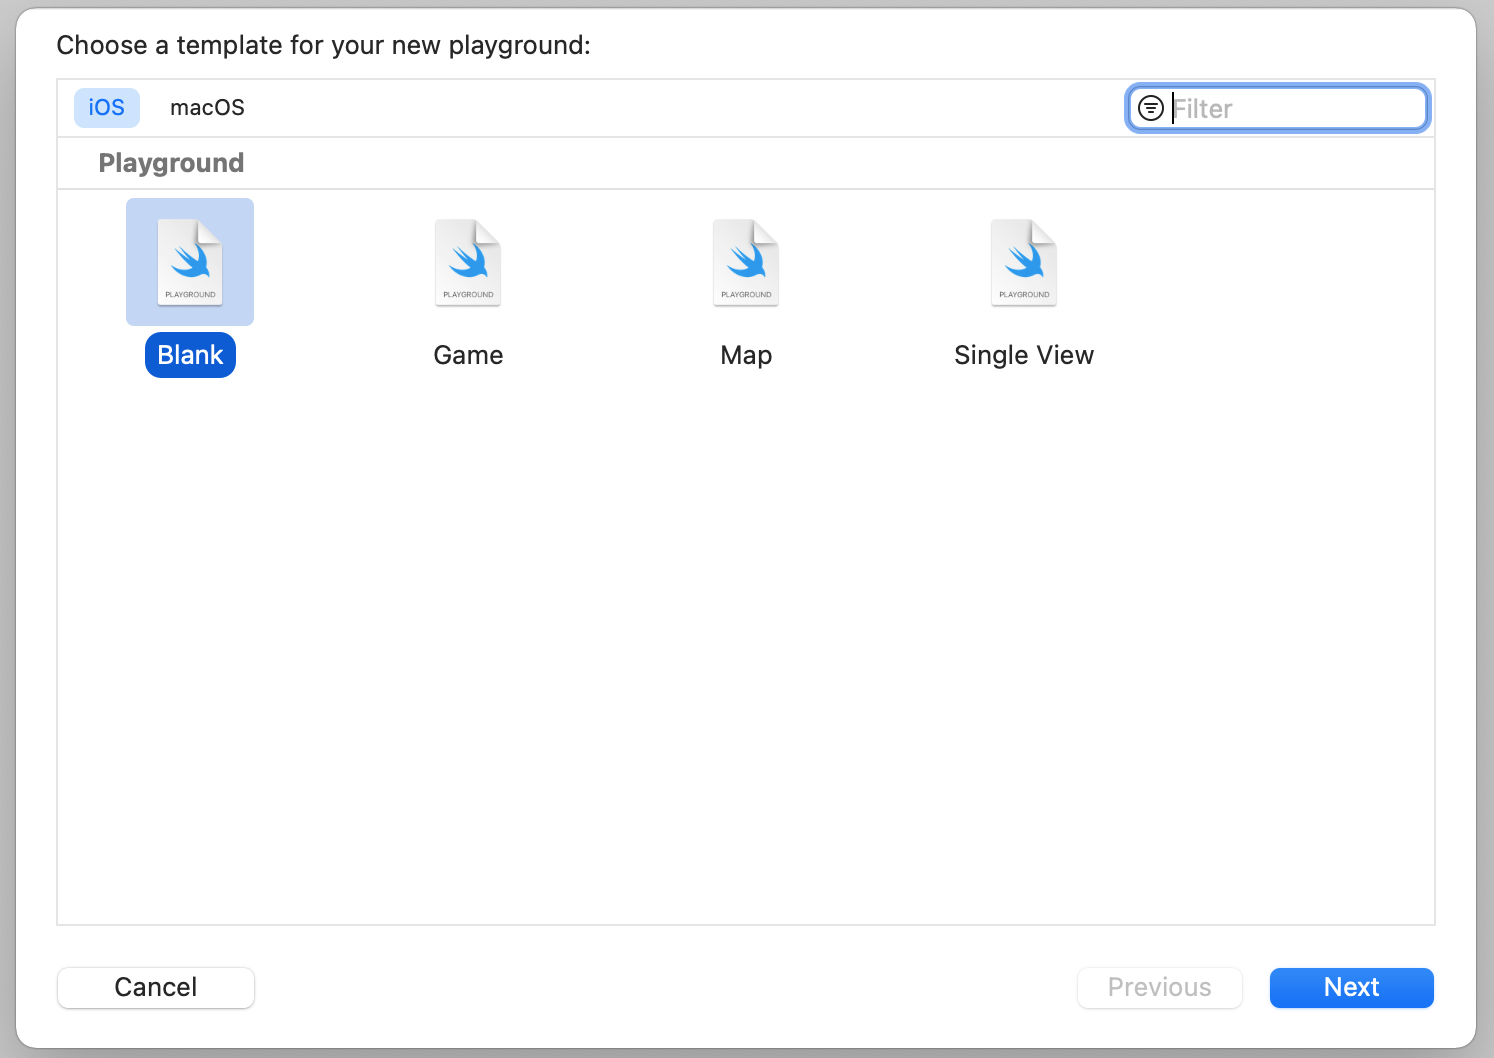
A Playground is a special type of Xcode file. In the top menu, click File > New > Playground... to create a new Playground file. You'll then be prompted to select a template for your playground. Since we focus on exploring Swift in iOS environment, choose Blank under the iOS section to create a blank file. Click Next to continue.
Once you confirm to save the file, Xcode opens the Playground interface. Your screen should like this:
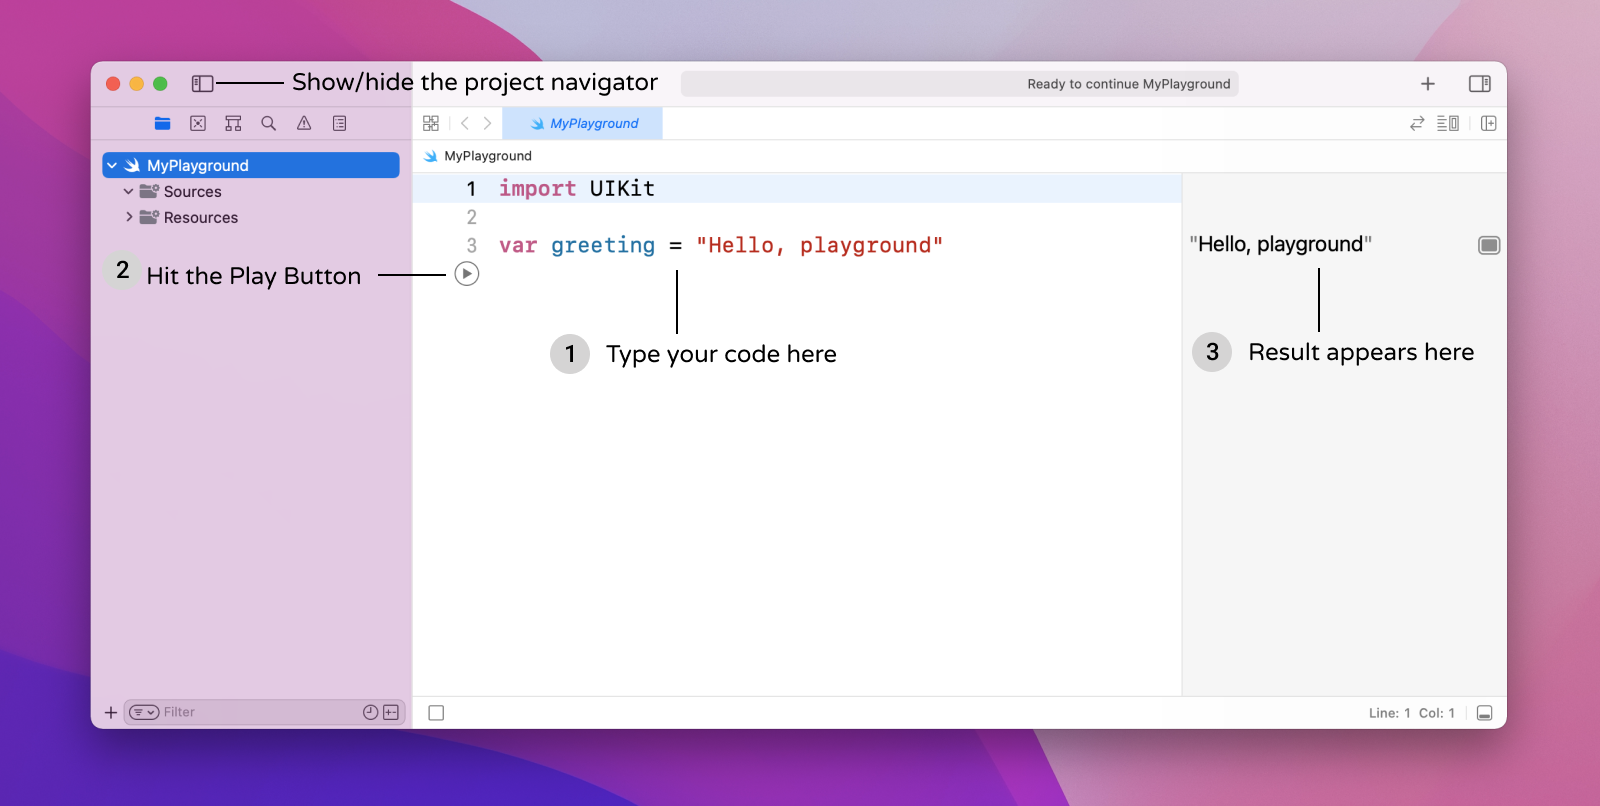 
On the left pane of the screen, it is the editor area where you type the code. When you want to test your code and see how it works, hit the Play button. Playground immediately interprets the code (up to the line of the Play button) and displays the result on the right pane. By default, Swift Playgrounds includes two lines of code. As you can see, the result of the

On the left pane of the screen, it is the editor area where you type the code. When you want to test your code and see how it works, hit the Play button. Playground immediately interprets the code (up to the line of the Play button) and displays the result on the right pane. By default, Swift Playgrounds includes two lines of code. As you can see, the result of the greeting variable appears immediately on the right pane after you hit the Play button at line 4.
We'll write some code in Playgrounds together. Remember the purpose of this exercise is to let you experience Swift programming and learn its basics. I will not cover every feature of Swift. We will only focus on these topics:
- Constants, variables and type inference
- Control flow
- Collection types like arrays and dictionaries
- Optionals
These are the basic topics that you need to know about Swift. You will learn by example. However, I'm quite sure you will be confused by some of the programming concepts, especially you are completely new to programming. No worries. You will find my study advice in some sections. Just follow my advice and keep studying. And, don't forget to take a break when you're stuck.
Cool! Let's get started.
Constants and Variables
Constants and variables are two basic elements in programming. The concept of variables (and constants) is similar to what you learned in Mathematics. Take a look at the equation below:
x = y + 10
Here, both x and y are variables. 10 is a constant, meaning that its value is unchanged.
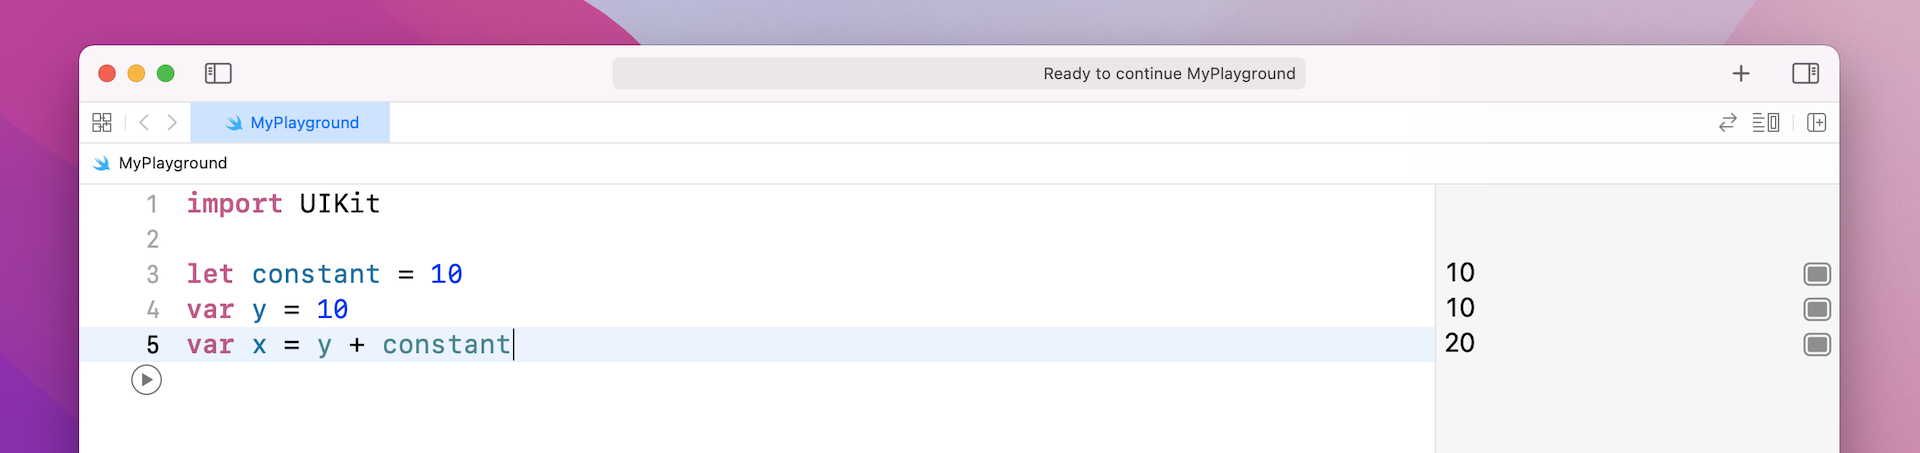
In Swift, you declare variables with the var keyword and constants using the let keyword. If you write the above equation in code, here is what it looks like:
let constant = 10
var y = 10
var x = y + constant
Type the code above in Playgrounds and then hit Play at line 5. You will see the result below.
You can choose whatever name for variables and constants. Just make sure they are meaningful. For example, you can rewrite the same piece of code like this:
let constant = 10
var number = 10
var result = number + constant
To make sure that you clearly understand the difference between constants and variables in Swift, type the following code to change the values of constant and number:
constant = 20
number = 50
After that, press shift+command+enter to execute the code. Other than using the Play button, you can use the shortcut keys to run the code.
You simply set a new value for the constant and variable. But as soon as you change the value of the constant, Xcode gives you an error in the console. Conversely, there is no issue for number.
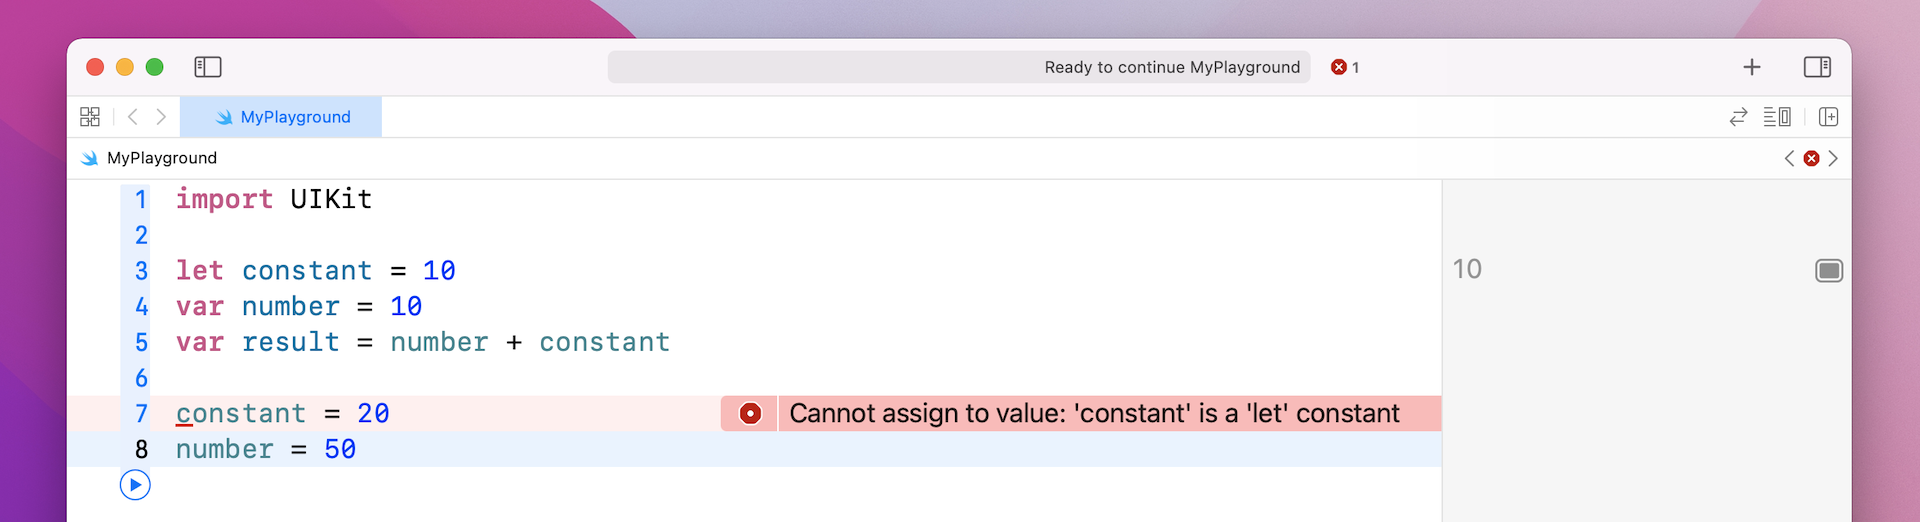
This is the core difference between constants and variables in Swift. Once a constant is initialized with a value, you can't change it. If you have to change the value after initialization, use variables.
Understanding Type Inference
Swift provides developers with a lot of features to write clean-looking code. One feature is known as Type Inference. The same code snippet we just discussed above can be explicitly written as follows:
let constant: Int = 10
var number: Int = 10
var result: Int = number + constant
Each variable in Swift has a type. The keyword Int after colon (:) indicates the type of the variable/constant is an integer. If the value stored is a decimal number, we use the type Double.
var number: Double = 10.5
There are other types like String for textual data and Bool for boolean values (true/false).
Now back to Type Inference, this powerful feature in Swift allows you to omit the type when declaring a variable/constant to make your code look cleaner. The Swift compiler can deduce the type by examining the default value given by you. This is why we can write the code like this earlier:
let constant = 10
var number = 10
var result = number + constant
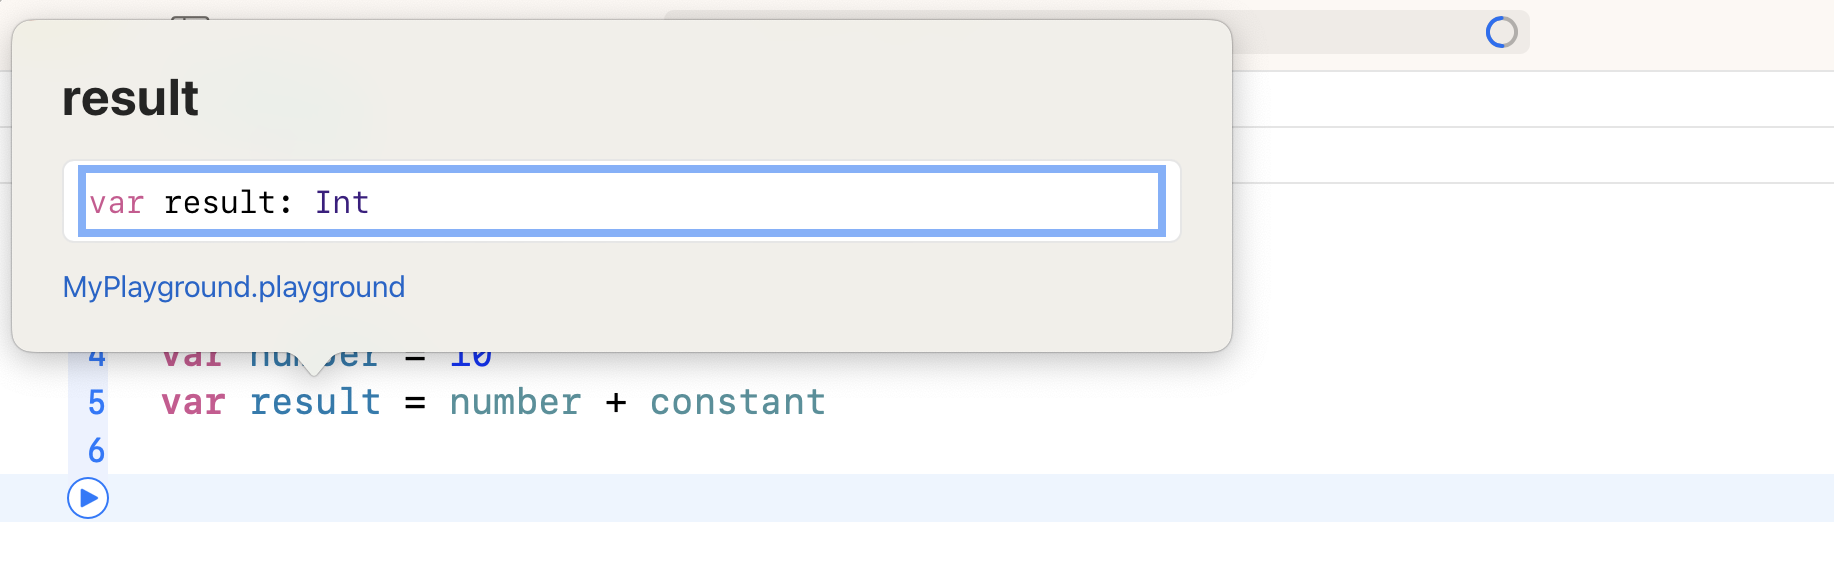
The given value (i.e. 10) is an integer, so the type is automatically set to Int. In Playgrounds, you can hold the option key, and click any variable name to reveal the variable type, deduced by the compiler.
Feeling overwhelmed by all the new programming concept?
Just a take a break. You don't have to go through this chapter without a rest. You can even skip this chapter and read the next one if you can't wait to build your first app. You can always come back to this chapter to study the basics of Swift.
Working with Text
So far, we only work with variables of the type Int and Double. To store textual data in variables, Swift provides a type called String.
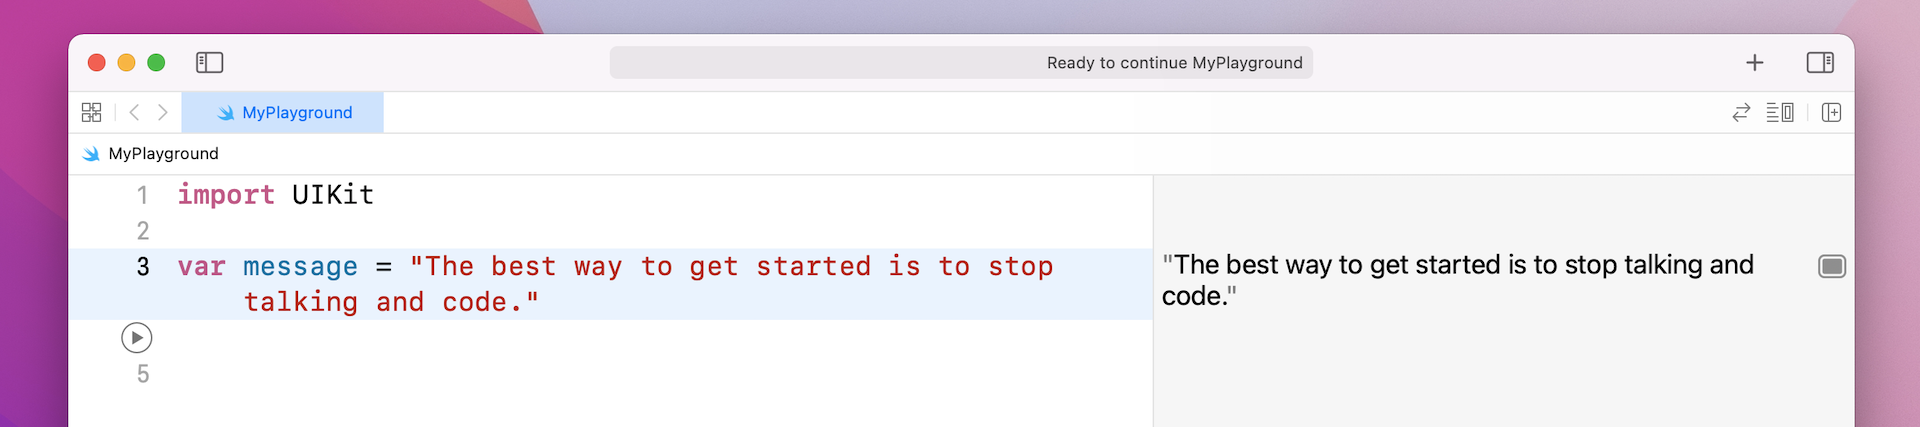
To declare a variable of the type String, you use the var keyword, give the variable a name and assign the variable with the initial text. The text specified is surrounded by double quotes ("). Here is an example:
var message = "The best way to get started is to stop talking and code."
After you key in the line of code above in Playgrounds and hit Play, you will see the result on the right pane.
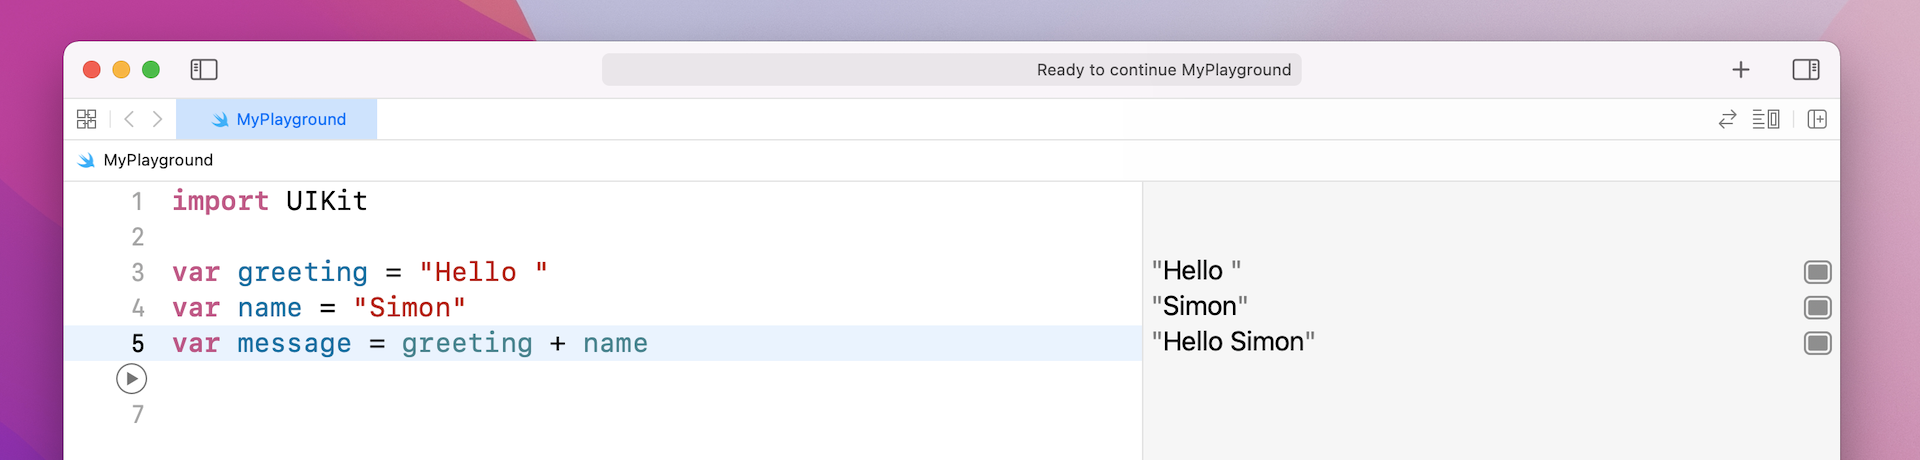
Swift provides different operators and functions (or methods) for you to manipulate strings. For example, you can use the addition (+) operator to concatenate two strings together:
var greeting = "Hello "
var name = "Simon"
var message = greeting + name
What if you want to convert the whole sentence into upper case? Swift provides a built-in method named uppercased() to convert a string to upper case. You can type the following code to have a try:
message.uppercased()
Xcode's editor comes with an auto-complete feature. Auto-complete is a very handy feature to speed up your coding. As soon as you type mess, you'll see an auto-complete window showing some suggestions based on what you have keyed in. All you need to do is to select message and hit enter.
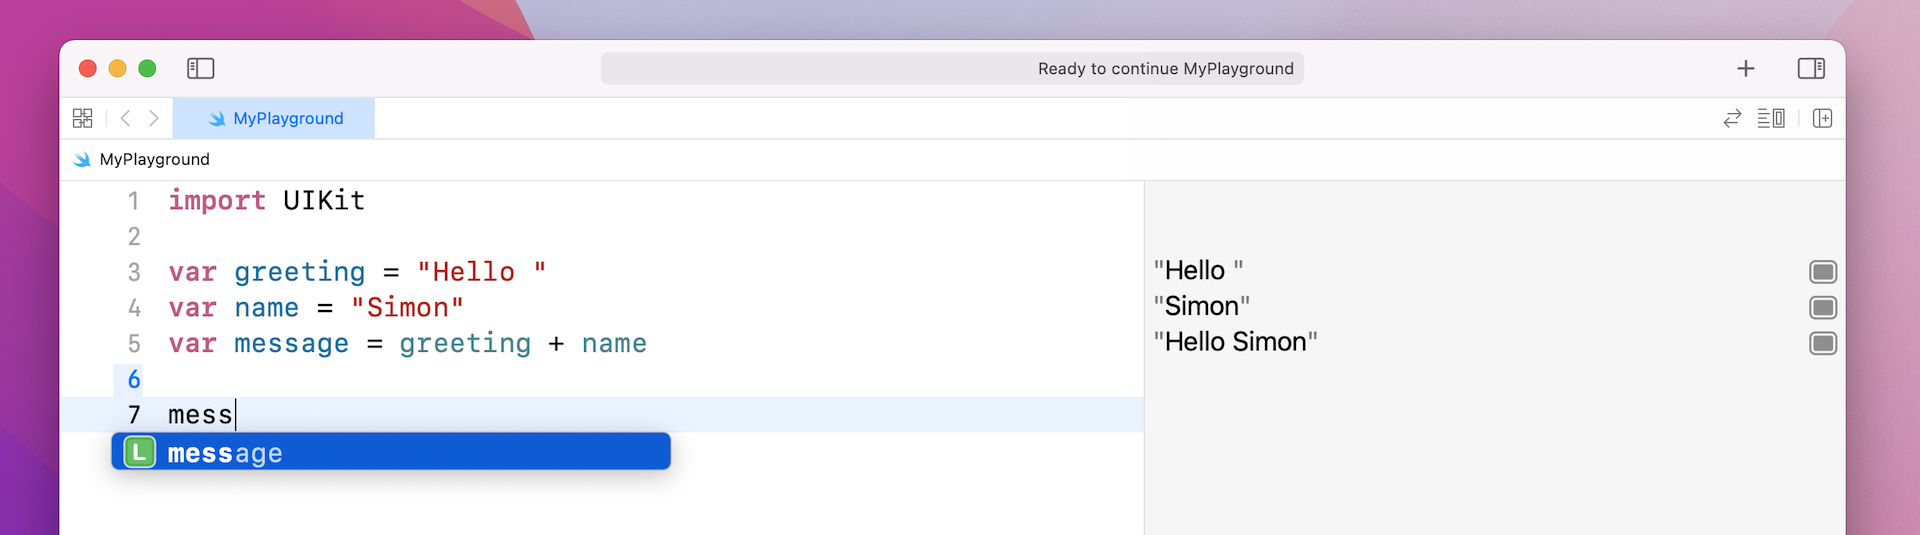 
Swift employs the dot syntax for accessing the built-in methods and the properties of a variable. As you type the dot after

Swift employs the dot syntax for accessing the built-in methods and the properties of a variable. As you type the dot after message, the auto-complete window pops out again. It suggests a list of methods and properties that can be accessed by the variable. You can continue to type uppercase() or select it from the auto-complete window.
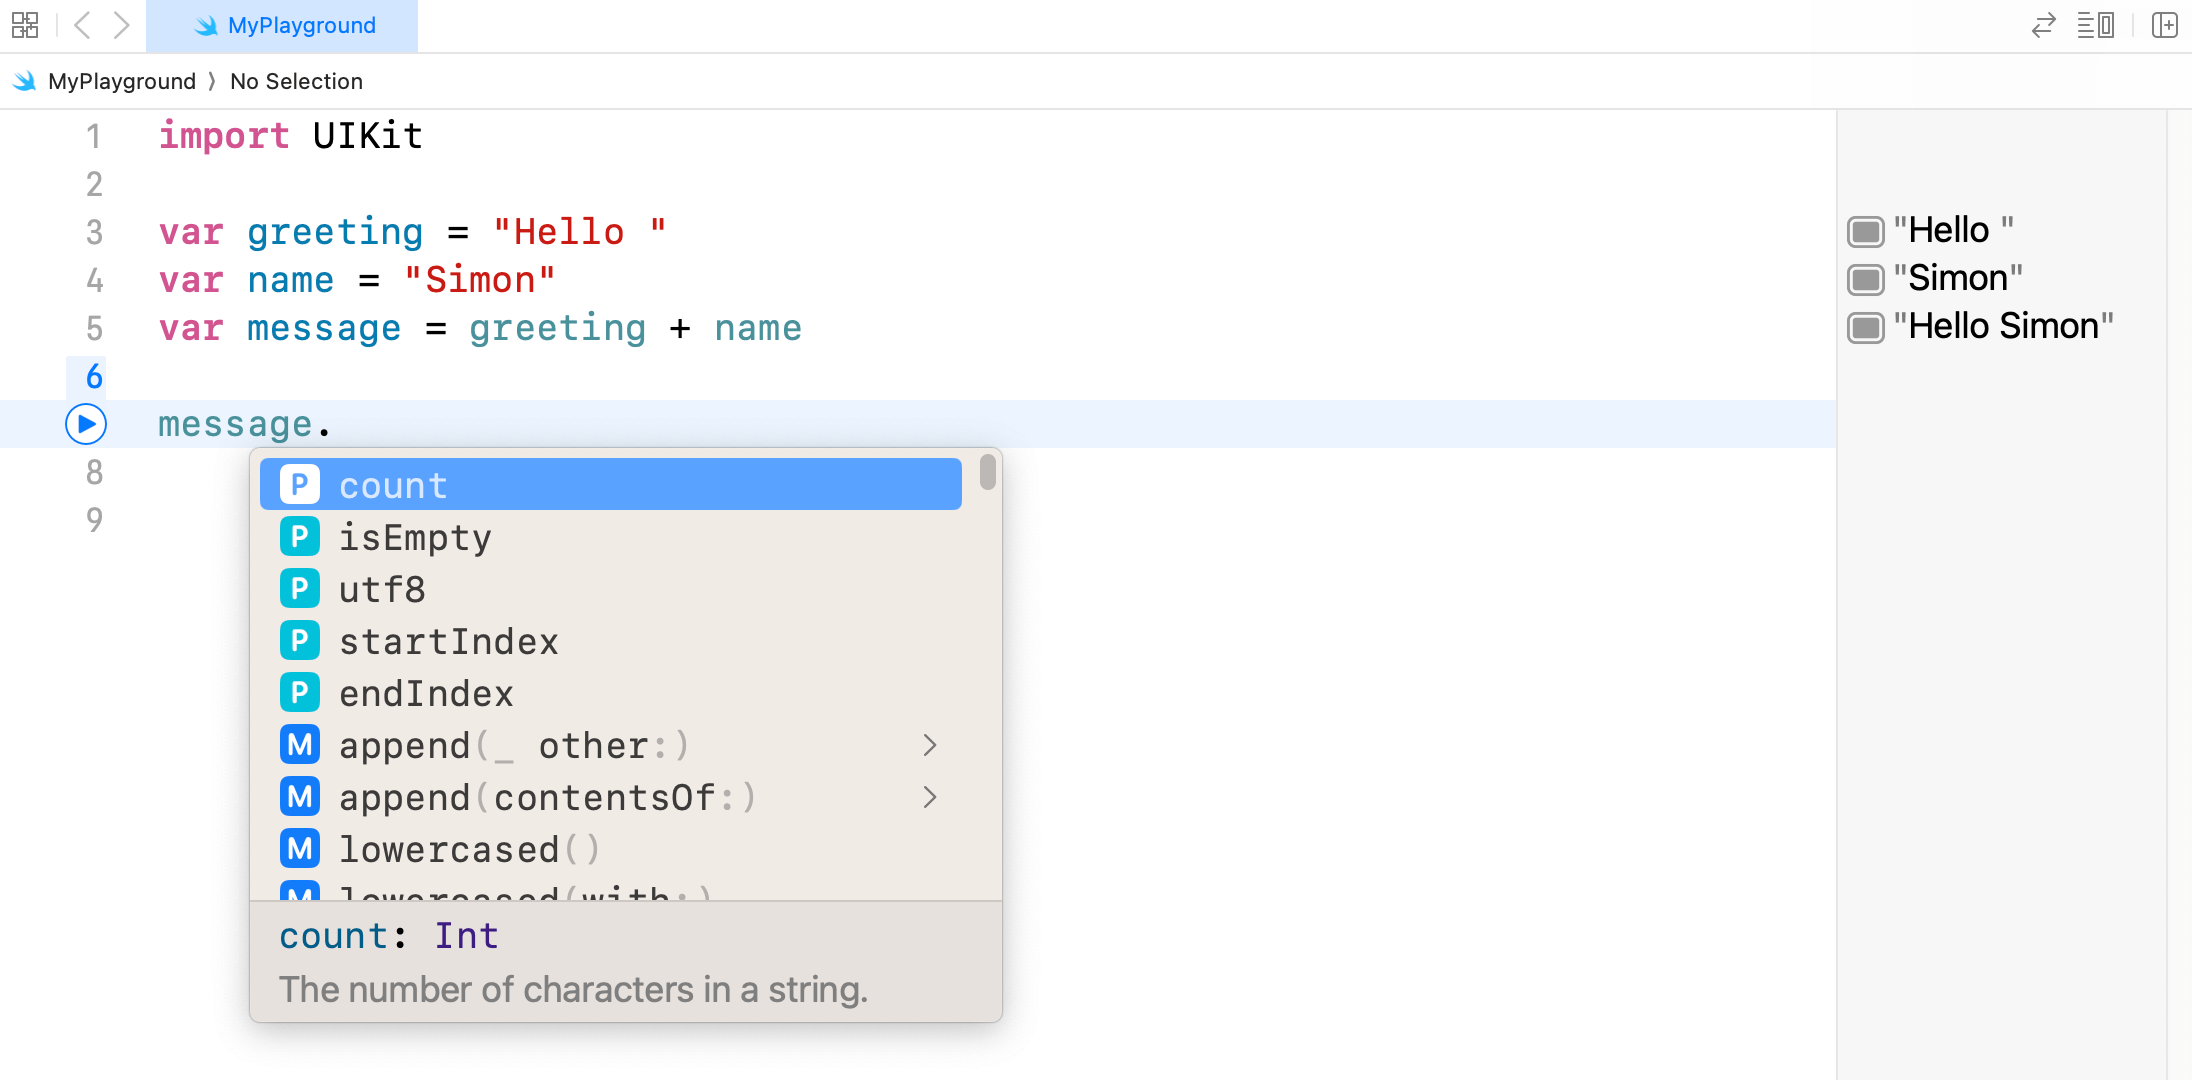 
Once you complete your typing, you would see the output immediately. When we use

Once you complete your typing, you would see the output immediately. When we use uppercased() on message, the content of message is converted to upper case automatically.
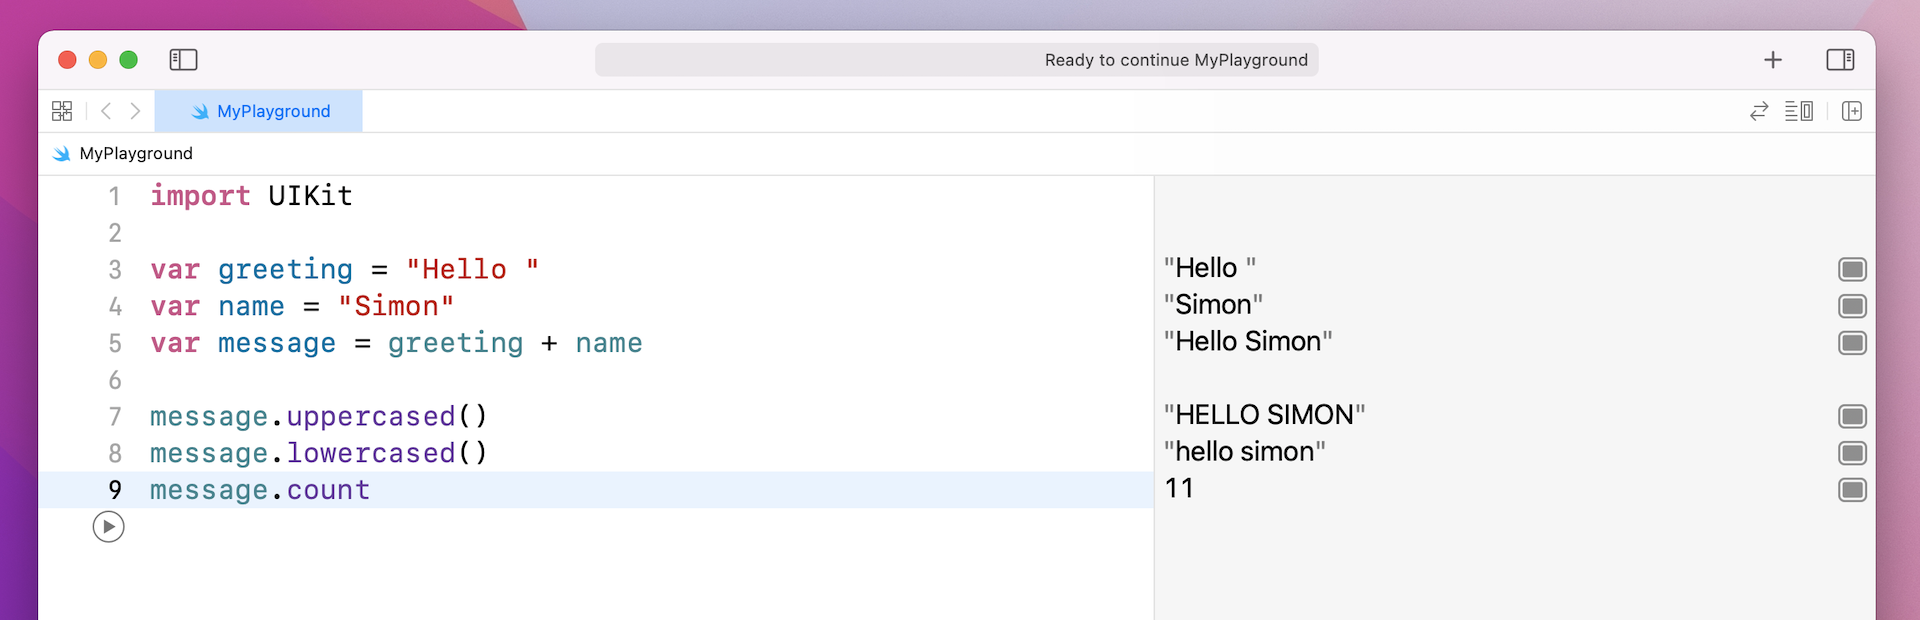
uppercased() is just one of the many built-in functions of a string. You can try to use lowercased() to convert the message to lower case.
message.lowercased()
Or if you want to count the number of characters of the string, you can write the code like this:
message.count
String concatenation looks really easy, right? You just add two strings together using the + operator. However, it is not always trivial. Let's write the following code in Playgrounds:
var bookPrice = 39
var numOfCopies = 5
var totalPrice = bookPrice * numOfCopies
var totalPriceMessage = "The price of the book is $" + totalPrice
It is quite usual to create a string that mixes both a string and a number. In the example above, we calculate the total price of the books, and create a message that shows the total price to the user. If you have typed the code in Playgrounds, you will notice an error.
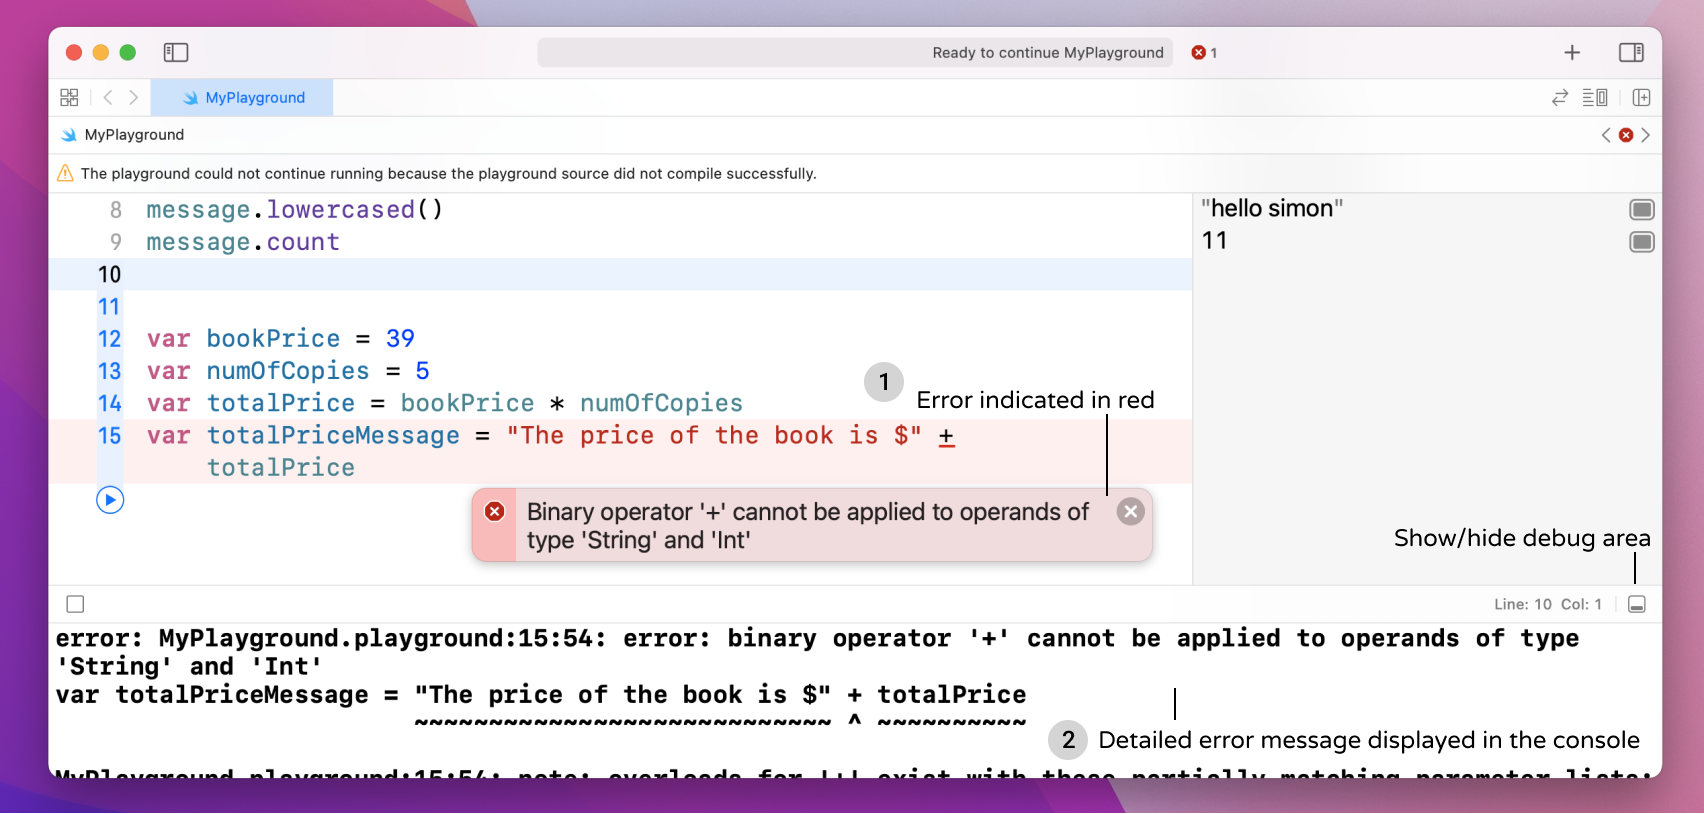
When Xcode finds an error in your code, the error is indicated by a red exclamation mark with a brief error message. Sometimes, Xcode shows you the possible fixes of the errors. But sometimes it does not.
To reveal the error details, you can refer to the debug area/console. If the console doesn't show up in your Playground, click the debug area button at the top-right corner.
Before I show you the solution, do you know why the code doesn't work? Give yourself a few minutes to think about that.
First, always remember that Swift is a type-safe language. This means each variable has a type that specifies what kind of values it can store. Let me ask you: what is the type of totalPrice? Recall what we learned earlier, Swift can determine the type of a variable by examining its value.
Since 39 is an integer, Swift determines that bookPrice has a type of Int, so does numOfCopies and totalPrice.
The error message displayed in the console mentioned that the operator + cannot concatenate a String variable with an Int variable. They must have the same type. In other words, you have to convert totalPrice from Int to String in order to make it work.
You can write the code like this by converting the integer to a string:
var totalPriceMessage = "The price of the book is $" + String(totalPrice)
There is an alternate way known as String Interpolations to do that. You can write the code like this to create the totalPriceMessage variable:
var totalPriceMessage = "The price of the book is $ \(totalPrice)"
String interpolations is the recommended way to build a string from multiple types. You wraps the variable for string conversion in parentheses, prefixed by a backslash.
After making the changes, re-run the code by hitting the Play button. The error should be fixed.
Control Flow Basics
As far as the confidence goes, I think you will appreciate that it is not because you succeeded at everything you did, but because with the help of your friends, you were not afraid to fail. And if you did fail, you got up and tried again. And if you failed again, you got up and tried again. And if you failed again, it might be time to think about doing something else. But it was not just success, but not being afraid to fail that brought you to this point.
- John Roberts, Chief Justice of the United States
Source: http://time.com/4845150/chief-justice-john-roberts-commencement-speech-transcript/
Every day we make numerous decisions. Different decisions lead to different outcomes or actions. For example, you decide if you can wake up at 6AM tomorrow, you will cook yourself a big breakfast. Otherwise, you will go out for breakfast.
When writing programs, you use if-then and if-then-else statements to examine a condition and determine what to do next. If you turn the example above into code, it will be like this:
var timeYouWakeUp = 6

if timeYouWakeUp == 6 {
    print("Cook yourself a big breakfast!")
} else {
    print("Go out for breakfast")
}
You declare a variable timeYouWakeUp to store the time (in 24-hour) you wake up. You use if statement to evaluate a condition and determine what to next. The condition is placed after the if keyword. Here we compare the value of timeYouWakeUp to see if it equals 6. The == operator is used for comparison.
If timeYouWakeUp does match 6, the actions (or statements) enclosed in the curly brackets are executed. In the code, we simply use the print function to print a message to console.
Otherwise, the statements specified in the else block will be run to print another message.
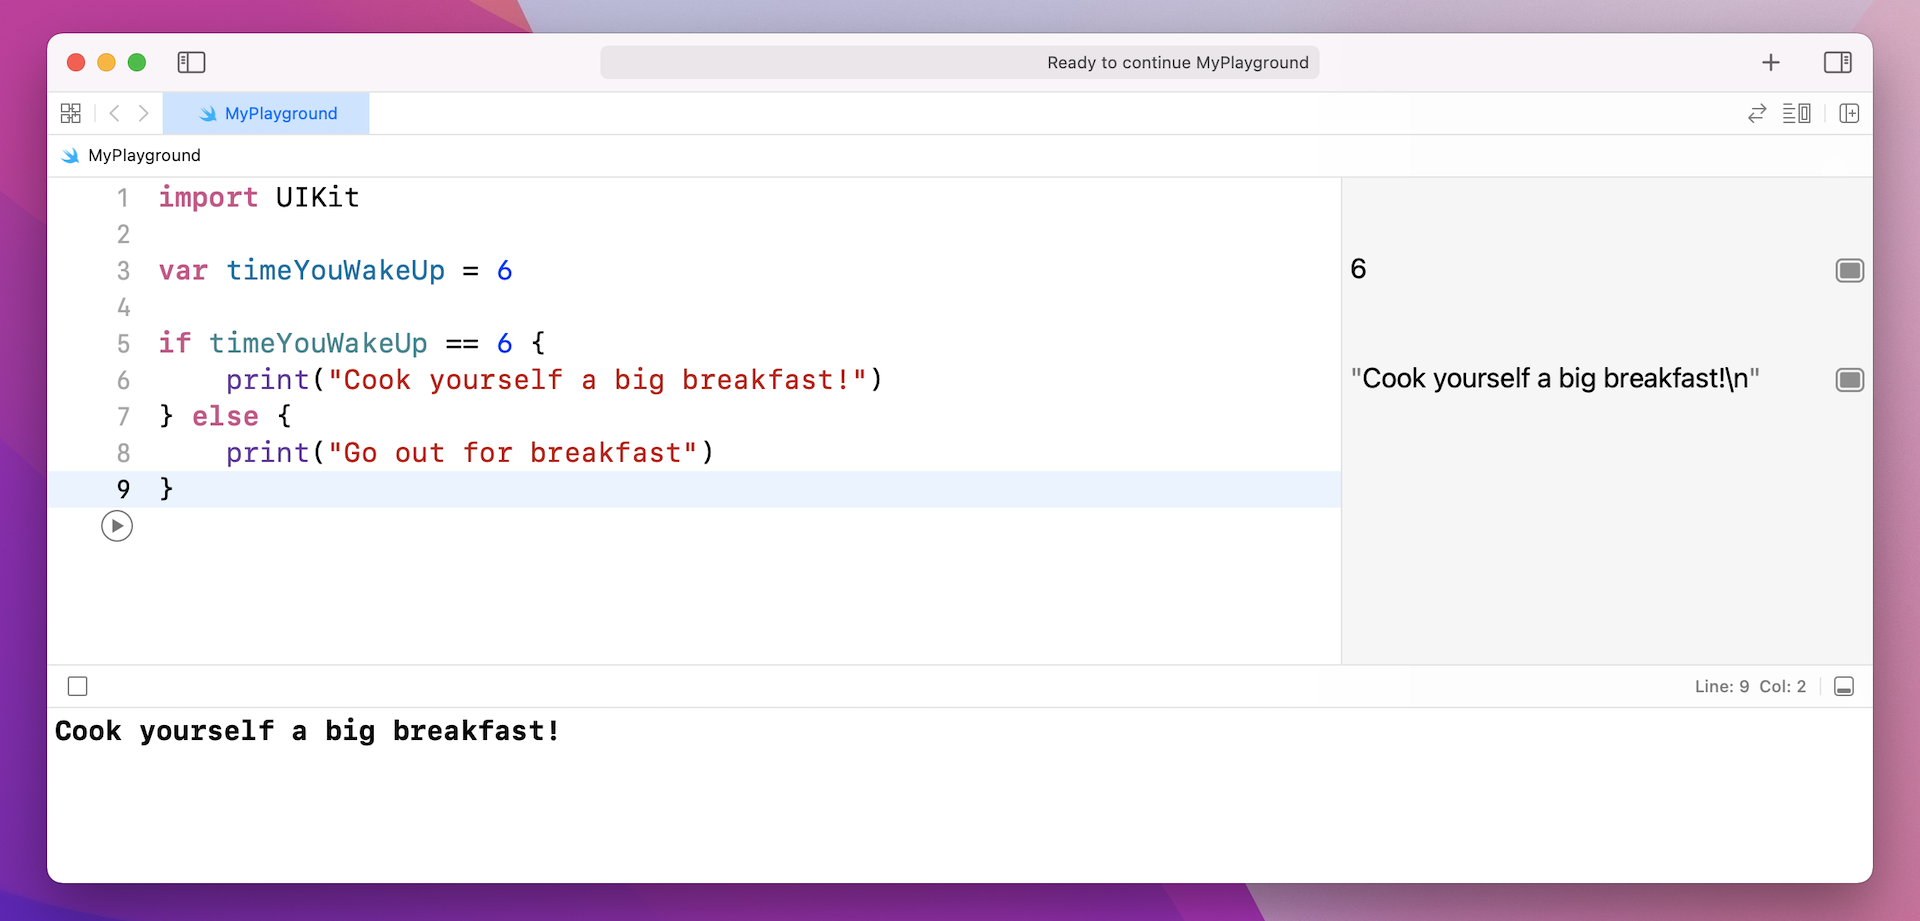
In Playgrounds, you will see the message "Cook yourself a big breakfast!" in the console because the value of timeYouWakeUp is initialized to 6. You can try to change it to other values and see what you get.
Conditional logic is very common in programming. Imagine you are developing a login screen that requires users to input the username and password. The user can only be logged into the app with a valid account. In this case, you may use if-else statement to verify the username/password.
The if-else statement is one of the ways in Swift to control program flow. Swift also provides switch statements to control which code block to run. You can rewrite the example above using switch.
var timeYouWakeUp = 6

switch timeYouWakeUp {
case 6:
    print("Cook yourself a big breakfast!")
default:
    print("Go out for breakfast")
}
It will achieve the same result if timeYouWakeup is set to 6. A switch statement considers a value (here, it is the value of timeYouWakeUp), and compare with the value specified in the case. The default case is indicated by the default keyword. It is very much like the else block in the if-else statement. If the value being evaluated doesn't match any of the cases, the default case will be executed. So if you change the value of timeYouWakeUp to 8, it will display the message "Go out for breakfast."
There is no universal rule about when to use if-else and when to use switch. Sometimes, we prefer one over the other just because of readability. Let's say, you typically get a bonus at the end of each year. Now you are making a plan for your next travel destination. Here is the plan:
- If you get a bonus of $10000 (or more), you will travel to Paris and London.
- If the bonus is between $5000 and $9999, you will travel to Tokyo.
- If the bonus is between $1000 and $4999, you will travel to Bangkok.
- If the bonus is less than $1000, you just stay home.
If you write the above plan in code, it looks like this:
var bonus = 5000

if bonus >= 10000 {
    print("I will travel to Paris and London!")
} else if bonus >= 5000 && bonus < 10000 {
    print("I will travel to Tokyo")
} else if bonus >= 1000 && bonus < 5000 {
    print("I will travel to Bangkok")
} else {
    print("Just stay home")
}
>= is a comparison operator, indicating "greater than or equal to". The first if condition checks if the value of bonus is greater than or equal to 10000. To specify two simultaneous conditions, you use && operator. The second if condition checks if the value is between 5000 and 9999. The rest of the code should be self explanatory.
You can rewrite the same piece of code using a switch statement like below:
var bonus = 5000

switch bonus {
case 10000...:
    print("I will travel to Paris and London!")
case 5000...9999:
    print("I will travel to Tokyo")
case 1000...4999:
    print("I will travel to Bangkok")
default:
    print("Just stay home")
}
Swift has a very handy range operator (...) that defines a range from lower bound to upper bound. For example, 5000...9999 defines a range that runs from 5000 to 9999. For the first case, 10000... indicates a value that is great than 10000.
Both code blocks work exactly the same, but which way do you prefer? In this case, I prefer the switch statement which makes the code clearer. Anyway, even if you prefer to use if statement for the problem above, it is still correct. As you continue to explore Swift programming, you will understand when to use if or switch.
Understanding Arrays and Dictionaries
Now that you have a very basic knowledge of variables and control flow, let me introduce another programming concept that you will usually work with.
So far, the variables that we used can only store a single value. Referring to the variables in the earlier code snippet, bonus, timeYouWakeUp and totalPriceMessage can hold a single value, regardless of the variable type.
Let's consider this example. Imagine you are creating a bookshelf application that organizes your book collection. In your program, you will probably have some variables holding your book titles:
var book1 = "Tools of Titans"
var book2 = "Rework"
var book3 = "Your Move"
Instead of storing a single value in each variable, is there any way to store more than one value in it?
Swift provides a collection type known as Array that lets you store multiple values in a variable. With an array, you can store your book titles like this:
var bookCollection = ["Tool of Titans", "Rework", "Your Move"]
You can also initialize an array by writing a list of values, separated by commas, surrounded by a pair of square brackets. Again, since Swift is a type-safe language, all values should be of the same type (e.g. String).
Accessing the values of an array may look weird to you if you just begin to learn programming. In Swift, you use the subscript syntax to access the array elements. The index of the first item is zero. Therefore, to refer to the first item of an array, you write the code like this:
bookCollection[0]
If you type the code above in Playgrounds and hit Play, you should see "Tool of Titans" shown in the result pane.
When you declare an array as var, you can modify its elements. For example, you can add a new item to the array by calling the built-in method append like this:
bookCollection.append("Authority")
Now the array has 4 items. How can you reveal the total number of items of an array? Use the built-in count property:
bookCollection.count
Let me ask you, how can you print the value of each item of the array to console?
Don't look at the solution yet.
Try to think.
Okay, probably you will write the code like this:
print(bookCollection[0])
print(bookCollection[1])
print(bookCollection[2])
print(bookCollection[3])
It works. But there is a better way to do it. As you can see, the code above is repetitive. If the array has 100 items, it will be quite tedious to type a hundred lines of code. In Swift, you use a for-in loop to execute a task (or a block of code) for a specific number of time. For example, you can simplify the code above like this:
for index in 0...3 {
    print(bookCollection[index])
}
You specify the range of number (0...3) to iterate over. In this case, the block of code in the for loop is executed for 4 times. The value of index will be changed accordingly. When the for loop is first started to execute, the value of index is set to 0 and it will print bookCollection[0]. After the statement is executed, the value of index will be updated to 1, and it will print bookCollection[1]. This process continues until the end of the range (i.e. 3) is reached.
Now I have a question for you. What if there are 10 items in the array? You probably change the range from 0...3 to 0...9. How about later the total number of items are increased to 100? Then you will change to range to 0...99.
Is there a generic way to do that, instead of updating the code every time the total number of items changes?
Do you notice a pattern for these ranges: 0...3, 0...9 and 0...99?
The upper bound of the range equals to the total number of items minus 1. You can actually rewrite the code like this:
for index in 0...bookCollection.count - 1 {
    print(bookCollection[index])
}
Now regardless of the number of array items, this code snippet works.
Swift's for-in loop offers an alternate way to iterate over an array. The sample code snippet can be rewritten as follows:
for book in bookCollection {
    print(book)
}
When the array (i.e. bookCollection) is iterated, the item of each iteration will be set to the book constant. When the loop is first started, the first item of bookCollection is set to book. In the next iteration, the second item of the array will be assigned to book. The process keeps going until the last item of the array is reached.
Now that I believe you understand how for-in loop works and how you can repeat a task using loop, let's talk about another common collection type called dictionary.
A dictionary is similar to an array that allows you to store multiple values in a variable/constant. The main difference is that each value in a dictionary is associated with a key. Instead of identifying an item using an index, you can access the item using a unique key.
Let me continue to use the book collection as an example. Each book has a unique ISBN (short for International Standard Book Number). If you want to index each book in the collection by its ISBN, you can declare and initialize a dictionary like this:
var bookCollectionDict = ["1328683788": "Tool of Titans", "0307463745": "Rework", "1612060919": "Authority"]
The syntax is very similar to an array initialization. All values are surrounded by a pair of square brackets. The key and value pair is separated by a colon (:). In the sample code, the key is the ISBN. Each book title is associated with a unique ISBN.
So how can you access a particular item? Again, it is very similar to array. However, instead of using a numeric index, you use the unique key. Here is an example:
bookCollectionDict["0307463745"]
This gives you the value: Tool of Titans. To iterate over all items of the dictionary, you can also use the for-in loop:
for (key, value) in bookCollectionDict {
    print("ISBN: \(key)")
    print("Title: \(value)")
}
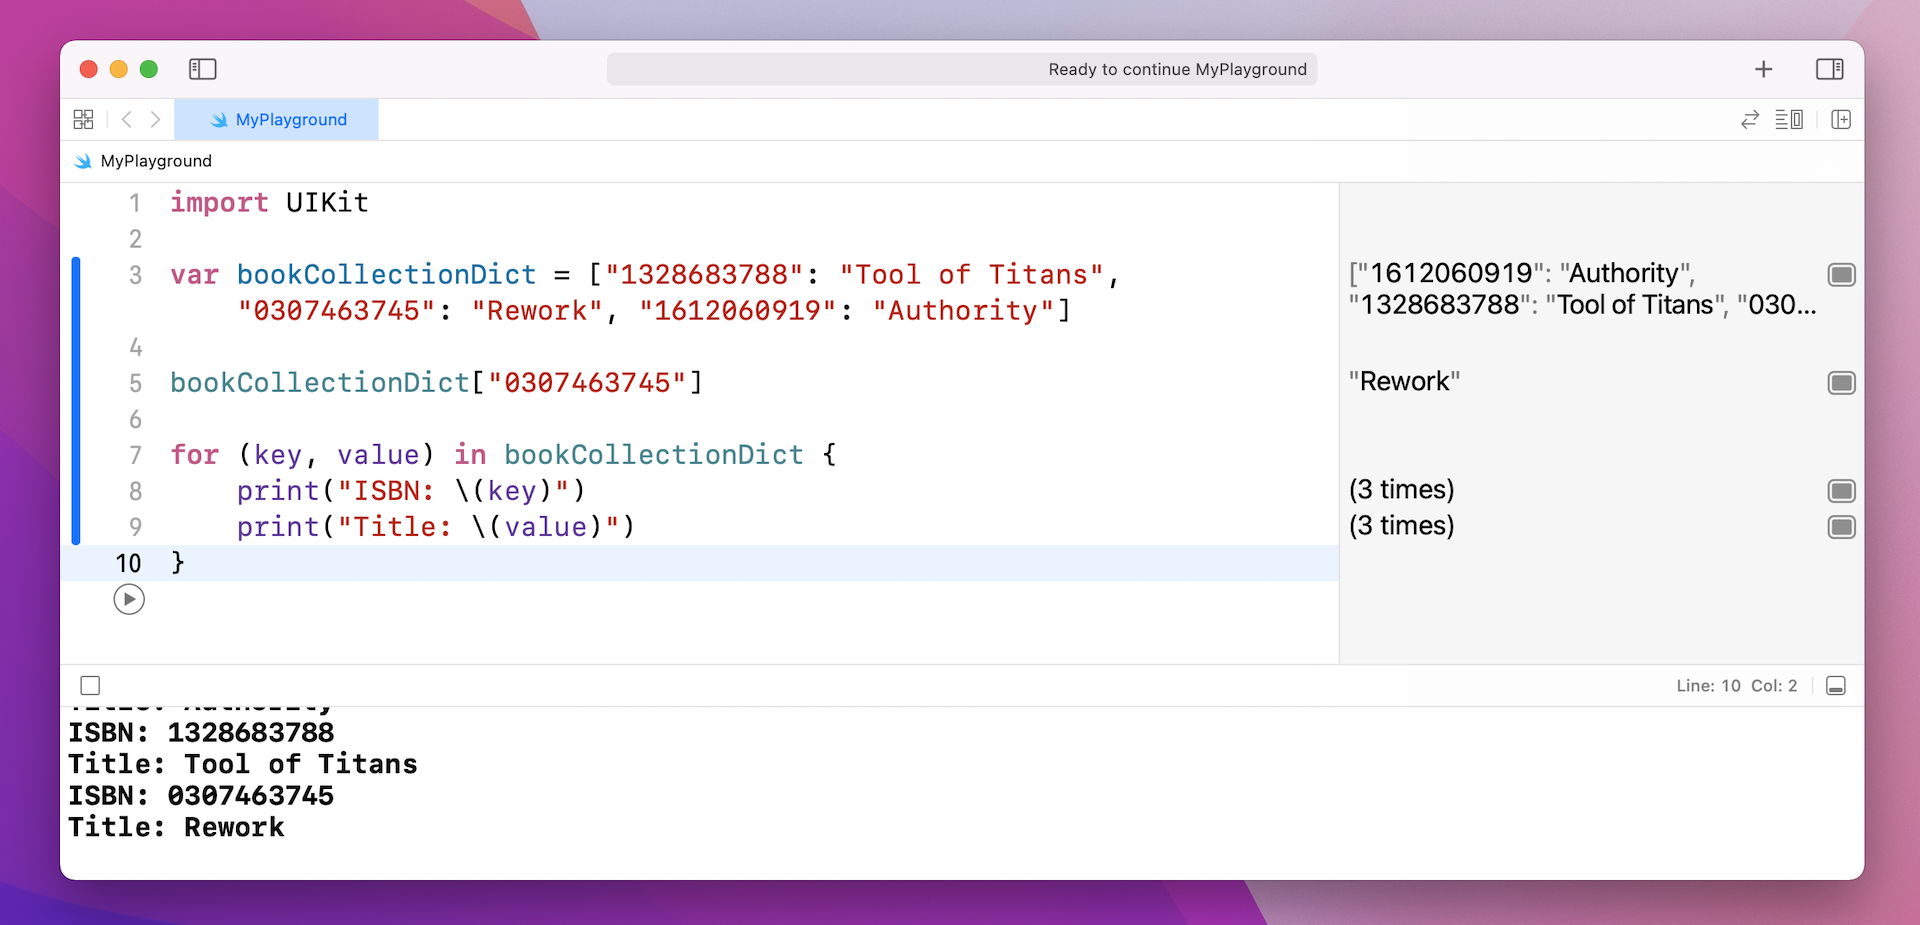
As you may reveal from the message in the console, the order of the items doesn't follow the order in the initialization. Unlike an array, this is a characteristic of dictionaries that stores items in an unordered fashion.
You may still wonder when you will need to use a dictionary when building an app. Let's take a look another example. There is a reason why it is known as a dictionary. Think about how you use a dictionary, you look up a word in a dictionary, and it gives you the word's meaning. In this case, the word is the key, and its meaning is the associated value.
Before you move onto the next section, let's have a very simple exercise to create an Emoji dictionary, which stores the meaning of emoji characters. To keep things simple, this dictionary has the meaning of the following emoji characters:
- 👻 - Ghost
- 💩 - Poop
- 😤 - Angry
- 😱 - Scream
- 👾 - Alien monster
Do you know how to implement the emoji dictionary using the Dictionary type? Below is the code skeleton for the emoji dictionary. Please fill in the missing code to make it work:
var emojiDict = // Fill in the code for initializing the dictionary //

var wordToLookup = // Fill in the Ghost emoji //
var meaning = // Fill in the code for accessing the value //

wordToLookup = // Fill in the Angry emoji //
meaning = // Fill in the code for accessing the value //
To type an emoji character on Mac, press control-command+space.
Are you able to complete the exercise?
Let's take a look at the solution and the output in figure 2-16.
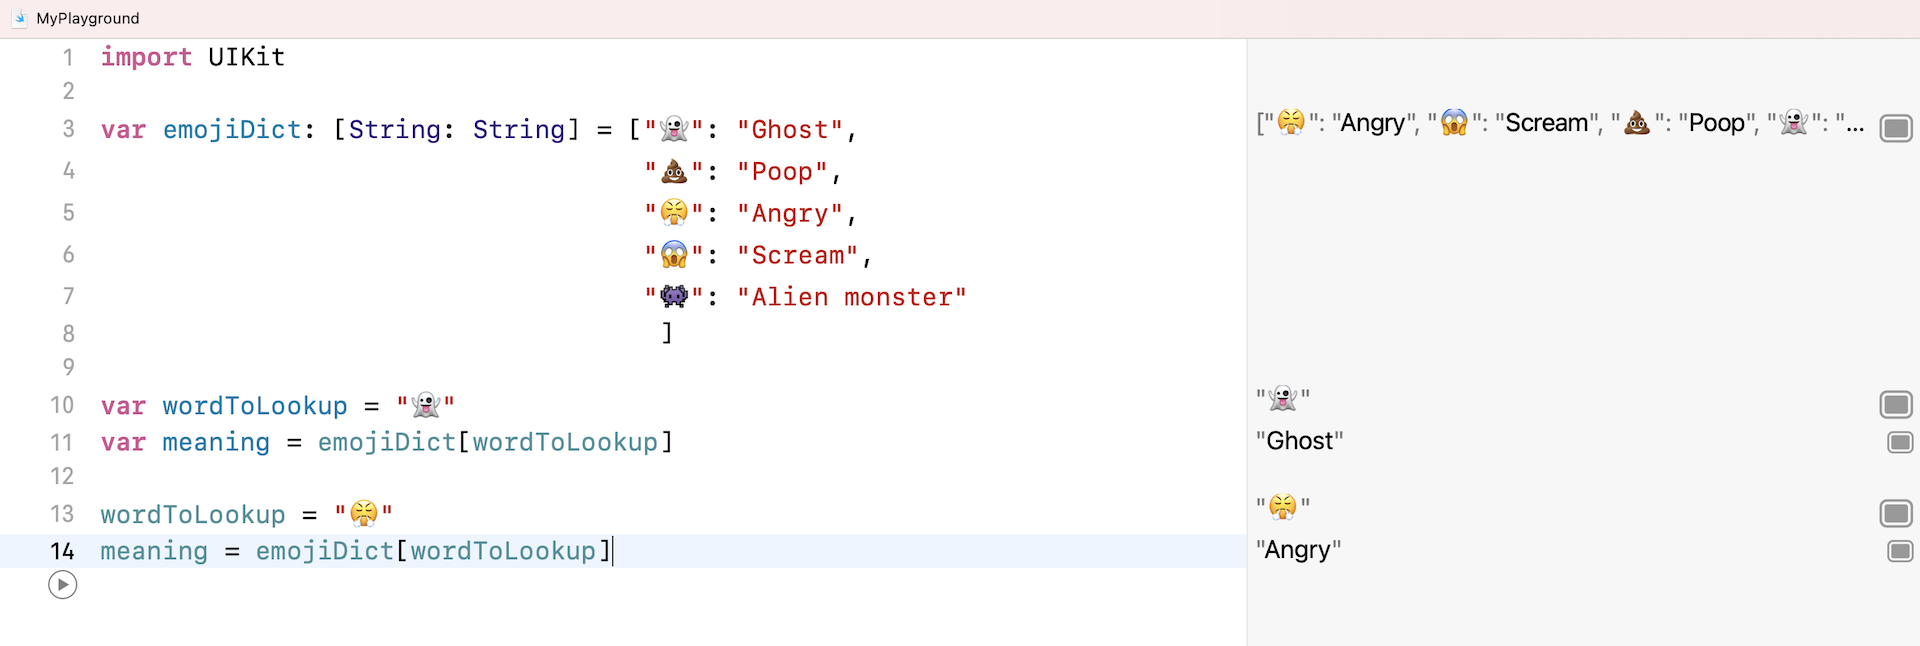
I believe you can figure out the solution by yourself.
Now let's add a couple of lines of code to print the meaning variable to console.
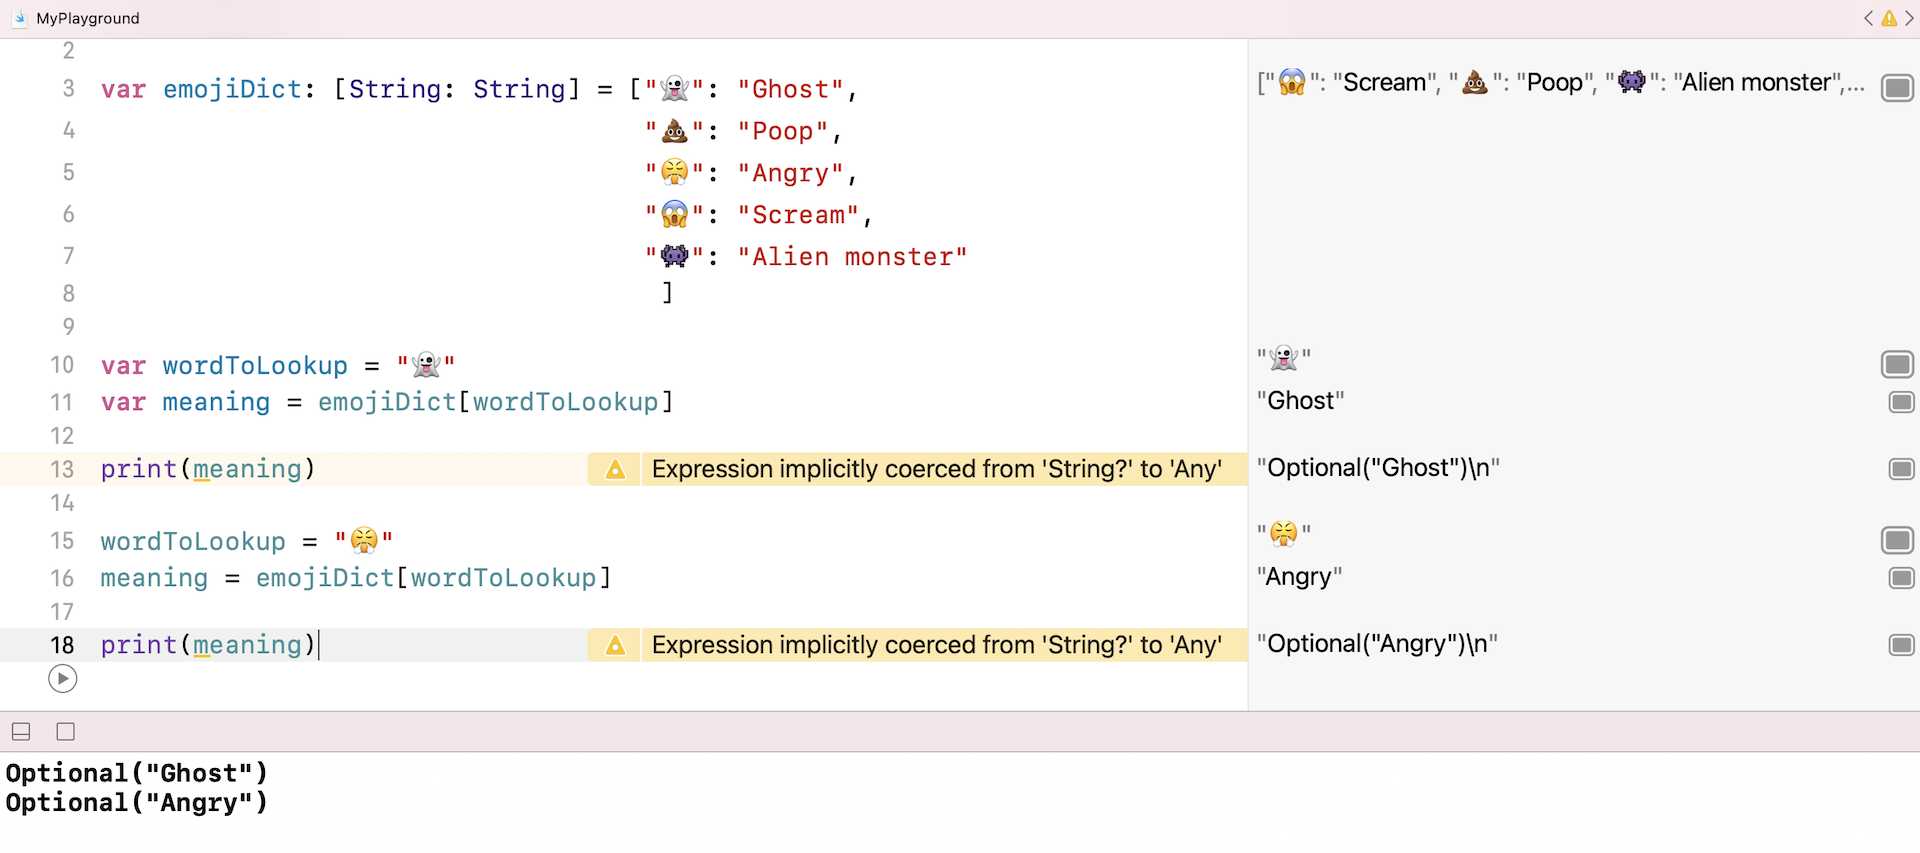
You will notice two things:
- Xcode indicates both print statements have some issues.
- The output in the console area looks a bit different from other output we went through before. The result is correct, but what does Optional mean?
Note: In Xcode, warnings are indicated in yellow. One main difference between warnings and errors is that your program can still be run even if it has some warnings. As the name suggests, a warning gives you an advanced notice of some issues. You better fix the warnings to avoid any potential issues.
Both issues are related to a new concept in Swift called Optionals. Even if you have some programming background, this concept may be new to you.
I hope you enjoy what you've learned so far. But if you are feeling stuck, take a break here. Grab a coffee and relax. Or you can even skip the rest of the chapter and try to build your first app in the next chapter. You can always revisit this chapter anytime.
Understanding Optionals
Do you have such experience? You open an app, tap a few buttons, and it suddenly crashes. I am quite sure you have experienced that.
Why does an app crash happen? One common cause is that the app tries to access a variable that has no value at runtime. Then the unexpected happens.
So is there a way to prevent the crashes?
Different programming languages have different strategies to encourage programmers to write good code or less-error-prone code. The introduction of Optionals is Swift's way to help programmers write better code, thus prevent app crashes.
Some developers struggle to understand the concept of Optionals. The fundamental idea is actually quite simple. Before accessing a variable that may have no value, Swift encourages you to verify it first. You have to make sure it has a value before any further processing. Thus, this can avoid app crashes.
Up till now, all the variables or constants we worked with have an initial value. This is a must in Swift. A non-optional variable guarantees to have a value. If you try to declare a variable without a value, you get an error. You can give it a try in Playgrounds and see what happens.
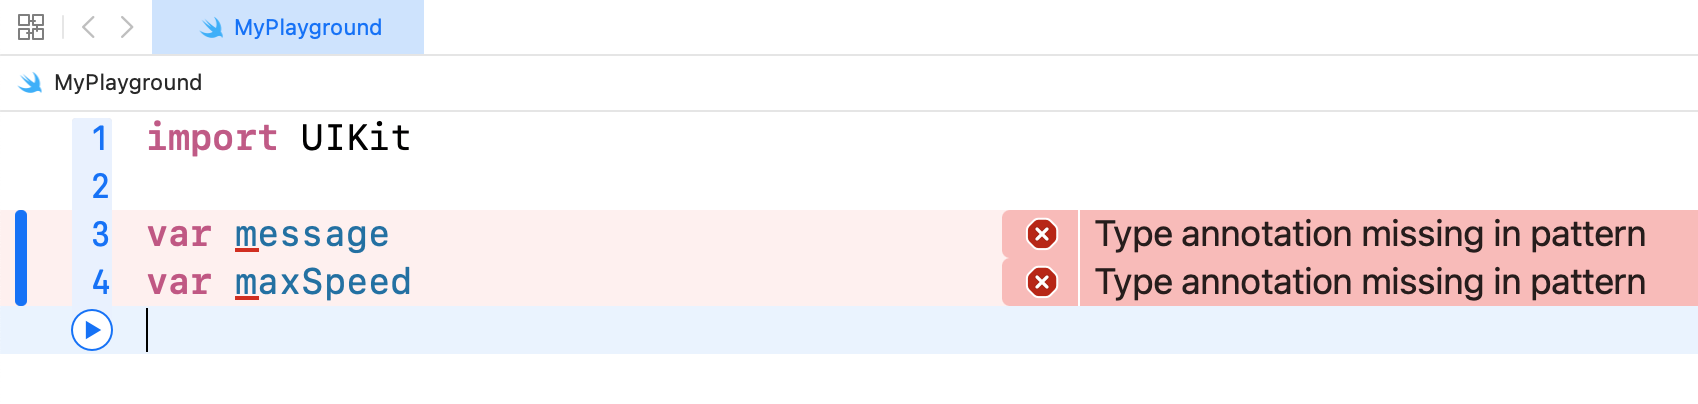
In some situations, you have to declare a variable without an initial value. Imagine, you are developing an app with a registration form. Not all fields in the form is mandatory, some fields (e.g. job title) are optional. In this case, the variables of those optional fields may have no values.
Technically, optional is just a type in Swift. This type indicates that the variable can have a value or no value. To declare a variable as an optional, you indicate it by appending a question mark (?). Here is an example:
var jobTitle: String?
You declare a variable named jobTitle which is of type String and it is also an optional. If you place the code above in Playgrounds, it will not show an error because Xcode knows that jobTitle can have no value.
Unlike a non-optional variable that the compiler can deduce the type from its initial value, you have to explicitly specify the type of an optional variable (e.g. String, Int).
If you have followed my instruction to enter the code in Playgrounds (and hit Play), you may notice that nil is displayed in the resulting pane. For any optional variable with no value, a special value called nil is assigned to it.

In other words, nil indicates the variable does not have a value.
If you have to assign a value to an optional variable, you can just do that as usual like this:
jobTitle = "iOS Developer"
Now that you should have some knowledge of optionals, but how can it help us write better code?
Try to key in the code as displayed in figure 2-19.

As soon as you complete typing the following line of code, Xcode indicates it by giving an error message.
var message = "Your job title is " + jobTitle
Here jobTitle was declared as an optional variable. Xcode told you that there was a potential error for that line of code because jobTitle might have no value. You have to do some checkings before using the optional variable.
This is how optionals can prevent you from writing bad code. Whenever you need to access an optional variable, Xcode forces you to perform verification to find out whether the optional has a value.
Forced Unwrapping
So how can you perform such verification and unwrap the value of the optional variable? Swift offers a couple of ways to do that.
First, it is known as if statements and forced unwrapping. In simple words, you use a if statement to check if the optional variable has a value by comparing it against nil. If the optional does have a value, you unwrap its value for further processing.
This is how it looks like in code:
if jobTitle != nil {
    var message = "Your job title is " + jobTitle!
}
The != operator means "not equal". So if jobTitle does not equal to nil, it must have a value. You can then execute the statements in the body of if statement. When you need to access the value of jobTitle, you add an exclamation mark (!) to the end of the optional variable. This exclamation mark is a special indicator, telling Xcode that you ensure the optional variable has a value, and it is safe to use it.
Optional Binding
Forced unwrapping is one way to access the underlying value of an optional variable. The other way is called optional binding, and it is the recommended way to work with optionals. At least, you do not need to use !.
If optional binding is used, the same code snippet can be rewritten like this:
if let jobTitleWithValue = jobTitle {
    var message = "Your job title is " + jobTitleWithValue
}
You use if let to find out whether jobTitle has a value. If yes, the value is assigned to the temporary constant jobTitleWithValue. In the code block, you can use jobTitleWithValue as usual. As you can see, there is no need to add the ! suffix.
Do you have to give a new name for the temporary constant?
No, you can actually use the same name like this:
if let jobTitle = jobTitle {
    var message = "Your job title is " + jobTitle
}
Note: Even though the names are the same, there are actually two variables in the code above. jobTitle in black is the optional variable, while jobTitle in blue is the temporary constant to be assigned with the optional value.
This is pretty much about Swift's optionals. Are you confused by various ? and ! symbols? I hope you do not. In case you are struggled to understand optionals, post your questions to our Facebook group (https://facebook.com/groups/appcoda).
Okay, do you still remember the warning displayed in figure 2-16? When you tried to print the value of meaning, Xcode gave you some warnings. In console, even though the value was printed, it was prefixed by "Optional".
Now can you figure out why? Why the meaning variable is an optional? How can you modify the code to remove the warning messages?
Again, don't look at the solution yet. Think.
If you look into the code, meaning is actually an optional. It is because the dictionary may not have a value for the given key. For example, if you write this code in Playgrounds:

The meaning variable will be assigned with nil because emojiDict doesn't have a value for the key :heart_eyes:.
Therefore, whenever we need to access the value of meaning, we have to check if it has a value. To avoid the warning messages, we can use optional binding to test the existence of the value.
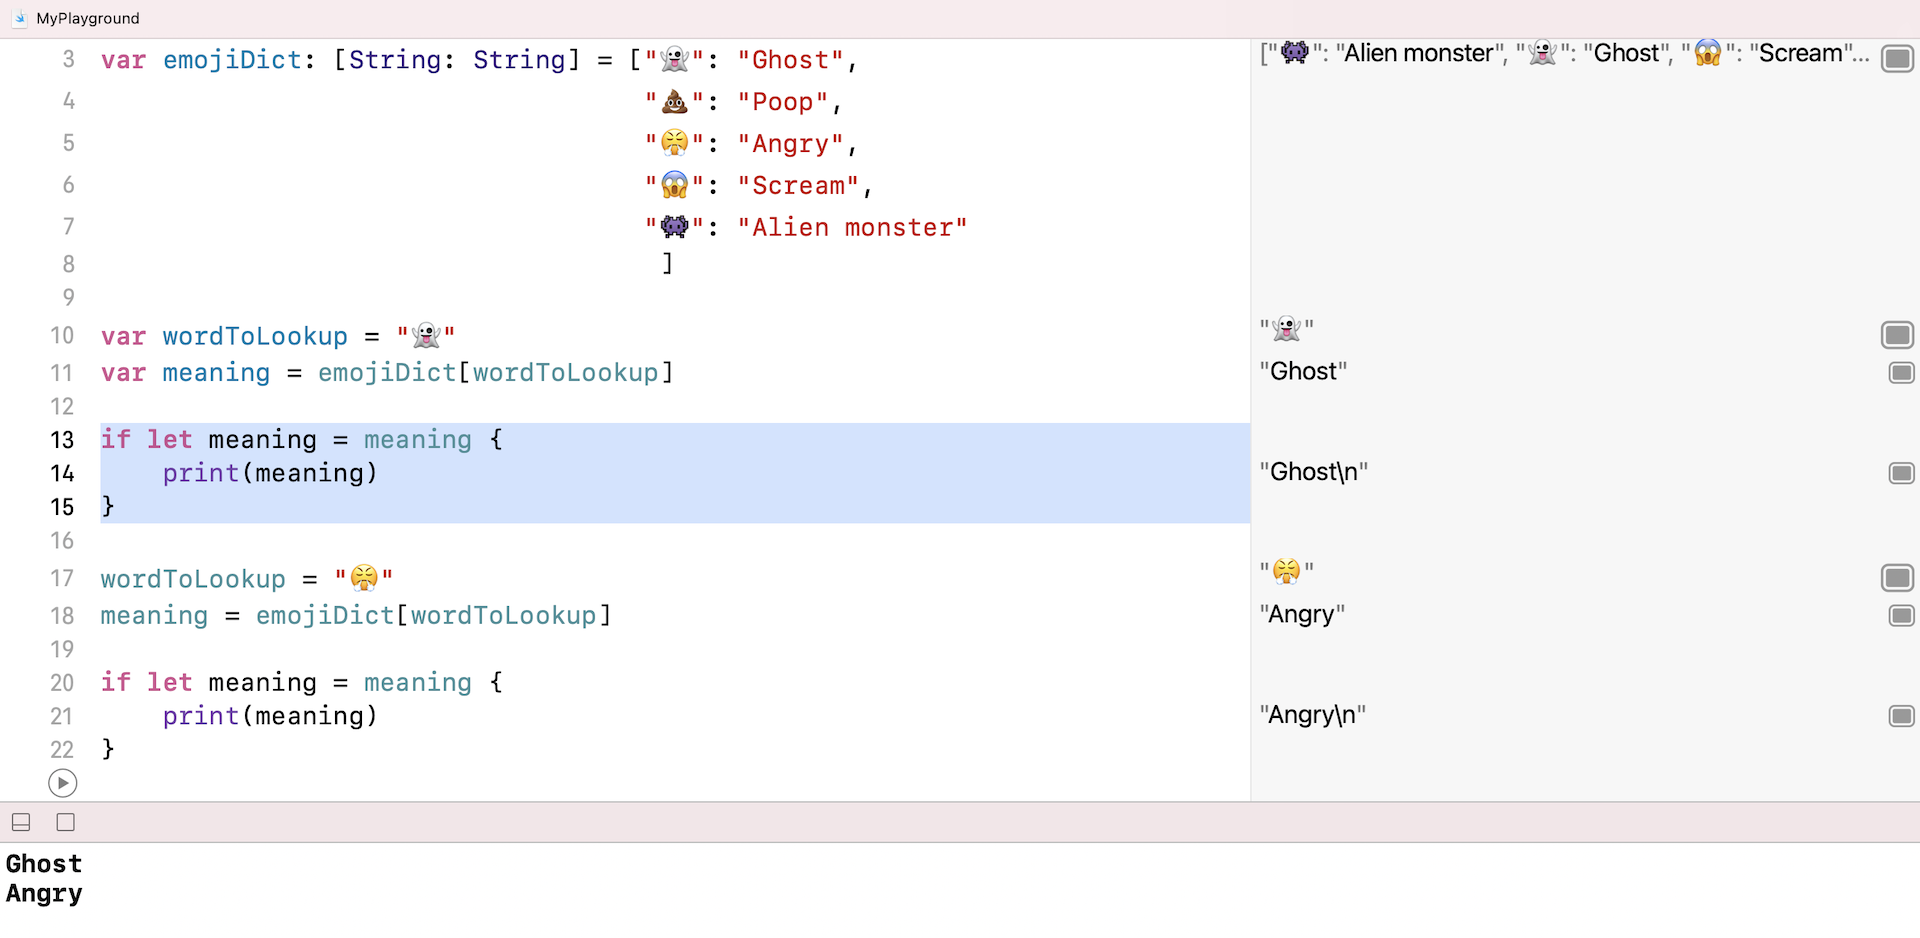
After you made the changes, the warning messages disappears. You also notice that the values displayed in the console is no longer prefixed with Optional.
Playing around with UI
Before I close this chapter, let's have some fun to create some UI elements. What we are going to do is to display the emoji icon and its corresponding meaning in a view (see figure 2-22).

As I mentioned at the very beginning of the chapter, other than learning Swift, you will need to familiarize yourself with frameworks provided by the iOS SDK. One of the essential frameworks is SwiftUI, which allows you to create interactive UIs.
You can also use Playgrounds to explore some of the UI controls, provided by the SwiftUI framework. Now key in the code as displayed the figure below and then hit Play to run the code.
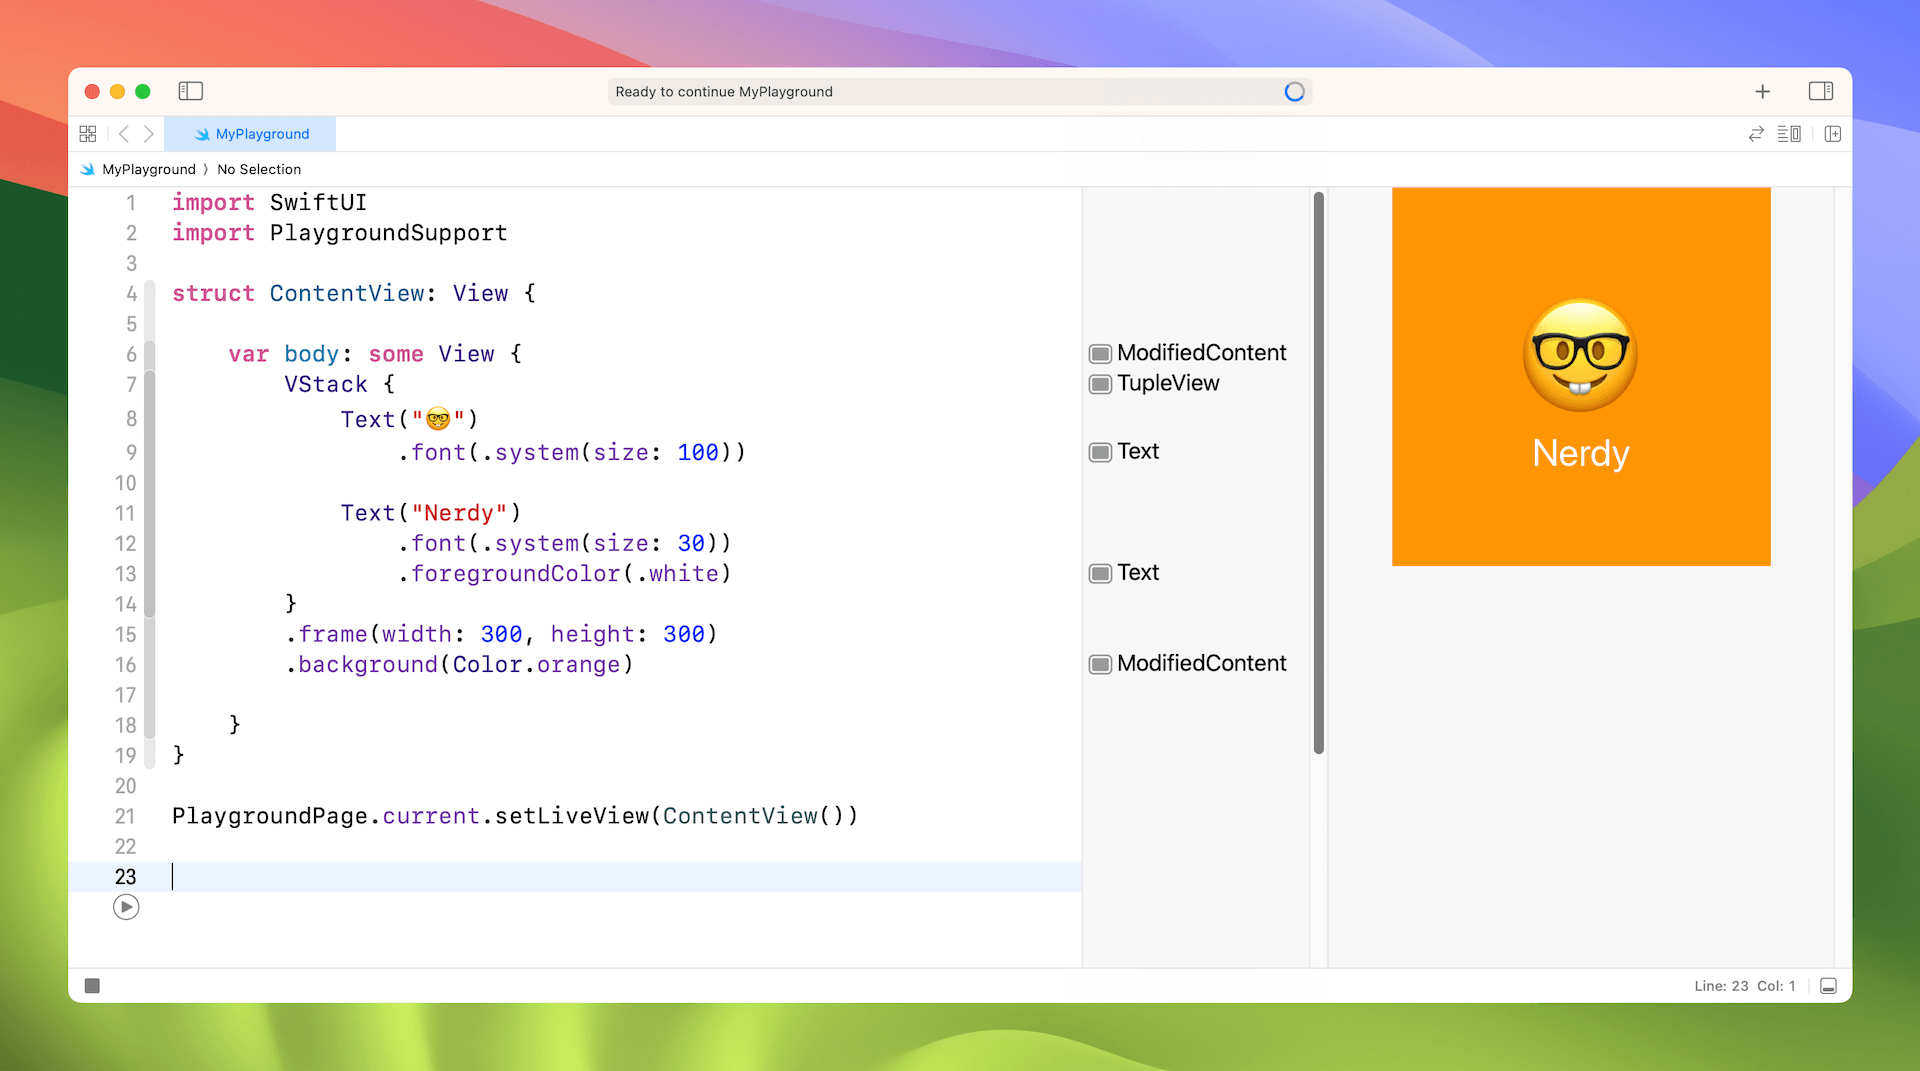
This should give you a taste of SwiftUI. You just made use of the SwiftUI framework to render a view and some text labels on screen.
A view is the basic UI element in iOS. You can think of it as a rectangular area that is used for showing content. The ContentView is our custom version of a generic View. Inside the view, we add two text elements to display the emoji icon and the label. We also change the background of the view to orange.
The following line of code is used to preview the UI in Playgrounds:
PlaygroundPage.current.setLiveView(ContentView())
This is the power of SwiftUI and iOS SDK. It comes with tons of pre-built elements and allows developers to customize them with few lines of code.
I guess you may not fully understand the SwiftUI code. No worries. I just want to give you a very quick introduction to SwiftUI. We will walk you through some of the most common SwiftUI components in the next chapter.
What's Next
Now you've got a taste of Swift. What do you think? Love it? I hope you find Swift beginner friendly and this chapter won't scare you away from learning app development.
What's coming up is that I will teach to build your first app using SwiftUI. You can now move onto the next chapter. However, if you want to learn more about the Swift programming language, I would recommend you to check out Apple's official Swift Programming Language guide (https://docs.swift.org/swift-book/). You will learn the language syntax, understand functions, optionals, and many more.
But it's not a must.
If you can't wait to build your first app, flip it over to the next chapter, and read the guide later. You can learn more about Swift along the way.
For reference, you can download the sample Playground file from http://www.appcoda.com/resources/swift59/swiftui-playgrounds.zip.