Chapter 39
Capturing Text within Image Using Live Text API
iOS came with a very useful feature known as Live Text. You may have heard of the term OCR (short for Optical Character Recognition), which is the process of converting an image of text into a machine-readable text format. This is what Live Text is all about.
Live Text is built into the Camera app and Photos app. If you haven't tried out this feature, simply open the Camera app. When you point the device's camera at an image of text, you will find a Live Text button at the lower-right corner. By tapping the button, iOS automatically captures the text for you. You can then copy and paste it into other applications (e.g., Notes).
This is a very powerful and convenient feature for most users. As a developer, wouldn't it be great if you could incorporate this Live Text feature into your own app? Starting from iOS 16, Apple offers the Live Text API for developers to power their apps with Live Text. In this chapter, let's see how to use the Live Text API with SwiftUI.
Using DataScannerViewController
In the WWDC session about Capturing Machine-readable Codes and Text with VisionKit, Apple's engineer showed the following diagram:
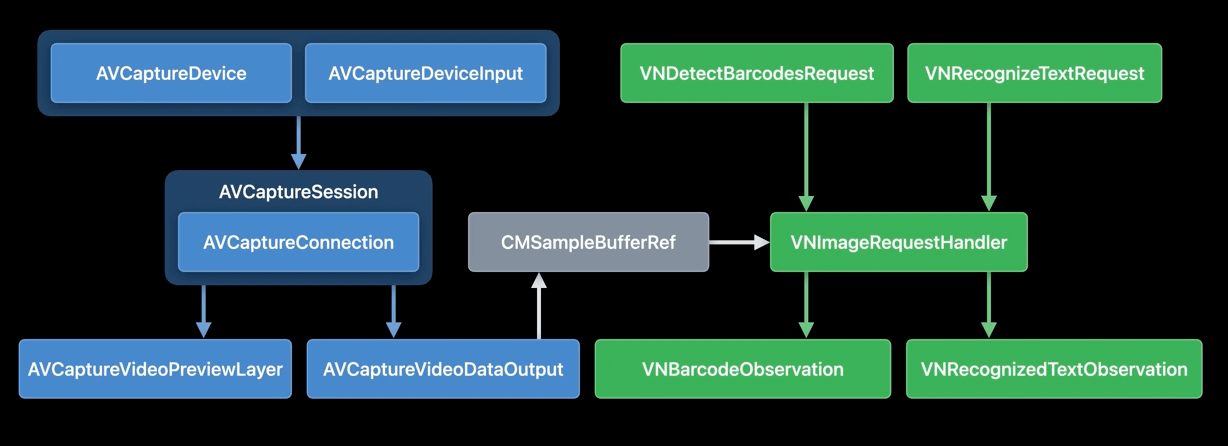
Text recognition is not a new feature in iOS 16. In older versions of iOS, you could use APIs from the AVFoundation and Vision framework to detect and recognize text. However, the implementation was quite complicated, especially for those who were new to iOS development.
In iOS 16, all of the above is simplified with a new class called DataScannerViewController in VisionKit. By using this view controller, your app can automatically display a camera UI with Live Text capability.
To use the class, you first import the VisionKit framework and then check if the device supports the data scanner feature:
To access the full content and the complete source code, please get your copy at https://www.appcoda.com/swiftui.