Chapter 1
Introduction to SwiftUI
At WWDC 2019, Apple surprised developers with the announcement of a completely new framework called SwiftUI. This framework not only changes the way you develop iOS apps but also represents the most significant shift in the Apple developer ecosystem since the debut of Swift. SwiftUI is applicable to all Apple platforms, including iPadOS, macOS, tvOS, and watchOS, making it a game-changer for developers across the ecosystem.
SwiftUI is an innovative, exceptionally simple way to build user interfaces across all Apple platforms with the power of Swift. Build user interfaces for any Apple device using just one set of tools and APIs.
For a long time, developers have been debating whether to use Storyboards or build the app UI programmatically. With the introduction of SwiftUI, Apple has provided an answer to this debate. This brand new framework offers developers a new way to create user interfaces. Take a look at the figure below and examine the code.
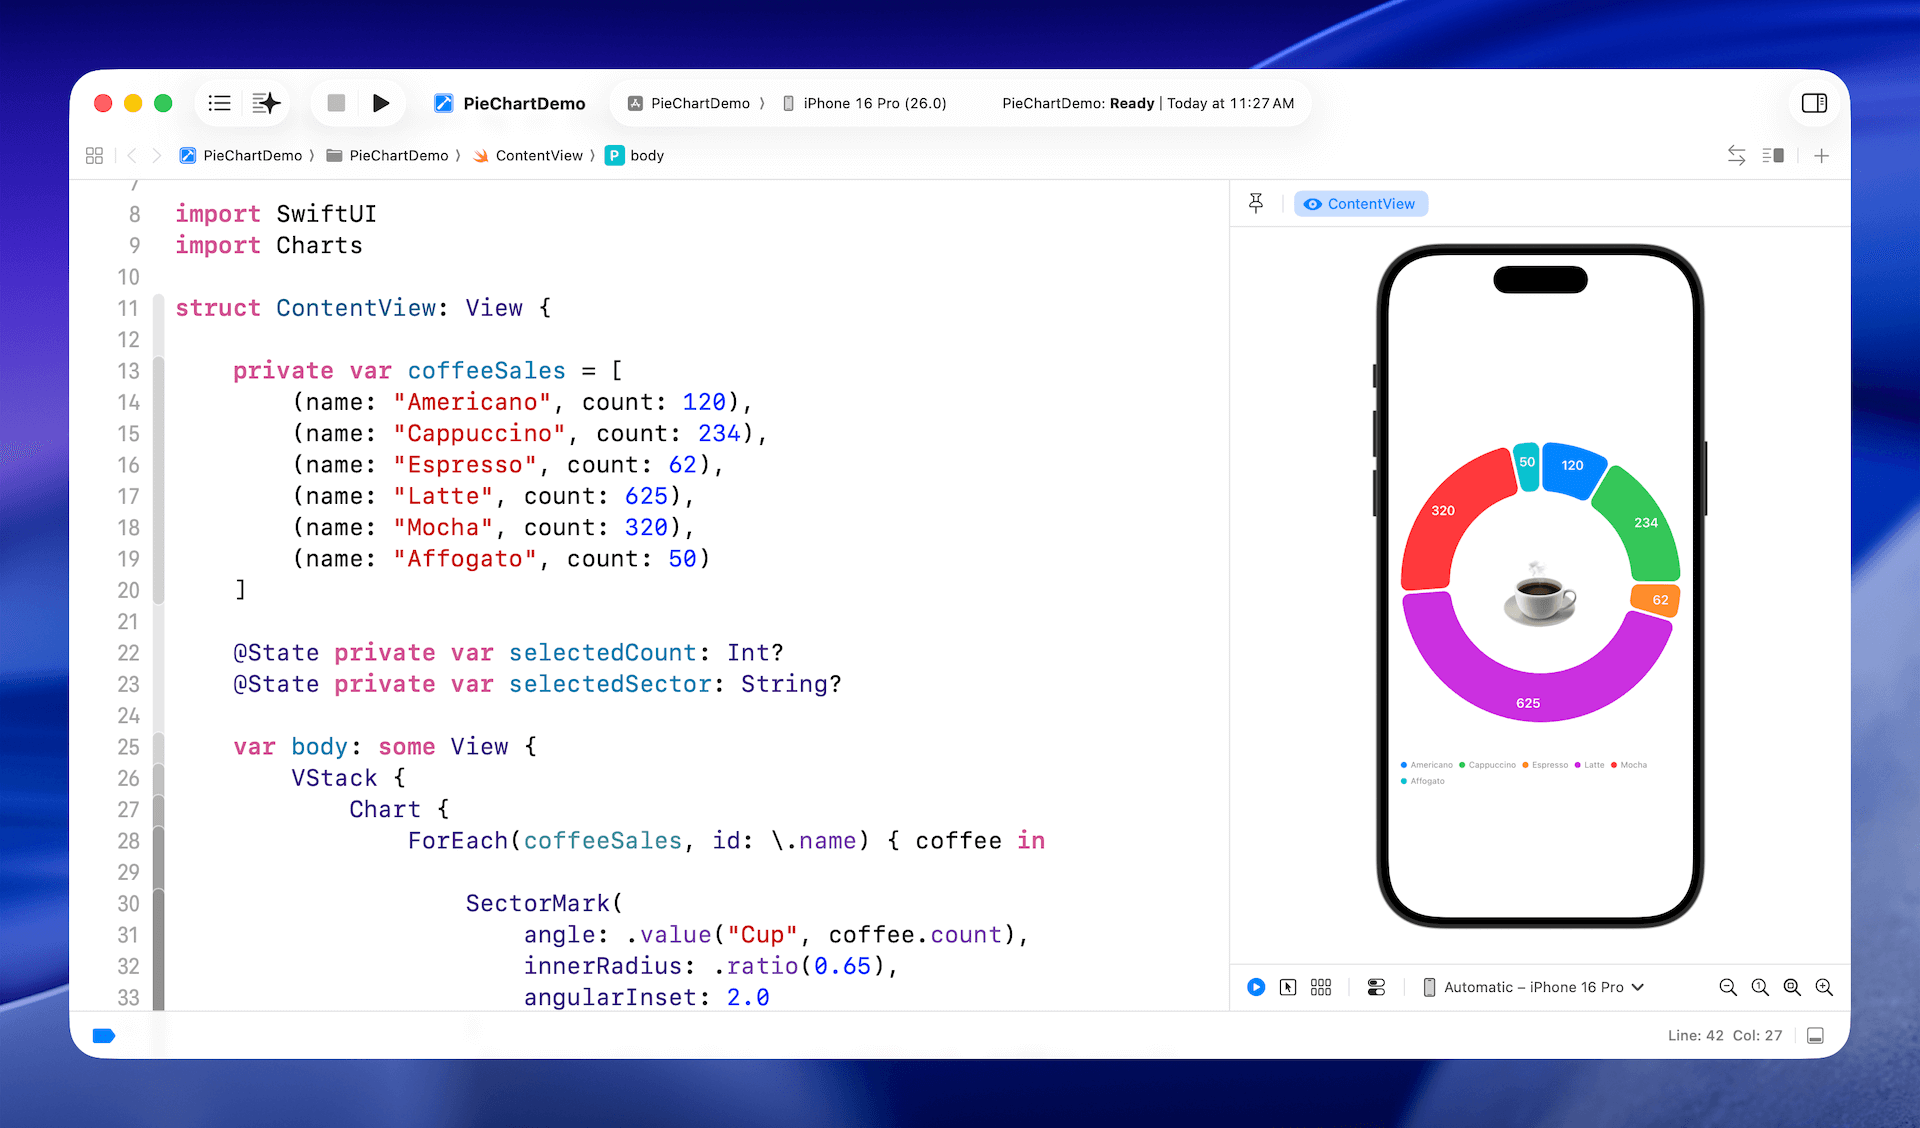
With the release of SwiftUI, it's now possible to develop an app's UI with a declarative Swift syntax in Xcode. This means that the UI code is easier and more natural to write, and compared to existing UI frameworks like UIKit, you can create the same UI with much less code.
In the past, the preview function in Xcode has been a weak point, as it was only possible to preview simple layouts in Interface Builder, and it wasn't possible to preview the complete UI until the app was loaded onto the simulators. However, with SwiftUI, you get immediate feedback on the UI you're coding. For example, if you add a new record to a table, Xcode renders the UI change on the fly in a preview canvas. If you want to preview how your UI looks in dark mode, you just need to change an option. This instant preview feature makes UI development a breeze and iteration much faster.
In addition to allowing you to preview the UI, the new canvas also lets you design the user interface visually using drag-and-drop. Xcode automatically generates the SwiftUI code as you add UI components visually, ensuring that the code and the UI are always in sync. This is a feature that Apple developers have been anticipating for a long time.
In this book, you will delve deep into SwiftUI, learning how to lay out built-in components and create complex UIs with the framework. If you already have experience in iOS development, let me first walk you through the major differences between the existing framework you're using (e.g., UIKit) and SwiftUI. However, if you're completely new to iOS development or have no programming experience, you can use this information as a reference or even skip the following sections. I don't want to discourage you from learning SwiftUI; it's an awesome framework for beginners.
Declarative vs Imperative Programming
Swift is an imperative programming language, much like Java, C++, PHP, and C#. However, SwiftUI is proudly claimed as a declarative UI framework, which allows developers to create UI in a declarative way. But what does the term "declarative" mean? How does it differ from imperative programming, and most importantly, how does this change affect the way you code?
If you're new to programming, you may not need to worry too much about the difference as everything is new to you. However, if you have some experience in object-oriented programming or have developed with UIKit before, this paradigm shift can affect how you think about building user interfaces. You may need to unlearn some old concepts and relearn new ones.
So, what's the difference between imperative and declarative programming? If you search for the terms on Wikipedia, you'll find these definitions:
In computer science, imperative programming is a programming paradigm that uses statements that change a program's state. In much the same way that the imperative mood in natural languages expresses commands, an imperative program consists of commands for the computer to perform.
In computer science, declarative programming is a programming paradigm—a style of building the structure and elements of computer programs—that expresses the logic of a computation without describing its control flow.
Understanding the difference between imperative and declarative programming can be challenging if you haven't studied computer science. Let me explain the difference using a cooking analogy.
Imagine you're instructing someone else (a helper) to prepare a pizza (or any dish you like). You can either do it imperatively or declaratively. To cook the pizza imperatively, you would give your helper specific instructions like a recipe:
- Heat the over to 550°F or higher for at least 30 minutes
- Prepare one-pound of dough
- Roll out the dough to make a 10-inch circle
- Spoon the tomato sauce onto the center of the pizza and spread it out to the edges
- Place toppings (including onions, sliced mushrooms, pepperoni, cooked sausage, cooked bacon, diced peppers and cheese) on top of the sauce
- Bake the pizza for 5 minutes
On the other hand, if you cook pizza in a declarative way, you wouldn't need to specify step-by-step instructions. Instead, you'd describe how you'd like the pizza cooked. Do you want a thick or thin crust? Pepperoni and bacon, or just a classic Margherita with tomato sauce? 10-inch or 16-inch? The helper would figure out the rest and cook the pizza accordingly.
That's the core difference between imperative and declarative programming. Now, let's relate this to UI programming. Imperative UI programming requires developers to write detailed instructions to lay out the UI and control its states. Conversely, declarative UI programming lets developers describe what the UI looks like and how it should respond when a state changes.
Using the declarative approach makes code much easier to read and understand. Most importantly, the SwiftUI framework allows you to write much less code to create a user interface. For example, let's say you're building a heart button in an app. This button should be positioned at the center of the screen and able to detect touches. When a user taps the heart button, its color changes from red to yellow, and when a user taps and holds the heart, it scales up with an animation.
Take a look at figure 2. That's the code you need to implement the heart button. In around 20 lines of code, you create an interactive button with a scale animation. This is the power of the SwiftUI declarative UI framework.
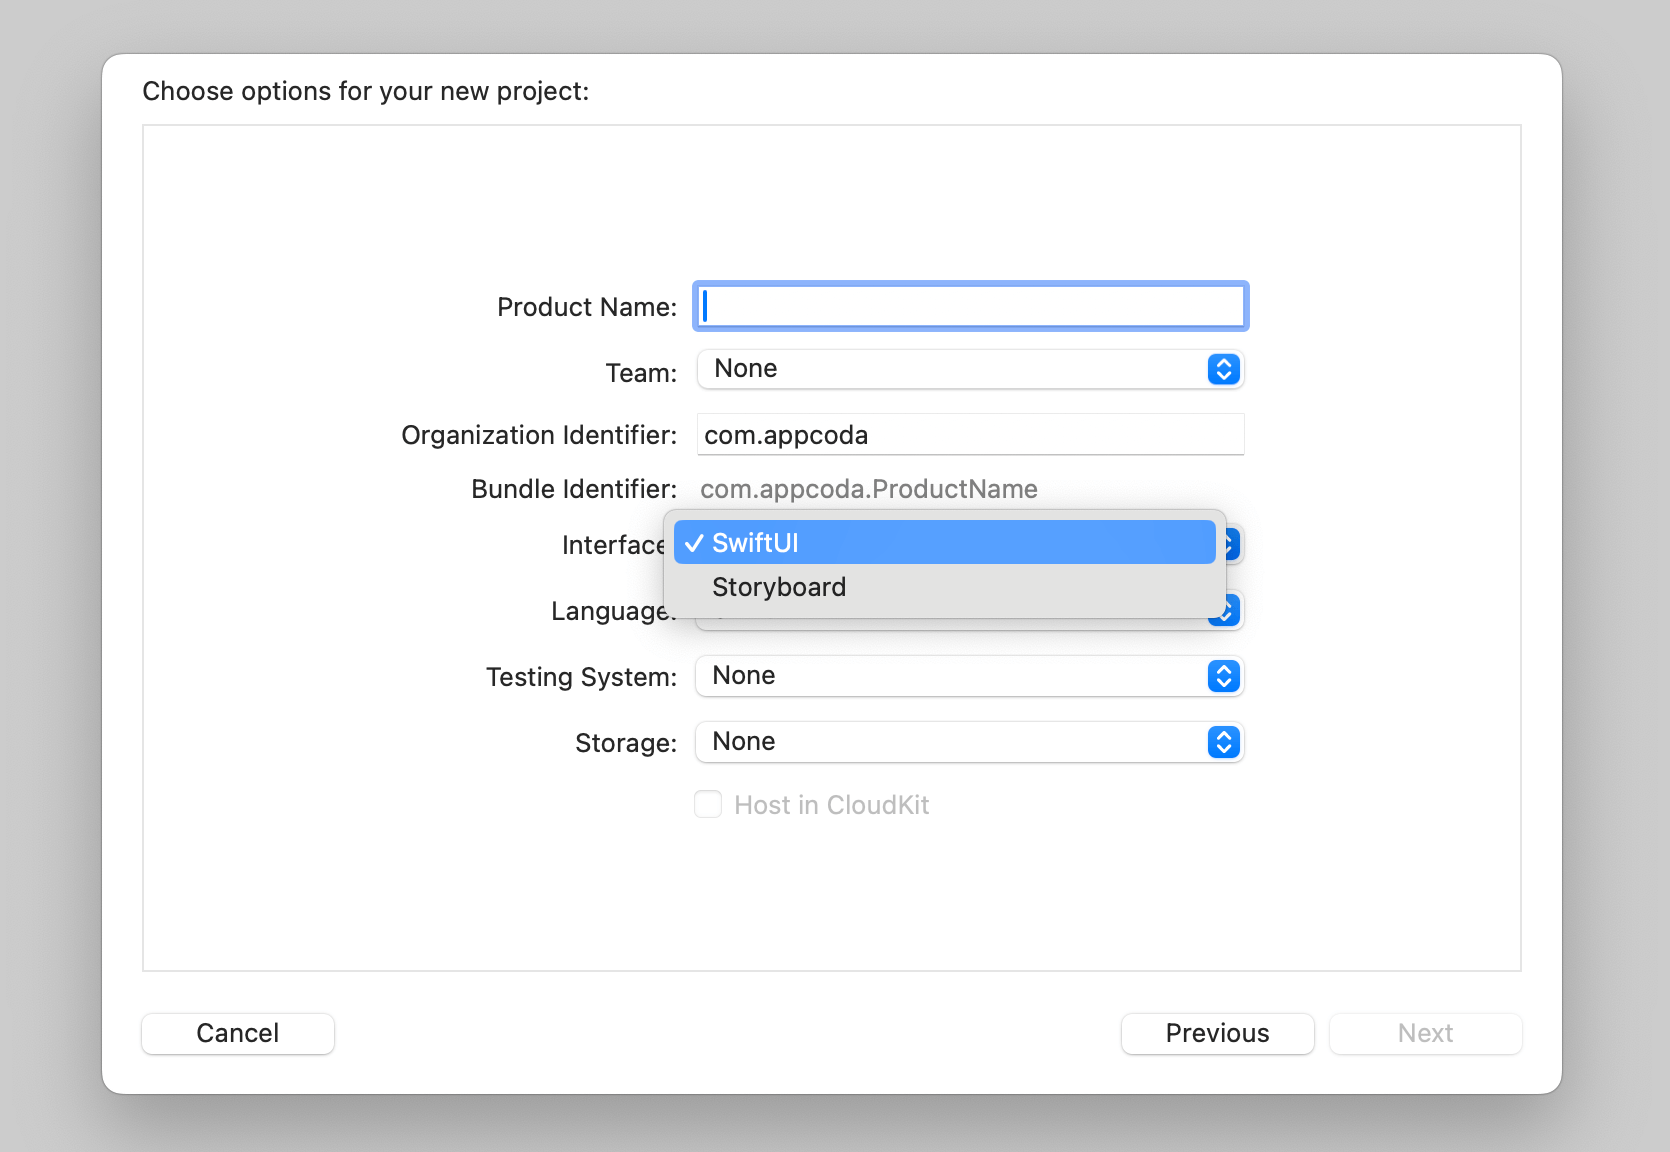
No more Interface Builder and Auto Layout
Starting from Xcode 11, you have the option to choose between SwiftUI and Storyboard for building the user interface. If you've built an app before, you may have used Interface Builder to lay out the UI on the storyboard. With SwiftUI, Interface Builder and storyboards are replaced by a code editor and a preview canvas, like the one shown in Figure 2. You write the code in the code editor, and Xcode renders the user interface in real-time, displaying it in the canvas.
Auto layout has always been a challenging topic when learning iOS development. However, with SwiftUI, you no longer need to learn how to define layout constraints and resolve conflicts. Instead, you can compose the desired UI using stacks, spacers, and padding. We will discuss this concept in detail in later chapters.
The Combine/Observation Approach
In addition to storyboards, the view controller is also gone. If you're new to iOS development, you can ignore what a view controller is. However, if you're an experienced developer, you may find it strange that SwiftUI doesn't use a view controller as a central building block for communicating with the view and model.
Instead, communication and data sharing between views are now handled by new frameworks like Combine and Observation. This new approach completely replaces the role of the view controller in UIKit. In this book, we will cover the basics of Combine & Observation and how to use it to handle UI events.
Learn Once, Apply Anywhere
While this book primarily focuses on building UIs for iOS, it's important to note that everything you learn here can be applied to other Apple platforms, such as watchOS and macOS. Prior to the launch of SwiftUI, developers relied on platform-specific UI frameworks to create user interfaces. For instance, UIs for macOS apps were written using AppKit, while TVUIKit was used for developing tvOS apps, and WatchKit for watchOS apps.
However, with the introduction of SwiftUI, Apple has provided developers with a unified UI framework for building user interfaces on all Apple devices. The UI code written for iOS can be easily adapted to your watchOS/macOS/watchOS app with minimal or no modifications. This is possible due to the declarative UI framework, where code describes how the user interface should look. Depending on the platform, the same piece of code in SwiftUI can result in different UI controls.
For example, the following code snippet demonstrates how to declare a toggle switch:
Toggle(isOn: $isOn) {
    Text("Wifi")
        .font(.system(.title))
        .bold()
}.padding()
For iOS and iPadOS, the toggle is rendered as a switch. On the other hand, SwiftUI renders the control as a checkbox for macOS.

The beauty of this unified framework is that you can reuse most of the code on all Apple platforms without having to make any changes. SwiftUI automatically renders the corresponding controls and layouts, doing most of the heavy lifting for you.
However, it's important not to consider SwiftUI as a "Write once, run anywhere" solution. As Apple emphasized in a WWDC talk, that's not the primary goal of SwiftUI. Therefore, you shouldn't expect to turn a beautiful app designed for iOS into a tvOS app without any modifications.
There are definitely going to be opportunities to share code along the way, just where it makes sense. And so we think it's kind of important to think about SwiftUI less as write once and run anywhere and more like learn once and apply anywhere.
- WWDC Talk (SwiftUI On All Devices)
While the UI code is portable across Apple platforms, you still need to provide specialization that targets for a particular type of device. You should always review each edition of your app to make sure the design is right for the platform. That said, SwiftUI already saves you a lot of time from learning another platform-specific framework, plus you should be able to reuse most of the code.
Interfacing with UIKit/AppKit/WatchKit
Can I use SwiftUI on my existing projects? I don't want to rewrite the entire app which was built on UIKit.
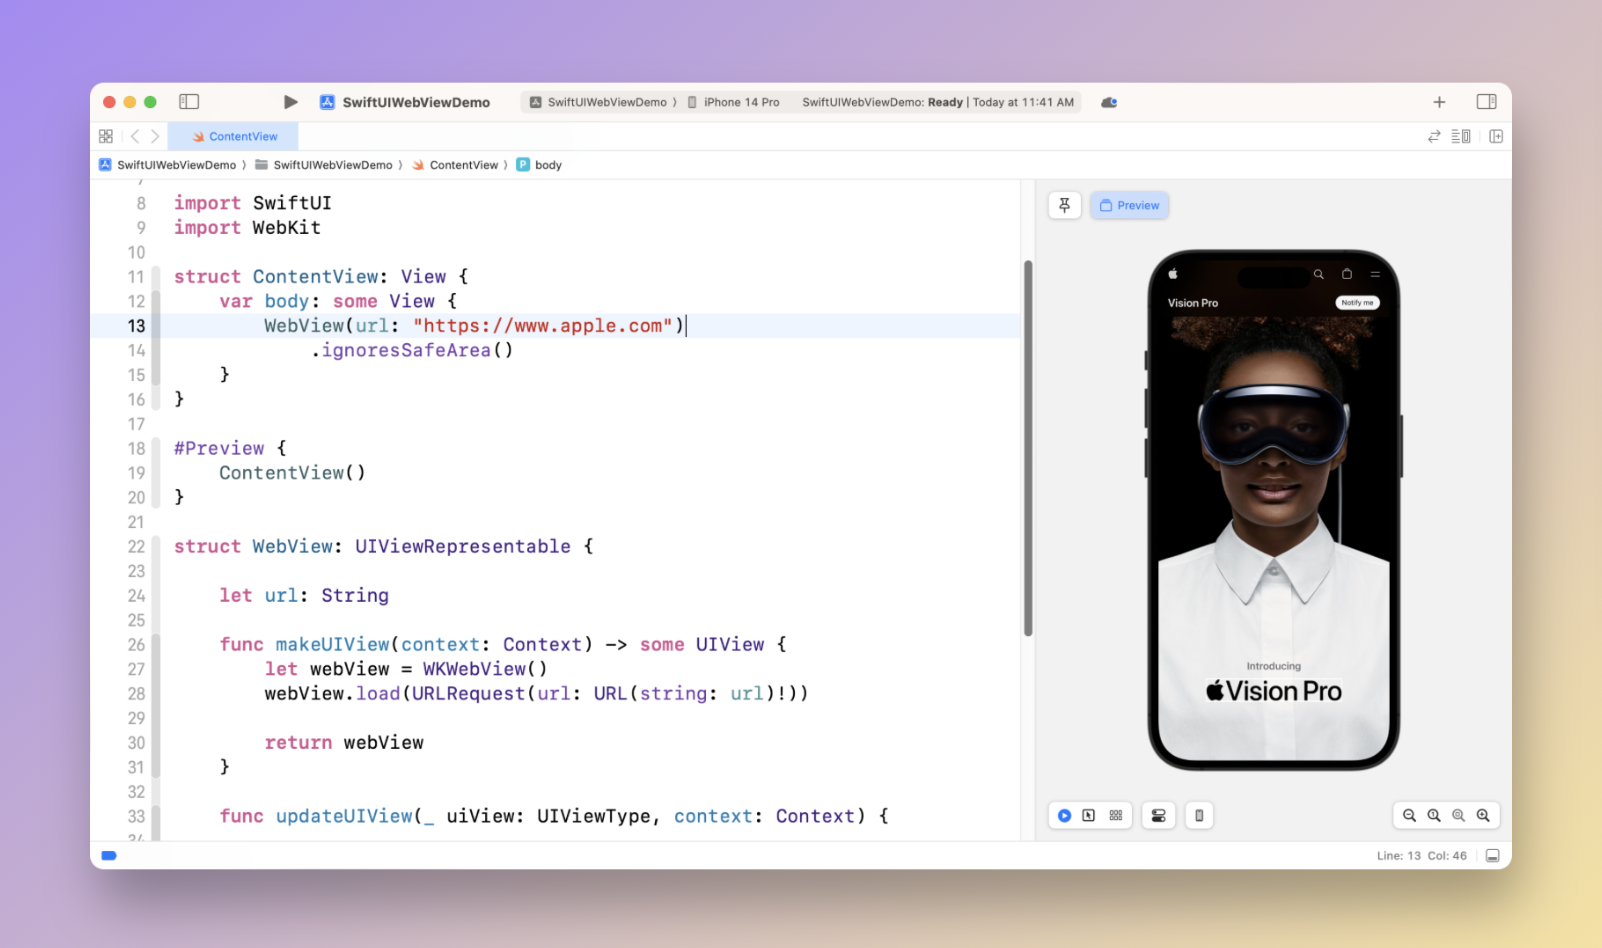
SwiftUI is designed to work with the existing frameworks like UIKit for iOS and AppKit for macOS. Apple offers several representable protocols that you can adopt to wrap a view or controller into SwiftUI, making it possible to use SwiftUI in your existing projects.

Say, you have a custom view developed using UIKit, you can adopt the UIViewRepresentable protocol for that view and make it into SwiftUI. Figure 6 shows the sample code of using WKWebView in SwiftUI.
Use SwiftUI for Your Next Project
Whenever a new framework is released, developers often wonder whether it's ready for their next project or if they should wait a little longer. Although SwiftUI is still new to some developers, now is the right time to learn and incorporate it into your new projects. With the release of Xcode 26, Apple has made the SwiftUI framework more stable and feature-rich. If you have personal or side projects for personal use or work, there's no reason why you shouldn't try out SwiftUI.
As of this writing, SwiftUI has been officially released for over 6 years. The debut of Xcode 26 has brought new UI support and new APIs to SwiftUI. In terms of features, SwiftUI can't be directly compared to existing UI frameworks like UIKit, which has been available for many years. Some features that are present in the older framework, such as direct camera access, may not be available in SwiftUI, and you may need to develop workarounds. This is something you have to take into account when adopting SwiftUI in production projects.
SwiftUI has already grown into a reliable framework. It's clear that SwiftUI is the future of UI development for Apple platforms, including the new visionOS. Even if it’s not ready for your production apps yet, I suggest starting a small side project to get hands-on experience. Once you try it and see the advantages, you’ll likely find building interfaces declaratively both enjoyable and efficient.
To access the full content and the complete source code, please get your copy at https://www.appcoda.com/swiftui.