Chapter 32
Working with TextEditor and Multiline Text Fields

The first version of SwiftUI, released along with iOS 13, didn't come with a native UI component for a multiline text field. To support multiline input, developers had to wrap a UITextView from the UIKit framework and make it available to their SwiftUI project by adopting the UIViewRepresentable protocol. In iOS 14, Apple introduced a new component called TextEditor for the SwiftUI framework. This TextEditor enables developers to display and edit multiline text in your apps. Additionally, in iOS 16, Apple further improved the built-in TextField to support multiline input.

In this chapter, we will demonstrate how to utilize both TextEditor and TextField for handling multiline input in your SwiftUI apps.

Using TextEditor

It is very easy to use TextEditor. You simply need to have a state variable to hold the input text. Then, create a TextEditor instance in the body of your view, like this:

struct ContentView: View {
    @State private var inputText = ""

    var body: some View {
        TextEditor(text: $inputText)
    }
}

To instantiate the text editor, you pass the binding of inputText so that the state variable can store the user input.

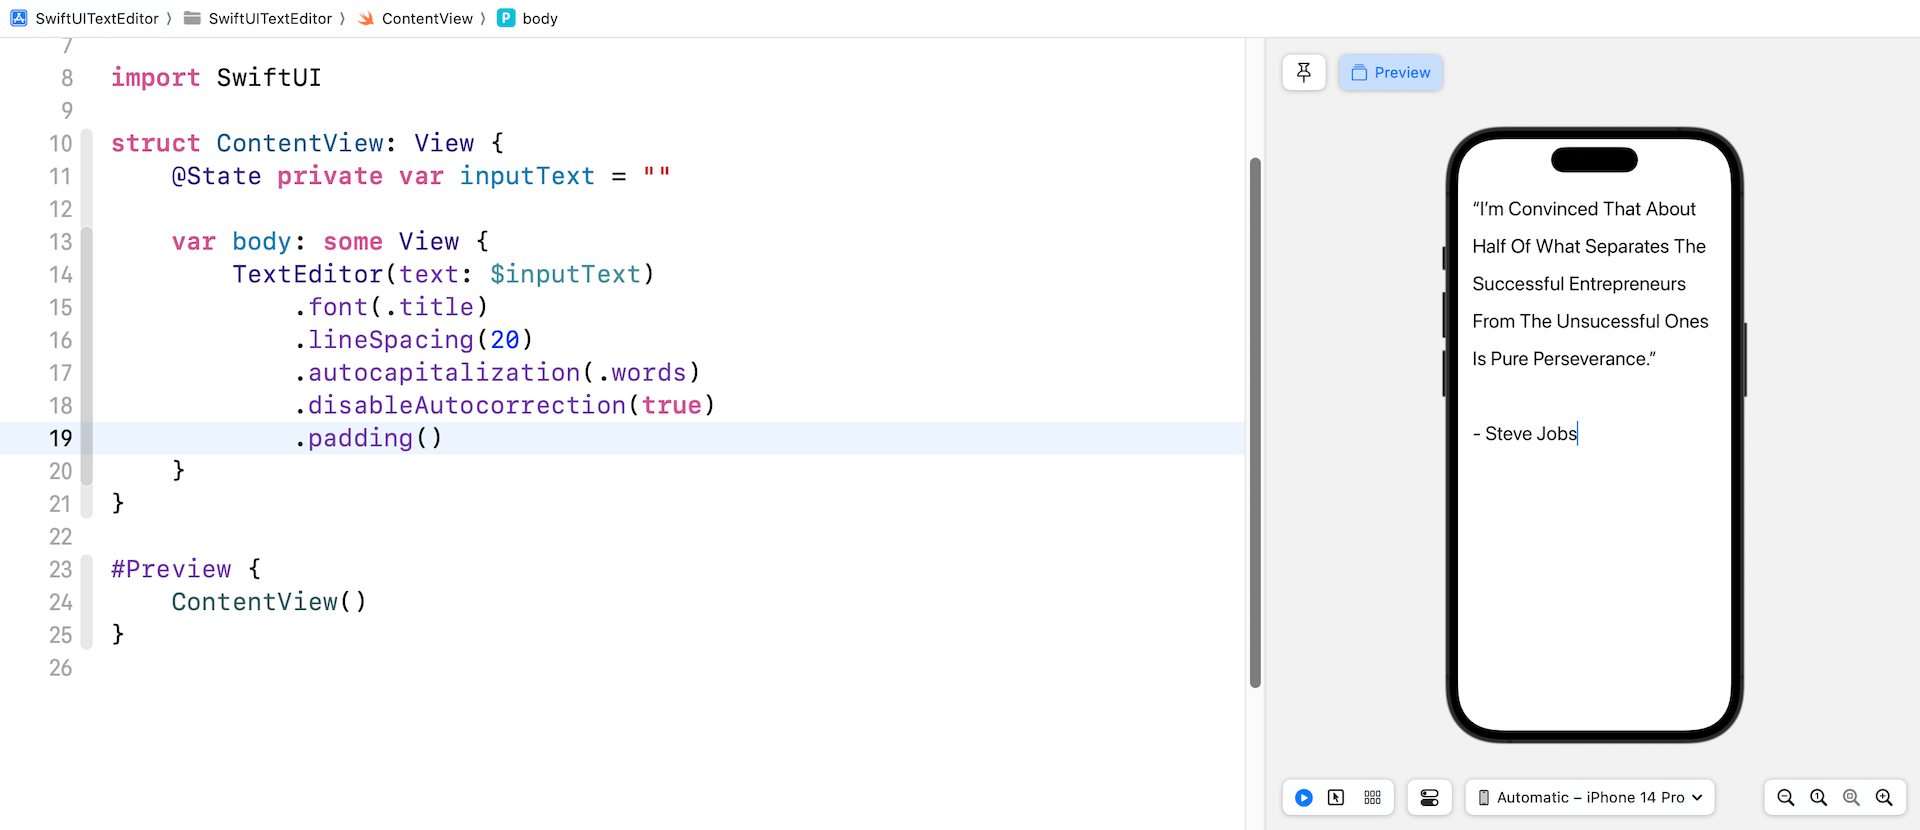
You can customize the editor like any other SwiftUI view. For example, the code below changes the font type and adjusts the line spacing of the text editor:

TextEditor(text: $inputText)
    .font(.title)
    .lineSpacing(20)
    .autocapitalization(.words)
    .disableAutocorrection(true)
    .padding()

Optionally, you can enable/disable the auto-capitalization and auto-correction features.

Figure 1. Using TextEditor

Using the onChange() Modifier to Detect Text Input Change

In UIKit, UITextView works with the UITextViewDelegate protocol to handle editing changes. So, how about TextEditor in SwiftUI? How do we detect the change of user input and perform further processing?

The SwiftUI framework provides an onChange() modifier, which can be attached to TextEditor or any other views to detect state changes. Let's say you are building a note application using TextEditor and need to display a word count in real time. You can attach the onChange() modifier to TextEditor like this:

struct ContentView: View {
    @State private var inputText = ""
    @State private var wordCount: Int = 0

    var body: some View {
        ZStack(alignment: .topTrailing) {
            TextEditor(text: $inputText)
                .font(.body)
                .padding()
                .padding(.top, 20)
                .onChange(of: inputText) {
                    let words = inputText.split { $0 == " " || $0.isNewline }
                    self.wordCount = words.count
                }

            Text("\(wordCount) words")
                .font(.headline)
                .foregroundColor(.secondary)
                .padding(.trailing)
        }
    }
}

In the code above, we declare a state property to store the word count. And, we specify in the onChange() modifier to monitor the change of inputText. Whenever a user types a character, the code inside the onChange() modifier wilsl be invoked. In the closure, we compute the total number of words in inputText and update the wordCount variable accordingly.

If you test the code in Xcode preview or a simulator, you should see a plain text editor that also displays the word count in real time.

Figure 2. Using onChange() to detect text input and display the word count

Expandable Text Fields with Multiline Support

Prior to iOS 16, the built-in TextField could only support a single line of text. Now, Apple has greatly improved the TextField view, allowing users to input multiple lines. Even better, you can now use a new parameter named axis to tell iOS whether the text field should be expanded.

For example, the text field initially displays a single-line input. When the user keys in the text, the text field expands automatically to support multiline input. Here is the sample code snippet for the implementation:

struct TextFieldDemo: View {
    @State private var comment = ""

    var body: some View {
        TextField("Comment", text: $comment, prompt: Text("Please input your comment"), axis: .vertical)
            .padding()
            .background(.green.opacity(0.2))
            .cornerRadius(5.0)
            .padding()

    }
}

The axis parameter can either have a value of .vertical or .horizontal. In the code above, we set the value to .vertical. In this case, the text field expands vertically to support multiline input. If it's set to .horizontal, the text field will expand horizontally and keep itself as a single line text field.

Figure 3. The improved TextField view can support multiline input

By pairing the lineLimit modifier, you can change the initial size of the text field. Let's say, if you want to display a three-line text field, you can attach the lineLimit modifier and set the value to 3:

TextField("Comment", text: $comment, prompt: Text("Please input your comment"), axis: .vertical)
    .lineLimit(3)

You can also provide a range for the line limit. Here is an example:

TextField("Comment", text: $comment, prompt: Text("Please input your comment"), axis: .vertical)
    .lineLimit(3...5)

In this case, the text field will not expand more than 5 lines.

Summary

Since the initial release of SwiftUI, TextEditor has been one of the most anticipated UI components. You can now use this native component to handle multiline input. With the release of iOS 16, you can also use TextField to get user input that may need more space to type. The auto-expand feature allows you to easily create a text field that is flexible enough to take a single line or multiline input.

To access the full content and the complete source code, please get your copy at https://www.appcoda.com/swiftui.

results matching ""

    No results matching ""